


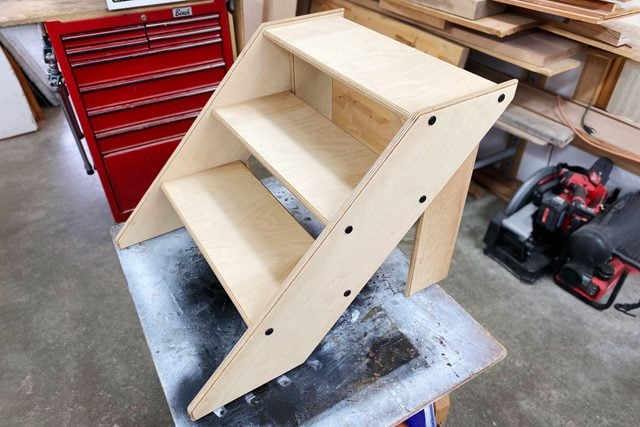
Got a dog who loves spending time on your furniture? Make it easier for them by building these simple, elegant DIY dog stairs for the bed or couch.
Two days
Intermediate
$101–250
Introduction
If you're a dog person, chances are you're well aware of why dogs are called man's (or woman's) best friend. Sharing your life with a dog is a special experience, and for many folks part of that involves snuggling with your beloved companion on the bed or couch. Trouble is, if your dog is small, has short legs, or is getting on in years, they may find it difficult to climb or jump on furniture, or they may cause pet damage to the furniture by doing so.That's where a good set of DIY dog stairs come in. We'll show you the step-by-step process for building a set of portable dog stairs that will make it easy for your furry friend to climb onto a bed or couch.
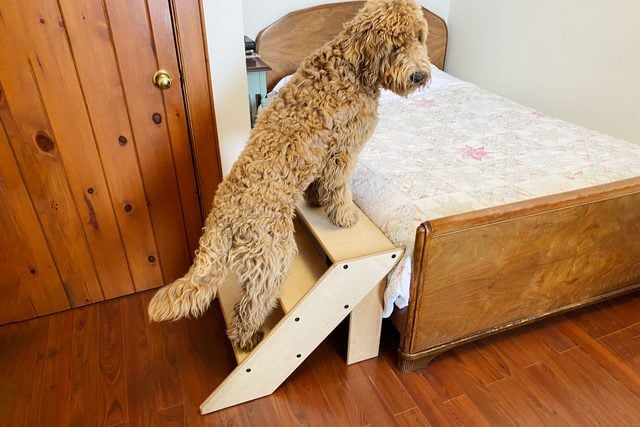
Even if your dog is large enough to climb onto furniture without stairs or a pet ramp, bigger dogs can develop joint problems that make this sort of movement painful. That's why stairs of this sort work great for big dogs (like the one in the photos) as well as small.
Tools Required
- 120-grit sanding discs
- 2-foot level
- 4 quick-grip woodworking clamps
- Carpenter's combination square
- Compound miter saw or hand saw
- Cordless drill and drill bit index
- Handheld router (optional)
- Hearing protection
- Impact driver and driver bit
- Pencil
- Random orbit sander
- Safety glasses
- Sheets of 120-grit sandpaper
- Sheets of 220 grit sandpaper
- Shop vacuum or regular vacuum
- Table saw handheld circular saw or hand saw
- Tape measure
Materials Required
- 1/2 sheet of 3/4-inch-thick furniture-grade plywood
- 12 large flat-headed 2- to 3-inch-long structural screws (or deck screws with cup washers)
- Disposable rubber gloves
- High-quality shop towels
- Waterproof wood glue
- Wood finish of your choice
- Wood finishing brush
Project step-by-step (10)
Step 1
Determine Stair Height
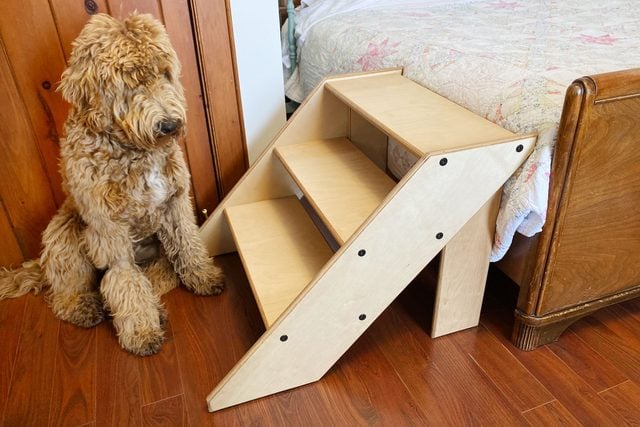
- Start by determining the height you’d like your dog stairs to be. The dimensions here will give you stairs about 20 inches tall, which should help your furry friend climb onto most beds and couches. The design can be easily modifiable if you need more or less.
- Measure the height of the piece of furniture the dog climbs onto, then subtract three to five inches. This is the ideal stair height for your situation. Building the stairs to come level with the top of the bed or couch makes them larger and heavier than necessary.
Step 2
Measure and Cut Stringers
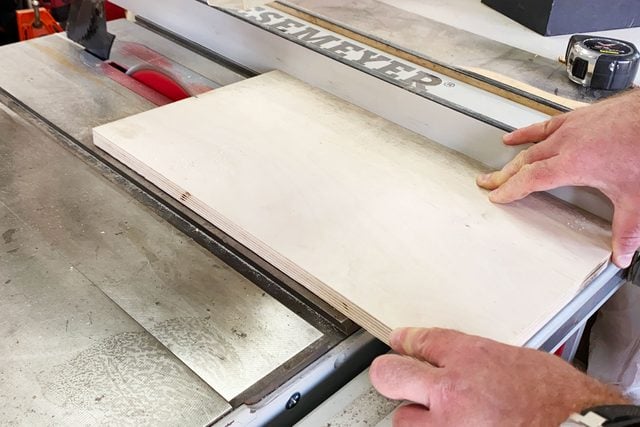
- Use your table saw, circular saw or hand saw to rip-cut two strips of plywood eight inches wide and 34 inches long. If you don’t own a table saw, try a handheld circular saw with a level or some other straightedge clamped to the workpiece to keep you cutting in a straight line.
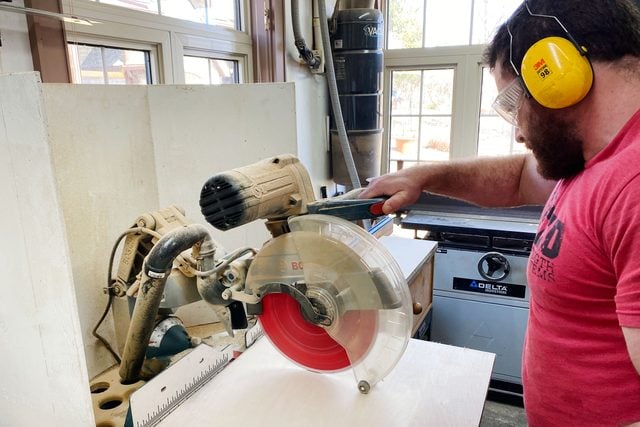
- Set your compound miter saw (AKA chop saw) to cut at a 45-degree angle. Cut both ends of each strip to a 45-degree angle, making sure to cut the ends of each strip parallel with each other. You can also do this with a hand saw.
- Cut the pointy corners off each end of each stringer with your chop saw or a hand saw. Be sure to remove enough wood so the cut end is no wider than 1-1/2-inch.
Step 3
Measure and Cut Treads
- Use a table saw, hand saw or circular saw to rip-cut a strip of wood roughly five feet long and nine inches wide.
- Cut the strip into three equal-length pieces, 19-1/2-inches long.
Step 4
Measure and Rough-Cut Legs
- Rip-cut two more 5-1/4-inch-wide strips with your table or circular saw.
- Cross-cut the strip with your chop, circular or hand saw to 20 inches long. This isn’t the final length. You’ll be custom cutting that later.
Step 5
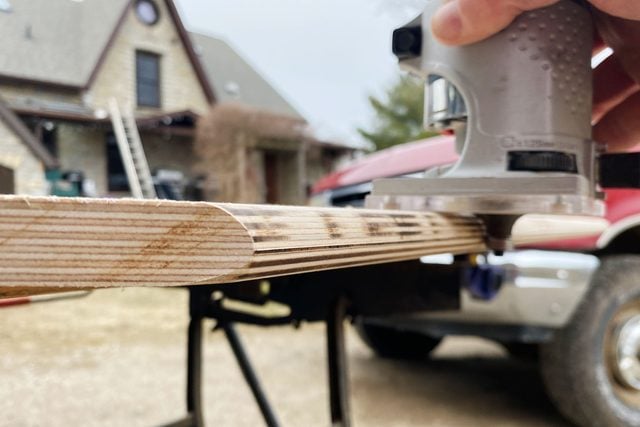
Route and Sand Parts (Routing Optional)
- Install a quarter-round bit in a handheld router.
- Route the edges and corners of all parts, except the tops of the legs and the ends of the treads, which should remain flat. Rounding all visible corners and edges with the router will improve the appearance of your stairs and reduce risk of your pet getting slivers in its paws or hurting itself on a sharp edge.
- Sand all surfaces of all parts (other than the tops of the legs and the ends of the treads) with a 120-grit disc on a random-orbit sander.
Step 6
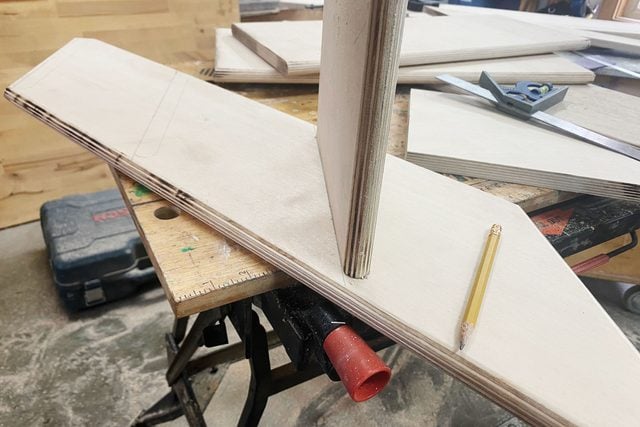
Mark Stringers for Tread Installation
- Use a pencil and combination square (in the 45-degree orientation) to mark three horizontal lines on one side of each stringer. Be sure to mark these lines on opposing faces of each stringer.
- Mark the first line 3/4-in. below the top edge of each stringer. The second line should be 6-1/2-in. below this, and the bottom line another 6-1/2-in. below the second line.
- Be sure to orient the lines so they’re horizontal when the stringers are sitting in the 45-degree position they’ll be when the stairs are finished.
- Use one of the treads as a template on the stringers, lining up its top edge with each of the horizontal lines you just drew. Center it within the width of the stringer. Trace the profile of the tread where your lines are on each stringer. You should end up with three tracings of a tread on each stringer. These markings will determine where the treads will be joined to the stringers.
- Use a tape measure and pencil to mark dots 1-1/4-inches in from the end of each tread tracing. Be sure to center the dots vertically.
Step 7
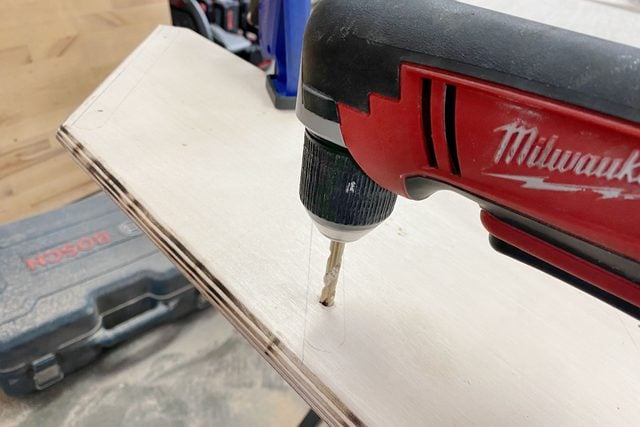
Drill Stringers and Treads
- Choose a drill bit from your drill index just large enough to produce a hole of sufficient size that the threads of the screws will pass through it smoothly without biting.
- Drill six holes in each stringer, one at each of the dots you marked in pencil.
- Use the holes in your stringers to mark the ends of each tread for pre-drilling.
- Mark each tread tracing on both stringers lightly in pencil with a unique number, from 1 to 6. Mark corresponding numbers on each end of all three treads.
- Hold the end of each tread in place over its respective spot on the stringers. Then poke a screw through each stringer hole and into the tread, marking where you’ll be pre-drilling that tread to accept the screws.
- Choose a drill bit roughly the same size as your screw’s root diameter (the size of the metal shaft without the threads). Then drill two holes in the end of each tread where you marked it. Twelve holes total.
- Use structural screws or deck screws with cup washers to join the stringers and treads together using your pre-drilled holes.
Step 8
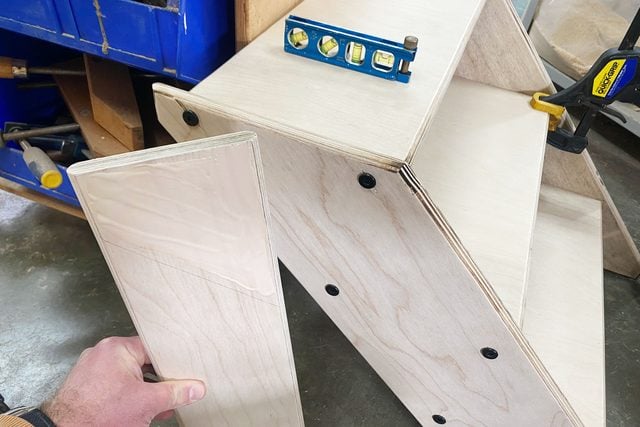
Cut and Install Legs
- Lean the stair assembly against a vertical surface, then adjust until it’s level. Use your two-foot level on the top tread to determine when levelness has been achieved.
- Measure the distance between the bottom face of the top tread and the floor, then use this figure to cut the stair legs to the final length. Be sure to cut from the top end so you don’t remove the routed profile from the bottom.
- Apply wood glue to each leg, one at a time, in the area where it will contact the inside face of its respective stringer.
- Make sure the stairs are still sitting level, then clamp the legs in place tight to the floor and butted up against the back edge of the second tread. Use two quick-grip clamps to hold each leg. Let the glue dry overnight.
Step 9
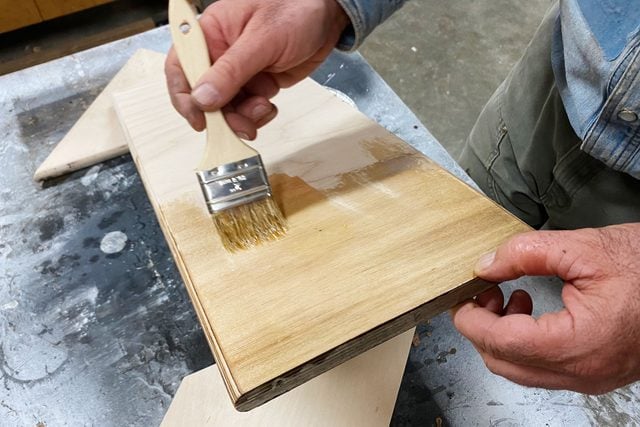
Disassemble Stairs and Apply Finish
- Remove the screws and take the stairs apart for finishing.
- Vacuum all stair parts thoroughly, along with the floor and workbench where you’ll be working.
- Apply a coat of your favorite wood finish. I used wipe-on polyurethane, which is easy to apply and fast-drying.
- Let the finish dry according to the directions on the can, then give a light hand sanding with 220-grit paper to smooth down the swollen wood fibers.
- Vacuum again, then apply a second coat. Repeat as desired.
Step 10
Reassemble and Use
- Wait until the final coat of finish is dry, then reassemble the stairs.
- Bring the stairs into your home and enjoy giving your canine pal easy access to their favorite spot on the bed or couch.
Originally Published: April 28, 2022