


Make bath time more comfortable and convenient for you both — and keep the mess out of your house.
Multiple Days
Intermediate
$501-1000
Introduction
Make bath time more comfortable and convenient for you both — and keep the mess out of your house.Tools Required
- Circular saw
- Cutting guide
- Drill
- Finish nailer
- Jigsaw
- Miter saw
- Plumbing tools
- Router
- Table saw
- Tiling tools
Materials Required
- 1-1/2" brad nails
- 1-1/2” trim-head screws
- 1-1/4" magnets
- 1/2" PEX pipe
- 1/2" x 3' x 5' GoBoard
- 1/2" x 4' x 4' Baltic birch plywood (1)
- 1/4" aluminum channel
- 1/4" x 12" x 30" plexiglass
- 1/8" x 1-1/2" flat steel (for step catches) (16")
- 10" drawer slide (pair)
- 18" drawer slide (pair)
- 2" trim-head screws
- 20" drawer slide (pair)
- 28" drawer slide (pair)
- 2x4 x 10' (7)
- 2x4 x 8' (6)
- 3" exterior screws
- 3/4" x 4' x 8' Baltic birch plywood (4)
- 30" drawer slide (pair)
- 32" x 48" shower pan
- Miscellaneous plumbing fittings & pipe
- Mortar
- Polyurethane caulk/sealant
- Shower fixture
- Tile (24 square ft.)
- Wood glue
Our dog frequently returns from her outdoor romps with a big helping of dirt. Sure, I could haul her to the bathtub, getting my clothes and the floor filthy. But now that I’ve built a DIY dog wash station in the garage, the mess never has to come inside.
A pull-out staircase makes it easy for my dog to step up to a comfortable working height, so I don’t have to stoop to wash those dirty paws. And all my cleaning supplies store neatly inside the steps
Getting Started on Your DIY Dog Wash Station
Every house’s plumbing is different. To see the basic plumbing, check out Figure B. Aside from that, this is a pretty straightforward project: standard wall framing and some tiling. I eliminated the hard part of tiling by using a preformed shower pan. The stairs require precise measuring and cutting, but we’ll walk you through the details.
The size of the dog shower depends on the shower pan you buy, which depends on the size of your dog. So before cutting any parts, buy a shower pan that will comfortably hold your dog. Next, determine the shower pan height. For your comfort working, it should be about the height of your wrists when your hands are at your sides.
To find the height of the walls, measure to your dog’s shoulder and add three to six inches to that. That total gives you the height of the walls above the pan. Keep in mind that design changes might be needed to accommodate the specific shower pan you buy.
I used high-end materials on this project, so don’t let the price tag scare you. You can substantially trim the cost of this DIY dog wash station by choosing home center plywood, inexpensive fixtures and tile (or plastic wall panels). You could also skip the stairs, which would save you a bundle on drawer slides.

Project step-by-step (16)
Step 1
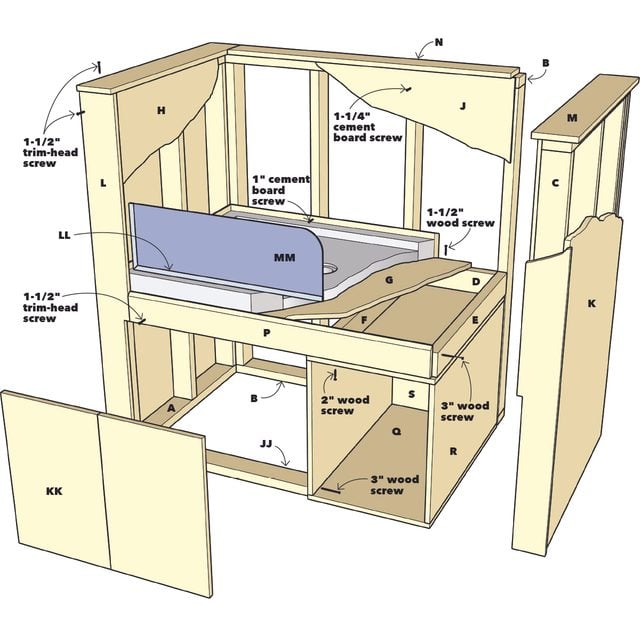
Build the Frame
With the dimensions and design finalized, build and assemble the walls — 2x4s 16-in. on center — and deck frame (A – F). Support the deck at the desired height while attaching it using temporary blocks on the wall framing. Screw on the deck platform (G), and then cut the drain hole. Size the hole generously so you have extra room if you ever need to work on the drain.

Step 2
Set the Pan
A standard fiberglass shower pan forms the dog wash basin. Install the drain in the shower pan ($250 at home centers), then apply construction adhesive to the decking and set the shower pan in place. Typically a shower pan is set in mortar, but this pan won’t have to support a person so I skipped the mortar. Screw through the pan’s flange into the wall framing to fully secure it.

Step 3
Install the Plumbing
Attach the shower valve and wand plumbing to a plywood backer fastened between the studs. Shower hardware differs by brand, so you’ll need to adapt the plumbing fittings to the needs of your fixture. The valve’s depth and the thickness of the substrate, tile and mortar determine how deep into the wall to mount the valve.
Mount the valve in the first stud cavity so it’s easy to reach. The plumbing supplies you’ll need depend on what’s included with your shower. My shower (Ravinte Rain Shower, $160 online) had an overhead component, which I just capped off. I also connected a tee at the cold water stub-out and ran pipe over to the outside wall and plumbed in a hose bib. Handy for filling buckets!


Step 4
Tile the Walls
Cut holes for the fixtures in the tile substrate, then fasten the substrate (H – J) to the framing using cement board screws. For the substrate, I used GoBoard backer board. It has a foam core so it’s lightweight, easy to cut and less messy than cement board. GoBoard is available at most home centers. Seal all the seams and cover the screw heads with a polyurethane sealant.
Apply mortar, using the proper notching trowel for your tile. Install the tile and let it set up for 24 hours. After the mortar has set, the tile is ready for grout, but apply the plywood wall caps first. The overhanging edges of the wall caps serve as a “form” for the grout.

Step 5
Add the Wall Trim
Attach outer panels (K), then the front wall end caps (L) and the top caps (M and N). Since the caps overhang the wall faces by 1/4-in., determine their width by measuring the finished wall thickness, including tile, and adding 1/2-in.
Next, bevel the top edge of the front rail (P) so it sheds water and attach it with its bottom edge flush with the bottom of the deck frame. Caulk the top edge of the rail to the shower pan. Once all the wall caps are attached, grout the tile.

Step 6
Create the Staircase
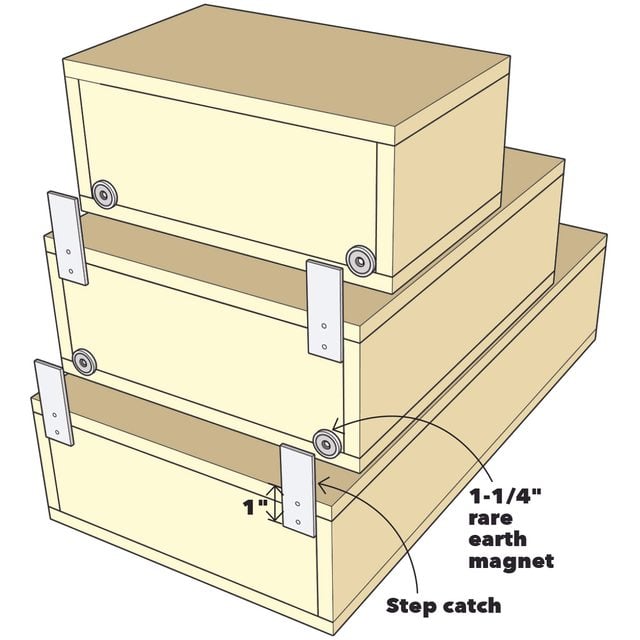
The staircase is like a set of Russian dolls. There are three subassemblies — the stair box, the steps and the drawers — and six pairs of drawer slides. Each step rides on a pair of slides, and each drawer rides on a pair of slides inside a step. Steel catches and rare earth magnets on the backs of the steps let them slide in and out in sequence by pulling out the bottom step.
Build the Stair Box
My stair box (Q – S) is 18-1/2-in. wide, giving the steps ample width. To determine the height, measure the space underneath the deck frame. The stair box should be a snug fit under the deck when assembled. Build the stair box but don’t install it yet. It’s easier to add the slides with the box sitting on your workbench.

Step 7
Build the Steps
To determine the step heights, measure the inside height of the stair box. Subtract one inch, then divide by three. This allows for a 1/4-in. gap above and below each step.
For the step width, measure the width of the box and subtract one inch. Cut all the parts (T – Z) and assemble the top and middle steps. Before assembling the bottom step, first rout or chisel the finger grip into the underside of its top. Because of the bottom step’s length, it’s nearly impossible to install interior drawer slides after assembly. So attach those slides, then finish assembling the step.

Step 8
Build the Drawers
Cut the drawer parts (AA – HH) and make a hand-grip cutout in each drawer front with a jigsaw. Build the drawers, leaving the fronts off for now. Attach the drawer slides using spacers to center the slides on the drawers and inside the steps.

Step 9
Attach the Fronts
Slide each drawer into its step and apply wood glue to the drawer’s front edges. Using playing cards as shims, set the fronts in place, with the drawer edge locations marked on the step edges as a reference for nailing. Adjust the fronts side to side until the gap is even all the way around, then pop in a few brad nails. If you’re not in a hurry, skip the nails and just let the glue dry.

Step 10
Position the Bottom Step
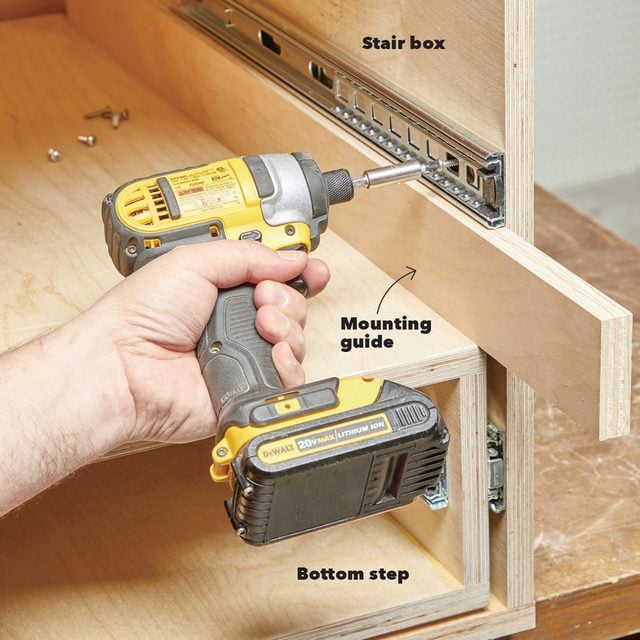
Installing drawer slides perfectly is tricky. I cut mounting guides to make the procedure foolproof.
Separate the two components of each slide. Attach the drawer components of the slides centered on the outside of each step, and then slide the cabinet components onto the drawer components. Set 1/4-in. spacers on the stair box’s bottom, then set the bottom step on the spacers. Measure from the bottom of the drawer slide to the box bottom and cut a mounting guide to that width.

Step 11
Hang the Bottom Step
Cut a mounting guide the width of the measurement from the last step. Set the drawer slides on the guide and screw them to the box sides.

Step 12
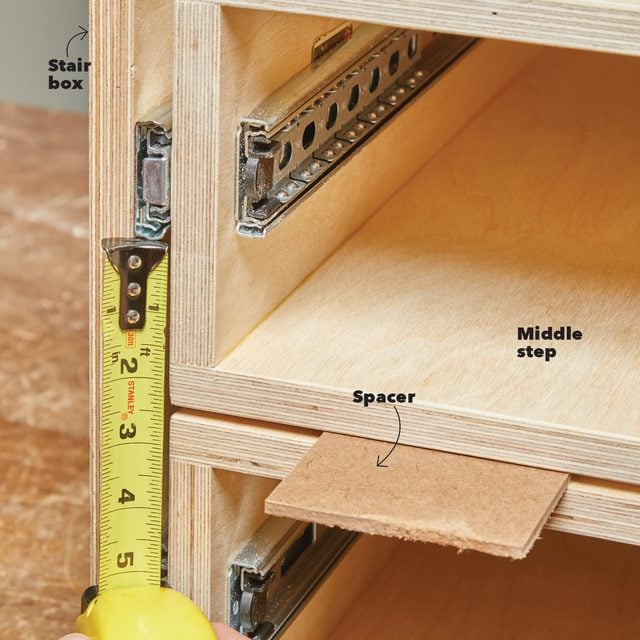
Position the Next Step
Set the middle step on top of the bottom step with an assembled slide attached to the step. Measure from the slide to the top of the bottom drawer and cut a mounting guide to that width.
Step 13
Hang the Remaining Steps
Set the guide on top of the bottom step. Set the slide on the guide and attach it to the stair box. Repeat the process to hang the top step, then remove all the steps.
Step 14
Add the Step Catches
Cut the step catches and drill two screw holes in each one. Mount two catches to the backs of the bottom and middle stairs. Attach the magnets to the backs of the top and middle stairs, aligned with each step catch.

Step 15
Install the Stair Box
Slide the box into place and screw it to the framing, then reinstall the steps, starting with the bottom step. Measure the opening to the left of the stair box and cut and install the spacer (JJ) to keep the opening square.

Step 16
Add the Splash Guard
Cut aluminum channel (LL) for the splash guard (MM) and attach it to the shower pan and the tiled wall with silicone. Once the silicone is dry, caulk the channel into place so that it sheds water. Cut the splash guard to size and radius the outer corner. Break all the sharp edges with a fine-tooth file. Set the splash guard into the channel and caulk it into place.
Fill the screw holes, sand the plywood parts up to 180 grit, and then apply two or three coats of polyurethane. Finally, hang the doors (KK), add the door hardware and install the shower controls and hose bib. Optional accessories for your DIY dog wash station include tie rings, hooks and a shower caddy.

Originally Published: August 07, 2020