
How To Make Your Own Washer and Dryer Pedestal
Updated: Mar. 19, 2024
Save money by DIYing your washer and dryer pedestals. Here's how.
Our editors and experts handpick every product we feature. We may earn a commission from your purchases.
1 hour
Beginner
Varies
Introduction
Pedestals for front-loading washing machines and dryers can cost hundreds. Save your money — you can DIY your own bases from standard lumber in an hour.Tools Required
- Circular saw
- Cordless drill
- Countersink drill bit
- Framing square
- Level
- Safety glasses
Materials Required
- 1-5/8-in. screws
- 1/2-in. plywood
- 2 x 10 or 2 x 12
- 3-in. screws
- Construction adhesive
Washer and dryer pedestals look nice in laundry rooms, and they can raise the machines to a more comfortable height so you don’t have to stoop over to clean your clothes. If you’re planning on buying one, it’ll probably be expensive.
Fortunately, with a little time and some lumber, you can DIY washer and dryer pedestals for much less, customized to your needs and your style.
Building the Washer and Dryer Stand Base
The key to the DIY washer and dryer pedestal project is make the pedestal sturdy, especially for front-loading washers. These tend to move around if they’re not on a solid, level surface. The last thing you want to do is fix one problem by creating a new, noisier and potentially dangerous one.
To start, measure the length and width of your washer and dryer. That’s your minimum size for the pedestals.
You can make them longer and wider if you want extra space to stand on to reach overhead shelving or set the laundry baskets on. Or you can make one long pedestal to fit under both machines. The size is up to you.
Project step-by-step (4)
Laundry pedestal plan
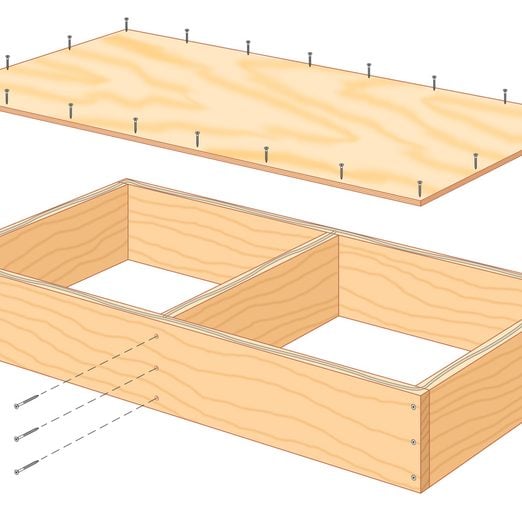
Build laundry pedestal frame
Build the pedestal out of 2×10 or 2×12 lumber. Fasten the frame together with 3-in. screws. Attach a joist in the middle for extra support. Make sure you’ve securely attached everything before moving on to the next step.
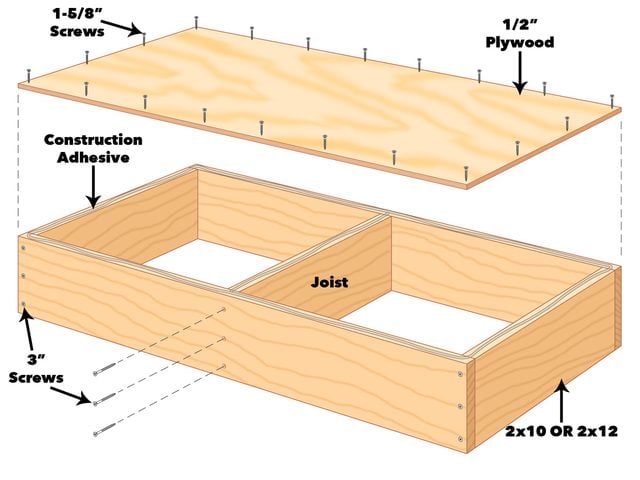
Silence the squeak
Apply construction adhesive to eliminate squeaks. Your goal is making your laundry room more functional, not squeaky and noisier. Then, fasten 1/2-in. plywood over the top with 1-5/8-in. screws. Allow the construction adhesive to fully dry before adding a finish or putting the appliances on top. While you’re at it, learn the reasons behind dryer squeaking.
Laundry pedestal finish
Feel free to add an attractive finish. Use whatever colors work best in the room to make the piece look a little fancier. After all, it is custom.
Be sure to use shims to level the pedestal before you set the appliance on it. An uneven pedestal can be noisy at best and dangerous at worst.
Congratulations! You’ve designed and built a custom piece for your laundry room that looks nice and makes your life a little easier!