


Forget buying a crate from the pet store. Make this DIY wooden dog crate, a piece of fine furniture and a safe home for your pup.
Our editors and experts handpick every product we feature. We may earn a commission from your purchases.Learn more.


Updated Jul. 25, 2024
Forget buying a crate from the pet store. Make this DIY wooden dog crate, a piece of fine furniture and a safe home for your pup.
Our editors and experts handpick every product we feature. We may earn a commission from your purchases.Learn more.
Two days
Intermediate
$500
Forget buying a crate from the pet store. Make this DIY wooden dog crate, a piece of fine furniture and a safe home for your pup.

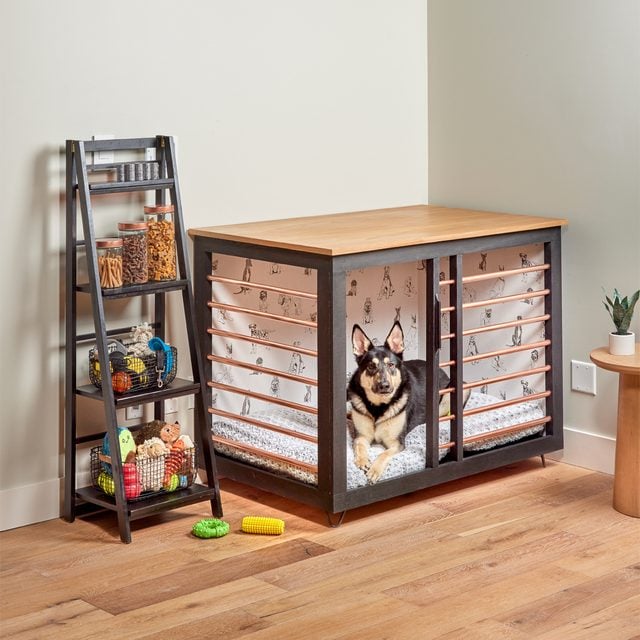
If a pet is part of your family, you want to give them the best of the best. But if we’re talking a crate or dog kennel, you know pet store mostly sells plastic boxes and metal cages. For my dog Charlie, that wasn’t good enough.
So I designed this dog crate with red oak lumber and copper pipe, both readily available at home centers. I added a slick sliding door and dyed the frame black with India ink. Charlie jumped right in and has been calling it home ever since.
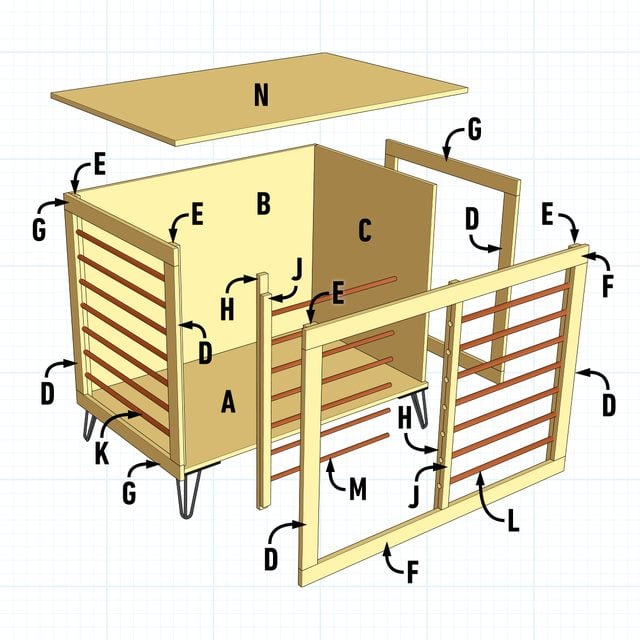
| KEY | QTY. | DIMENSIONS | PART |
| A | 1 | 3/4” x 30” x 48” | Bottom |
| B | 1 | 3/4” x 34-1/2” x 48” | Back |
| C | 1 | 3/4” x 23-1/4” x 33-3/4″ | Side |
| D | 6 | 3/4” x 2-1/2” x 30-1/2” | Outer stiles |
| E | 4 | 3/4” x 1-3/4” x 33-3/4” | Inner stiles |
| F | 2 | 3/4” x 2-1/2” x 48-1/2” | Front rails |
| G | 4 | 3/4” x 2-1/2” x 30-1/4” | Side rails |
| H | 7 | 3/4” x 1-1/4” x 33-3/4” | Inner door stiles |
| J | 7 | 3/4” x 1-1/4” x 30-1/2” | Outer door stiles |
| K | 7 | 3/4” diameter x 26-1/2” | Side panel copper pipe |
| L | 7 | 3/4” diameter x 21-3/4” | Front panel copper pipe |
| M | 7 | 1/2” diameter x 21-3/4” | Door copper pipe |
| N | 1 | 3/4” x 33-1/2” x 51-1/2” | Top |
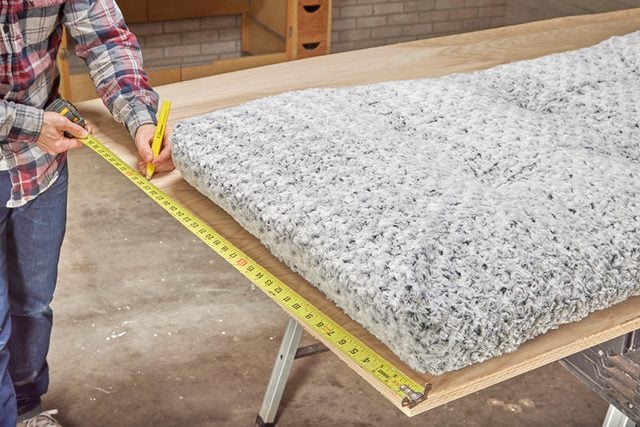
Measure the length and the height of your dog, then add four inches to each dimension. I’m placing a bed in the bottom of the crate, so I used this rule to determine the proper-sized bed.
With the dog bed in hand, I placed it on a sheet of 3/4-in. plywood and marked its length and width. This will be the bottom of the crate.
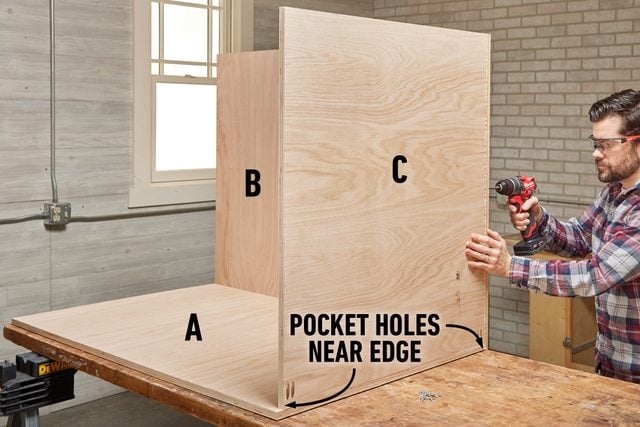
Cut the bottom, back and side panels from 3/4-in. plywood. I’m using a sheet of red oak veneer plywood.
Fasten the side to the bottom panel with glue and a pair of pocket screws; keep the pocket holes within two inches of each edge. Next, fasten the back panel with pocket screws to the bottom, then use trim screws to fasten the corner.
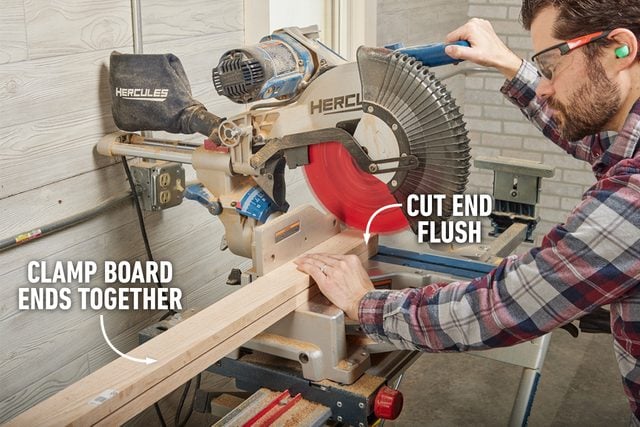
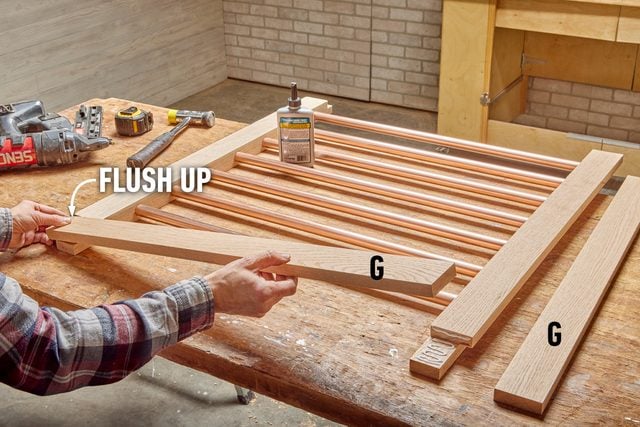
The front and opposite sides are face frame panels. Putting these panels together is easier when all the parts are the exact same size, so I stacked my boards on the miter saw and clamped the ends to keep them together. I cut the ends flush, then cut the outer and inner stiles and rails to length.
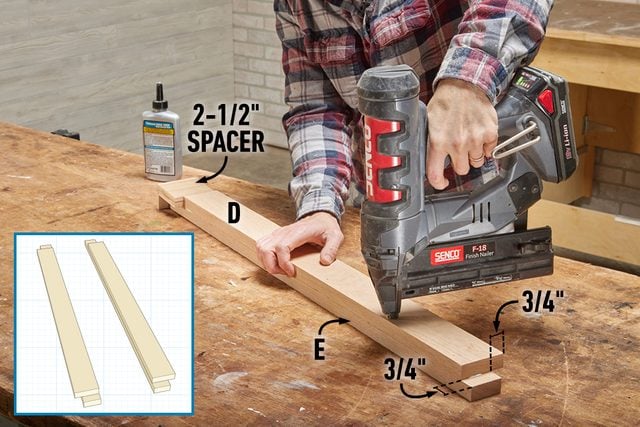
Glue the stiles flush on the edge, then use a 2-1/2-in.-wide spacer on the top side of the stiles to position the boards. The spacer ensures the rails will fit precisely when you assemble the face frame. Build a pair of stiles for each panel.
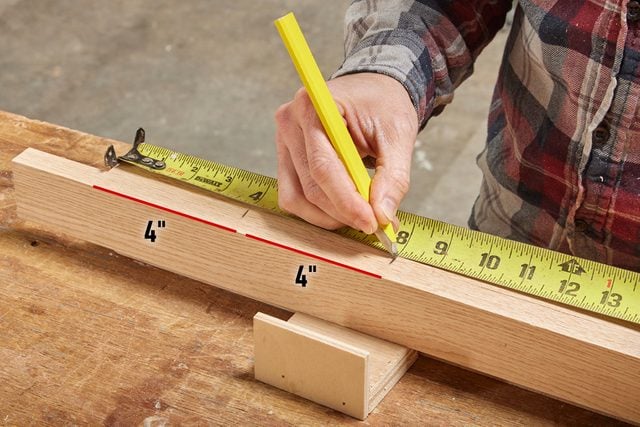
Position the stiles with the inside edge facing up, and hook your tape measure to the top of the outer stile. Make a mark every four inches from the top to the bottom on each. I used the spacer from the previous step to support the stiles while I made the marks.
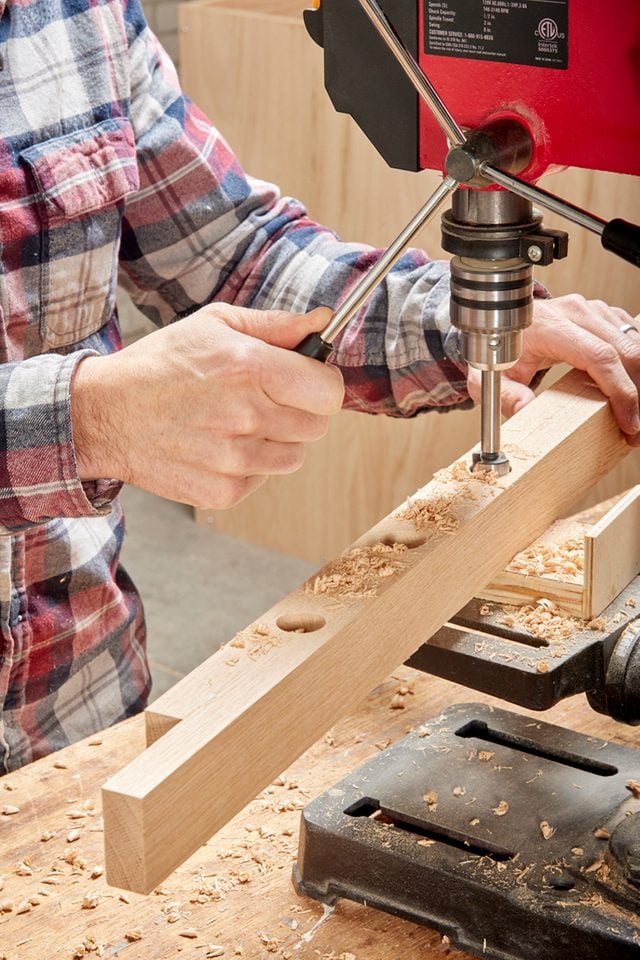
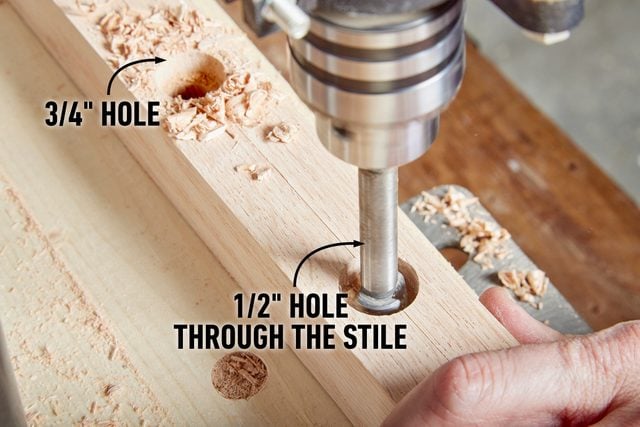
Set up a drill press with a 3/4-in. Forstner bit and a waste board clamped to the table. Then drill 1/2-in. deep holes at each of the marks on the stiles. The copper pipes making up the rest of the side and front panels will fit into these holes.
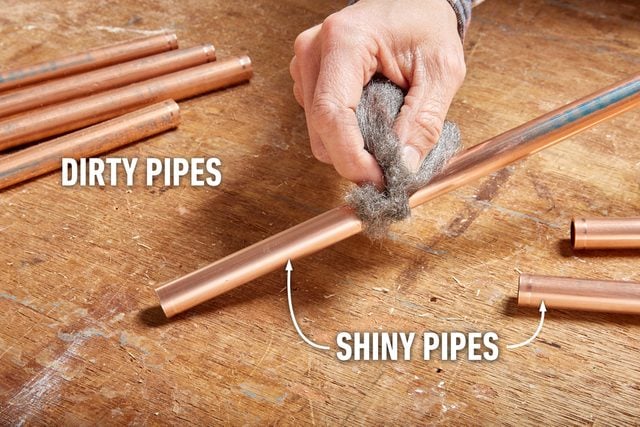
Before fitting the side panels together, I polished the copper pipe with steel wool to remove all the marking and give it a nice shine. Wipe them down with a little acetone, rinse with soapy water and let dry.
I took a soft-blow hammer to pound the pipes into the holes of the side panel, then glued and nailed the rails to the stiles to hold everything together. I made sure the rails were flush to the outside of the stiles, then checked that everything was square. The front face frame is built the same way, but without the pipes.
I fit the side face frame panel, followed by the front, and made sure all the corners lined up. Then I fastened them with wood glue and nails.

I made two center stiles the same way I made the corner stiles, the only difference being their width. For the one that will be fixed to the front face frame, I drilled the same 3/4-in. holes as the other stiles, but then drilled a 1/2-in. hole all the way through the stile. This allows the door to telescope into the crate when it’s opened.
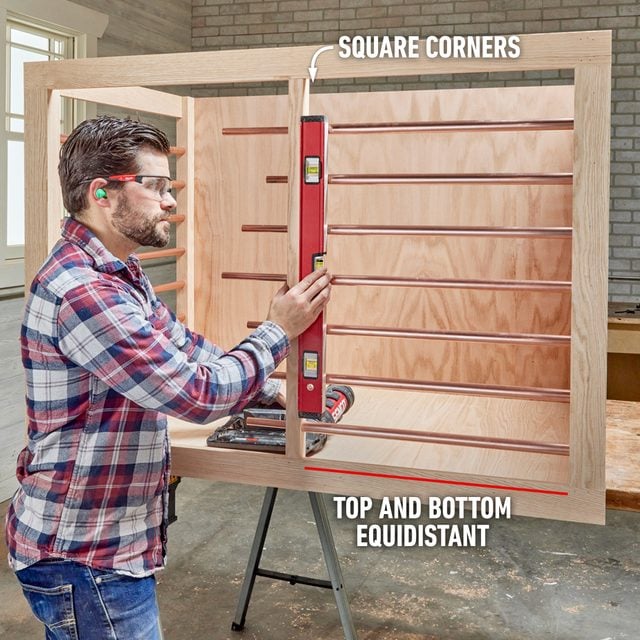
I fit the 3/4-in. copper pipes in the fixed center stile, then nested 1/2-in. pipes into the other side of this stile. I positioned the stile along the front panel and worked the pipes into the adjacent holes in the corner stile. I checked that it was square to the frame and glued and nailed this fixed center stile into place.
Note: Since my work surface is level, I only needed a level to make sure the stile was plumb for the assembly to be square. Instead, use a framing square, or check that the distances from the corner stile are equidistant top to bottom.
I drilled 1/2-in. holes four inches apart into the center door stile and placed it in a closed position. Then I used five-minute epoxy to adhere the 1/2-in. pipes into the door stile.

Next, I flipped the crate frame over and added four-inch hairpin legs to each corner.
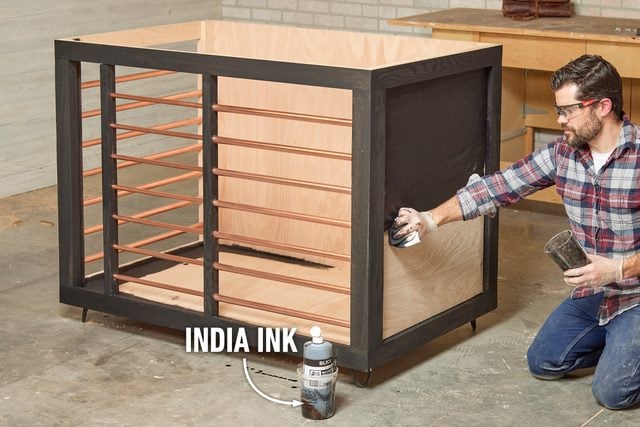
I nailed trim boards to match the face frame on the opposite side panel, then dyed the wood surfaces with India ink. I left only the back and side panels on the inside natural.
India ink is less expensive than wood dye and provides a really dark finish, which looks especially stunning in open grain woods like oak.
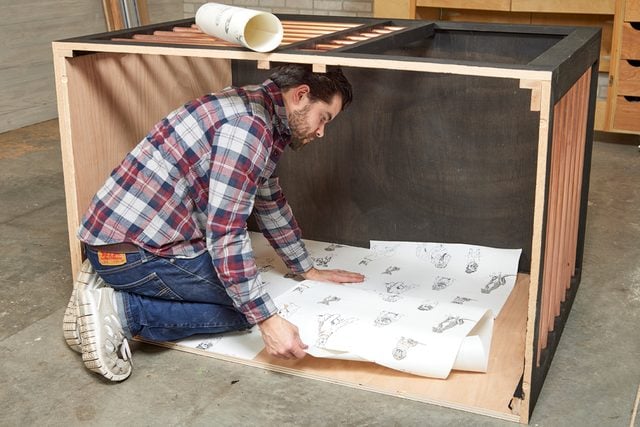
On the inside panels of the crate, I applied peel-and-stick wallpaper as an accent. I started from one side and worked my way across the back and side, lining up the edges and cutting the roll to fit.
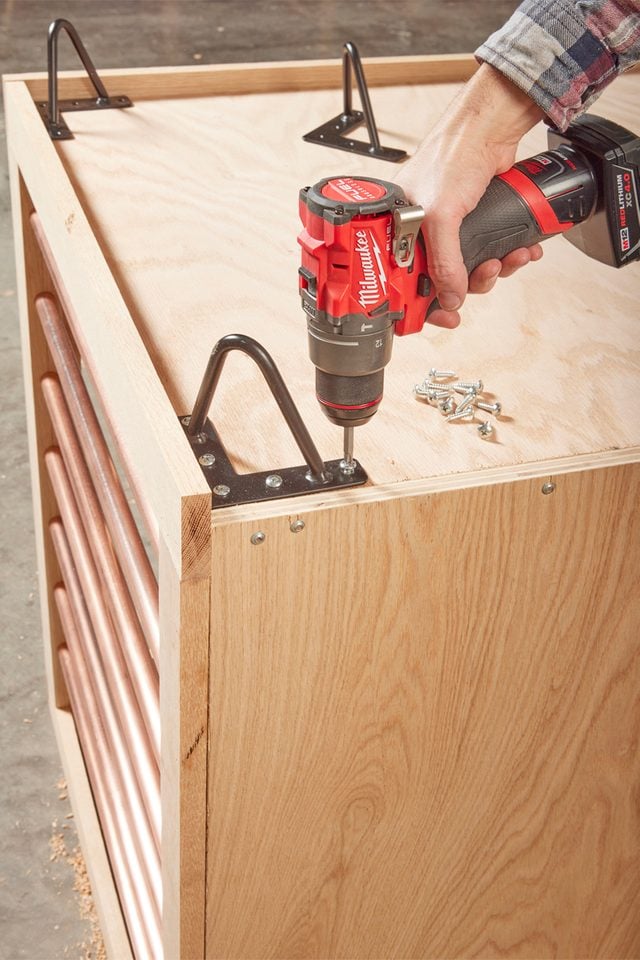
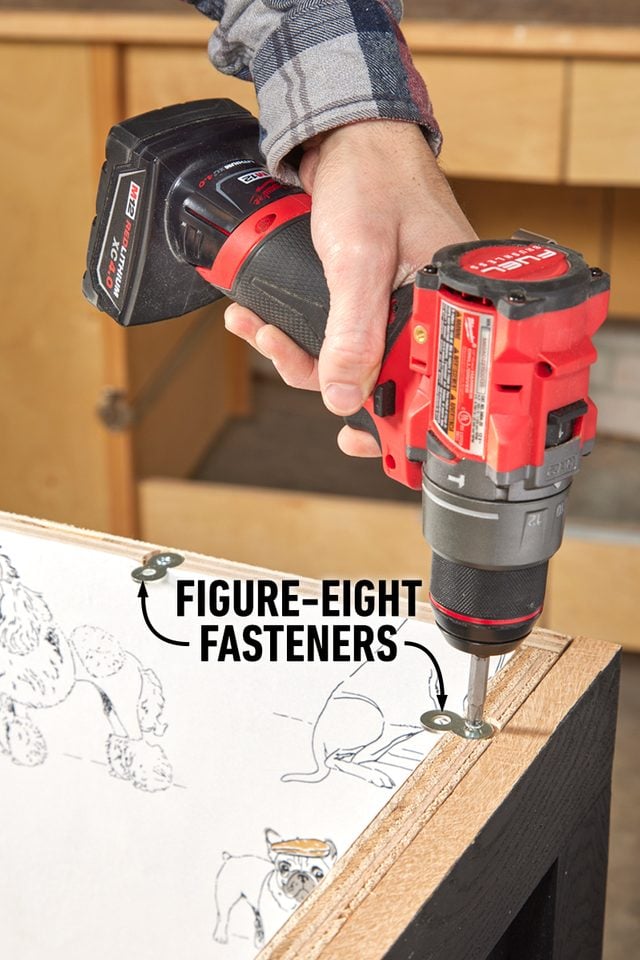
Be sure to clean the panels well; peel-and-stick wallpaper is forgiving, but it won’t stick to sawdust-covered surfaces. I learned that the hard way. To attach the top, I used figure-eight desktop fasteners. I mortised a hole on the top of the walls for each fastener, then placed the top on and attached it with screws.
I cut the top of the dog crate 1-1/2-in. longer than its length and 3/4-in. wider than its depth. I drilled two mortises on each side using a 5/8-in. Forstner bit and fastened figure-eight desktop fasteners to the top edge of the panels.
I positioned the top flush with the back and allowed a 3/4-in. overhang on the sides and front. Then I secured it through the figure-eight fasteners with 1/2-in. screws.
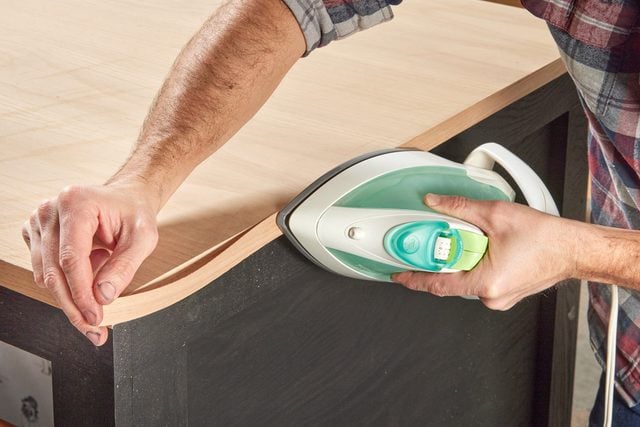
I covered the plywood edge of the top with matching iron-on edge banding, trimmed the edges, sanded the top and applied a finish coat. Once it dries, it’s ready for a comfy dog bed and your furry best friend.
Originally Published: April 07, 2023