
How to Build a Chicken Coop

Updated: Jun. 01, 2023
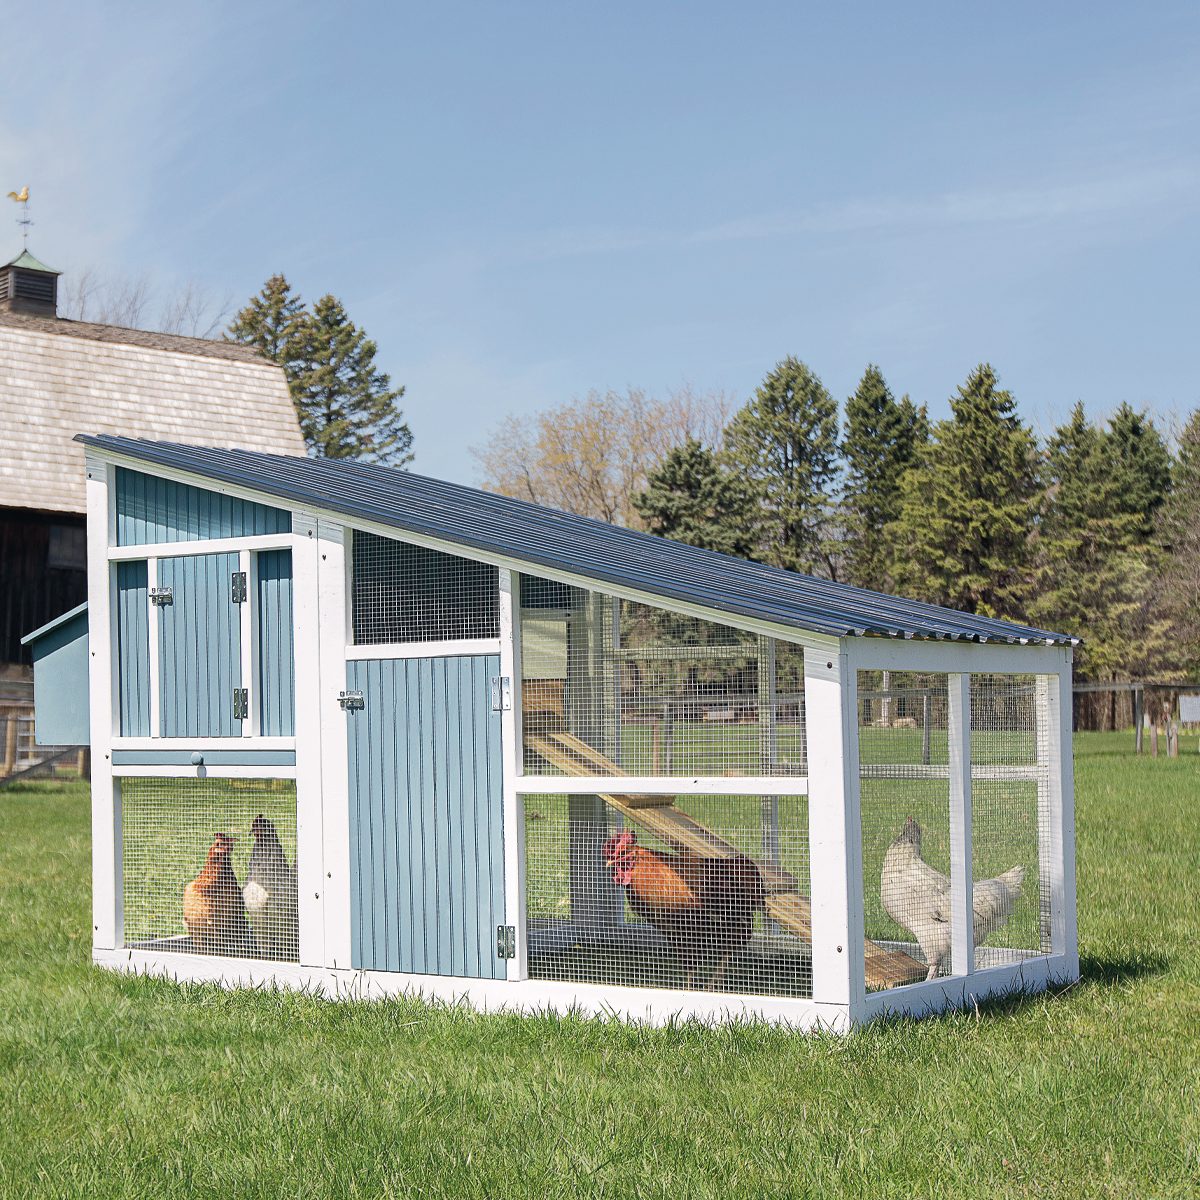
This easy-to-build DIY project combines the coop and run in one design, making it perfect for urban and rural settings.
Two days
Intermediate
$400 to $600
Introduction
There’s nothing better than fresh eggs from just outside your back door. Backyard chicken coops have become popular even in urban areas. This DIY chicken coop incorporates the coop and the run together. You can easily build it in a couple of days with minimal skills and a few power tools.Tools Required
- Circular saw or table saw
- Clamps
- Crown stapler
- Drill/driver
- Miter saw
Materials Required
- #14 x 2-1/2" Pocket hole screws
- #9 x 3” Construction screws
- 1 - 1/2" x 2' x 25' Galvanized hardware cloth
- 1 - 1/2" x 4' x 8' Exterior or marine plywood
- 1 - CoverLite plastic closure strips (6 Pieces)
- 1 – 4’ x 4’ Acrylic or poly carbonate glass
- 1 qt. - Exterior paint
- 1-1/2" construction screws
- 1-1/2" Roofing screws w/ rubber washers
- 1" MultiLite screws
- 15 - 2 x 2 x 8' Furring strip
- 2 - 26" x 8' Clear polycarbonate roof panel
- 2 - 3/8 x 4 x 8 Beaded plywood panel siding
- 2 - Galvanized hinge sets
- 2 - Slide bolt latch
- 4 - 1 x 4 x 8' Select pine board
- 4 - 2 x 4 x 8' Ground contact green pressure treated lumber
- 4" Strap hinges
- 8 - 2 x 4 x 8' Premium construction/framing lumber

Project step-by-step (16)
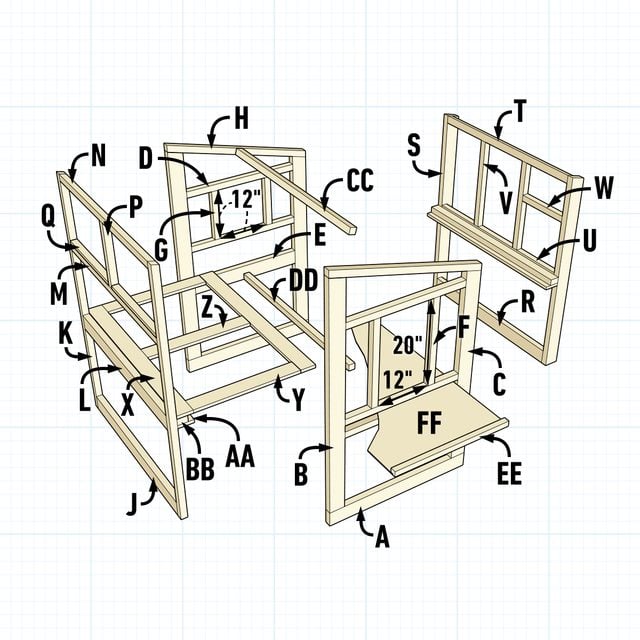
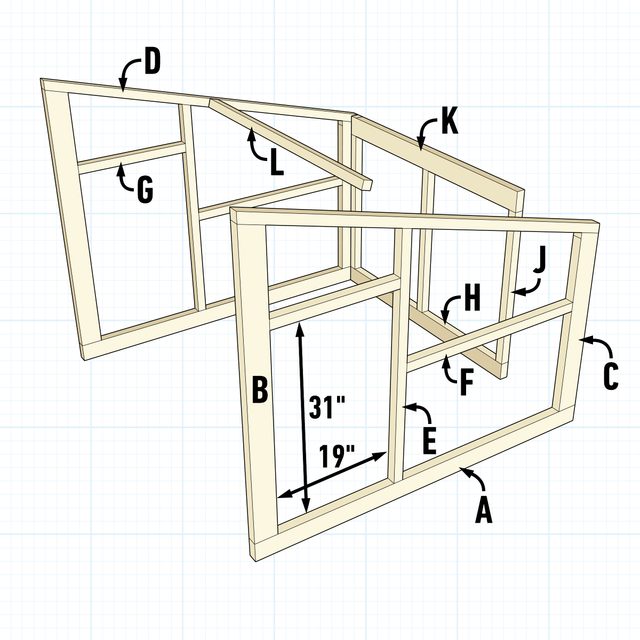
Build the Coop Frames
Coop Overview
Coop Cutting List
| KEY | PART | QTY. | DIMENSIONS |
| A | Side Frame Bottom (Treated) | 2 | 1-1/2″ x 3-1/2″ x 34″ |
| B | Side Frame Back | 2 | 1-1/2″ x 3-1/2″ x 53-9/16″ |
| C | Side Frame Front | 2 | 1-1/2″ x 3-1/2″ x 45-7/16″ |
| D | Side Frame Horizontal | 5 | 1-1/2″ x 1-1/2″ x 27″ |
| E | Side Frame Mid-Support | 1 | 1-1/2″ x 3-1/2″ x 27″ |
| F | Side Frame Door Vertical | 2 | 1-1/2″ x 1-1/2″ x 20″ |
| G | Side Frame Window Vertical | 2 | 1-1/2″ x 1-1/2″ x 12″ |
| H | Side Frame Top | 2 | 1-1/2″ x 1-1/2″ x 35-3/16″ |
| J | Back Frame Bottom (Treated) | 1 | 1-1/2″ x 3-1/2″ x 42″ |
| K | Back Frame Vertical | 2 | 1-1/2″ x 1-1/2″ x 58-5/8″ |
| L | Back Frame Mid-Support | 1 | 1-1/2″ x 3-1/2″ x 42″ |
| M | Back Frame Upper-Support | 1 | 1-1/2″ x 1-1/2″ x 42″ |
| N | Back Frame Top | 1 | 1-1/2″ x 1-1/2″ x 42″ |
| P | Back Frame Partition | 1 | 1-1/2″ x 1-1/2″ x 14-1/8″ |
| Q | Hinge Build-Up | 1 | 3/4″ x 1-1/2″ x 20-1/4″ |
| R | Front Frame Bottom (Treated) | 1 | 1-1/2″ x 3-1/2″ x 42″ |
| S | Front Frame Vertical | 2 | 1-1/2″ x 3-1/2″ x 49-7/8″ |
| T | Front Frame Top | 1 | 1-1/2″ x 1-1/2″ x 42″ |
| U | Front Frame Horizontal | 1 | 1-1/2″ x 3-1/2″ x 42″ |
| V | Front Frame Upper Vertical | 2 | 1-1/2″ x 1-1/2″ x 22-1/2″ |
| W | Front Frame Upper Horizontal | 1 | 1-1/2″ x 1-1/2″ x 13″ |
| X | Floor Frame Side | 2 | 3/4″ x 3-1/2″ x 45″ |
| Y | Front Frame End | 2 | 3/4″ x 3-1/2″ x 24″ |
| Z | Floor Frame Mid | 1 | 3/4″ x 3-1/2″ x 24″ |
| AA | Tray Supports | 2 | 3/4″ x 3-1/2″ x 45″ |
| BB | Floor Supports | 2 | 1-1/2″ x 2-1/4″ x 45″ |
| CC | Roof Supports | 1 | 1-1/2″ x 1-1/2″ x 45″ |
| DD | Cross Member | 1 | 1-1/2″ x 1-1/2″ x 45″ |
| EE | Tray Front | 1 | 1-1/4″ x 1-1/4″ x 26-1/2″ |
| FF | Waste Tray (Acrylic) | 1 | 1/4″ x 45″ x 26-1/4″ |
Make the Side Frames
Cut all the parts for the side frames (A-H). You may want to wait to cut the two top boards (H) until you have the rest of the pieces assembled. Lay the parts out on a large flat work surface. Mark the verticals (B & C) where you’ll be attaching the horizontals (D & E).
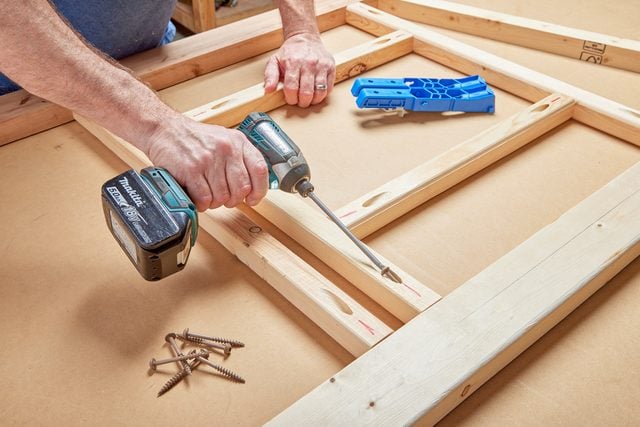
Drill pocket holes and attach the back and front (B & C) to the edge of the bottom (A) using pocket screws. Attach one horizontal (D) to the right-side frame and (E) to the left side frame. Next, build the right-side door frame (D & F) and the left side window frame (D & G).
Attach the door and window frames between the verticals using pocket screws. Now measure and cut the two top boards (H) and attach them to the top of the side frames.
Make the Front and Back Frames
Measure the height of the side frames at their tall end. Cut the verticals (K) to length for the back wall. Do the same for the front frame, taking your measurement from the lower end of the side frame, then cut the two front frame verticals (S) to length. Cut the remaining parts for both frames.
Use a circular saw or table saw to rip a 2×4 down the middle at a 15-degree angle for both top boards (N & T). Mark the front and back frame verticals where you’ll be attaching the horizontals. Attach the verticals to the bottoms, tops and horizontal supports, then attach the remaining vertical supports using #10 x 3-in. exterior construction screws.
Build the Run Frames
Run Overview
Run Cutting List
| KEY | PART | QTY. | DIMENSIONS |
| A | Side Bottom (Treated) | 2 | 1-1/2″ x 3-1/2″ x 57-3/4″ |
| B | Side Back Vertical | 2 | 1-1/2″ x 3-1/2″ x 45″ |
| C | Side Front Vertical | 2 | 1-1/2″ x 3-1/2″ x 30-1/2″ |
| D | Side Top | 2 | 1-1/2″ x 1-1/2″ x 59-13/16″ |
| E | Side Mid-Support | 2 | 1-1/2″ x 1-1/2″ x 39″ |
| F | Side Horizontal Support | 2 | 1-1/2″ x 1-1/2″ x 30-3/8″ |
| G | Side Door Support | 2 | 1-1/2″ x 1-1/2″ x 18-7/8″ |
| H | Front Bottom (Treated) | 1 | 1-1/2″ x 3-1/2″ x 45″ |
| J | Front Vertical | 3 | 1-1/2″ x 1-1/2″ x 27-1/2″ |
| K | Front Top | 1 | 1-1/2″ x 3-1/2″ x 45″ |
| L | Roof supportd> | 1 | 1-1/2″ x 1-1/2″ x 45″ |
Construct the frames (A-P) for the run just like the frames of the coop.
To get the angle of the roof line from the coop continuing into the run, measure the height on the coop front frame, from the bottom to the short point of the angle on the top (R). This gives you the height of the run side frames at the long point of the angle. Cut all the components, drill the pocket holes and assemble frames as before.
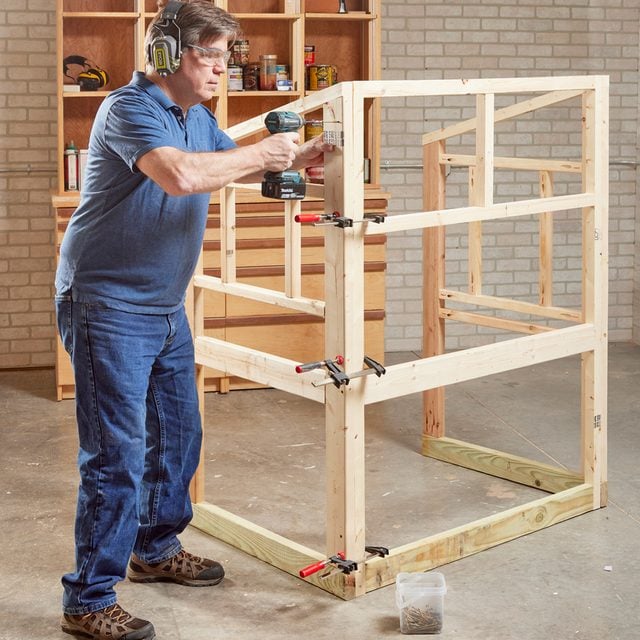
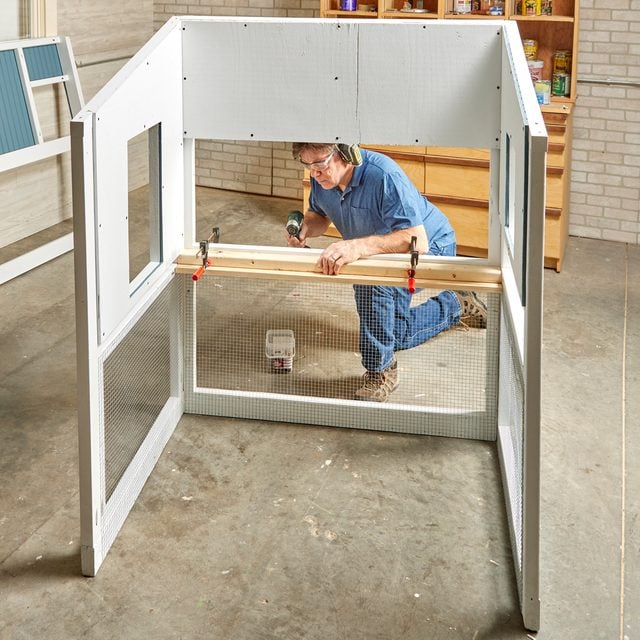
Pre-assemble the Frames
Pre-assemble the Coop
Clamp the frames together to make sure they all fit perfectly, starting with the coop frames.
Start by clamping the back frame between the two side frames aligning the angles at the top of each frame. Pre-drill pilot holes through the side frames and secure the side frames to the back frame with #10 X 3-in. screws. Attach the front frame in the same manner.
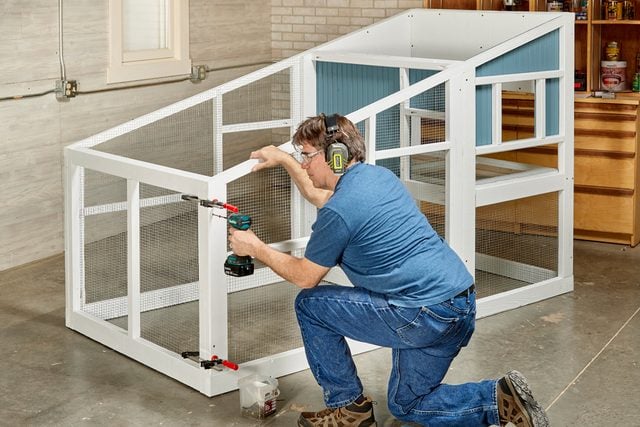
Pre-assemble the Run
Clamp the run side frames to the coop front frame vertical (S) keeping them tight against the side frame front vertical (C). Again, pre-drill holes and secure the frames together with lag screws. Attach the run front frame between the two run sides.
Cut the Beaded Panels
Beaded Panel Cutting Diagram
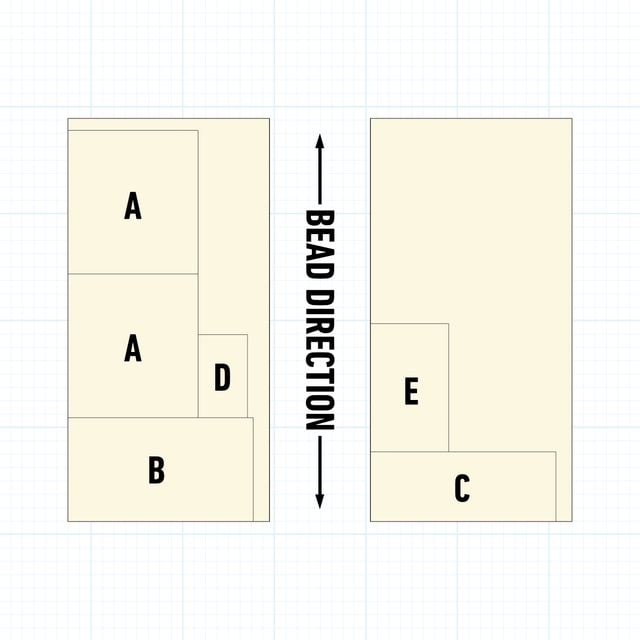
Beaded Panel Cutting List
| KEY | PART | QTY. | DIMENSIONS |
| A | Side Panels (before roof cut) | 2 | 3/8″ x 31″ x 34-3/16″ |
| B | Inside Panel | 1 | 3/8″ x 44-1/8″ x 24-3/4″ |
| C | Back Panel | 1 | 3/8″ x 44-1/8″ x 16-5/8″ |
| D | Coop Door Panel | 1 | 3/8″ x 11-3/4″ x 19-3/4″ |
| E | Run Door Panel | 1 | 3/8″ x 18-5/8″ x 30-1/2″ |
Measure and cut the beaded plywood panels for the inside of the coop. For each side of the coop, I cut large beaded panels, which were then marked and cut with a jigsaw where the roof angle, door, window, nesting box and flower box were located.

To keep the vertical direction of the beads on the panels uniform from piece to piece, I needed two 4×8 sheets (as pictured above) to get all six pieces cut. However, in a pinch, or to save money, it’s possible to cut small individual panels for each framed section out of a single 4×8 sheet.
Paint the Coop and Run
Disassemble the frames in reverse order of assembly. Paint all surfaces of the frames. Paint the beaded coop panels an accent color if you choose. Once the paint dries, attach the beaded plywood panels to the back of their frames with construction screws.
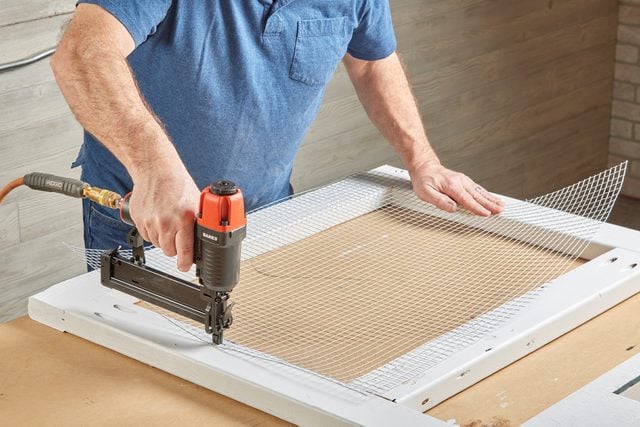
Install Chicken Wire
Cut and attach chicken wire to the coop and run frames as well as the coop floor frame, using crown staples.
Add the Floor Supports
Measure, cut and install the floor and tray supports (AA & BB) onto the front and back frames.
Assemble the Coop and Run
Use wood clamps to put all the finished parts together and secure them with construction screws.
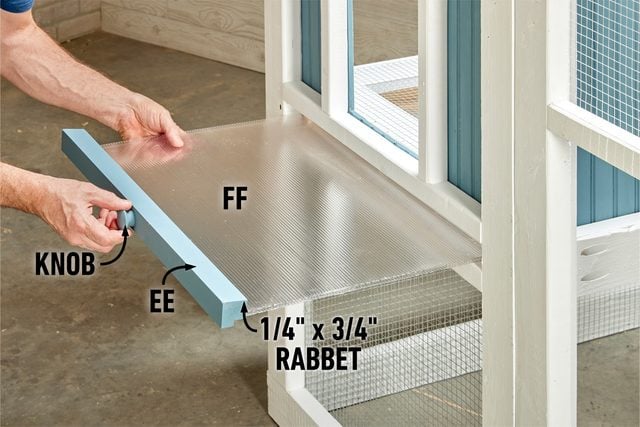
Add the Floor and Waste Tray
Install the assembled coop floor (X, Y, Z) with chicken wire, by lowering it through the roof opening or raising it from the bottom and placing it on the mounted floor supports. After that, slide the waste tray onto the floor.
The waste tray (FF) is simply a piece of 1/4-in. polycarbonate or plexiglass attached to the tray front (EE) with a 1/4-in. by 3/4-in. rabbet joint and a couple of screws. After that, I added a knob for easy removal.
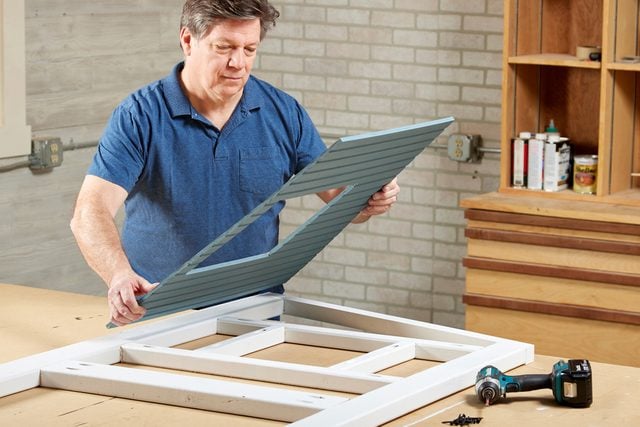
Add the Doors and Window
Make the Doors
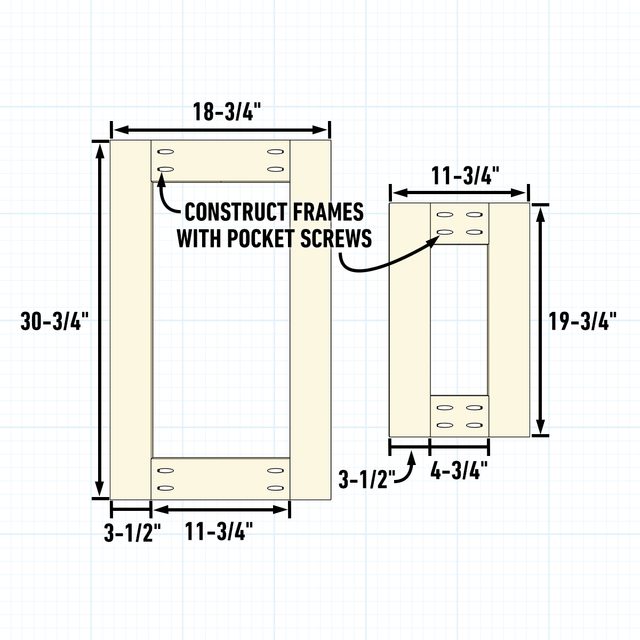
You should already have the beaded plywood panels for the coop and run doors cut (beaded panels E & D), but now it’s time to beef them up and install them.
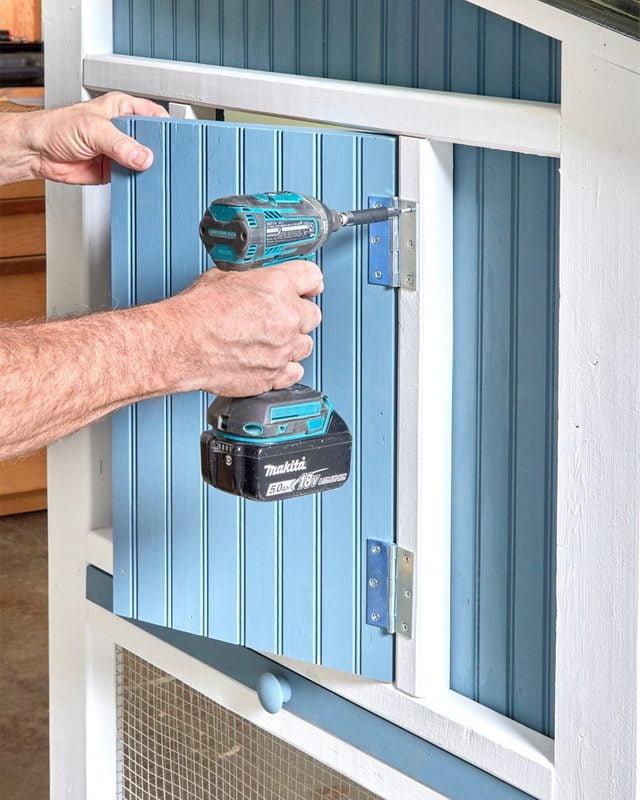
Build the door frames as shown above out of 1×4 boards, then glue and nail them to the back of the door panels. Attach the doors by flat mounting hinges and install a side bolt latch to keep them secure.
Add the Window
Cover the 12-in. by 12-in. window opening with a piece of poly carbonate or plexiglass left over from your waste tray. Cut the material to 13-1/4-in. square with a table or circular saw. Next, pre-drill pilot holes in all four corners and secure it inside the window opening with one-inch pan-head screws.
Attach the Roof
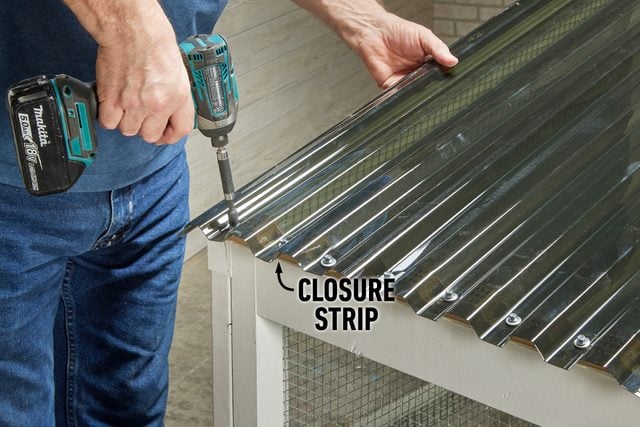
Attach a cross support between the two run side frames. Then install plastic closure strips for corrugated roofing on the top of the front and back coop frames, and another on the run front frame and cross support.
Place the roof panels on top of the coop and run frames, letting them overhang a minimum of one inch on each side. Secure the panels using roofing screws with rubber washers.
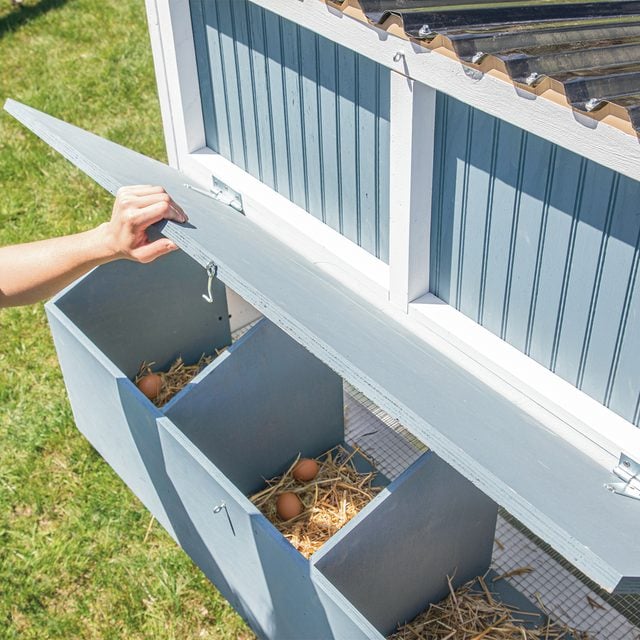
Build the Nesting Box
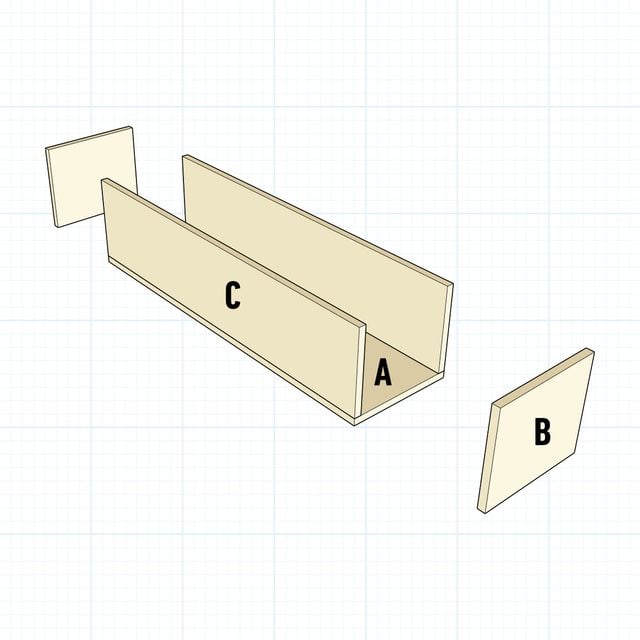
Nesting Box Overview
Nesting Box Cutting List
| KEY | PART | QTY. | DIMENSIONS |
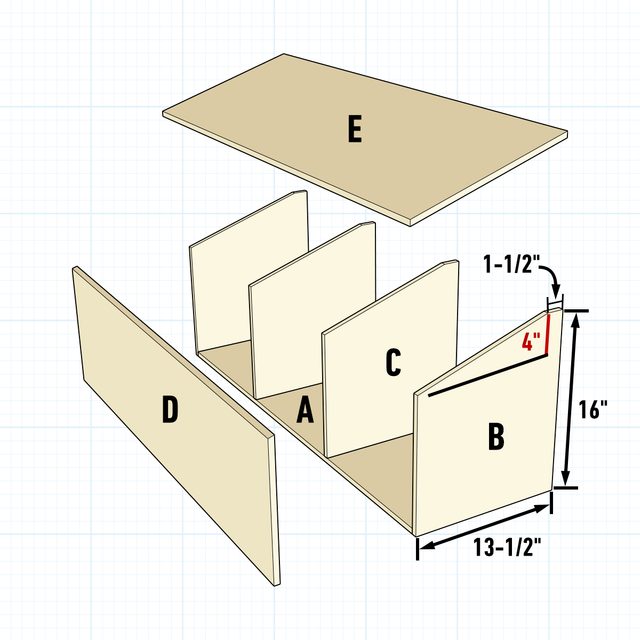
| A | Bottom | 1 | 1/2″ x 13-1/2″ x 41″ |
| B | End | 2 | 1/2″ x 13-1/2″ x 16″ |
| C | Partition | 2 | 1/2″ x 13-1/2″ x 15-1/2″ |
| D | Front | 1 | 1/2″ x 12″ x 42″ |
| E | Lid | 1 | 1/2″ x 14-1/4″ x 44″ |
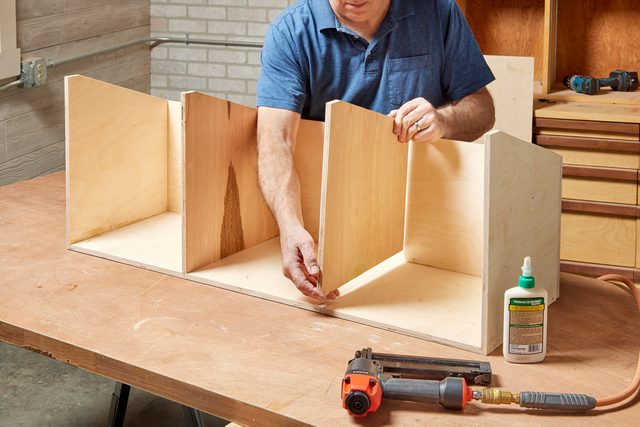
Cut all the parts listed above. Using a circular saw, cut the top angles on the ends (B) and partitions (C). Following this, assemble the nesting box as pictured below, remembering to leave the top free since it will be hinged.
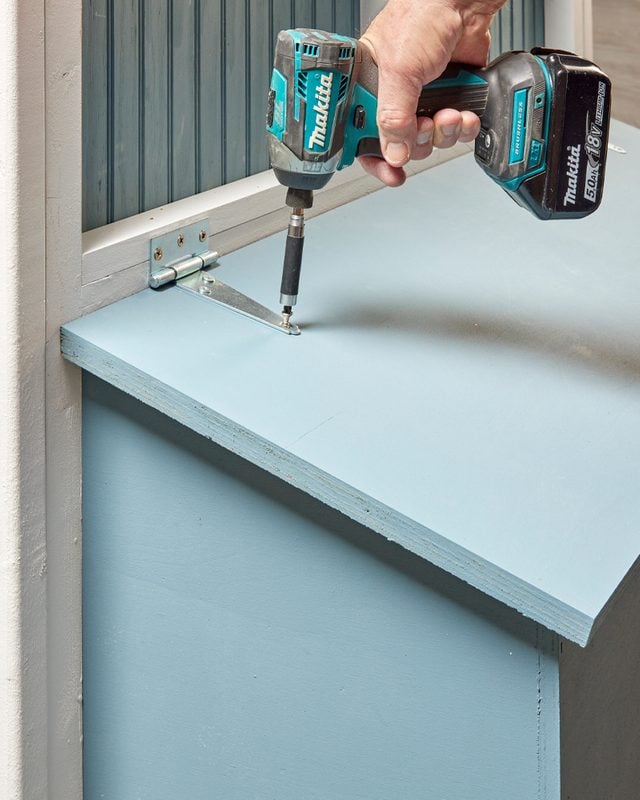
After painting, install the nesting box into its opening by driving screws into the framing around it from the inside.
Install the Nesting Box Lid
Identify the angle on the top edge of the nesting box lid (E) and cut it; it should be around 18.5-degrees. Place the lid on the nesting box so the lip is uniform on all sides, and attach it with strap hinges.
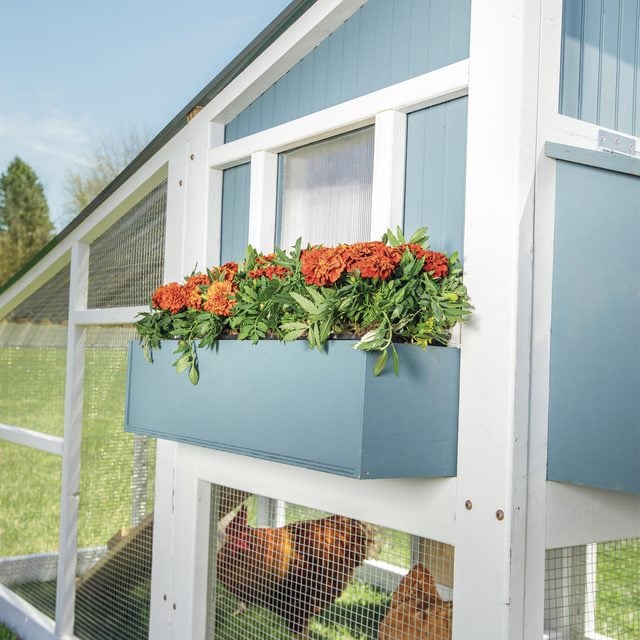
Build the Flower Box
Flower Box Overview
Flower Box Cutting List
| KEY | PART | QTY. | DIMENSIONS |
| A | Bottom | 1 | 1/2″ x 7-1/2″ x 26″ |
| B | End | 2 | 1/2″ x 7-1/2″ x 6-1/2″ |
| C | Front & back | 2 | 1/2″ x 6″ x 26″ |
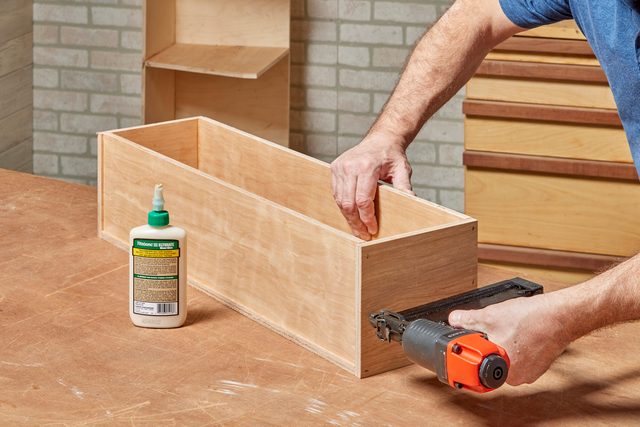
Cut the five pieces from the list above. Construct the box as pictured below, using crown staples and wood glue.
Drill a handful of 3/16-in. weep holes along the center of the bottom (A) to allow rain water to escape. Paint the flower box and install it into its opening by driving construction screws into the framing around it from the inside.
Get Chickens for the Finished Coop
Now it’s just a matter of getting some chickens, placing a few flowers in the box, and laying a 2×10 ramp from the coop into the run so the chickens may migrate back and forth.
Originally Published: April 28, 2023