
How to Build Easy DIY Steps on a Slope
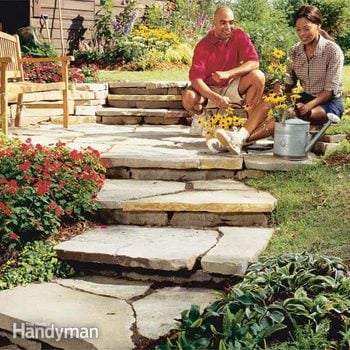
Updated: Jun. 13, 2023This easy-to-build natural stone path will last a lifetime
- Time
- Complexity
- Cost
- Multiple Days
- Intermediate
- $501-1000
Step 1: Overview
Stonework doesn’t have to be complex or require special masonry skills. In most regions, you can buy flat flagstones that you can easily lay for paths and stack for solid stairs. We’ll show you how to plan, lay out and build a set of natural stone steps using flat flagstones for the treads and solid blocks of stone, called wallstone, for the risers.
Our steps are built on a gradual slope, but by changing the riser and tread sizes you can build them on slopes as steep as about 40 degrees. Rustic steps like these are well suited for informal garden paths like ours, but we wouldn’t recommend them for entry or other steps that get heavy daily use.
In addition to the basic gardening tools, leather gloves and carpenter’s level, you’ll need a few special tools for breaking and moving stone. Buy a 4-lb. maul (Photo 7) to chip and break stone. If you have to cut a few stones, buy a dry-cut diamond blade, available at home centers. To move the stone, rent or buy a two-wheeled dolly with large wheels.
Step 2: Stone steps don’t have to be exact
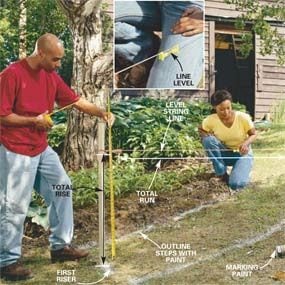
Photo 1: Lay out the steps
Outline the steps with spray paint and drive stakes at the top and bottom. Tie a level string line to the stakes. Measure the total run between the stakes and the total rise from the ground to the level line. Calculate the length of each tread (see Fig. A and text) and mark them with spray paint.
Make a rough sketch of the plans for your steps, including the approximate number of risers and any retaining walls you might have to build.
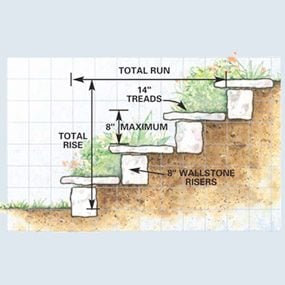
Begin by measuring the total horizontal distance the stair will travel along a level line (Photo 1). This is called the “run” of the stair. Then measure down from this level line to determine the total vertical distance, or “rise.” Your goal is to arrive at a set of comfortable steps with rises of 6 to 8 in. and treads at least 12 in. deep.
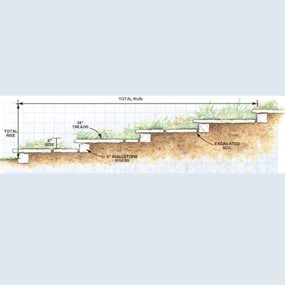
First figure out how many step risers you’ll need. Gentle slopes like ours require short risers and long treads, while steep slopes require taller risers (up to a maximum of 8 in. and short treads). If your hill has both steep and gentle slopes, break it up into sections and calculate the step layout separately for each area (Fig. A). Divide the total rise by about 6 in. for shallow slopes, up to a maximum of 8 in. for steep slopes, to arrive at the approximate number of risers. In our case, the total rise was 29 in. Dividing by 6 yielded 4.83, which we rounded up to 5 risers.
Subtract 1 from the number of risers to determine the number of treads. Then divide the total run by this number to arrive at the depth of each tread. We divided the total run of 145 in. by 4 treads to arrive at a tread depth of a little more than 36 in. Using this information, mark the location of each stair riser on the ground with spray paint.
There’s no margin for error when you’re building wood steps, but luckily you can cheat a little on these rustic stone steps. You’ll still have to calculate the height of each riser and the depth of the treads, but if you’re off by an inch when you reach the top, it’s not difficult to adjust the level or slope of the landing to make up for it. If your route includes a space where the grade levels out, make this spot a small seating area (lead photo).
Step 3: Buying stone
A visit to your local stone supplier is the quickest way to find out what types, sizes and shapes of stone are available in your area. Look for flat stones called flagstones that range in thickness from 2 to 3 in. to use for your treads. Ours are limestone, but you may find that another type of stone is more readily available. You’ll need some 6- to 8-in. thick blocks of stone, called wallstone, for the risers (Photo 2). Follow our instructions for figuring your riser height (Photo 1). Then pick out wallstones of this height to use for your risers. Try to find flagstones of consistent thickness. It will make it easier to keep the stone steps all the same height.
Since stone is usually sold by the ton, and the number of square feet a ton will cover depends on the thickness of the stone, figuring quantities is best left to someone with experience selling natural stone. Note the dimensions on the sketch and take it with you to order the stone. Order about 15 percent extra to provide more shapes to choose from and avoid having to pay for a second delivery. You’ll have no trouble finding uses for the extra stone.
Our project required about 3 tons of stone for the treads and landing and another 2-1/2 tons for the risers and wall. In addition to the stone, order 1 ton of crushed gravel with aggregate 3/4 in. and smaller for leveling the treads and risers (Photos 3 and 4).
Step 4: Start with level risers
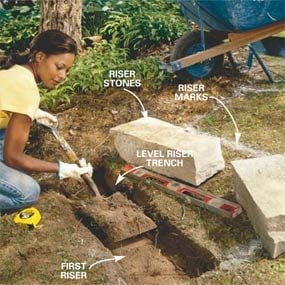
Photo 2: Set the first stone riser deeper
Dig a trench for the first stone riser. Plan to leave enough of the riser stone exposed so the step will be at the correct height when you set the stone tread on top.
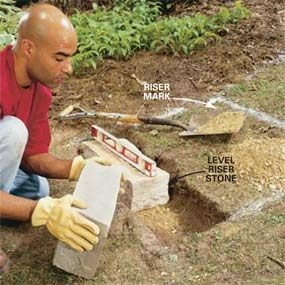
Photo 3: Level the riser
Level the riser stones by removing soil or adding gravel as needed. Set the distance from the ground (or future path) to the top of the first riser stone equal to the riser dimension less the thickness of the tread.
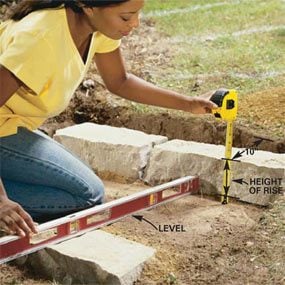
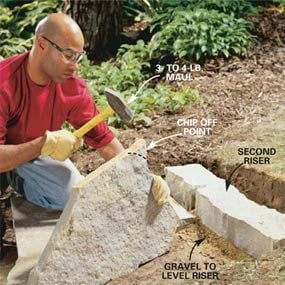
Photo 4: Excavate the first tread and second riser
Dig straight back, level with the top of the first riser stone, to 10 in. beyond the mark for the second riser. Set the next riser stone so the distance from the dug-out ground to the top of the stone is equal to your riser height. Adjust the height of the riser by burying a bit of the stone or adding gravel under it. Level the top.
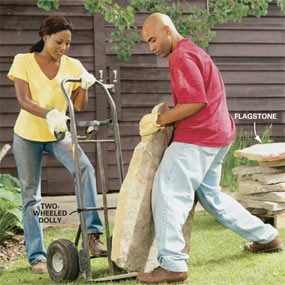
Photo 5: Use a dolly for heavy stones
Move heavy flagstones by tipping them up on end and rocking them onto a two-wheeled dolly. Keep your back straight and lift with your legs.
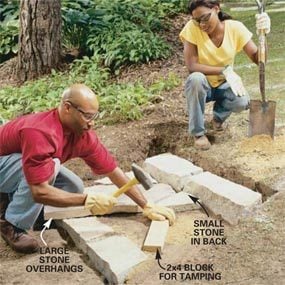
Photo 6: Place the tread
Arrange large flagstones to overhang the lower riser about 2 in. Remove soil or tamp gravel into low areas to level the tops of the stones. Leave gaps between stones up to 2 in. wide.
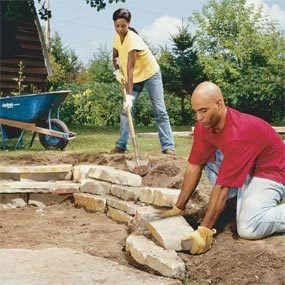
With the tricky planning out of the way, you’re ready to dig in and start building steps. Spread out some of the stone so you’ll have many shapes to choose from. Then build one step at a time, starting at the bottom and working your way up. Photos 2 – 11 show how.
The first step is the trickiest to build. After that you just repeat the process until you reach the top. Set the first riser in place (Photos 2 and 3). Remember to bury it a few inches so the first riser won’t be too tall. Now use the top surface of this riser stone to guide your shovel as you dig straight back into the hill to make a level spot for the first tread and the second riser. Be sure to dig out all of the sod. When the first two risers are in place, you’re ready to set stones for the first tread. Pick larger stones to overhang the riser (Photo 9). The extra weight will keep them from tipping. Then fill in behind them with smaller stones.
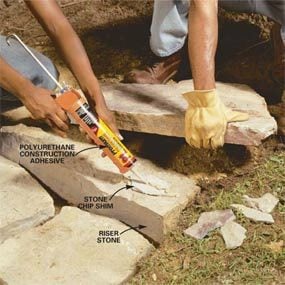
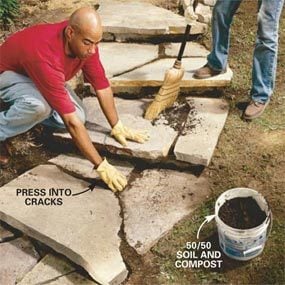
For a safe set of steps, it’s important to keep all the risers the same height. Compensate for variations in flagstone thickness by adjusting the height of the riser. If the stone you pick for the tread is extra thick—say, 3 in. rather than 2 in.—bury the riser an extra inch so the total rise will be consistent. The same goes for keeping the top surface of the treads even. Put a little gravel under thin stones to raise them, or excavate under stones that are too thick. If a stone tips or rocks when you step on it, shim it with stone chips (Photo 8). Take your time adding gravel and removing soil until your step is just right. Then move on to the next one.
To avoid moving stones more than necessary, we found it helpful to arrange the stones into the shape of the treads near the stone pile, and then move the pieces to their permanent location on the steps.
Step 5: Blend the steps into the landscape
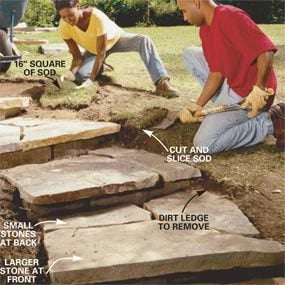
Photo 9: Blend the yard into the steps
Cut 16-in. squares of sod from alongside the steps with a flat-blade shovel and lift them out. Remove enough soil to slope and blend the surrounding yard into the new steps. Replace the sod and water it.
Notching into the hill will leave bare ledges of soil along the edge of each tread. You can either remove soil to slope the surrounding landscape down to the steps or add stones along the edge to retain the soil. Photo 9 shows how to cut out the sod and regrade the soil. On the three steps leading from the landing to the top of the hill, we buried wallstone along the edge to hold back the dirt (Photo 10 and lead photo).
Filling the cracks between stones is the final step in the project. Experts we talked to had varying opinions on the best material to use. Sand is easy but it will wash out. Pea gravel looks good but tends to fall out and get under your feet, and it’s like walking on ball bearings. We settled on a 50/50 mix of compost and soil. It packs easily into the cracks and looks natural. And if you want, you can plant a durable creeping groundcover, like creeping thyme, in the large spaces. Besides looking great, it will fill in the spaces to keep out weeds and hold the soil in place.
Cutting Stone
You’ll probably get through the project without having to cut any stone. But if you need an exact fit or just can’t find the right shape, cutting is an option. Buy a diamond blade to fit your circular saw.
Mark the stone with a crayon. Set the abrasive blade to cut about 1/2 in. deep and saw along the line. Increase the depth in 1/2-in. increments and make repeated cuts until you’ve sawed at least halfway through the stone. Direct a stream of water from a garden sprayer onto the blade as you saw to reduce dust and cool the blade. Turn over the stone and gently tap along the cutting line with a heavy hammer until it breaks.
Caution: Plug the saw into a GFCI-protected outlet or into a special portable GFCI plug.
Additional Information
Required Tools for this Project
Have the necessary tools for this DIY project lined up before you start—you’ll save time and frustration.
- Circular saw
- Dust mask
- Level
- Line level
- Safety glasses
- Spade
- Tape measure
- Wheelbarrow
Required Materials for this Project
Avoid last-minute shopping trips by having all your materials ready ahead of time. Here’s a list.
- 2-in. – 3-in.-thick flagstone
- 50/50 mix of soil and compost
- 6-in. – 8-in.-thick wallstone
- Polyurethane adhesive
