
How to Build a Stone Path and Steps
Updated: Jul. 07, 2023Modular blocks let you build like a master mason—even on slopes
- Time
- Complexity
- Cost
- Multiple Days
- Intermediate
- $501-1000
Step 1: Stone Steps Overview

Modular concrete blocks
Wall block systems are designed for easy assembly. This system has both 6-in.- and 3-in.-thick blocks in a variety of widths. A flange on the back evenly spaces and interlocks the wall. We used a “split-face, weathered” style, which is available in several colors. For other styles, check online or visit a home center or landscape supplier. Here are tips on picking the right retaining wall material.
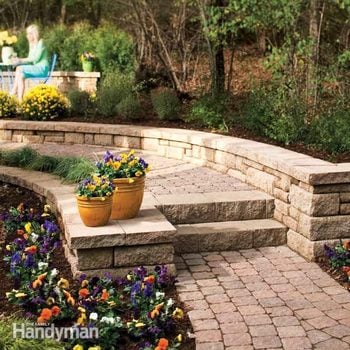
You don’t have to let the hills and slopes in your yard stop you from enjoying your outdoor space. With a little imagination (and a good bit of sweat!), you can change those negatives into striking features. The heart of the project is a practical path and steps that give you convenient yard access—no tromping through the mud. And the bonus is a series of new terraces, garden beds and sitting areas that will turn that largely wasted space into your favorite hangout.
But a lot of hills and slopes means you’ll face a more difficult building challenge. In this article, we’ll show you special techniques for planning and building durable steps, paths and retaining walls in a sloped yard. The process is similar for each. The key to guaranteeing long life and little or no maintenance is to establish a solid, level base. Otherwise your paths and steps will become a tippy, tilted mess within a season or two.
Path building techniques are fairly straightforward; a novice can tackle this project. But stair building is a bit more complex. You should have some experience assembling paths or walls on flat yards before taking on a project as big as ours.
Normally a project this large would be a job for pros only. But the modular concrete block system we used vastly simplifies the process.
While the technical side of this project isn’t too difficult, the labor involved in a project this large can be daunting. You’ll have to dig out tons of soil and move dozens of concrete blocks. (Our step blocks weigh more than 100 lbs. each.) The three sets of stone steps in this project, the 40-ft.-long path and the patio would take you at least 10 full days to complete. (Pros could complete it in four days.)
To do a first-rate job, you’ll need several special tools—a plate compactor (Photo 10), a cutoff saw with a diamond blade and a hand tamper (Photo 3). Don’t be intimidated by the size and weight of the compactor and saw. Although heavy, both are fairly easy and safe to operate.
Step 2: Material options
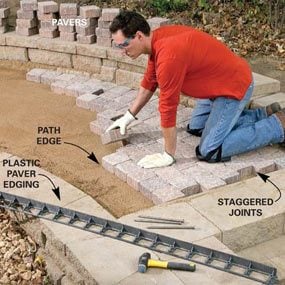
The modular wall blocks and stone steps are all designed to fit together in an easy-to-assemble system. Home centers often stock one brand of these blocks, but you should also shop at full-service nurseries or landscape suppliers for a wider selection. Each manufacturer has a slightly different interlocking system, either an offset flange that also spaces the blocks as you stack them (Photo 5) or an interlocking pin. The flange type on the block we chose is a bit easier to use for small-scale projects like ours. All types are available in a number of styles and colors. The “weathered” face we chose looks more like natural stone, especially when it’s assembled in a mix of block sizes. Be sure to check the style options in each manufacturer’s catalog, get a firsthand look at the block before you buy, and compare prices.
Concrete and clay (brick) pavers for the path are also available at the same stores, in a wide variety of colors and patterns. If your path curves, as ours does, stick to simple patterns. You won’t have to trim them as much.
Figure A: 3 Stages of Stair Building
- Start with a level base and first course.
- Add more step blocks and wall blocks.
- Extend the walls and cap them.
Step 3: Planning and buying materials
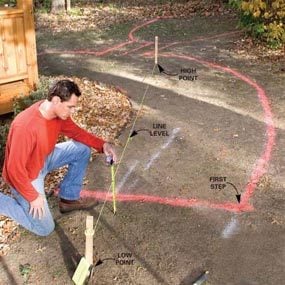

Begin by laying out the approximate location of the path and patio in your yard. Use a garden hose at first, so you can easily adjust path positions until you find the design you like. We recommend a 35- to 40-in.-wide path to let two people walk side by side or pass each other, and at least a 35-in.-wide stairway. But there is no absolute rule here. Then mark the lines using spray paint and measure the slopes (Photo 1) between the approximate high point of the path and the low points. Both these points represent approximately level path heights. Steps will carry you from one level to the other. To determine the number of stone steps, measure the height difference using a level string line (Photo 1). Then divide that measurement by the height of the step block you intend to use (ours was 6 in.). The result won’t come out exact, but don’t worry. Plan for the smallest number of steps. You can easily make up the remainder when building the paths, by raising the lower path a bit or lowering the upper path.
Plan to begin your steps close to the low point to minimize digging (Photo 1). And try to have at least two steps per flight. A single step is a tripping hazard.
Follow the same process when you’re planning the patio height and the steps to it. Then make a sketch of your path plan, including rough dimensions and slopes.
Now plan the retaining walls. If your path and stairs run along a slope, as ours do, you have to retain the soil on both sides. (Stairs always need retaining walls.) Otherwise rainfall will wash soil down on the high side and undermine the path on the low side. Figure B shows our design for the path. The top retaining wall extends about 9 in. above the path, leaving a small flat terrace behind to catch water. The lower retaining wall leaves a small terrace/planting bed alongside the path to: (1) catch water and avoid path erosion on the low side, (2) provide a buffer zone so walkers won’t inadvertently step over the edge, and (3) allow flexibility in the path width for easier paver setting (Photo 12).
It’s difficult to calculate the materials you’ll need for your project. So take your sketch to the stone or landscape supply dealer you intend to use. The dealer will advise you on which block system will work best for your site and help you determine the heights of walls, the number of stone steps and all the special blocks. The dealer will also help with style options. We needed special stair blocks, retaining wall blocks (one decorative side), freestanding wall blocks (two decorative sides for the sitting wall around the patio), cap blocks (wall tops), and an assortment of corner blocks and pavers. In addition, the dealer will estimate the amount of sand and compactable gravel you’ll need for the base (6 in. under everything). Have the materials delivered and dropped as close to your site as possible.
Step 4: Excavate for the steps
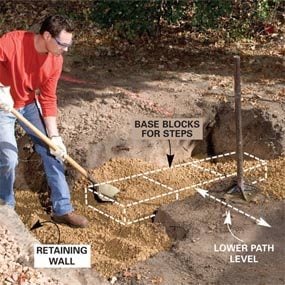
Begin your project by setting the steps and the retaining walls around them. These retaining walls will flow into the path retaining walls (Figure A). For stability and to prevent washouts, always excavate about 12 in. down—a 6-in. base of packed gravel and a 6-in. base block mostly below the grade (ground level) when finished. Make the excavation about 4 in. wider than the block. Always keep the base course level. Since ground level varies, simply raise (step up) or lower (step down) the base course if it runs too deep or too shallow. In general, keep at least 4 in. of your 6-in.-thick base blocks buried.
Get a friend or two to help with the digging. You’ll have to remove lots of soil. If you don’t have a nearby location to dump it, rent a “roll-off” trash container and wheelbarrow it directly into the container to avoid moving it twice.
Then dump in a 3-in. layer of gravel, tamp it, then another 3 in. of gravel. Roughly flatten and level this second layer and tamp it solid before laying the base course (Photo 2).
Step 5: Set the stairs
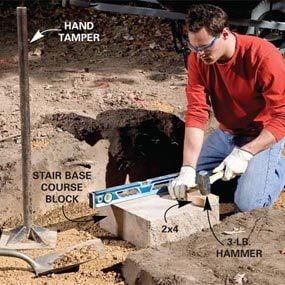
Photo 3: Level the first block
Set the first base course block for the stairs perfectly level, front to back and side to side. Make slight adjustments with a 3-lb. hammer and a block of wood. Or lift the block and add or remove gravel.
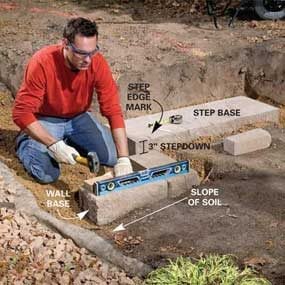
Photo 4: Set the next blocks
Align and level the other stair blocks and retaining wall base course blocks with the first stair block. Drop the lower retaining wall base 3 in. deeper to make the 3-in. cap blocks flush with the top step (Figure A). Cut blocks as necessary to fit at corners
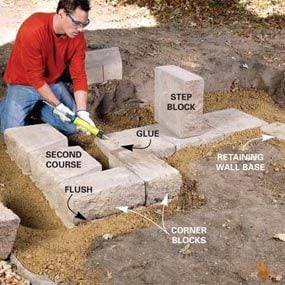
Photo 5: Begin the second course
Set a second course of blocks on top of the first. Knock off the back flange on retaining wall blocks around the stairs so their fronts fit flush to the blocks below. Glue the second course of blocks in place.
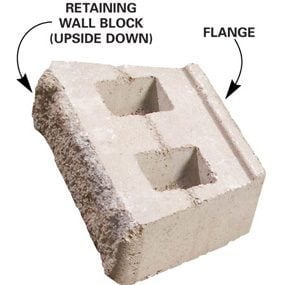
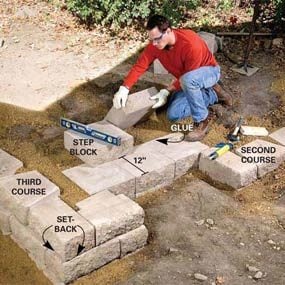
Photo 6: Start the third course
Add a third course of blocks to the retaining wall (second exposed row), setting them back. Stagger the exposed vertical joints. Level the second step blocks, overlapping the first and 12 in. back from the front edge, and glue them.
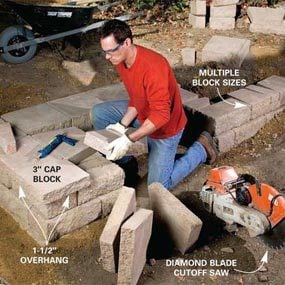
Photo 7: Add cap blocks on the lower wall
Glue 3-in.-thick cap blocks on top of the lower wall. Cut them to fit tightly. Add retaining wall blocks to the high side, varying the sizes for the best appearance (Figure A). Keep the rows flush alongside the steps and step them back elsewhere.
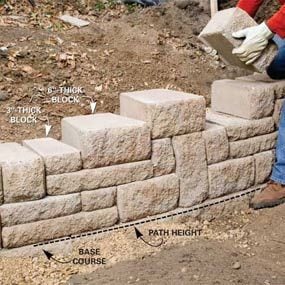
Photo 8: Continue the retaining wall
Dig, tamp the gravel base and continue to assemble the retaining walls. Stagger the joints and mix the block sizes for the best appearance.
To set the base course, center the first stair block on the path (Photo 3). This is slow, painstaking work, but be extra fussy here. It’s critical to make it perfectly level, because you’ll level all other base course blocks to it. You’ll spend more than half your building time leveling the base courses. Once they’re set, wall and stair building will go quickly.
Level additional stair blocks to the first, butting them tightly together, and then add the wall blocks to complete the base course (Figure A and Photos 4 and 5). We stepped the retaining wall on the low side down 3 in. because of the lower grade level. This was convenient because it helped us fit the 3-in.-thick cap flush with the top step (Figure A). Firmly tamp gravel around the base course.
Then set the second course (the first exposed row). It’s easiest to use identical blocks around the steps and stack this course directly on the one below, but stagger all exposed joints in later courses. Regular retaining wall blocks have flanges to step each row back slightly and interlock the wall. However, the flanges won’t work at corners (Photo 5). In most cases, the dealer will supply you with special corner blocks (adjacent decorative faces; Photo 5), which don’t have flanges. Glue corner blocks and step blocks with two squiggly beads of polyurethane adhesive (Photo 5). Glue the second course of step blocks directly over the base with the front faces flush. Your steps will also look better if you keep the wall faces along the steps flush to one another as well, rather than stepping them back (Photo 6). If flanges get in the way, simply knock them off with a 3-lb. hammer and glue the block into place.
It’s likely that you’ll have to cut blocks for the corners, and you certainly will as you begin to mix block sizes in highly visible areas. The diamond blade cutoff saw makes these cuts quick and easy. (See “Handling a Cutoff Saw.”)
Tamp more gravel around the base course and behind the step blocks as you build. Then level and glue the third course of step blocks (second exposed layer) 12 in. back from the front of the first step (Photo 6). Be sure to stagger the vertical joints. The top of this block will be the path height when you lay the pavers later.
Now finish the flanking walls (Photo 7). Cut and glue on cap blocks as necessary to make a tight joint at the corners of the lower wall (Figure A). The upper retaining wall will cross over the step blocks and continue on along the path.
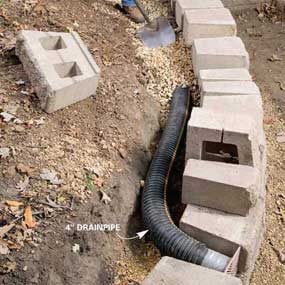
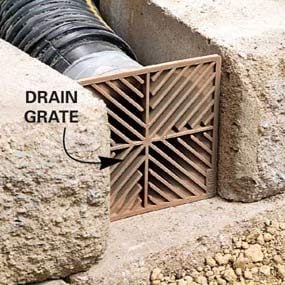
With the steps complete, dig and continue the base courses for both walls and assemble them (Figure B). This base course will determine the elevation of the base course for the two steps up to the patio and for other stairs at the other end of our path (not shown). For the best appearance, be sure to mix block sizes (Photo 8). Your order will include an assortment of standard sizes, but you’ll probably have to cut some to fit. If your wall is more than 2 ft. high, add a perforated drainpipe behind the second (first exposed) course (Photo 9). This will ease water pressure behind the wall that could otherwise overturn it. Embed the pipe in gravel and run the pipe out to the end of the wall or poke it through the wall, using a plastic grate to keep out critters (Photo 9).
Handling a Cutoff Saw
A cutoff saw has a 12-in. or 14-in. diamond blade that’ll cut through concrete blocks and pavers almost as easily as a circular saw through wood. You can rent either gas-powered or electric models. Dry-cutting concrete raises a huge cloud of dust, so, if possible, rent a cutoff saw that has a water spray system, as shown. You simply connect it to your garden hose.
To cut a block, fully support it on a soft surface. The ground works fine, as does a sheet of plywood. Then start the saw and lay the blade on your cutting line. The weight of the saw alone will push the blade through; you don’t have to add extra pressure. But brace one arm against your leg to keep the blade steady and on the line.
Cutting is relatively safe because the blade doesn’t have teeth. Instead, it grinds through the stone. But keep the blade steady and perfectly vertical as you cut. Wavering or twisting the saw will pinch the blade in the cut, causing it to grab the block and shoot it back at you.
Cutting is noisy. Wear hearing protection, as well as goggles and a dust mask to protect your face from flying chips and dust. And keep your feet well away from the blade. If necessary, weigh down pavers with a block to keep them steady while you’re cutting.
Step 6: Excavate the path and lay the pavers

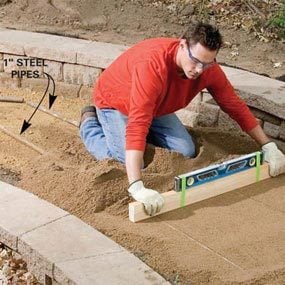
Photo 10: Roughly level the path
Dig out the path area 9 in. below the top step, lay woven fabric and fill with two 3-in. layers of gravel, tamping between layers with a plate compactor. Roughly level the second layer before compacting.
With the walls and steps in place, you can go ahead and build the path. The upper wall becomes the border for one side of the path, and the step blocks form the ends.
Begin by digging out the path area about 9 in. below the future path height (Figure B). The woven fabric you add next helps stabilize the gravel base over clay and other soils. Use a plate compactor to tamp the gravel; the area is too large to do a good job with a hand tamper. While it takes two to lift and move the compactor, once you start it, you’ll quickly find it easy to control by simply tipping the handle slightly one direction or another. The gravel is compact when the compactor “bounces” rather than “thumps.” If you dig the base for the paths and the patio, you can add gravel and tamp the whole thing in about two hours. You’ll also use it to tamp down the pavers.
Before compacting the second 3 in. layer of gravel, roughly flatten and level it (Photo 10). Use the level base course as a guide and slope the gravel to the low side about 3/4 in. This will build a slight slope into the path for drainage. When compacted, the gravel should be about 3 in. below the top of the steps.
You’ll have to buy a pair of 10-ft.-long, 1-in. outer-diameter steel pipes in order to lay a nice, even sand bed for the pavers. Rake the sand back with a 2×4, maintaining an even slope (Photo 11). Take care not to step in the sand or compress it. Use sand to feather the slight slope in the gravel to meet the level steps evenly. Check the sand height against the top step by laying a paver on it. The paver should sit about 1/4 in. above the step. It’ll tamp down later.
Laying the pavers is quick work. Simply start from one end and follow the upper wall (Photo 12). You’ll have to cut the pavers at the beginning and occasionally later to stagger the joints from one row to the next. Simply leave a gap for now and cut pavers to fit all at once later. Once they’re set, you can kneel on top of the pavers to reach others. Snug them tightly together; most have self-spacing nubs. The open path side allows you to lay the last row of pavers without cutting them. Be sure to slice the sand away from the edge with your trowel so you can shove the plastic edging tightly against the pavers and nail it to the packed gravel (Figure B). If you leave sand under it, the edging will loosen. To finish, sweep dry sand into the paver joints and tamp with the plate compactor.
Figure B: Paver Path Details
Slope and tamp the gravel and sand carefully so that water will drain away.
Step 7: Planning a patio and a freestanding wall
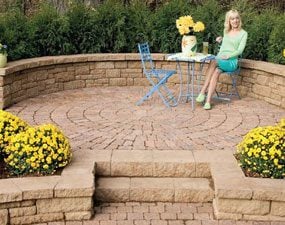
We added a circular patio partially surrounded by a freestanding wall at sitting height to our landscaping plan. We recommend that you buy a circular patio “package,” rather than try to lay one out yourself.
First decide on the patio size. Mark the rough outline with a garden hose, just as you did with the path. Make it at least 14 ft. in diameter (7-ft. radius) if you want to include a table or a fire pan. Then the landscape supplier will help you choose a freestanding wall system that can conform to the patio’s radius.
Freestanding wall blocks have two decorative faces (front and back). Since they stack directly on top of each other, you simply glue them together with polyurethane adhesive. The dealer will supply you with the correct number and variety of blocks you need for the size of wall you want.
The assembly techniques are the same as for the retaining walls and the paver path. Check out more garden path ideas for inspiration, too.
Required Tools for this How to Build a Stone Path and Steps Project
Have the necessary tools for this DIY project lined up before you start—you’ll save time and frustration.
- Dust mask
- Level
- Line level
- Safety glasses
- Spade
- Wheelbarrow
Required Materials for this How to Build a Stone Path and Steps Project
Avoid last-minute shopping trips by having all your materials ready ahead of time. Here’s a list.
- Cap blocks
- Corner blocks
- Gravel
- Landscape fabric
- Pavers
- Polyurethane adhesive
- Retaining wall block
- Sand
- Stair blocks
- Wall blocks
