


Taping Drywall Tips: How to Tape Drywall Joints
Updated: Aug. 25, 2023
Taping drywall can be a daunting task if you don't know the correct techniques. Get the tape coat just right and you're sure to have smooth drywall joints
Introduction
Improve your drywall taping skills and increase your speed with this drywall taping tutorial, which will help you achieve invisible joints and perfectly smooth walls.Tools Required
- Mud pan
- Taping knife
- Utility knife
Materials Required
- Drywall tape
- Setting-type joint compound
Properly taping drywall is a fine art but fortunately, you don’t need to be naturally gifted to get the hang of it. These tips and step-by-step tricks of the trade will help you achieve invisible seams and smooth walls.
Video: How to Tape Drywall
Project step-by-step (10)
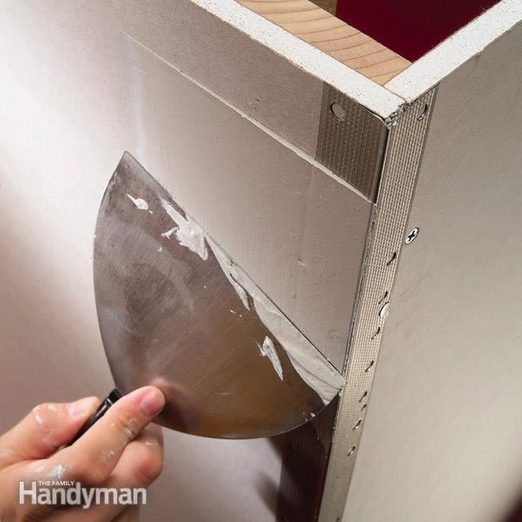
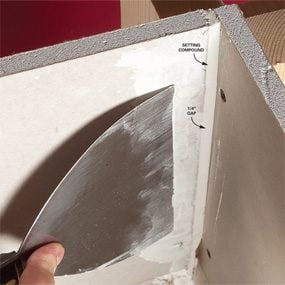
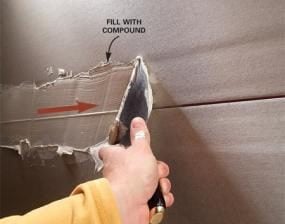
Fill Wide Gaps with Setting-Type Compound
- Mix the powder setting compound with water in your mud pan to a paste consistency.
- Press the compound into gaps, especially those wider than about 1/4 inch.
- Keep the fill level even with, or slightly below, the surrounding surface.
- Pro tip: Don’t overfill. Keep the fill flush with the drywall surface.
- Pro tip: Work quickly, because the water activates a catalyst that causes the compound to harden. Setting times vary, depending upon which mix you buy. Start with a 90- minute setting compound to give yourself plenty of working time so it doesn’t harden in your pan.
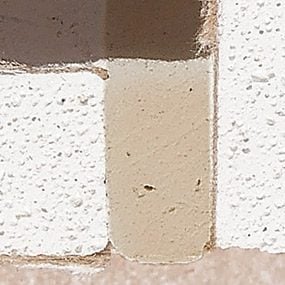
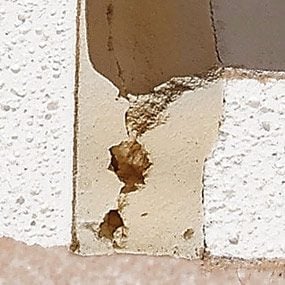
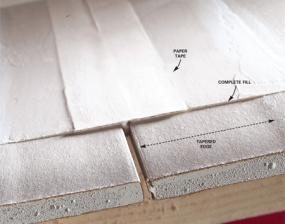
Setting Compound vs. Regular Compound
When dry and hard, setting compound (top photo) completely fills the void, preparing the joint for the tape and next coat. Setting-type compound comes in sacks with various hardening rates printed on the bags—20, 45- or 90-minutes. Buy ‘lightweight’ setting-type compound, because it’s sandable in case you overfill.
Regular compound (bottom photo) shrinks as it dries and results in a weak joint that you have to refill. It also takes hours to dry and harden.
Spread the Compound Over Joints
- Spread enough setting-type compound to fill the joint pocket.
- Pro tip: Tapered drywall joints have special edges that provide a pocket for joint compound and tape. They’re deceptively easy to fill because there’s plenty of space for both tape and “mud.” However, the trick here is to completely fill the joint, flush with the surrounding surface, on your first coat.
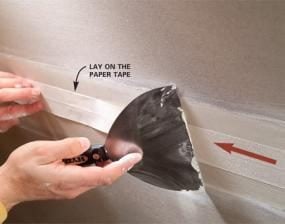
Lay on the Tape
- Lay on the tape and embed it in the compound with a stroke of the taping knife.
- Spread a thin coat of mud over the top of the tape, making light strokes with your knife.
- Pro tip: Pressing too hard will flex the blade and depress the compound, leaving you with more filling to do with the next coat.
- Note: Properly applied tape (bottom photo) is embedded in the setting compound, which completely fills the tapered drywall edges, making the wall flat.
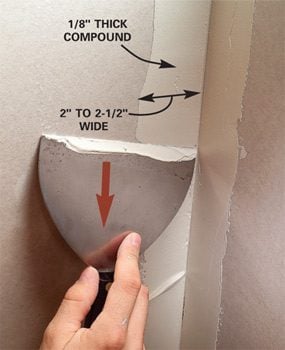
Mud and Tape Drywall Corners
- Lay a ribbon of mud about 1/8 inch thick and 2 inches wide along each side of the corner.
- Sharply crease the paper tape and tuck it into the corner.
- Note: The crease stiffens the tape and helps keep the corner straight and crisp.
- Quickly and lightly stroke your knife over both sides of the tape to position it exactly in the corner.
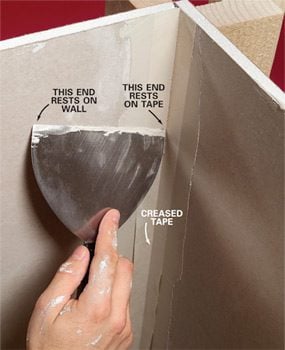
Bridge from Corner to Wall
- Create a smooth, crisp joint by resting one end of the taping knife on the tape and the other on the wall.
- Stroke down to embed the tape.
- Note: Some mud will squeeze out, but leaving about 1/16 inch under the tape will do. You can leave an irregular mud edge at this stage. It’s easy to fill and smooth during the second coat.
- Pro Tip: Hold your knife at a slight angle to the adjacent wall (not square to it) so you don’t gouge the mud on it.
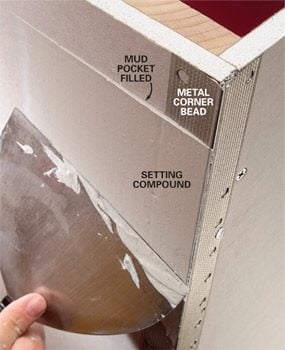
Fill Outside Corners
- Lay on plenty of mud to completely fill corner bead pockets.
- Drag your 6-inch knife along the bead on one side and the drywall on the other.
- Pro tip: Use light pressure; a heavy hand here will squeeze out the mud, leaving a hollow that’ll need more filling later.
OOOPS!
The setting compound suddenly hardened! If you don’t clean your pan completely after using setting compound, the leftover compound will catalyze the new batch and it’ll harden much more quickly. You’ll be amazed and amused— the first time.
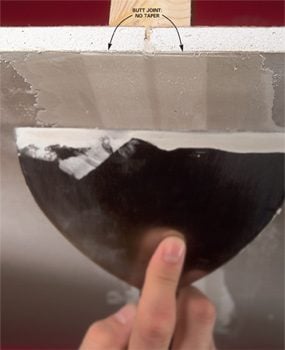
Tape Butt Joints
- Since butt joints don’t have tapered edges, take the following steps to avoid a large bump in the wall.
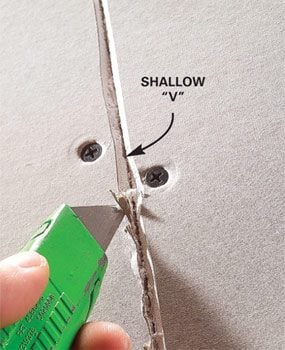
Cut Away Loose Paper
- Trim away loose drywall paper to prevent lumps and bubbling under the tape.
- Cut on both sides of the joint, to create a shallow V-shaped channel.
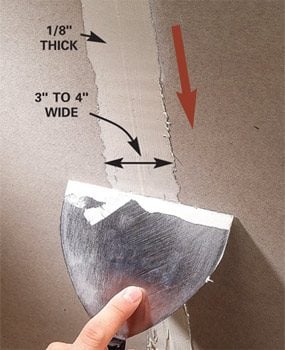
Apply Compound
- Apply about a 4-inch wide ribbon of mud about 1/8-inch thick over the joint.
- Pro tip: Make sure to completely fill the “V”.
Tape and Smooth
- Lay on the tape and embed it with a light stroke of your knife, leaving no more than about 1/16 inch of mud under the tape.
- Apply a thin second layer of mud over the tape.
- Lightly stroke down each side to taper the extra mud away from the center.
- Once the compound dries, taper the edges out a foot or more with later coats to hide the bump left by the tape.
Drywall Tape Repair
One common mistake is to press too hard and squeeze all the mud from under the tape. Then the tape will lift (bubble) when it dries. You can cut out occasional bubbles with a utility knife and re-mud. But if whole sections become loose, you have to scrape off the old tape and retape.