


Our pro taper shares his three-day, step-by-step taping routine. He gave us some great tips that will help you end up with smooth walls and crisp corners.
Create Smooth Walls: A Mudslinger’s Guide
1
/
15
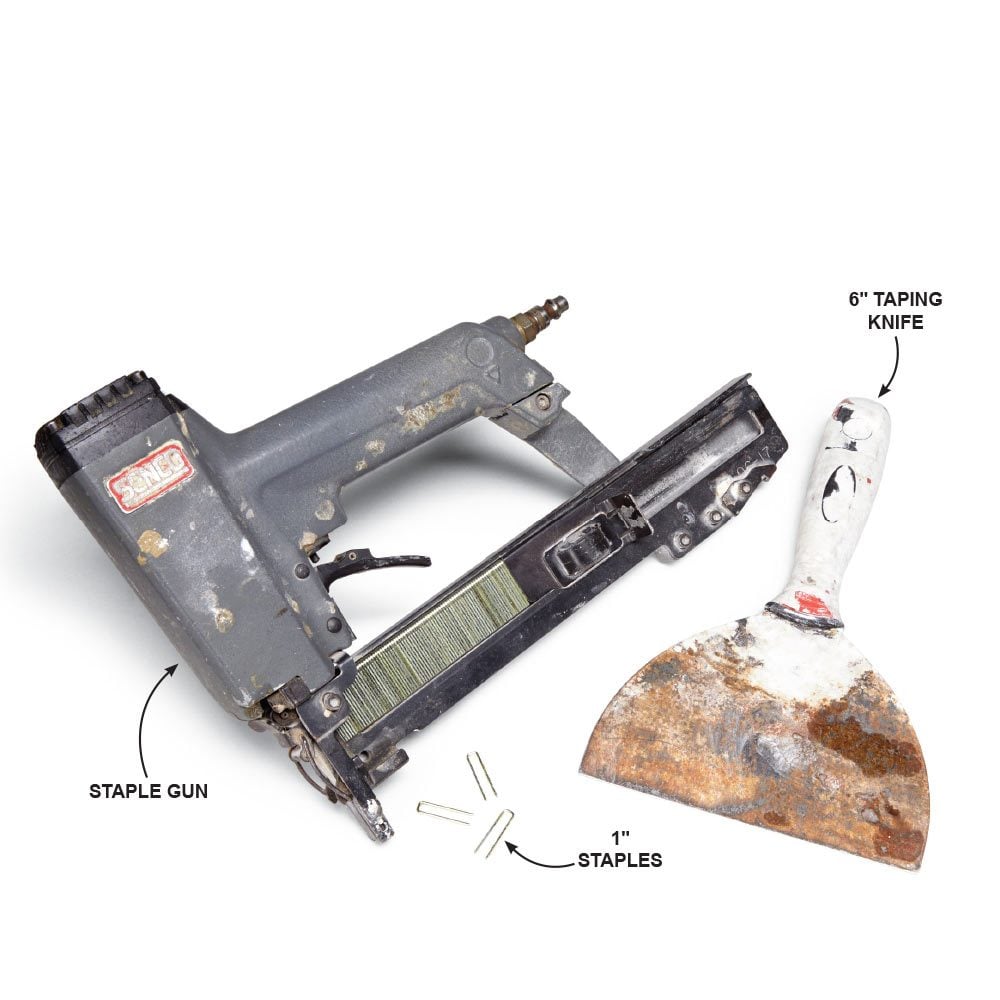
Tools for Drywall Taping
Day 1
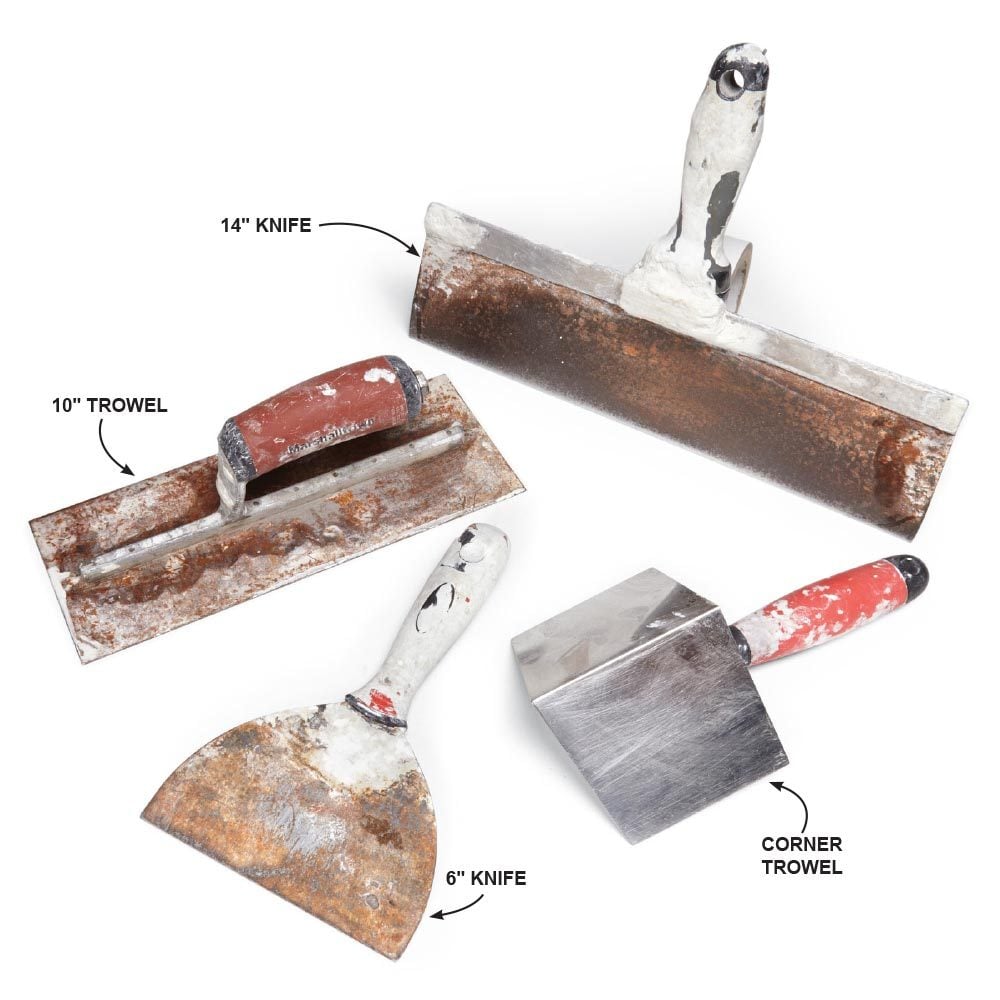
On the first day of taping and mudding drywall, have these tools on hand:
2
/
15
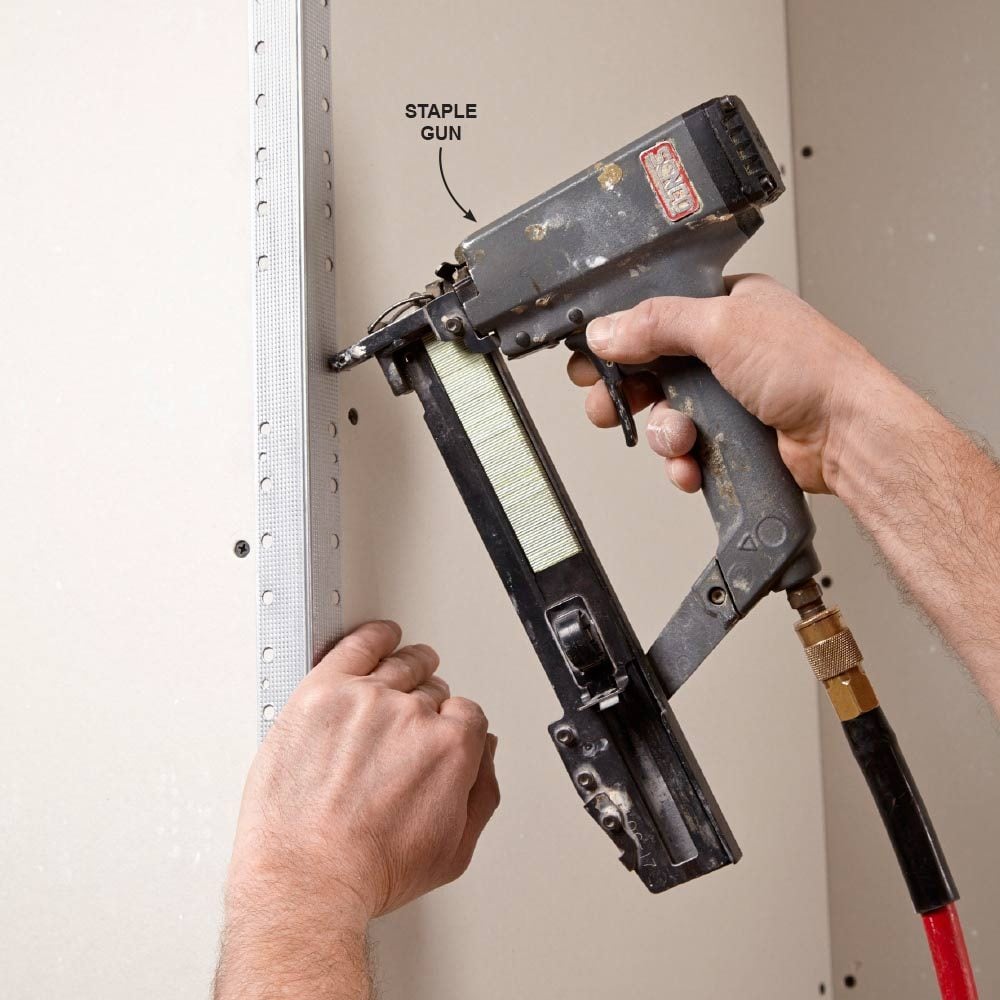
Tack on Outside Corner Bead
Our pro installs the outside corner beads with a staple gun that shoots 1-inch, 18-gauge staples with a 1/4-inch crown. Drywall nails will also do the job, but using a staple gun frees up one hand to get the bead exactly where you want it before tacking it into place. Outside corners take a lot of abuse, so make sure the corner beads are securely fastened to the framing. Nail or staple each side of the bead every 10 to 12 inches.
3
/
15
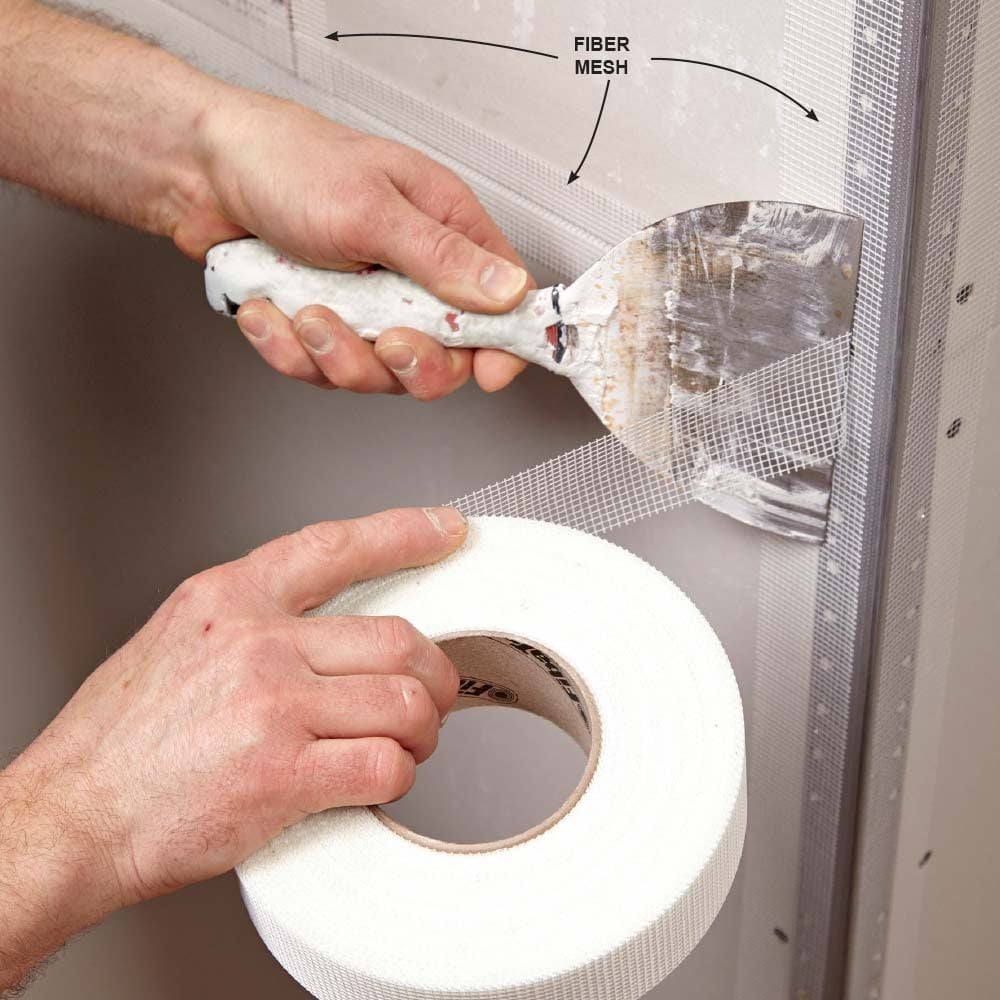
How to Roll Out Fiber Mesh
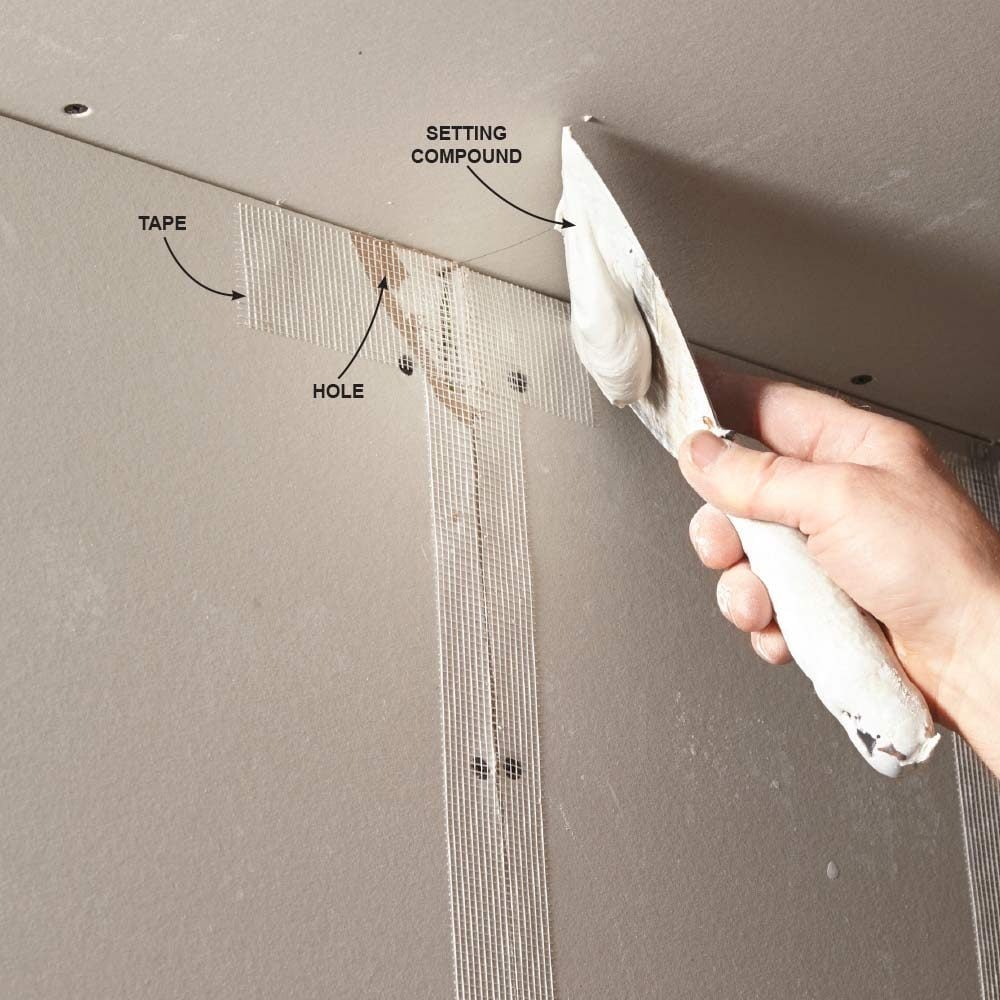
Installing fiber mesh saves time because it’s self-adhering. And unlike paper tape, fiber mesh allows mud to pass right through it, so you don’t need to fill cracks and gaps in the drywall before you install the tape. All you need to do is roll it onto the wall and trim it off with a 6-inch taping knife. Tape over all the joints, large gaps, holes larger than 1/8 inch, and both sides of the outside corner beads. On inside corners, only areas with a gap larger than 1/8 inch need mesh. The rest of the inside corners will get covered on Day 2 with paper tape.
4
/
15
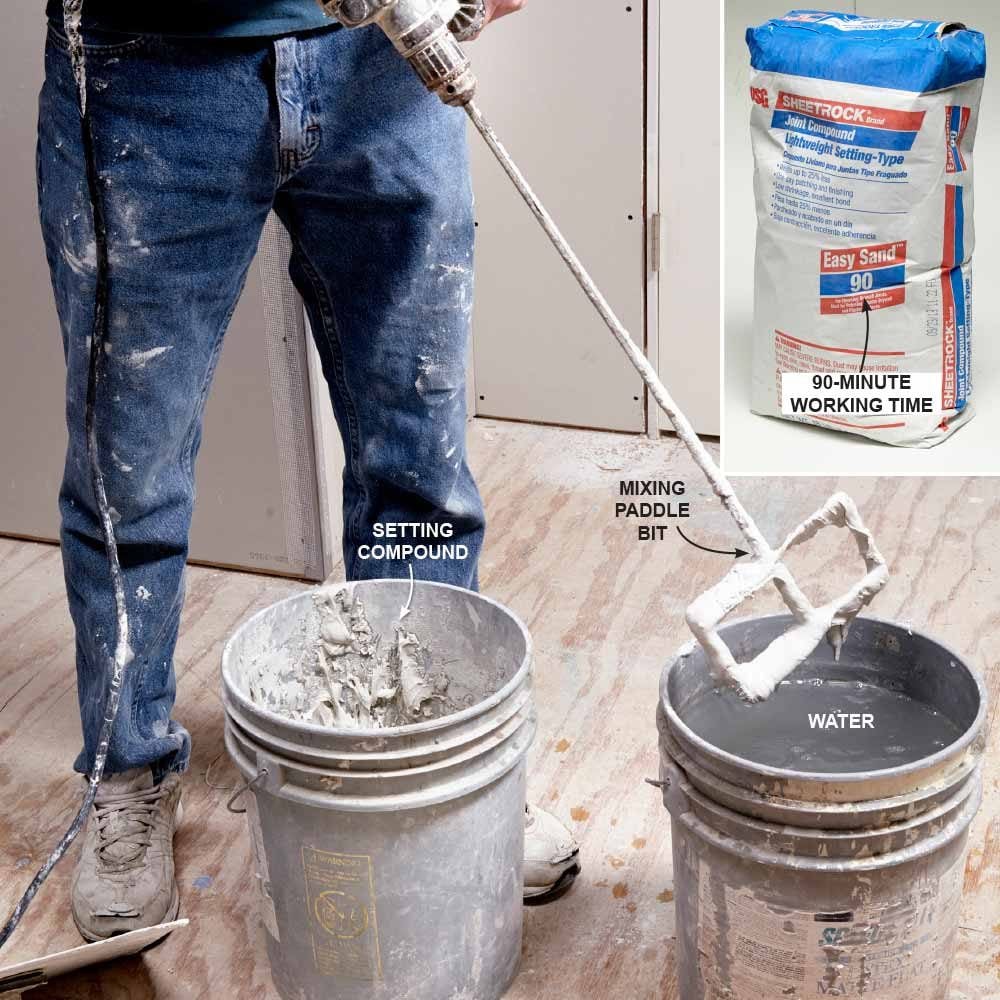
Drywall Compound
Setting compound shrinks less than regular joint compound, and it dries rock hard. This makes it ideal for day one, which is all about filling the big holes and gaps. But setting compound doesn’t sand nearly as easily as joint compound, so thinner coats are better. It comes in powder form, and the number on the bag indicates how many minutes it takes to set up. The bigger the job, the longer the working time you’ll want. Our pro mixes his with a mixing paddle bit in a 1/2-inch. drill. He keeps a bucket of water standing by so he can clean the paddle right away. Setting compound sets up like concrete—even under water! Here’s what you should do with your leftover drywall compound.
5
/
15
How to Tape Drywall
Taping a drywall can be tricky. Cover all the tape with setting compound using a 6-inch taping knife. Apply enough mud to fill the gaps under the tape, but remember, setting compound is much harder than the two coats of joint compound you’re going to apply the next two days, so you want to end up with just a thin coat covering the tape. If you sand through the joint compound into the setting compound, the result could be noticeably different textures on the two surfaces.
6
/
15
Tools for Drywall Taping
Day 2
On the second day of taping and mudding drywall, have these tools on hand:
7
/
15

Coat Butt Joints With a Knife
Use a lightweight joint compound on Day 2. Knock off any crumbs or ridges left over from the day before with a clean 6-inch taping knife—our pro always has one in his back pocket. Spread a thin coat of joint compound on the butt joints with a 14-inch taping knife.
8
/
15
How to Mud Drywall
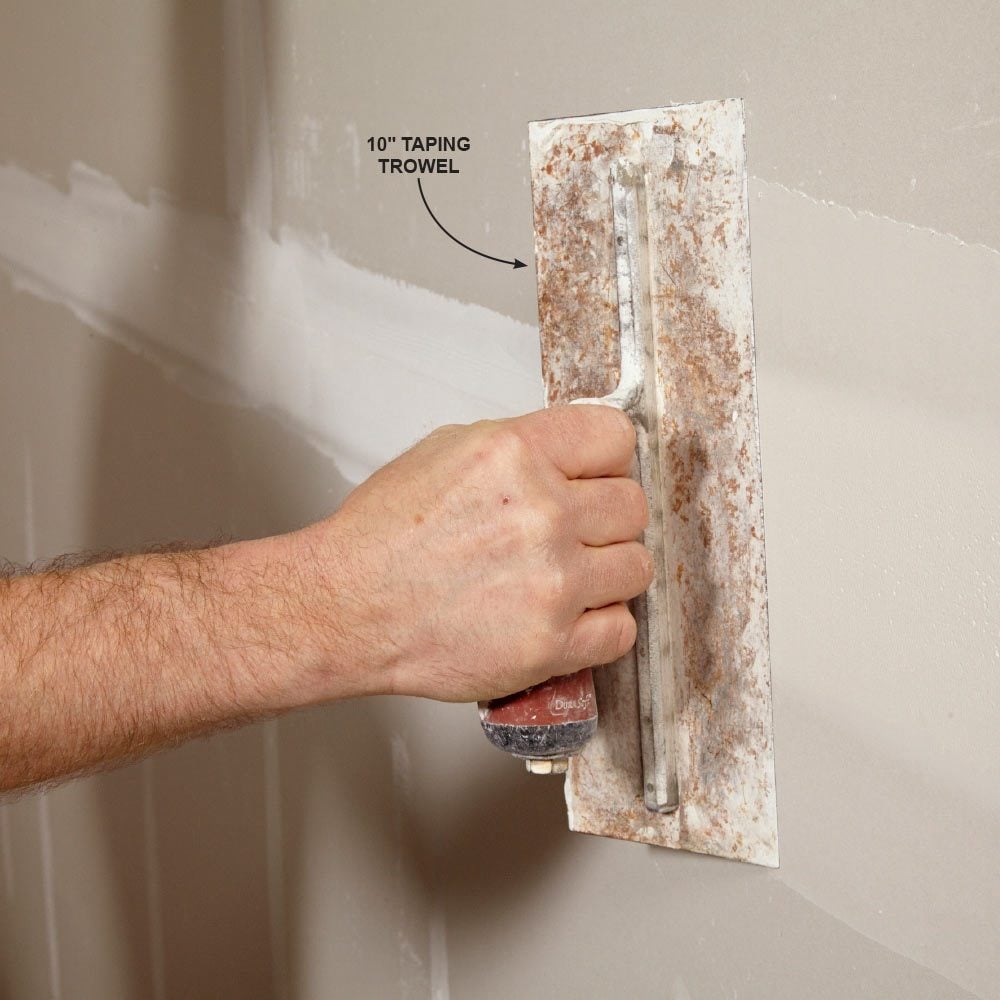
Each of the long sides of drywall is tapered to allow room for the mud. The goal is to fill this recessed area with mud so the wall ends up smooth. Taping knives are flat but flexible. If you press one too hard against a tapered joint in the wall, it could bend into the recess, and you could squeeze too much mud out, creating a trough. Taping trowels have a little bend in them, so when you press them against the wall, they flatten out to form a straight bridge across the tapered joint. Our pro uses a 10-inch trowel on Day 2. Be careful when you buy one: A taping trowel might look like a concrete trowel but it’s not—a concrete trowel is bent in the opposite direction.
9
/
15
Tape the Inside Corners
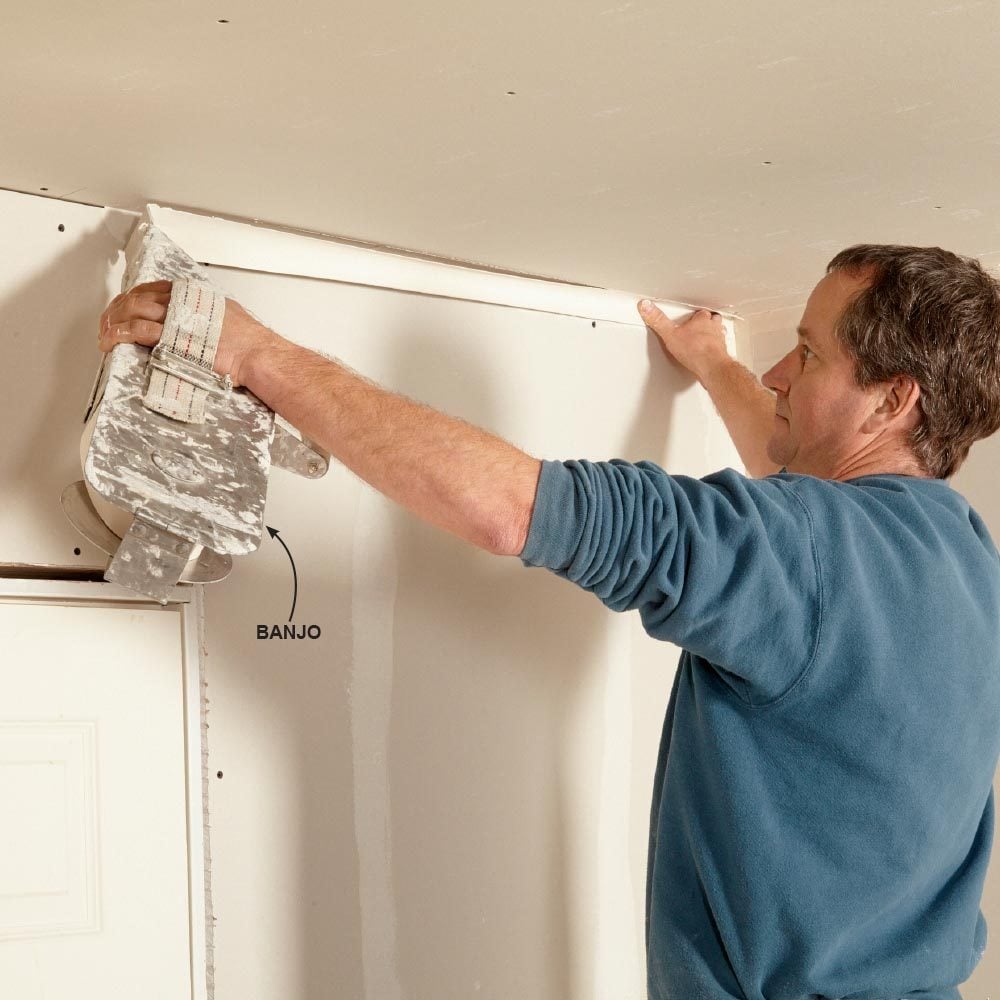
Paper tape is more flexible than fiber mesh and has a crease in it, which makes it easier to push into the corners. Our pro uses a banjo to install paper tape on all the inside corners. He holds the tape secure with one hand as he moves the banjo along the corner. Once a long section of tape is pulled out, he pushes it into the corner with a corner trowel.
If you don’t own a banjo, lay down a thin coat of mud and push the tape into the mud. Make sure there’s mud under every square inch of the tape or you’ll end up with bubbles. Banjos do a great job of applying the proper amount of mud to the tape, but regular joint compound will have to be watered down when you’re using one. This will require about 1 cup of water for every gallon of mud, but it depends on the moisture content of the mud you’re working with, so just keep adding a little water until it’s roughly the consistency of yogurt.
10
/
15

Top-coat the Corner Tape
A banjo applies mud only on the bottom of the tape, so once the tape is laid down, it will need to be top-coated. Our pro uses a corner trowel. Corner trowels can be tricky to work with—the secret (as with much of taping) is to not lay down too much mud. This is especially true where inside corners meet the ceiling and floor. Too much mud will round out the corners, making it difficult to install trim and moldings.
Start at the top of an inside corner an inch or so down from the ceiling because a lot of mud will ooze out the top side of the trowel when you first press it to the walls. Then go back for another pass and smooth out the excess left behind. Once the tape has been covered, go back with the 6-inch knife and clean up each side of the tape. This step takes skill and practice. An easier (but more time-consuming) method is to top-coat one side of the tape, and do the other side after the first side has dried.
11
/
15
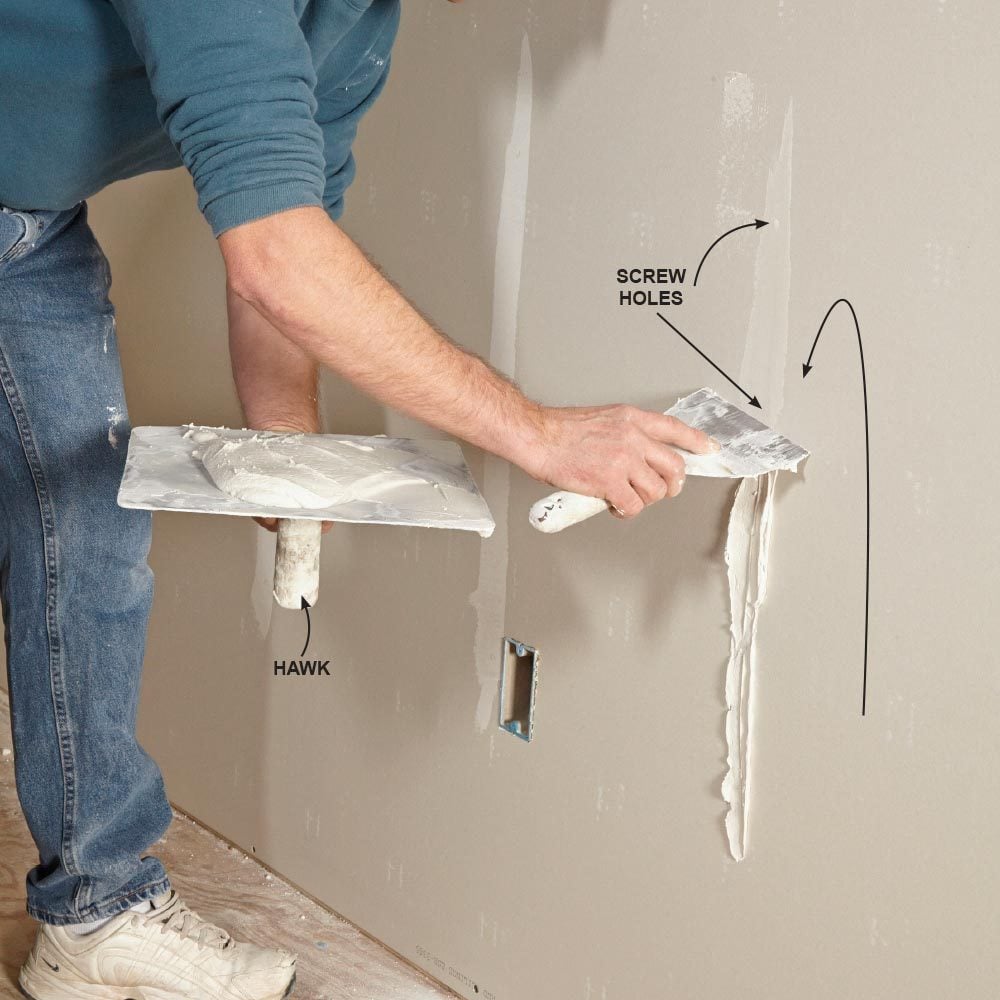
Fill the Screw Holes
Make two passes over every screw hole with a 6-inch taping knife. Hit all the screws that line up vertically in the field of each panel of drywall at the same time. To eliminate voids, each pass should come from a different direction. One efficient method is to lay out a thick coat in an upward motion, and then come back down, scraping off the excess as you go. Don’t forget about the screws on the ceiling. Save yourself a lot of walking around by covering all the joints, corners and screw holes in one area of a room at a time. It’s time to set up some fans and call it a day.
12
/
15
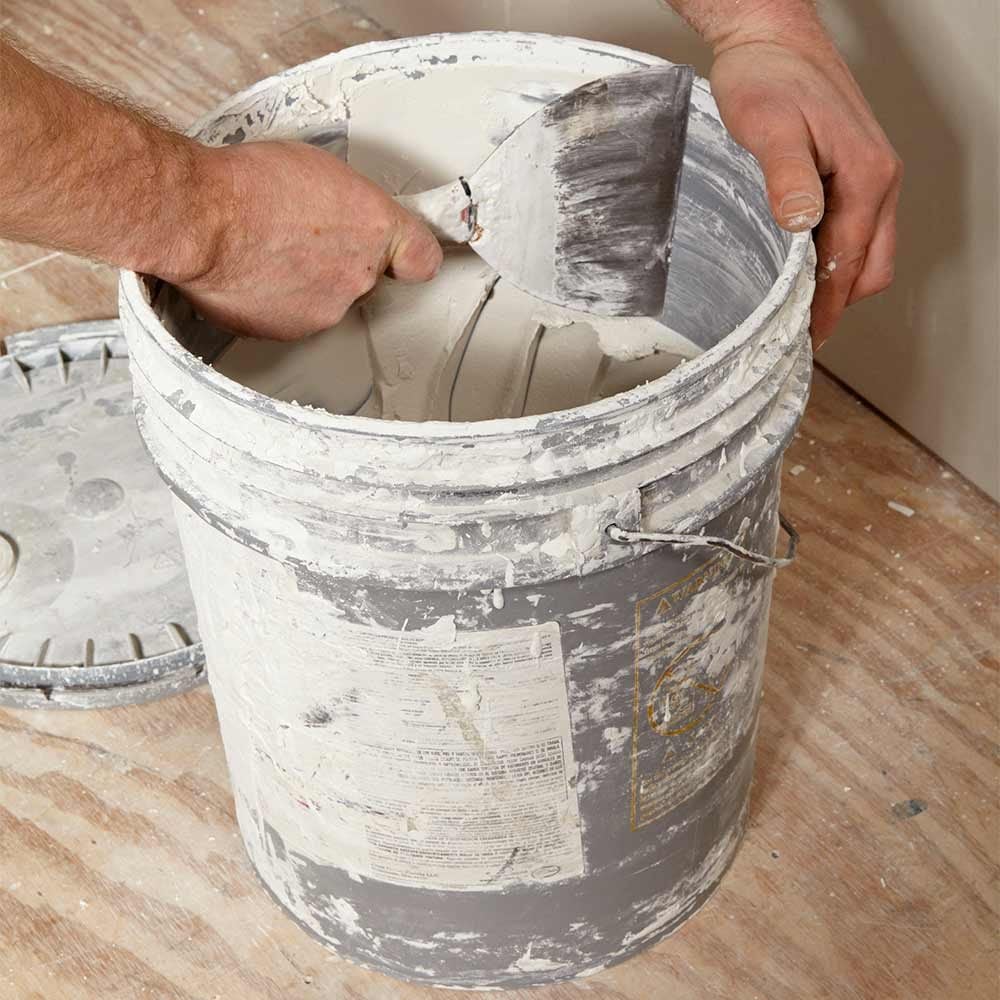
Mud Management
Our pro’s tools are caked with mud, but he works mostly on new homes where water is usually unavailable. He also burns through most of his tools in months, not years, so he focuses only on keeping the edges clean—a must for smooth mud lines. Here are some tips for managing your mud:
- Scrape and wipe out the bucket sides to remove mud before it dries and crumbles into the good mud.
- Clean lids after opening new buckets for the same reason.
- Never return unused mud to the bucket. Throw it away.
- Keep a wet rag or sponge on hand to clean tools and buckets with.
- Add a little water to the top of your mud between jobs to keep a crust from forming.
13
/
15

Tools for Drywall Taping
Day 3
On the third day of taping and mudding drywall, have these tools on hand:
14
/
15
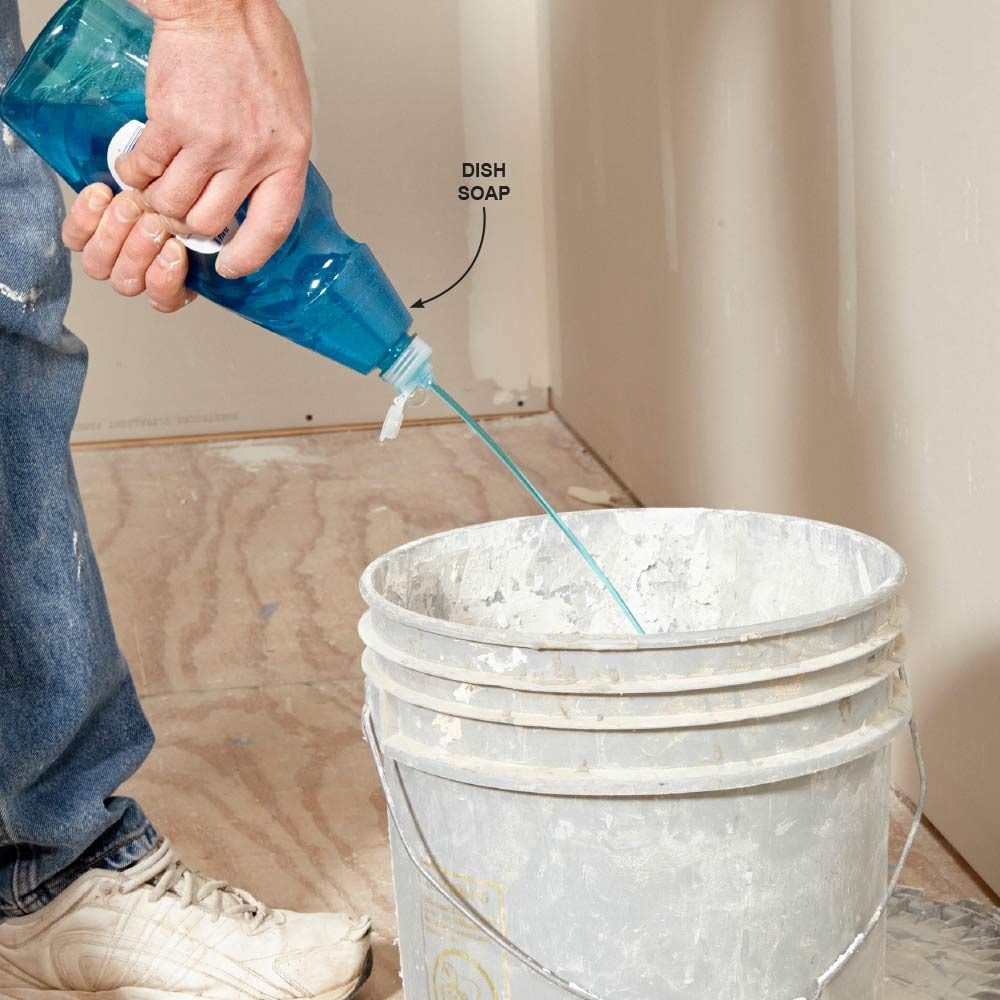
Make Your Own Topping Compound
The same lightweight joint compound you used on Day 2 will also work for your final coat on Day 3, but topping compound works better. Topping compound is easier to sand and doesn’t leave behind as many tiny air pockets. You could buy a bucket of topping compound or you could make your own. Our pro pours in about 1/2 cup of dish soap (any brand will do) into a 4-1/2 gallon pail of lightweight joint compound. He’s found that this concoction works every bit as well and is cheaper and a lot more convenient.
15
/
15
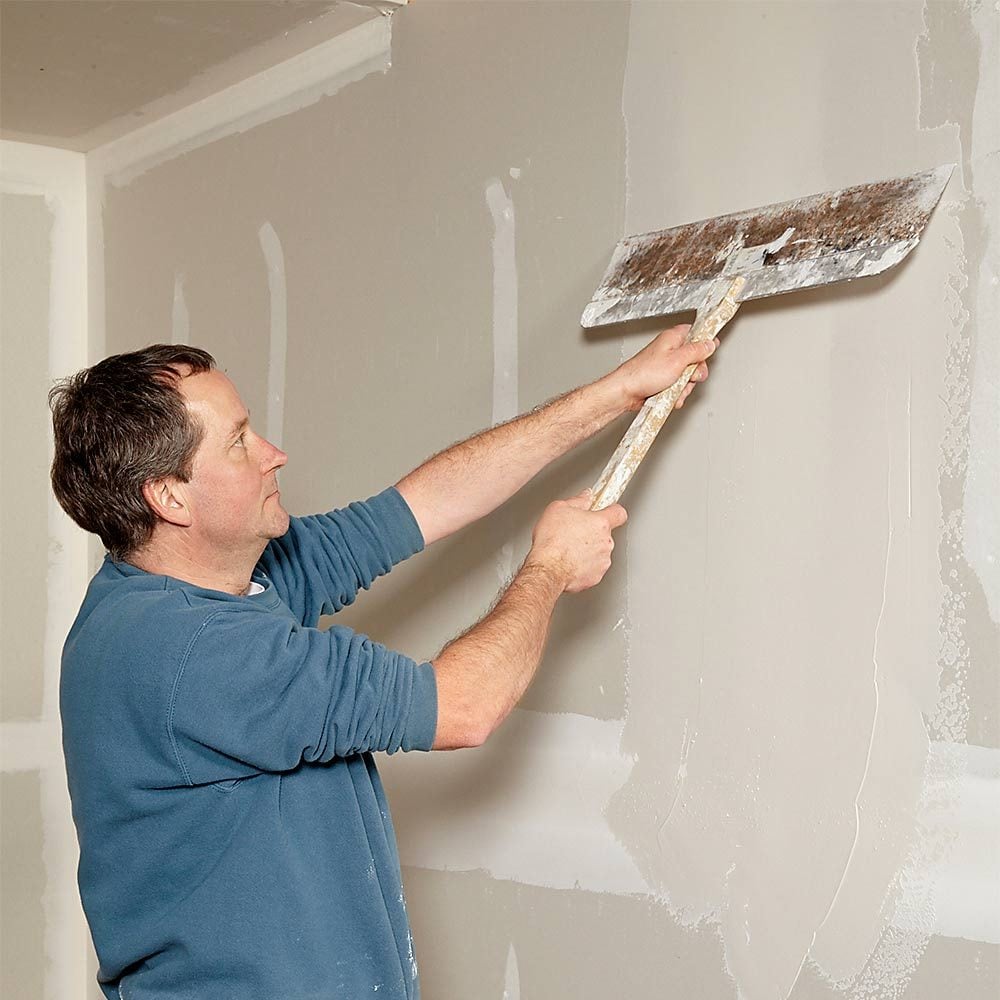
How to Finish Drywall
Now apply the final coat on the inside corners the same way you did on Day 2, laying down the mud with a corner trowel and smoothing each side with a 6-inch knife. Cover all the recessed joints with a 12-inch trowel (2 inches larger than the one used on Day 2). The farther the mud is feathered out, the less noticeable the joint will be, especially on butt joints. That’s why after our expert lays down a layer of mud on the butt joints with his 14-inch knife, he immediately follows with a monster 2-foot knife—no need to add more mud on the second pass. That’s it. You’re done. Now set up some fans so you can move on to sanding.