


Homeowner’s Guide to Drywall

Updated: Mar. 13, 2024

A drywall expert reveals some of his best tips and tricks so you can handle the job like a pro.
On This Page
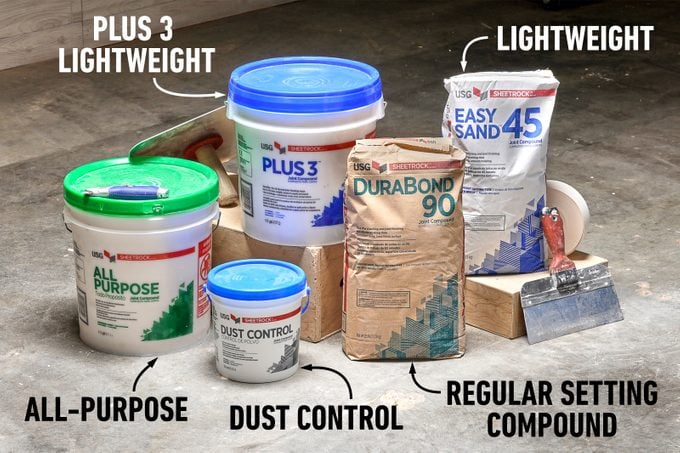
Understanding Joint Compound
Drying type
Most folks are familiar with drying compounds. They come in a bucket or a box, and they dry as the water content evaporates.
- All-purpose compound
- The strongest type of drying compound, with the highest glue content.
- Use it as a first coat to embed paper tape.
- Dust control compound
- A relative newcomer, this product is aimed at the DIYer.
- Perfect for repairs, it greatly reduces the mess involved with sanding drywall compound.
- Plus 3 lightweight compound
- Use this all-purpose joint compound for second coats and as a topping compound. It has good open time and sands easily.
Setting type
Think of setting-type compounds like cement — just add water and they set. Unlike the drying type, these set through a chemical reaction. The setting times vary and are called out in the names, like DuraBond 90 or Easy Sand 45.
- Regular setting compound
- This compound dries fast and hard. It’s difficult to sand, so this is where your skill with a blade can make a big difference.
- Get it on right and leave it alone. It’s not the best choice for beginners, but skilled drywall pros appreciate the rapid drying time so they can quickly apply a second coat.
- Lightweight
- Trading a little toughness for sandability, lightweight setting compound (5) is perfect for DIYers.
Types of Drywall Sheets
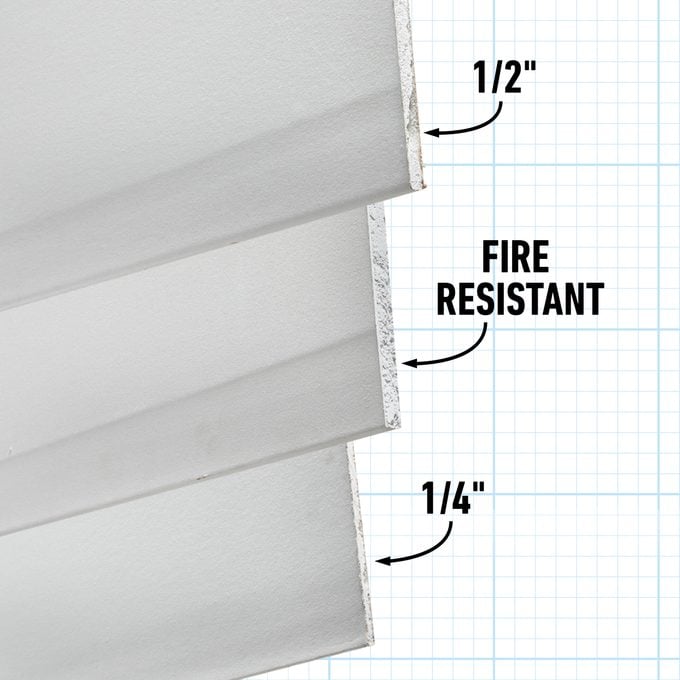
1/2-in. drywall
- Half-inch drywall is the standard thickness for most applications.
- When possible, choose lightweight or “ultralight” drywall. It’s about 25 percent lighter than standard 1/2-in. sheets, easier to handle and stiffer, too. It can even span ceiling joists 24 inches on center.
Fire-resistant sheets
- Standard gypsum board is naturally fire-resistant, but Type X is actually fire-rated. The core includes additives designed to slow the spread of fire.
- Often required on garage ceilings and walls that adjoin living areas.
1/4-in. sheets
- You won’t often need 1/4-in. drywall, but it’s great for arches and curved walls.
- Pro tip: Josh suggests skipping the screws with this thin material. Use construction adhesive instead. Tack it with a few nails until the glue sets and apply one more layer to reach 1/2-in. thickness.
The Top Tape Types
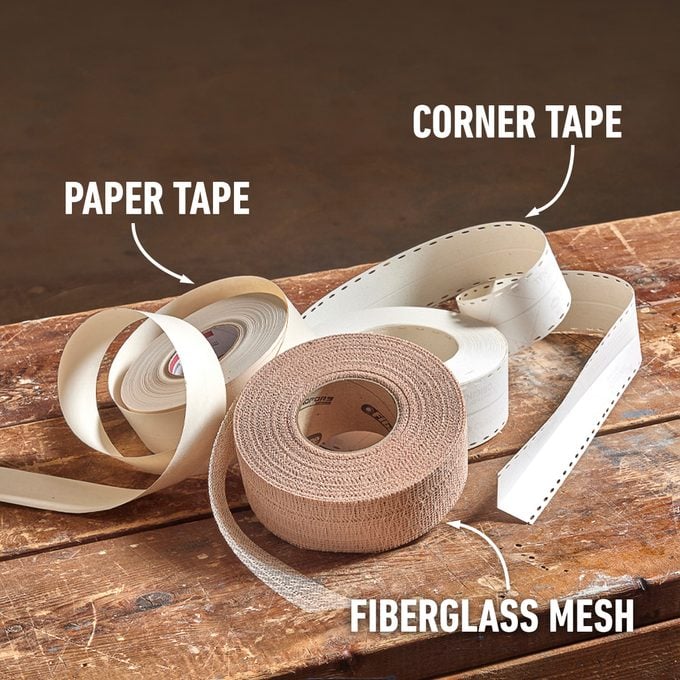
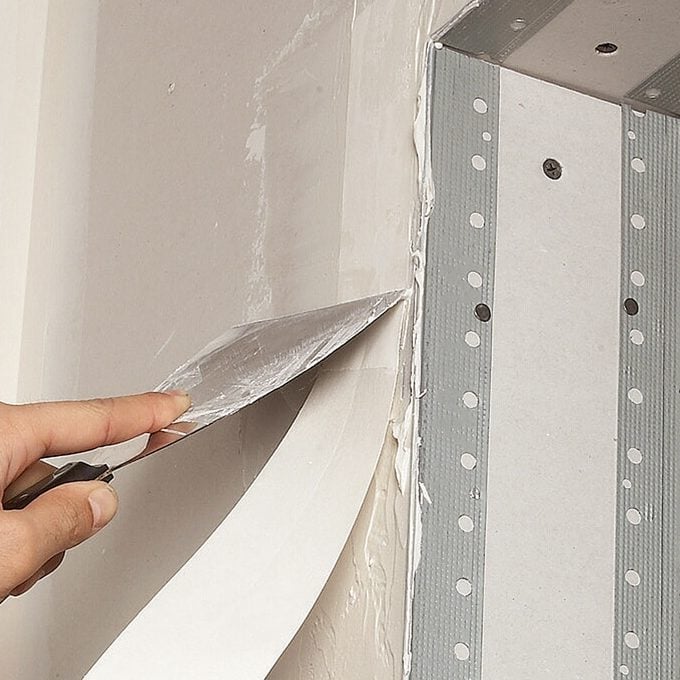
Paper tape
- Paper drywall tape is the most common type, though it’s not the easiest to use. You’ll need practice to become proficient in how to tape a drywall.
- Paper tape does offer advantages: It’s inexpensive; it’s actually stronger than fiberglass mesh; and most paper tape comes creased so you can easily bend it into a corner.
- Some paper tapes have micro-perforations to help prevent blistering.
Fiberglass mesh
- Fiberglass mesh might be the easiest drywall tape to use. Simply stick it to the wall and trowel on your mud.
- The ease of use, however, comes with a caveat: The first coat of mud must be setting type — its higher glue content will create a strong base. Drying-type compound is prone to cracking when used as a first coat over mesh tape.
Corner tape
- Designed for inside corners and wall-to-ceiling joints, corner tape has plastic or metal strips on the back.
- It provides a stiff guide for your knife to make a straight corner joint.
Drywall Pro Tips
Bend your blade
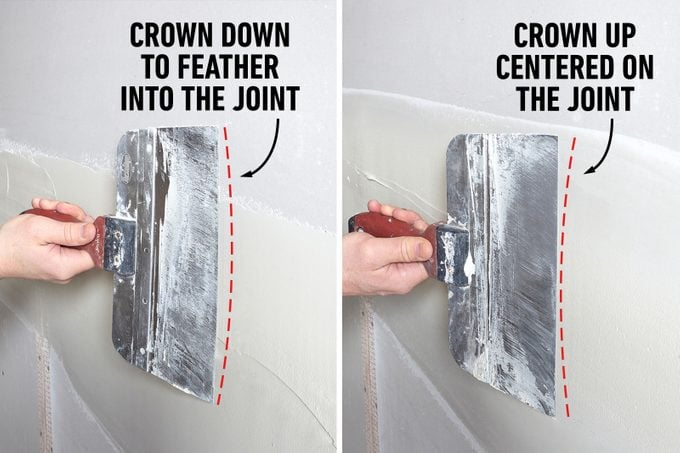
- You don’t want your blade to be perfectly flat. Bend your blade so it has a slight curve, and mark the concave side so you always know which side is which. Josh will use the convex side to feather out the edge of the joint, and the concave side to float over the joint.
Mix the compound
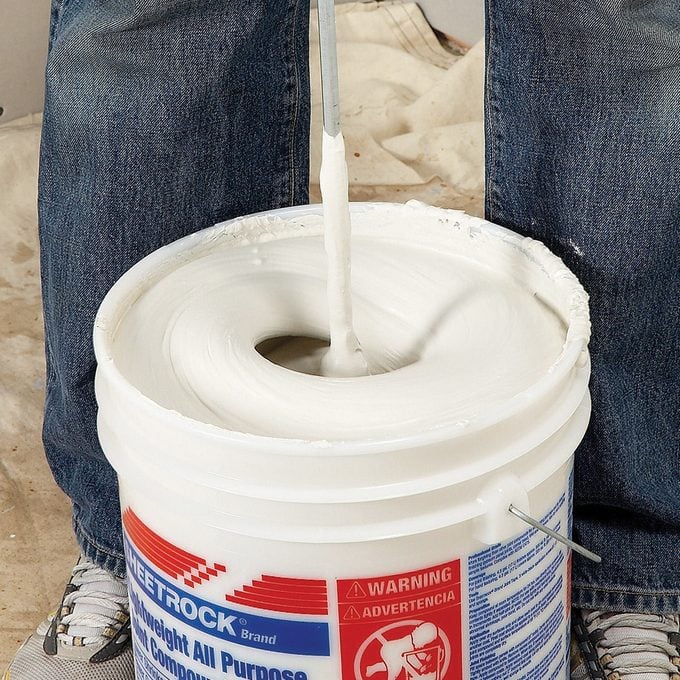
- You’ve got a new bucket of joint compound and you’re ready to start mudding, right? Wrong. Before you start, remove enough compound to make room for two to three cups of water. Mix this thoroughly using a paddle mixer and a 1/2-in. drill until you have the consistency of yogurt. Now you’re ready to go!
Check for clickers
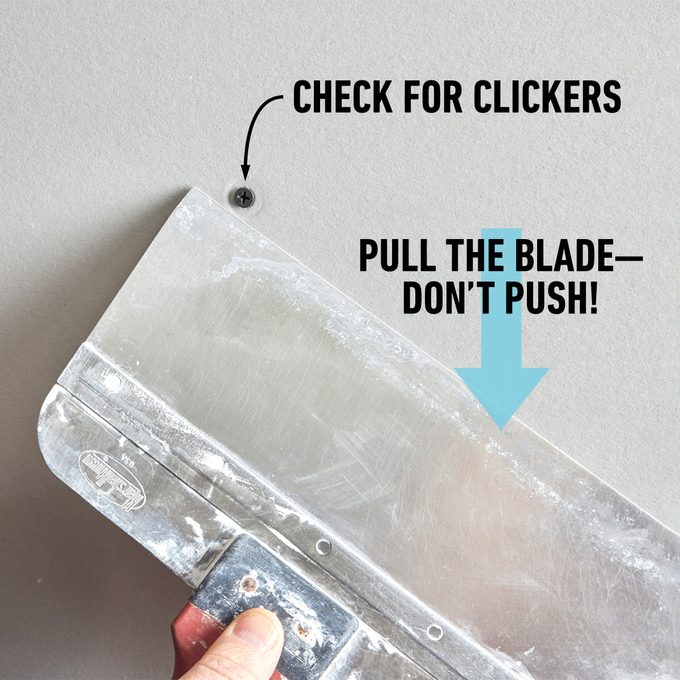
- Before spreading an ounce of mud, check your wall for “clickers.” These are the screws you didn’t sink quite deep enough. It’s best to find all of these now, before you have a hawk full of mud in one hand and a blade in the other.
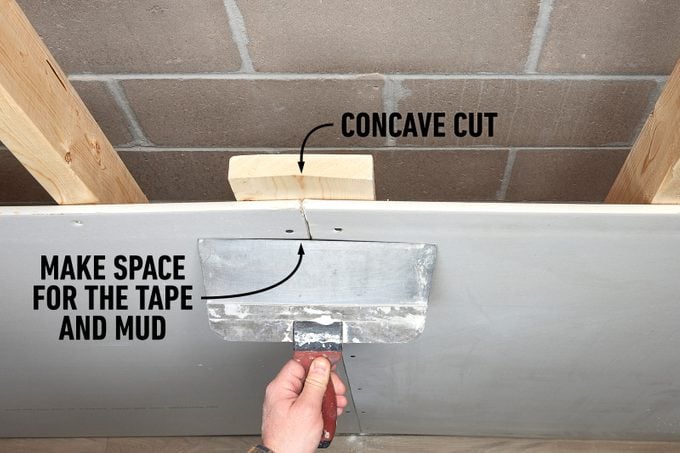
Butt joints made easy
- Drywall sheets have depressed edges that account for the thicknesses of tape and mud. When you cut a sheet, you lose that edge. On a piece of pine, Josh cuts a concave shape on one side with the table saw blade set to two degrees. This helps pull the edges of drywall in, forming a valley for tape and mud. This creates seamless joints between studs. Here’s what you need to know about these different types of drywall and what to use them for in your home.
Staple your corner bead

- Attach corner bead in a better way that’s easy, strong and won’t mess up the profile — with staples. A pneumatic stapler is faster than screws, easier than nails and much less likely to push the corner bead out of shape — something that’s easy to do with other methods.
Tape your metal corner bead
- Strengthen corners by taping your corner bead. It’ll take a little extra time but you’ll thank yourself later. A taped corner joint will last a lifetime.
Tearaway bead for exposed edges
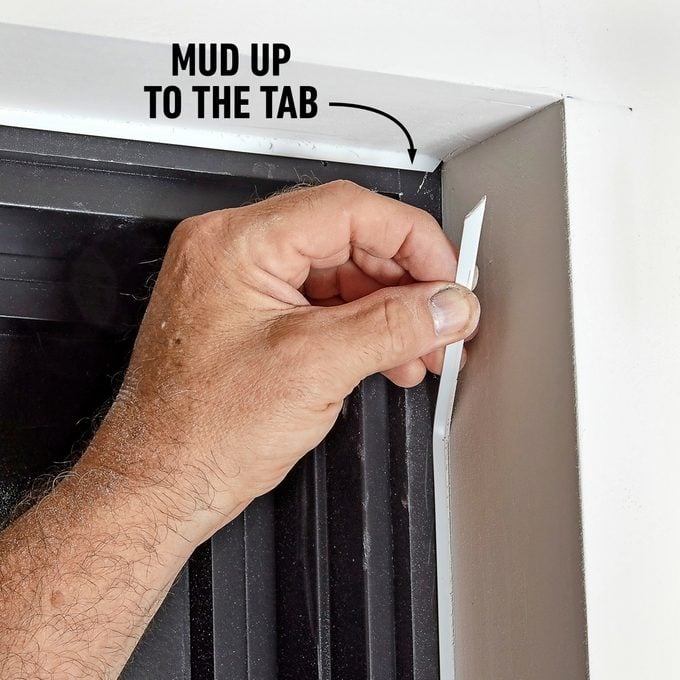
- Whenever drywall meets another surface like stone, brick or paneling, you need a way to neatly finish the edge. Tearaway bead gets you pro results with minimal effort. It attaches just like corner bead, but the compound is applied just up to the back edge. Once it dries, the tearaway strip easily pulls off, leaving a nice, finished edge.
Use the right fasteners
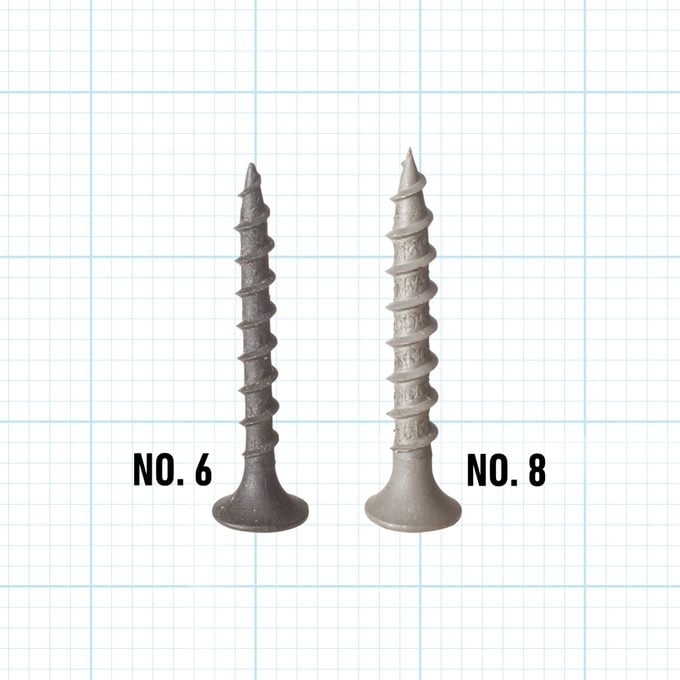
- Always use drywall screws, not nails. Drywall screws typically come in two sizes — No. 6 and No. 8. Choose the smaller No. 6 screws; they won’t blow out the edge of the drywall. Length is determined by sheet thickness plus 3/4-in. Use coarse-thread screws for wood stud walls and fine-thread for metal studs.
Josh’s Toolbox
Josh’s collection is huge. Here are some of his essential tools for doing drywall.
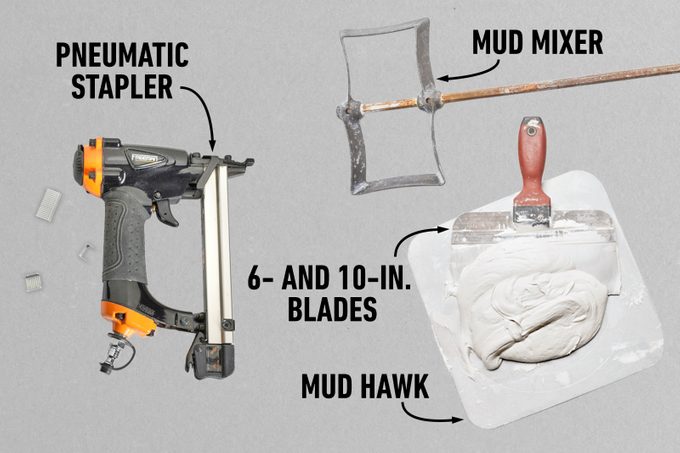
Mud mixer
- Use this and a power drill to mix compound. Find these at home centers for about $15.
Six- and 10-inch blades
- These sizes will cover most every need.
Mud hawk
- Load this with mud as you work. A 12-inch hawk will cost about $15.
Pneumatic stapler
- Attaching corner bead with a hand-powered stapler is hard work. A pneumatic stapler makes this job easy.
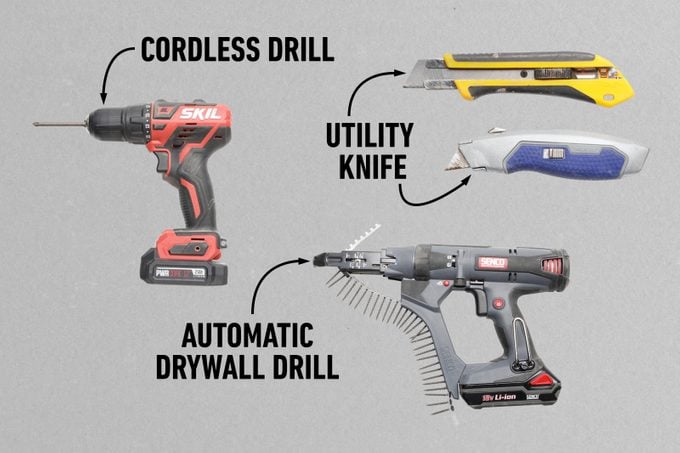
Utility knife
- Used to score gypsum board and tape alike, you can’t drywall without one!
Automatic drywall drill
- With automatic depth setting and a continuous feed of screws, an automatic drywall drill boosts your drywall game.
- Fast and accurate, this drill is often longer than a regular cordless drill so it can reach the ceiling with less effort on your part.
Cordless drill
- A lightweight cordless drill makes screwing drywall sheets much easier than by hand.

Mud mixer
- Use this with a power drill to mix compound. About $15 at home centers.
Originally Published: June 03, 2022