


How to Tape Drywall
Updated: Oct. 04, 2023
A color-coded guide to putting up flat, smooth, perfect walls.
Multiple Days
Intermediate
$101–250
Introduction
Save yourself $100s by taping your own walls. We'll show you how. This article shows you everything you need to get perfectly smooth walls, without having to worry about nail pops, cracks and bad joints later. We take a beginner DIY approach, so even if you've never used drywall tools before, you can get good results on your walls.Tools Required
- Banjo
- Clincher
- Corded drill
- Drywall sander
- Dust mask
- Hammer
- Hawk
- Mixer
- Mud pan
- Putty knife
- Rasp
- Sanding block
- Sanding pole
- Taping knife
- Tin snips
- Trowel
- Utility knife
Materials Required
- 1-5/8 in. drywall nails
- All purpose compound
- Corner bead
- Paper tape
- Setting compound

A guide to smooth walls
Taping drywall can be a frustrating, gut-wrenching experience, even if you’ve got a solid grip on basic drywall skills. Nagging flaws will show up right after painting and even months later. Nail pops, corner-bead cracks and bad joints will plague your walls forever.
To make your next taping job more successful, we’ve come up with a novice-friendly guide for getting good results and how to mud drywall. We’ve simplified professional techniques so you can learn them easily and recommended the basic tools and materials you’ll need to achieve smooth, flat walls ready for paint.
Since 90 percent of the cost of a professional job is labor, taping your walls yourself can save you several hundred dollars, even on small jobs. The key is a methodical, step-by-step approach with the proper tools and materials. Otherwise, taping will drive you nuts.
We’ll show you how to avoid the most common rookie mistake: heaping on drywall mud and then counting on a massive (and filthy) sanding effort at the end to rectify mistakes. We’ll also show you how to gradually build up layers and feather edges to avoid ridges and knock off high areas of freshly applied mud.
We’ve added color to each coat of drywall mud to make it easier to see the proper order of application. The first coat is orange, the second green and the third yellow.
Buy or Rent These Taping Tools, also Called Drywall Mud Tools
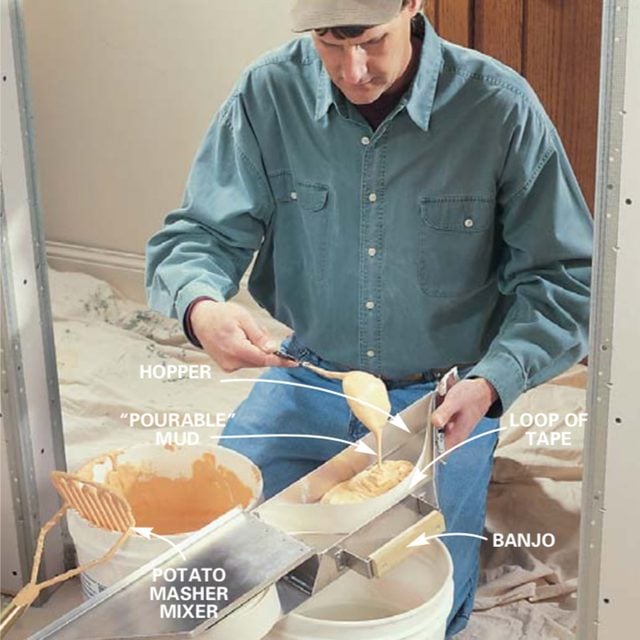
You’ll find a mind-boggling assortment of gimmicky taping tools at home centers. The truth is, most aren’t worth having and you can do an excellent job with just the ones we recommend. Banjos and clinchers can speed up and improve the job. They’re a must for larger rooms with lots of corners. But for small jobs, skip the banjo, and if you only have a few corner beads to do, nail them on by hand and skip the clincher too.
1. Four-inch flexible putty knife for small filling jobs and applying second and third coat mud to angles (inside corners).
2. Six-inch flexible putty knife for larger filling jobs, embedding tape and filling fastener holes.
3. “Potato masher” mixer for hand-mixing a bucket of mud quickly and thoroughly.
4. Mud pan for convenient dispensing of patching, fastener hole and corner mud.
5. A clincher makes quick work of crimping corner beads accurately in place to hold them for nailing.
6. A 12-in. trowel is less fatiguing and easier to use for applying mud to the joints and corner beads than the standard wide taping knives.
7. A banjo is essential for all but the smallest taping jobs for dispensing mud-saturated tape right onto the drywall joints.
Buy the Old-Fashioned, Time-Tested Materials—They’re What Pros Use
Just as with drywall mud tools, there are many new drywall products on the market purporting to make taping easier. But talk to a pro and you’ll find that few of them work any better or are any more durable than the old-fashioned taping supplies like paper tape and 1-1/4 in. solid metal corner beads.
Pick up enough corner beads to cover every corner with a single bead—no splicing!—plus one or two extras to replace mistakes. You’ll also need a small box of 1-5/8 in. drywall nails for fastening the corner beads. One roll of paper tape is usually plenty for the average-sized room, but they’re only a couple of bucks, so get two in case you come up short.
Project step-by-step (19)
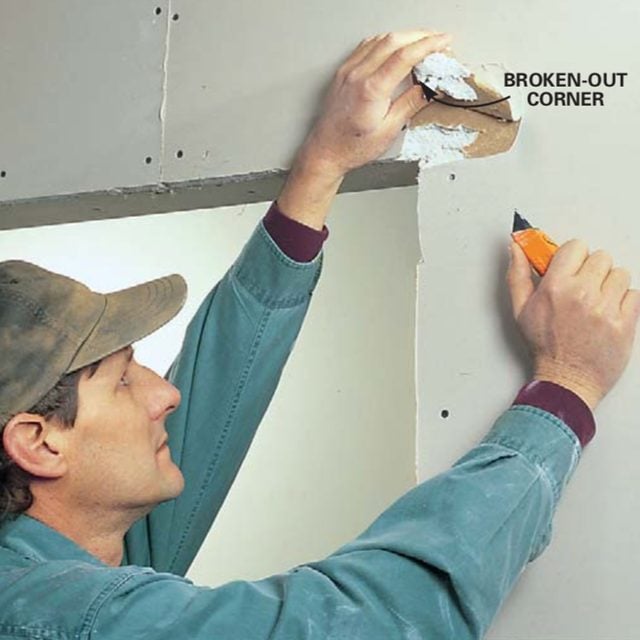
Remove broken or loose drywall
Score the paper around broken corners, blisters or other damaged areas in the drywall with a utility knife. Peel the paper away and remove any broken or loose gypsum core. Lightly sand rough paper and scored edges with a sanding sponge.
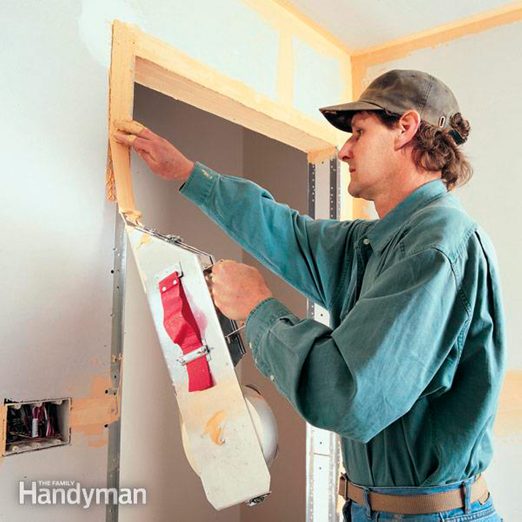
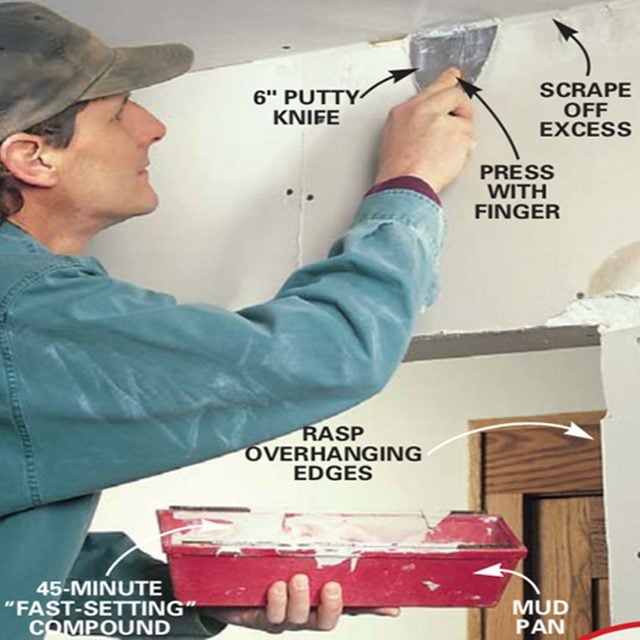
Fill damaged areas and cracks with setting compound
Mix 45-minute setting-type taping compound in a mud pan to the consistency of peanut butter. Fill damaged areas and cracks more than 3/8 in. wide with a 6-in. knife. Keep mud flush with surrounding drywall, never raised. Setting compound is hard to sand after it sets.
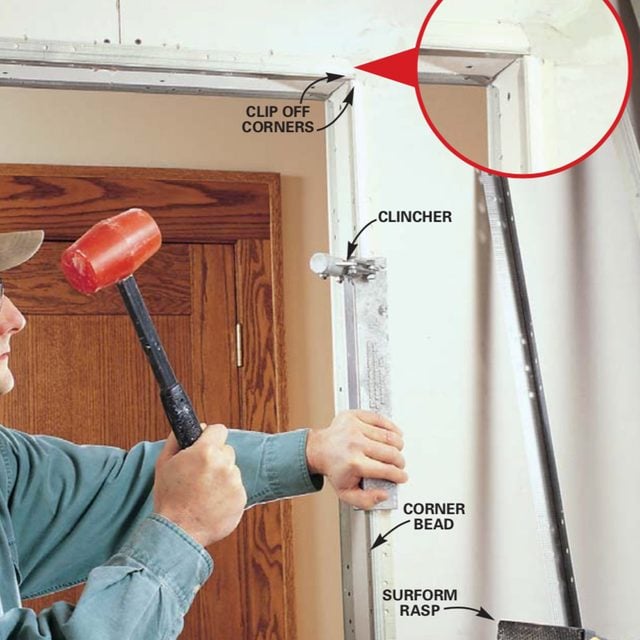
Install corner bead
Cut corner beads to length with tin snips and hold them in place to make sure beads meet perfectly at corners. Clinch corner beads into place with a clincher. Run a 6-in. putty knife along the bead and adjoining drywall (on both sides) to make sure you’ve left a void to fill with mud. Then anchor the corner beads through the drywall into surrounding framing with 1-5/8 in. drywall nails spaced every 8 in. Drive extra nails into edges that don’t lie flat.
Close-up: Test fit the corner bead.
Hold the corner beads in place to test fit the corners.
Make a dimple in damaged drywall holes
Remove any fasteners that have broken through the paper surface or missed the framing, and drive a replacement screw above or below the location into solid wood. Slightly dent the damaged paper left from extracted fasteners by tapping the spot with the butt of the knife handle.
No matter how accomplished you are as a taper, bad or incomplete prep work will make taping tougher than it has to be. It’ll also spoil a good taping job. Poorly installed corner beads will crack or work their way through the paint. Tape will peel, lift and blister if cracks or voids in the drywall are unfilled and simply taped over. Improperly set screws and nails or inadequately fastened drywall will cause nail pops for years to come.

Selecting and Mixing Mud
Mud comes in “setting-type” and “drying-type” varieties.
Buy setting compounds only for filling gaps and repairing broken drywall corners. Setting compounds contain plaster of Paris to make them chemically harden. They’re usually available with different setting times. That lets you put on several coats in the same day, an advantage pros like. Once mixed with water, setting compounds can harden fast and if applied too thick are difficult to sand. Mix small batches so you’ll have plenty of time to work before the compound sets.
Buy drying compounds for the actual taping. They come in powder or premixed in 5-gallon pails. We prefer premixed because it’s easier to mix and store. Despite its name, premixed compound is not ready for taping when you open the pail. You’ll need to add a little water and thoroughly mix the compound to the desired consistency before using it for the first time and before you begin taping each day. Drying-type compounds come in three forms: taping, topping and our choice, all-purpose. All-purpose is designed to be used for all three coats in the typical three-coat taping system.
A 12 x 12-ft. addition will require about two 5-gallon pails of mud. You won’t need more than a few gallons of mud for the first coat, and since it’s mixed runnier than succeeding coats, transfer some mud to a clean 5-gallon pail before mixing and thinning it. Don’t let our colors throw you off; the mud for the second and third coats is exactly the same.
To keep the mud from drying out as you work, loosely cover the pails. At the end of the day, wipe down the insides of the pails and the bottom of the lid with a sponge to remove any deposits. Otherwise, dried chunks of mud will fall into the mix and you’ll discover the little troublemakers when you’re spreading mud. Then lock the lids on tightly. Every new day of taping, remix the mud before using, adding water as needed.
Tip:
Drag the knife over all the fastener heads and listen for the metallic “click” of a protruding head. Set the screw- or nailhead slightly below the surface with a screw gun or a hammer.
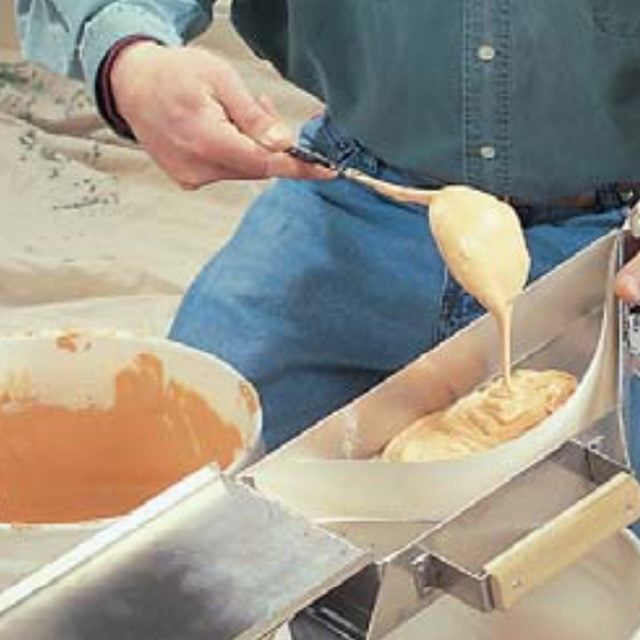
Load the banjo for the first coat
Mix the first coat mud to the consistency of honey with a “potato masher” mixer adding water as necessary. Load the banjo spool with a roll of tape and ladle mud into the hopper underneath a loop of tape.
Cover the joints with tape
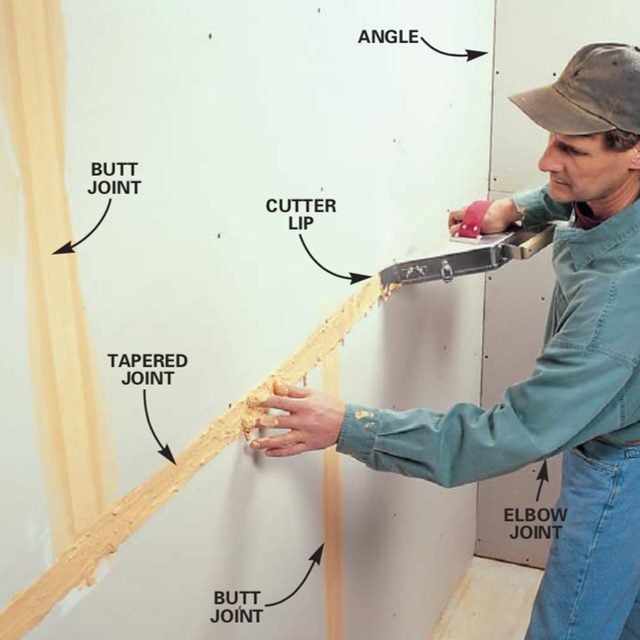
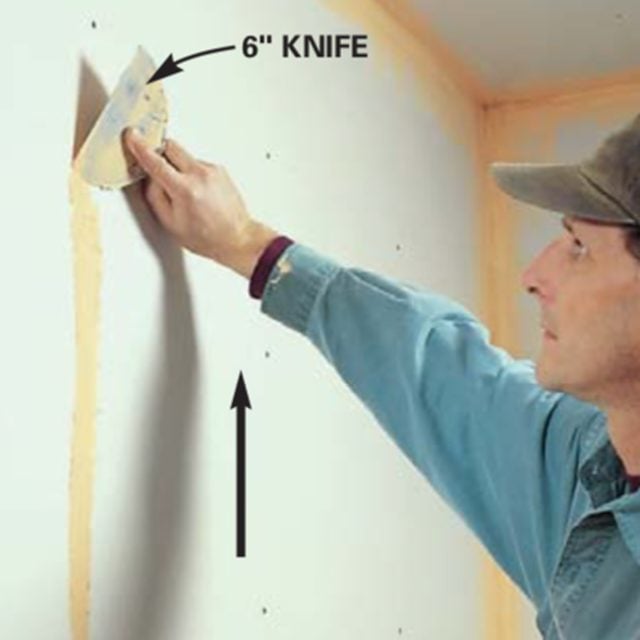
Apply the tape by holding one end of the tape against the joint with your hand while drawing away the banjo to pull out the tape. Press the wet tape into joints by dragging your fingers over the tape. Spread a little mud on the 6-in. knife and embed the tape by dragging the knife over the tape, pressing it tight to the drywall. Mud on the knife lubricates it so it won’t pull at the tape and thoroughly moistens the tape for good adhesion. Cover the butt joints first, then the tapered joints.
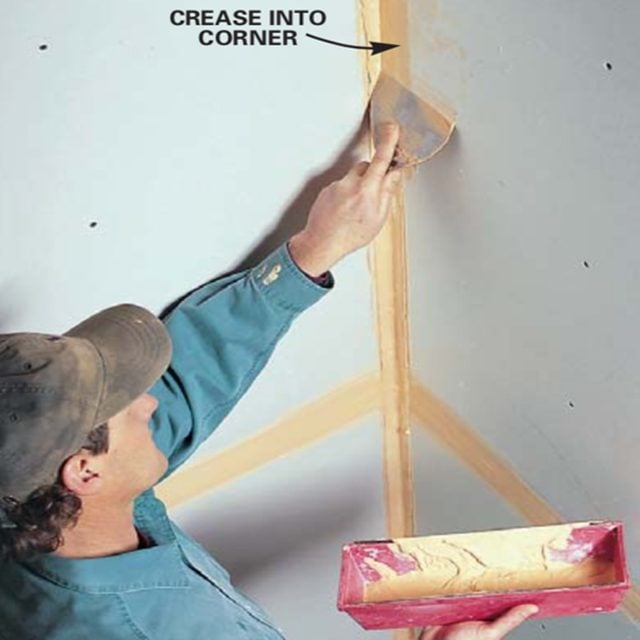
Tape the corners
Apply the tape to the angles with the banjo and smooth it into the corner with the 4-in. knife, taking care to smoothly crease the tape at the center. Then cover the corner-bead flanges with tape and scrape off any excess.
Fill nail or screw holes
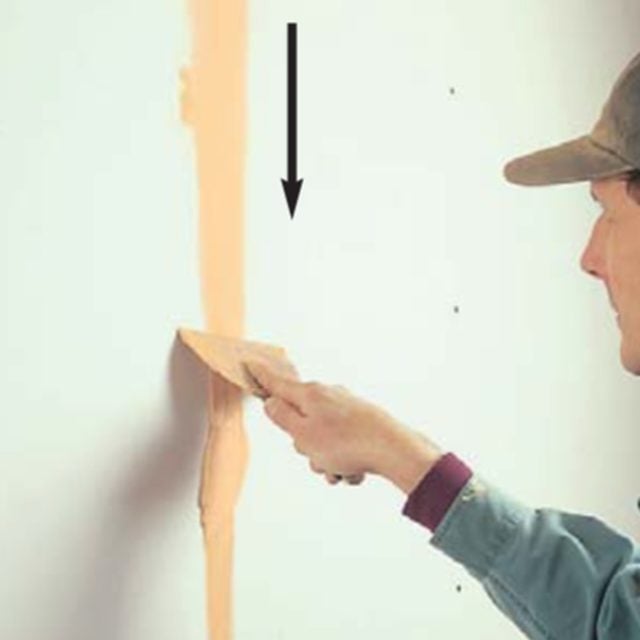
Fill fastener holes by spreading a narrow band of mud upward over a column of screw- or nailheads with the edge of the 6-in. knife.
Scrap away excess mud
Drag the end of the knife over the filler swipe to scrape away all of the surface mud. Use this technique at the end of each of the three coats to fill and refill all the fastener holes.
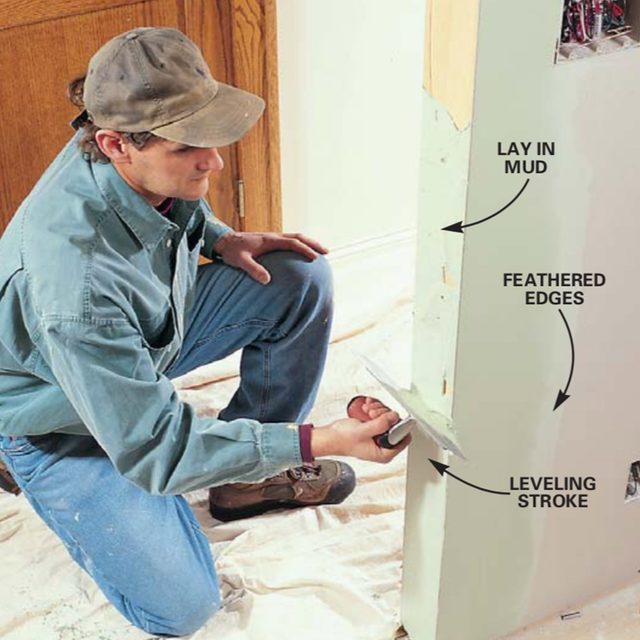
The “first coat” consists of applying the mud-saturated tape to all of the joints and corner beads and filling screw or nail holes for the first time. Begin with the butt joints first, then the horizontal tapered joints, then the angles and finally, the corner beads.
The easy way to apply the tape is to use the banjo, which not only dispenses the tape but also evenly saturates it with mud while you pull it off the spool. If you’re just working on a small area like a closet, skip the banjo and stick the tape on by hand into a layer of mud, then spread another coat over the top and embed the tape with a knife. You’ll be surprised how quickly you’ll learn to play the banjo. The key is to mix the first coat of mud to the consistency of honey (it should be pourable) and spoon it into the hopper underneath a loop of tape.
The right mix will result in even, complete mud coverage on both sides of the tape as you pull the tape out of the banjo and feed it onto the wall. Don’t be afraid to get your fingers dirty. As you feed out the tape, press and smooth it onto the centers of drywall joints with your fingers, then use the lip of the banjo to cut the tape to length. While you have the banjo in your hands, stick tape onto several joints at once, and then press the tape flat onto the joints with a 6-in. knife and tool off any excess mud.
After all the joints are covered, apply and flatten the tape over corner-bead edges. Although some pros skip this step, a layer of tape is easy, cheap insurance against cracked corner-bead edges later.
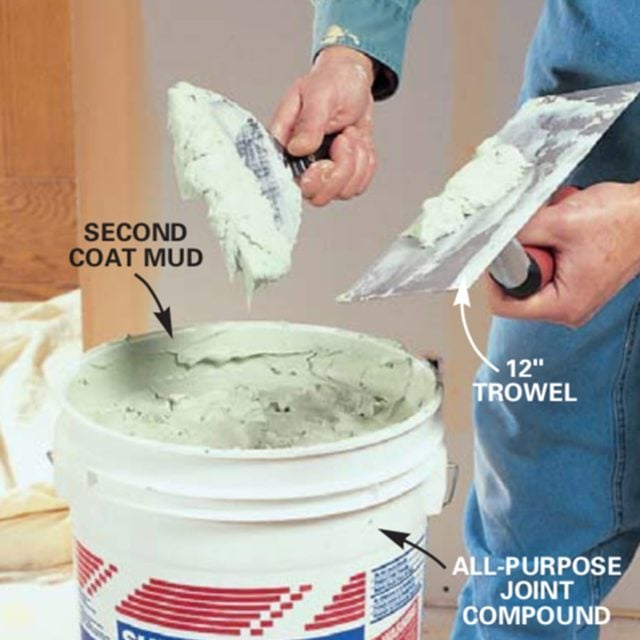
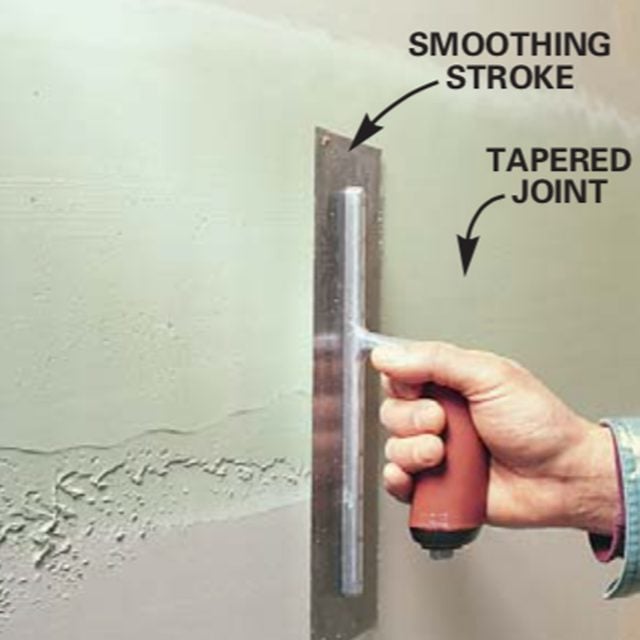
Mix the second coat of mud
Mix your second (and third) coat mud to the consistency of creamy mashed potatoes, adding water as necessary. Scoop mud out of the bucket and onto the trowel with the 6-in. knife for spreading on the wall.
Cover the joints with a second coat of mud
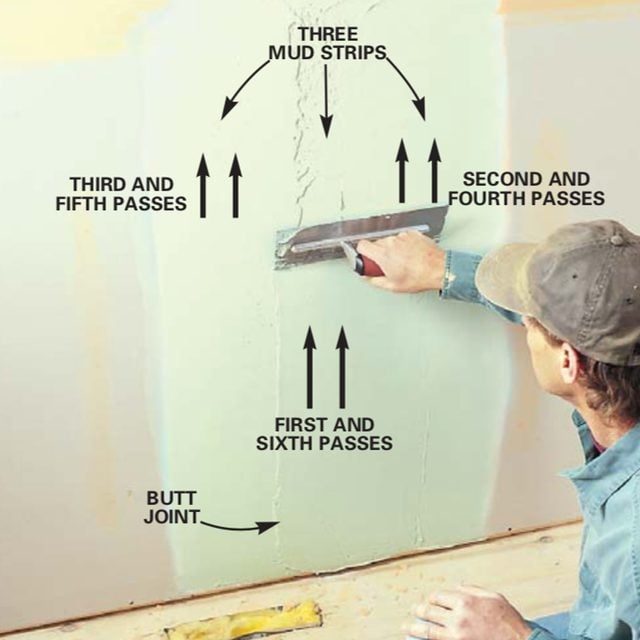
Lay on a 1/8-in. thick mound of mud across the centers of butt joints, then two more strips of mud on either side of the center strip. Make three more passes, feather the outer edges flat, then smooth the center.
Feather out the corners
Butter the sides of the corner beads, then level and smooth out the mud with the trowel. Fill both sides of the corner beads to the brim of the bead, feathering the outer edges flat to the surface of the drywall.
Coat the tapered joints
Lay the second coat on tapered joints. Keep the entire width of this coat only a few inches wider than the length of the trowel.
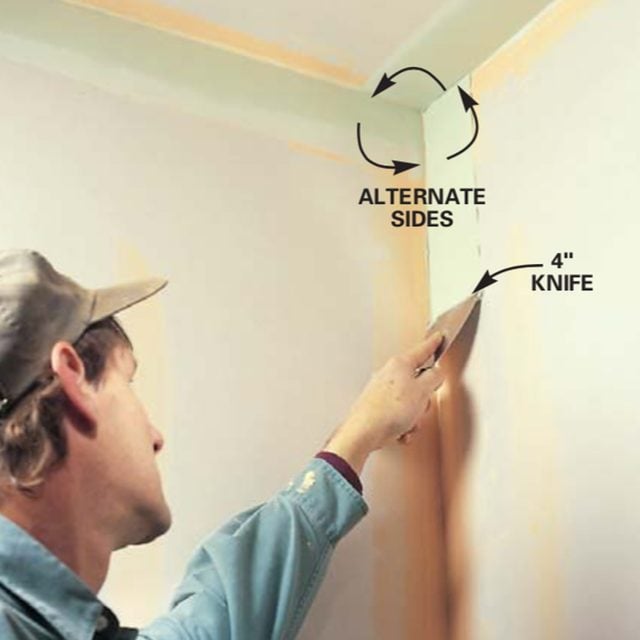
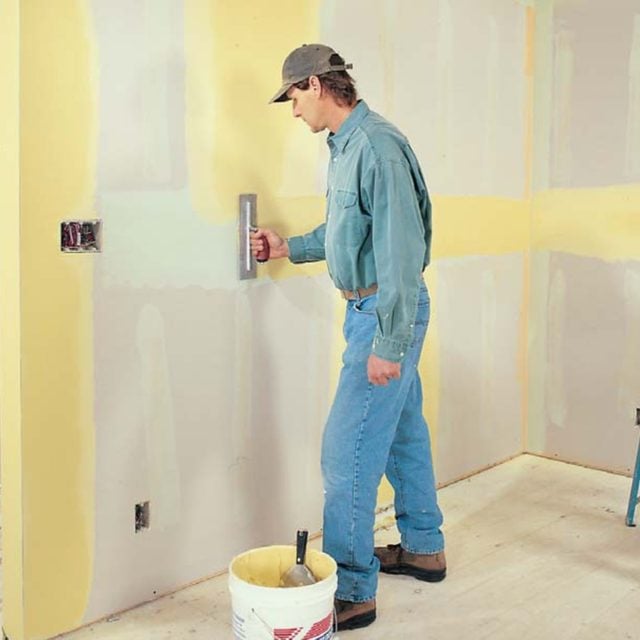
Spread the second coat over one side of angles
Spread a thin layer of mud over one side of vertical and ceiling angles with a 4-in. knife. Apply more pressure to the outside of the knife blade to wipe off excess mud and leave a feathered edge. Refill fastener holes.
Some pros use special wide taping knives for applying second- and third-coat mud, while others use conventional cement trowels like we did. If you’ve used knives successfully, great! But if you’re a first-timer, you’ll probably find a trowel easier to master and less fatiguing. Both take patience and time to get the right touch. When you’re first spreading the mud onto the wall to distribute it, hold the trowel at an angle away from the wall and slowly lower the leading edge as you empty the trowel. After the mud is on the wall, go back and hold the trowel flatter to smooth it out.
The second coat is the toughest coat to apply, especially on the butt joints. Don’t be shy about spreading this coat over a wide area. It really takes six passes with the trowel to handle a butt joint: three trowel-wide passes to apply the mud and three more to flatten the middle, smooth out the mud and feather the sides. When you’re through, the center should barely cover the tape, while the two sides feather out the center mound.
Different joints require different strategies. Butt joints, which join untapered ends, are by far the toughest because you have to build a wide, gradual “plateau” of mud and feather the edges to make the joint appear flat. In contrast, tapered joints along the long sides of drywall have recessed manufactured edges that are much easier to fill and level. They’re handled the same as butt joints, but the second coat doesn’t have to be nearly as wide or as built up because of the recess of the tapered edges.
Filling corner beads is about the simplest of taping tasks because you have the hard, defined surface of the corner bead to guide application. Just make sure to feather the edges flat to the drywall.
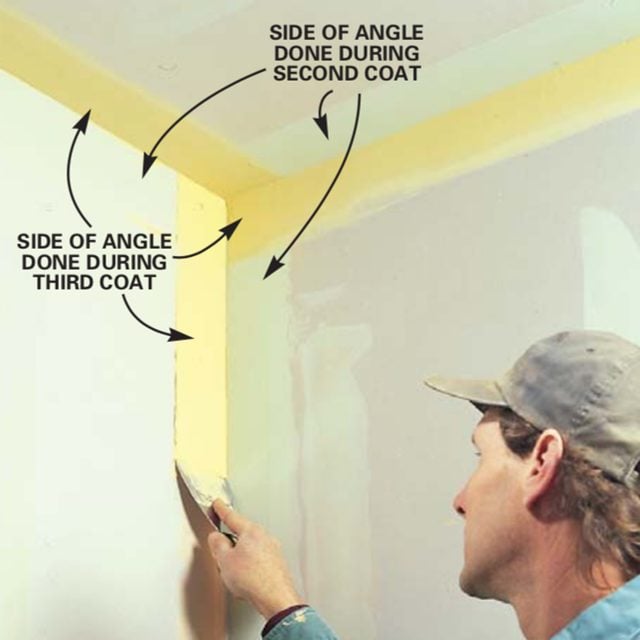
Angles only get one additional thin coat of mud—on one side during the second coat and on the other during the third-coat layer— with each side done alternately so one side is always dry when you coat the other side. That way you have a hard surface to drag your knife against. Again, feather all outside mud edges flat, then refill all the fastener holes.
Wall and Ceiling Repair Simplified: 11 Clever Tricks
Knock down high spots with a sander
Knock off excess dried mud from the edges of corner beads, tool ridges and high spots remaining after the second coat with a drywall sander and 100-grit paper or sanding sponge before beginning the third coat.
Tips for How to Use Painters Tape
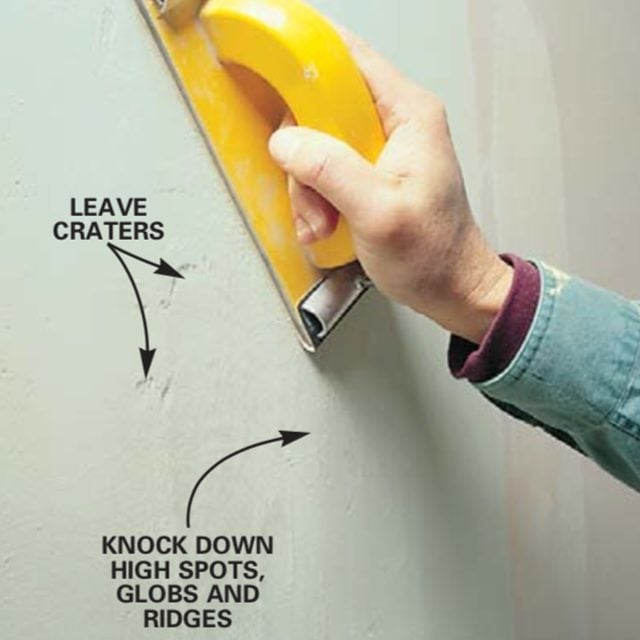
Fill low spots and feather the edges of joints
Fill low spots and other imperfections and feather the edges on all butt and taper joints. Finish filling corner beads by spreading another coat of mud using the same technique as with the second coat.
Drywall Finishing with Setting-Type Joint Compound
Finish the second side of the angles
Spread a layer of mud over the second sides of all angles to finish them. Refill the fastener holes for the third and last time.
Before getting started on the third coat, scrape down or sand any projecting ridges over seams and excess mud on the corner-bead edges. If you did a competent job of applying the second coat, the third coat will entail filling in imperfections such as low spots, craters and tool marks.
Use a “raking” light to highlight areas that need special attention. Hold the light against the wall so it shines across the surface to make all the problem spots apparent before you start. The second coat shrinks as it dries, so fastener holes and corner beads need to be filled with a third coat of mud.
Sanding is the last step in achieving smooth walls. It’s also the least pleasant. Buy yourself a pole sander for the large areas, a hand sander for detail work and 120-grit paper and a medium 3M sanding sponge for cleaning up the angles. The $25 total investment will be money well spent. Use the raking-light technique to constantly check progress and highlight irregularities that need more work. Be very careful not to over sand, especially in angles and on butt joints where mud layers barely cover the tape. Quit sanding the center of butt joints as soon as inconsistencies disappear.
Angles only need light sanding. Try not to sand onto unmudded paper drywall surfaces too much or abraded paper will show through the paint. If you expose tape while sanding, you’ll need to add more mud and let it dry before sanding again. Exposed tape will show through multiple layers of paint. Here are a few tips for finishing drywall.
Taping tips
Here is a list of important tips for rookies:
- Cut corners off corner beads at roughly 45 degrees because sharp corners tend to curl through the mud.
- Feather the outside edges of each and every coat wherever you’re taping so they’re flush with the drywall.
- Never leave up any tape that has a dry bond against the drywall. You’ll be able to tell by the light color. Peel back and fill tape that’s still wet, or cut out and replace tape that’s already dried.
- Don’t worry about eliminating small ripples, ridges or craters during the second coat. They’ll get filled, scraped or sanded off during the third coat. Just try to get the distribution as even as possible.
- Never return leftover mud to the pail. There are bound to be chunks in it that’ll plague you the rest of the job.
- Spray texture won’t hide poor taping, so don’t get sloppy on ceilings.
