
Health gurus say to "treat your body like a temple". Well, here at Construction Pro Tips we have a similar philosophy regarding workshops. A pro's workshop should be his holy place, a place to think and work. Here are some handy clamping (and a few gluing) tips and tricks for you to use around your workshop to help turn it into a thriving ecosystem.
Clamping and Gluing Tips and Tricks

Updated Sep. 07, 2023
1
/
7
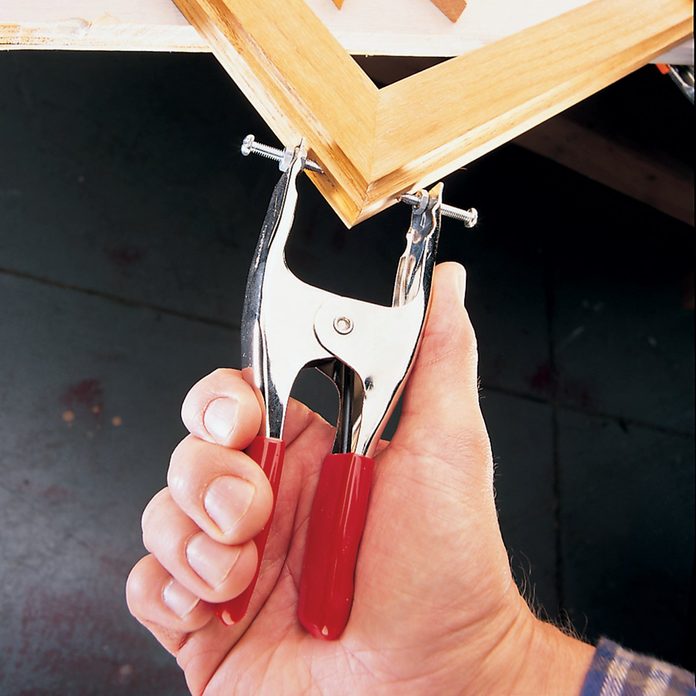
Ferocious Miter Clamp
Ever try to glue a picture frame corner only to have the clamp slide off? This customized spring miter clamp applies powerful force and stays put while the glue dries.
To make it, drill 3/16-in. holes in the jaw tips of a strong spring clamp and, using a couple of 1/8-in. nuts, tighten two 1/8-in. x 1-1/4 in. machine screws in the holes after sharpening the tips on a bench grinder. Yes, this clamp’s piranha-like jaws will leave holes in the wood, but you can drive brads in the holes to reinforce the joint, then fill them with putty.
2
/
7
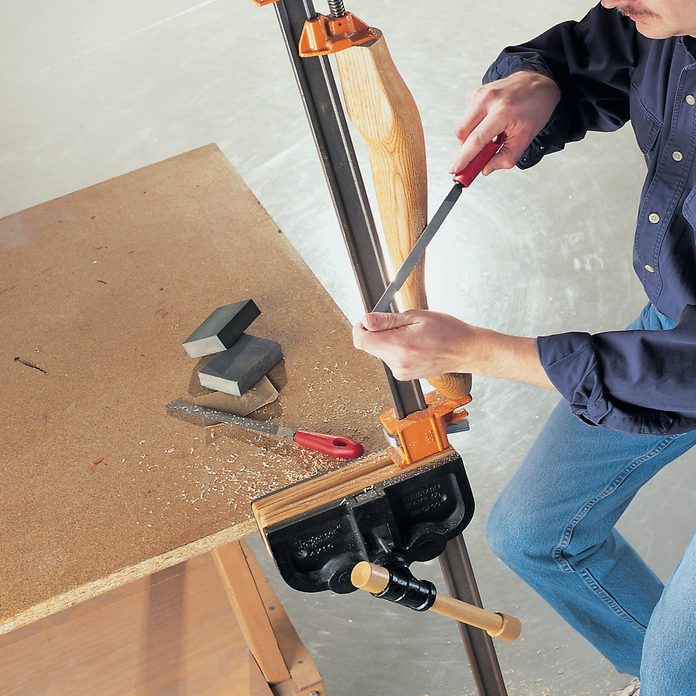
Bar Clamp Vise
Slender, curvy workpieces tend to slip and slide in regular woodworking vises, so try Richard Chowin’s great alternative. Clamp a bar or pipe clamp in your bench vise, then tighten the clamp to grip the workpiece at each end. Your future masterpiece won’t move a smidgen while you work, and you’ll have access to all the curves and recesses along its length. This vise also works great for holding more delicate projects for sanding or finishing.
3
/
7
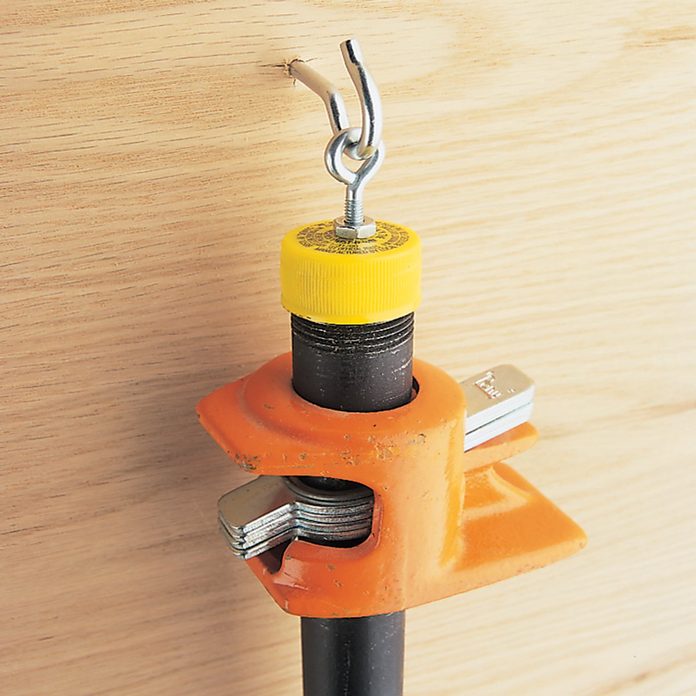
Save Your Caps
Don’t throw away your old bottle caps! Since these caps screw tightly on 3/4-in. pipe threads, you can use them to store your pipe clamps on a shop wall. Drill holes in the top of the caps, tighten eye bolts in the holes with nuts on both sides, then attach them to your clamps and hang them up.
4
/
7

We repeat: Don’t throw away bottle caps!
Another bottle cap tip? You bet! Epoxy that’s mixed in a plastic cap can’t spread out as you mix it, so it’s easier to scoop up and apply. That way you won’t make a huge epoxy mess all over your workshop. Plus, you won’t waste epoxy by pouring out more than you need.
5
/
7
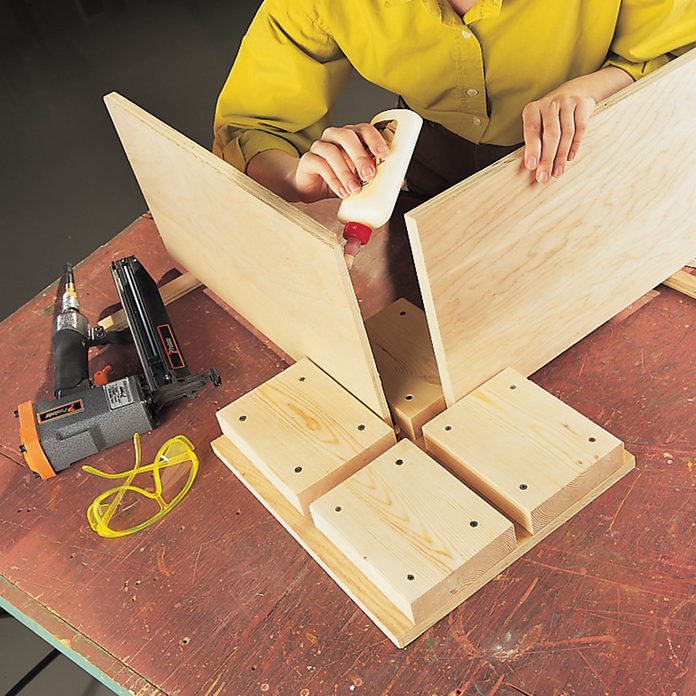
Cabinet assembly station
Here’s a third hand that will ensure square, no-hassle cabinet assemblies. Cut four 7-in. long pieces of 2×6 and screw or nail them to a plywood base, leaving exactly square crisscross channels just wide enough for the cabinet parts to fit in snugly. When you assemble the cabinet, the station will keep the parts vertical and aligned while you apply glue and shoot in staples or pound in nails.
6
/
7

Get a grip on longer boards
Alone in your workshop without a helping hand nearby? Here’s a great way to hold boards for routing and planing with ne’er a worry that they’ll slide around or flop over as you work. Clamp two handscrews to a sawhorse or tabletop so their jaws are lined up. Slide the workpiece into the jaws and tighten the handscrews. Medium-size handscrews have 5/8 in. of usable jaw surface above the screws, so they grip the board like two long-jawed vises. This tip is especially useful when routing molding profiles on narrow boards. You can also screw the handscrews to a piece of 3/4-in. plywood on your shop floor and use them to hold doors for edge-planing.
7
/
7

We’d Love to Hear From You
Do you have a jobsite or tool tip that makes your work-life easier, safer, or just more fun? Why not share it with your construction comrades? Plus, you can show off your professional prowess to your family and friends.
Click the image below to send us your Pro Tips! Please include an image if you can. We will contact you if we run your submission on the site.
