


Learn how to replace a bathtub drain and install a new stopper.
An hour or less
Beginner
Less than $20
Introduction
We'll show you how to replace your old-style bathtub drain with a low maintenance lift-and-turn drain. Once you remove the old stopper, installing the new one is a breeze. So stop dealing with the lever-style drain that catches all of the hair in the tub and replace it with a new one that doesn't have the complicated linkage.Tools Required
- 4-in-1 screwdriver
- Cold chisel
- Hacksaw
- Hammer
- Pliers
Materials Required
- Lift-and-turn stopper
- Plumber's putty
Project step-by-step (4)
Step 1
Lift-and-turn drains
Detail of a lift-and-turn stopper
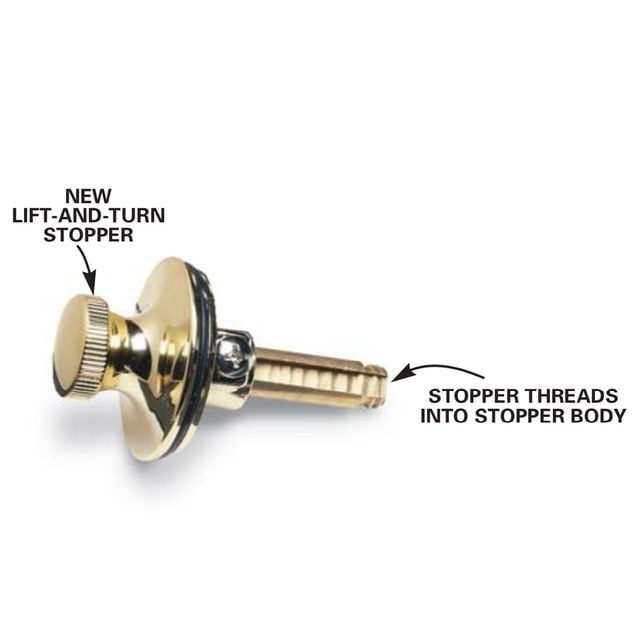
Buy a new lift-and-turn stopper to replace your old lever-style drain. When the stopper in your lever-style bathtub drain won’t pop up anymore because the linkage is damaged or clogged, replace it with a much simpler lift-and-turn style tub drain.
The linkage in a lever-style drain attracts dirt and hair like a magnet, and must be cleaned regularly in order to keep the drain working properly. The lift-and-turn drain has no complicated linkage to dig out and clean—almost everything catches in the drain grate. Buy the tub stopper replacement kit at hardware stores and home centers to begin this how to replace a bathtub drain project.
Step 2
How to replace the old bathtub drain: Remove the old drain parts
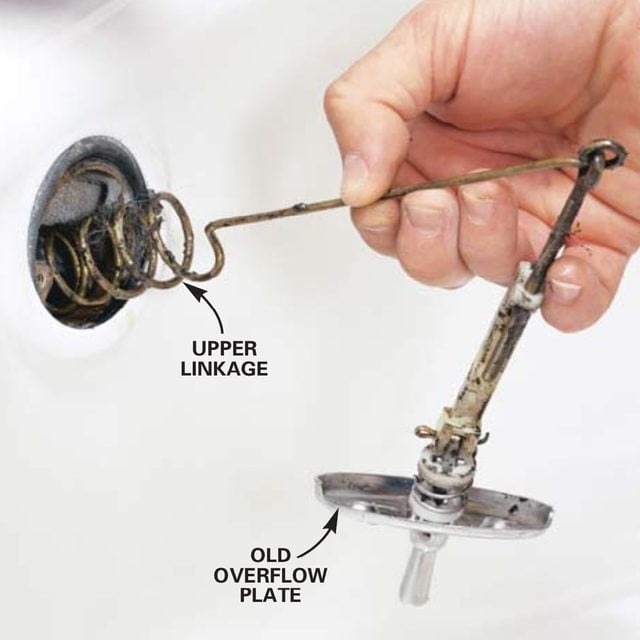
This photo shows how to remove the overflow plate, the stopper body and linkage. The linkage may stick and be stubborn to remove. Grab hold of it and tug hard until it pops out. Screw on the new overflow plate once the linkage has been removed. Unscrew the overflow plate and pull the upper linkage out of the overflow pipe. Pop out the drain stopper and remove the lower linkage as well. Tug firmly when extracting both parts of the linkage because they may bind inside the overflow pipe.
How to Install a Bathtub: Install an Acrylic Tub and Tub Surround
Step 3
Remove the stopper body
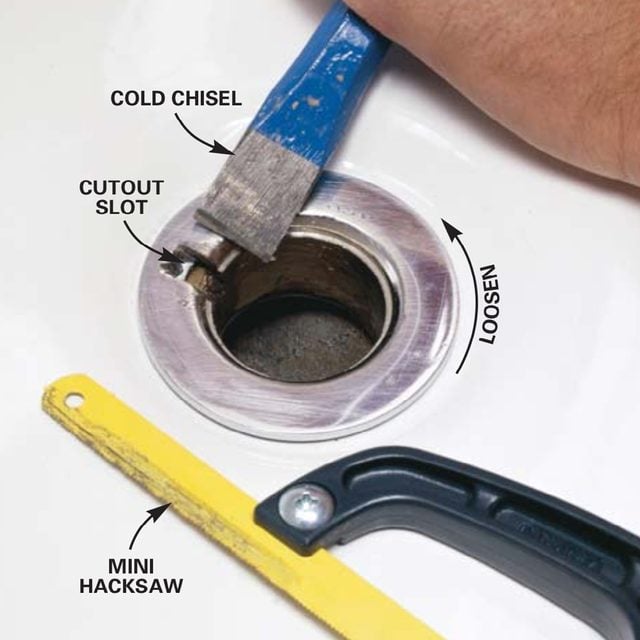
The toughest part of this how to remove a bathtub drain job is removing the old tub drain stopper body, but it’s all downhill after that. Remove the old stopper body as shown here. If you’re having trouble unscrewing it, try heating it with a hair dryer set on “high.” The heat may help loosen the old plumber’s putty. The old tub drain stopper body can also be cut out with a reciprocating saw and metal blade, but be very careful because it’s easy to cut into and damage the bathtub. Cut a notch 1/4 in. wide and deep in the old stopper body with a mini hacksaw. Check progress frequently to ensure you don’t cut into the tub. Wedge a 3/4-in. cold chisel into the cutout slot and pound counterclockwise with a hammer to free the stopper body (use caution when hammering so you don’t scratch the enameled tub). Completely unscrew and remove the stopper body.
Step 4
Bathtub drain installation: Install the new stopper body

Slide in a new gasket. Then roll a pencil-sized bead of plumber’s putty and press it around the underside of the new stopper body rim. Stick the jaws of 8-in. pliers into the stopper body grate and thread it into the drainpipe.
All that’s left in this how to remove a bathtub drain stopper job is to install the new bathtub drain stopper body and stopper. Slide the new rubber gasket on top of the drainpipe under the tub and insert the new drain flange with plumber’s putty on it as shown here.
Use the supplied bushing if the new threads are different from the old. Screw the stopper into the stopper body and congratulate yourself on a job well done. If you’ve got other bathtub issues, learn how to fix a leaking bathtub faucet.