
How To Remove a Stopper From the Bathroom Sink
Updated: Apr. 04, 2024
Do you have a stuck or malfunctioning sink stopper? We walk you through the types of stoppers and how to repair or replace them.
My first encounter with a broken drain stopper occurred the day I bought my own home. Ready to do some cleaning, I ran the bathroom sink and lifted the stopper rod. It immediately broke free and flew into the air, spraying rusty water across the mirror. Staring at my reflection, now crisscrossed with red-tinged water and looking like a horror-movie outtake, I could only wonder, “What have I gotten myself into?”
Luckily, I’m here to tell you I survived, and you will too. Fixing a pop-up assembly like this is not only doable, but it’s also a great, low-stakes way to learn a little bit about your home’s plumbing.
I consulted with a pair of master plumbers, Stephen Venturelli and Beau Means, about the most common types of bathroom sink stoppers and how to repair or replace them.
If you have a drain stopper that needs attention, there’s no need to worry. As Venturelli says, “The issues that pop up (pun intended) with a drain stopper are not a major repair and typically can be replaced at a minimal cost.”
On This Page
Pop-up Assembly Stoppers

The most common type of sink stopper is called a pop-up drain assembly. This design is easily identified; simply look for a pull rod on the back of the faucet. Beneath the countertop, that rod connects to another, horizontal rod that terminates in a ball joint in the drain tailpiece. The ball joint is secured in place, but still loose enough to serve as a pivot point.
The bottom of the drain stopper slides into the drain tailpiece, where it connects to the end of the pivot rod’s ball joint. Since the stopper is connected to the pivot rod, which is connected to the faucet rod, raising the faucet rod adjusts the stopper, allowing it to seal or open the drain.
That may sound complex, but the mechanics are fairly easy to understand when you see it in person. The trick with pop-ups is understanding that all the real work is done under the sink.
“Lavatory pop-ups come apart from the tailpiece,” says Beau Means. “Remove the nut from the side of the tailpiece and pull the pop-up free from the lever assembly that connects to the pull-rod and protrudes from the top of the lavatory faucet.”
How to Remove and Fix Pop-up Assembly Stoppers
Stephen Venturelli suggests a simple fix if there’s a drip or leak at the ball joint: using pliers to tighten up the nut connecting the assembly. It’s also possible to tighten or adjust the points where the rods connect to each other or the stopper.
But if any of those parts is damaged, Venturelli recommends purchasing a completely new assembly rather than trying to replace individual rods, clips or connecting parts. “The cost and ease of installation make it cost and time-efficient,” he says.
The worst-case scenario is that the entire pop-up has rusted. In that case, says Venturelli, “You will need to cut out the existing pop-up with a metal blade power/manual hacksaw. Clean up all surfaces before installing [the] new strainer and gaskets. Use channel lock style pliers to tighten the nut and squeeze gaskets tight to ensure no leaks. Connect to existing trap and again tighten nuts with pliers.”
Lift and Turn Stoppers
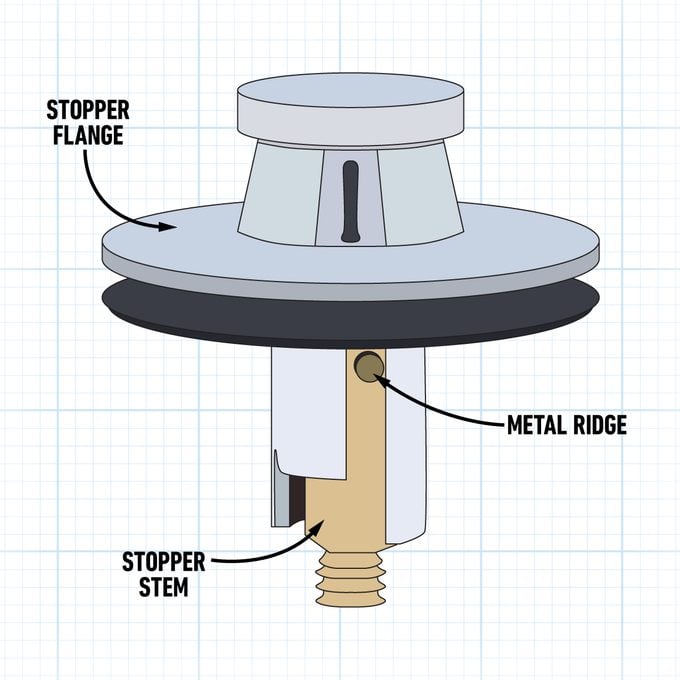
Lift and turn stoppers don’t have an assembly beneath the counter. Instead, they work by incorporating a metal ridge inside the drain flange. Raising the stopper and giving it a partial turn rests the stopper stem on that ridge, where it acts as a sort of shelf, holding the stopper up and allowing water drain freely.
How to Remove and Fix Lift and Turn Stoppers
According to Venturelli, “All these assemblies have very easy installation instructions which I believe a novice handy person can accomplish.”
You can typically remedy minor leaks at the drain washer by simply tightening the nut on the underside of the sink. If the stopper stem has broken and won’t stay in place, you must install a new drain stopper. To do that, you’ll fully loosen the nut beneath the sink, and remove the drain stopper, flange, and tail. Install the new tailpiece and drain flange, then tighten everything back together.
Flip Top Stoppers
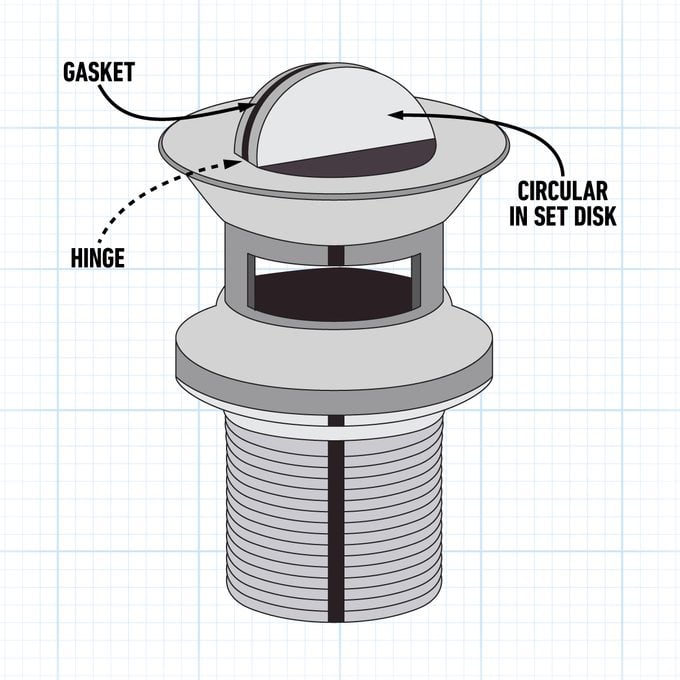
This design uses a circular inset disc on the stopper top. Hinged in the center, it functions like a butterfly valve on a carburetor, rotating to a 90-degree angle, allowing water to flow through.
How to Remove and Fix Flip Top Stoppers
Flip top stoppers develop issues when the gasket that helps create a seal wears out, or when the hinge is damaged in some way (often by a dropped object). In both instances, the easiest solution is usually to replace the entire assembly.
Replacing a flip top stopper is similar to repairing a lift and turn-style stopper. Working from beneath, loosen the nut, then remove the drain stopper, flange, and tailpiece. Install the new tailpiece and flange, and tighten until leak-free.
About the Experts
Beau Means is a master plumber with nearly 35 years of experience. Formerly the chief plumbing inspector for Wichita/Sedgwick County, Means is general manager of Benjamin Franklin Plumbing in Wichita, Kansas and chairman of the local plumbing board.
Stephen Venturelli has been a licensed master plumber in Massachusetts for 43 years and is currently the plumbing instructor for At Leisure Contractor Licensing.