


Lots of useful tips and step-by-step advice on how to install a new kitchen faucet, including how to avoid common problems.
A full day
Intermediate
$101–250
Introduction
The toughest part of replacing a kitchen faucet is removing the old one. Unexpected problems always pop up-corroded pipes, difficult-to-reach nuts and poor access to fittings. Otherwise, installing a new kitchen faucet isn't tough at all. Actually, the directions that come with your new faucet are probably all you'll need to do that part of the job. Barring unforeseen problems, you could be washing up under the faucet in an hour or so. This article walks you through a basic replacement process and tells you how to get through those tough parts.Tools Required
- 4-in-1 screwdriver
- Adjustable wrench
- Hammer
- Handsaw
- Pipe wrench
- Slip joint pliers
- Tube cutter
- Wrench set
Materials Required
- 150-grit sandpaper
- Braided stainless steel supply tubes
- New faucet
- P-trap
- Shut-off valves
Whether you’re looking for a simple upgrade for aesthetic reasons or have a sink desperately needing repair, it’s always good to know how to change a kitchen faucet.
Have a Shopping List Prepared
Plan on replacing your faucet during store hours. There’s a chance you’ll need to make more than one trip to the hardware store for parts as you learn how to change your particular kitchen faucet. To give yourself a fighting shot at completing the job with one-stop shopping, consult this list:
- Shutoff valves: Before you shop for your new faucet, take a look under the sink and make sure that there are shutoff valves feeding the faucet. If you don’t have shutoff valves, add them. If you have them, confirm that they’re in working order by turning on the hot and cold water at the faucet and shutting off the valves. If the faucet still drips, install new ones. Most likely, you have 1/2-in. copper supply pipes. If so, add easy-to-install solderless “compression fitting” valves to your shopping list. But if not, buy whichever valve type is compatible with your pipes.
- Supply tubes: Next, measure the existing supply tubes and buy new stainless steel–sleeved supply tubes. They’re designed to give rupture-free service for years and can be routed around obstacles without kinking.
- Basin wrench: This weird little wrench is made specifically for removing and installing those hard-to-reach fasteners that clamp older faucet assemblies to the sink. Newer faucets have plastic wing nuts that can usually be loosened and tightened by hand. A basin wrench’s spring-loaded jaws pivot so you can either loosen or tighten nuts in tight spaces.
If you need to remove drain lines to access the faucet, get a pipe wrench or slip-joint pliers. For cutting copper tubes, buy a conventional tubing cutter. But if your copper supply lines are within a few inches of the back of the cabinet, buy a special mini tube cutter. You’ll also need a set of open-end wrenches for disconnecting and hooking up the water lines.
Selecting a Faucet
When you’re buying a faucet, as with most other things, you get what you pay for. Faucets that cost less than $100 may be made of chrome-plated plastic arts with seals and valves that wear. They’re okay for light-duty use but won’t stand up long in a frequently used kitchen sink.
Faucets that cost more than $100 generally have solid brass bodies with durable plating and washerless controls that’ll give leak-free service for many, many years. Some even come with a lifetime warranty. Quality continues to improve up to about $200. Spend more than $200, and you’re mostly paying for style and finish. Sticking with popular brands will mean replacement parts will be easier to find.
With most faucets, only three of the four holes are covered, so you’ll either need to get a blank insert or use the extra hole for a liquid soap or instant hot water dispenser.
Project step-by-step (10)
Step 1
Remove the drain lines from the faucet
Prop up a scrap of plywood on some 1-qt. paint cans in front of the cabinet. You’ll be much more comfortable lying under the sink. Otherwise, the edge of the cabinet would be digging into your back
After you pull out all of the cleansers, buckets and old vases from under the sink, go ahead and lie under there and see if you can easily access the faucet. If so, go right to Step Three. If not, it’s time to start dismantling the things blocking your path.
Most likely, the main obstacles will be the pipes and P-traps that drain the sinks. Don’t be afraid to pull them out, but more importantly, don’t be afraid to replace them with new ones. If you have older, chrome-plated drain lines, the pipe walls may be so corroded that they’ll crush in the jaws of a pipe wrench or slip-joint pliers. After you remove them, throw all the parts in a box to match them exactly at the store later. If you have plastic drain parts, be careful during removal—you’ll probably be able to reuse them.
Before disconnecting the drain lines, take a snapshot or sketch the layout to help you put it all back together. Then, disconnect the drain lines and P-traps if they block your access to the faucet and water supply pipes. Place a bucket or coffee can under the P-trap to dump residual water after you pull it free.

Step 2
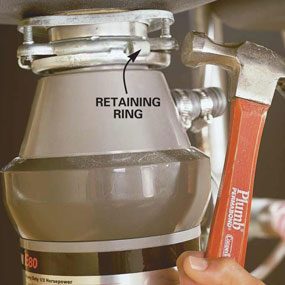
Disconnect the garbage disposer
Sometimes, a garbage disposer can be a 20-lb. roadblock. Don’t be discouraged—it’s easier than you think to remove it and then reinstall it after the faucet is in.
Unplug the garbage disposer, or shut off the circuit breaker in the main service panel if the disposer is directly wired.

Disconnect the dishwasher discharge line and place a 1-gal. paint can under the garbage disposer with some rags on top to cushion the disposer when it drops free. Release the disposer by tapping the retaining ring with a hammer in a counterclockwise direction.
Step 3
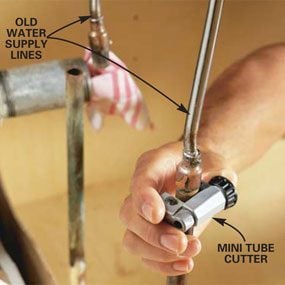
Cut the water supply lines (if you’re replacing the valves)
Once your prep work is finished, you can move on to the main project: changing the kitchen faucet. The first step in actually removing the old faucet is to disconnect the water supply lines.
If there are no shutoff valves and the water pipes are hooked up directly to the faucet supply lines, or if you’re replacing defective valves, turn off the main water supply valve to the house and cut off the pipes below the connections with a hacksaw or tube cutter.
Open the kitchen faucet and another lower faucet to bleed off any pressure and to drain the water. If you’re installing or replacing valves, cut the water lines directly below the fittings with a tube cutter or hacksaw.
Step 4
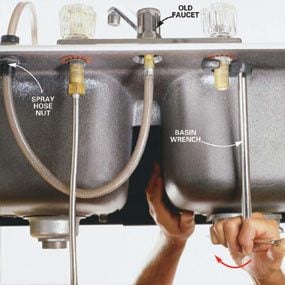
Loosen the tailpiece nuts with a basin wrench
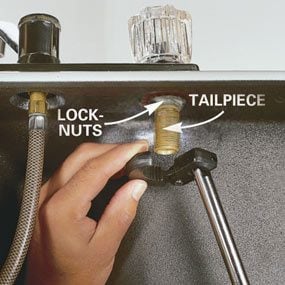
Make sure you’ve closed the new valves before turning the water back on to the house. Once you’ve disconnected the water lines, use the basin wrench to loosen the old faucet and remove it. Reach up behind the sink, fit the basin wrench jaws onto the tailpiece nuts and turn counterclockwise to loosen. Then disconnect the spray nozzle hose, remove the faucet and clean the sink area under the old faucet flange.
Sometimes, in spite of all your best efforts, it’s simply impossible to loosen the old faucet nuts. Try soaking the threads with penetrating oil and try again. If that doesn’t do it, it’s time to pull out all the stops and pull the sink so you can get at the nuts. It’s not that tough to do.
Loosen the screws on the bottom of the sink rim for a clamp-down sink, or cut the caulk between a drop-in sink and countertop with a utility knife and lift out the sink. Then you’ll be able to go after those nuts with locking pliers or a pipe wrench to free the old faucet.
If you’re replacing the kitchen sink along with a new faucet, install the faucet before setting the sink into the countertop.
Step 5
Place the flange over the faucet opening
Follow any manufacturer’s preassembly instructions and place the optional flange over the faucet opening. Finger-tighten the flange nuts underneath the sink and check the alignment of the flange, faucet and sink hole from above.

Step 6
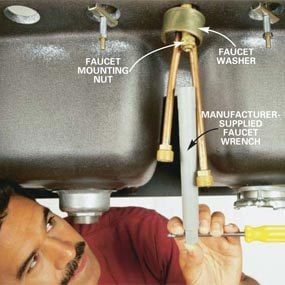
Tighten the faucet mounting nut.
Check the operation of the faucet and handle to confirm you’re not putting it in backward, and thread the feeder lines through the flange and sink holes. Then slip on the faucet washer, and thread on and tighten the faucet-mounting nut from below, gently spreading the faucet supply tubes if necessary to gain tool clearance. Sometimes manufacturers provide a special tool for this.
Step 7
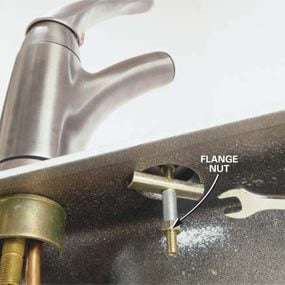
Tighten the flange nut
Hand-tighten, then snug up the flange nuts with an open-end wrench. You can only turn the wrench about a one-sixth revolution at a time.
Step 8
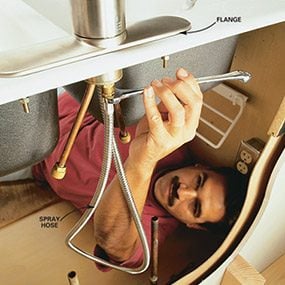
Attach the spray hose to the faucet supply tube.
Thread the spray nozzle line through the faucet body, then thread the spray hose fitting onto the faucet supply tube and tighten it. Pull the nozzle out of the faucet to make sure the hose under the sink operates freely, then attach the counterweight following the manufacturer’s instructions.
Step 9
Mark the supply lines where you want to cut them
Tighten the new valves onto the supply tubes and mark the feeder lines just above the compression nuts on the valves for cut-off.
Step 10
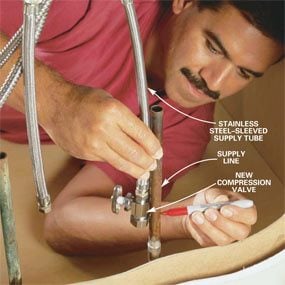
Connect the supply tube to the supply lines.
Clean the copper tubing with fine sandpaper. Then slip the nut, compression ring and valve body over the pipe and tighten. Close the valve, turn on the main water valve and check for leaks. Place a bucket under the faucet and turn the faucet on to check for leaks. Reassemble the garbage disposer, P-traps and drain lines. And there you have it; you now know how to change a kitchen faucet with ease!

Originally Published: November 20, 2019