Expert Tips for an Easy Faucet Installation

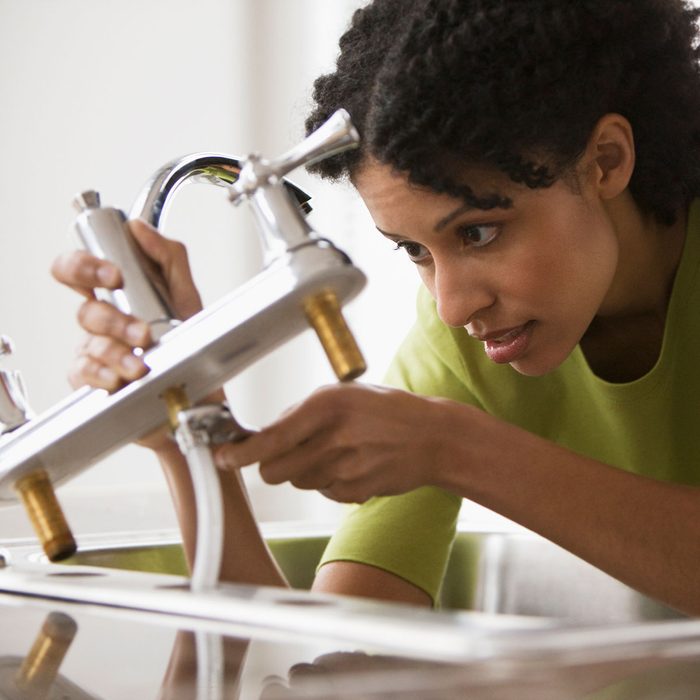
We caught up with Joe Barnes, a second-generation master plumber with more than 30 years of experience, to tackle this easy DIY project.


1 / 16
Gettyimages 93909456
Jose Luis Pelaez Inc/Getty Images

The instructions that come in the box with a new faucet should tell you everything you need to know for a normal installation. Trouble is, there’s no such thing as a normal installation because every job has its complications. To get the solutions to the most common problems, we sat down with a pro plumber who faces these faucet situations every day. Use these expert tips to make your faucet replacement an easy half-day job instead of an all-day ordeal.

2 / 16

Find the Source of the Problem

If your faucet has weak pressure or flow, a new faucet probably isn’t the solution. Here’s how our expert, Joe Barnes, tracks down the source of the trouble:

  •  If both the hot and the cold are weak, the aerator is probably clogged. Simply remove it and clean it to solve the problem.
  •  If either the hot or the cold (but not both) is weak, then faulty supply lines, shutoffs, or supply pipes are the problem. Supply hoses or shutoff valves are easy enough to replace. Fixing faulty or antiquated plumbing is a larger job, but it can benefit other fixtures in the home that have low water pressure.
3 / 16

Measure Before You Shop

Before you choose a new faucet, check the configuration and spacing on your sink. If you have a three-hole configuration, measure from the center of each handle to determine your spacing. Standard spacing is typically 4 or 8 in. If you want a single-hole faucet but your sink includes three holes, no problem. Many faucets include a cover plate to conceal the other two holes.

4 / 16

Get Everything You Think You Might Need

When you go to pick up your new faucet, bring a list of every possible install item you could need. Joe says if he’s headed to a job he hasn’t seen, he’ll be sure to have every potential part on board beforehand. One trip to return a few things is far easier than multiple runs to the home improvement store for the stuff you thought you wouldn’t need.

5 / 16

Get a Basin Wrench 

A basin wrench ($15) gets at impossible-to-reach nuts below the faucet. Joe uses a basic version of this tool, but many plumbers like Ridgid’s EZ Change Faucet Tool ($22). It will reach those difficult nuts and handle just about any other fitting you might encounter during a faucet install.

6 / 16

Install the Faucet First

If you’re installing a new sink, mount the faucet to the sink before dropping the sink into place. Having everything in plain view always makes for better connections — and the less time you spend on your back under that sink, the better.

7 / 16

Gettyimages 174974473
PictureLake/Getty Images

Test the Shutoffs

Almost every faucet is connected to shutoff valves beneath the sink. But those old valves often don’t work, and it’s best to know that before you begin. If your shutoffs don’t stop the water flow, you can repair them or replace them. Or you could turn off the water to the whole house at the main shutoff valve while you replace the faucet.

8 / 16

Cut Stubborn Connections

If you find rusted mounting nuts or other petrified connections that won’t budge, go ahead and cut them. An oscillating tool or rotary tool with a metal-cutting blade works well for this.

9 / 16

Clean Off Your Sink Deck

To ensure a good seal between the sink and the new faucet, be sure to clean up the footprint of the old faucet. Scouring powder works well for soap scum and crud. For tougher lime or rust deposits, a pumice stone is the best remedy.

10 / 16
family handyman

Use Plumber’s Putty

Some manufacturers suggest using silicone caulk to seal a faucet or drain, but beware: It can be difficult to apply and can stain natural stone. Joe prefers plumber’s putty. It’s easier to work with, and the non-staining variety won’t leave blemishes. He also says it’s far easier to repair a faucet assembly that was installed with putty. Silicone is as much an adhesive as it is a sealant and can make pulling things apart a pain.

11 / 16

Replace Your P-Trap

Make space under the sink by taking out the P-trap. Reusing an old P-trap can be a messy ordeal, so Joe usually includes a new trap assembly on his installs. The cost of a plastic P-trap kit is less than $5, and you’ll get peace of mind knowing all those fittings are new and clean. Keep in mind that most bath sink drains are 1-1/4 in., and kitchen sink drains 1-1/2 in. Joe sees a new P-trap as cheap insurance against callbacks.

12 / 16

Replace Your Supply Lines

Never reuse old supply lines. The last thing you want is water damage from a failed supply line. Even if the hoses are newer looking, Joe will replace them because the rubber washers can fail over time. Quality supply lines with a braided stainless steel casing may cost a bit more (about $8 each), but they’re well worth it.

13 / 16

Get Leakproof Connections

Each connection requires a different amount of torque to tighten. Over-tightening the slip nuts on a plastic waste line can strip the threads and make for a leaky connection. Always hand-tighten these connections. For flexible supply lines, the standard recommendation is to get them finger tight, then give them a quarter turn with a wrench. But Joe gives them a half turn and has never had an issue.

14 / 16

Don’t Skimp on the Teflon Tape

A 40-ft. roll of Teflon tape costs about a buck, so don’t be stingy with it. Make sure you wrap all your threaded connections clockwise several times. When you thread on that nut, it should feel tight, and the clockwise wrap will keep the tape from unraveling as you tighten the connection. Joe also wraps the threads for supply hoses even though they have a self-sealing rubber washer. Teflon tape is just more cheap insurance against any leaks, so don’t skimp.

15 / 16

Remove the Aerator and Flush Out Sediment

Plumbing work knocks sediment loose inside pipes. Be sure that water sediment doesn’t clog your aerator or valves. Joe always removes the aerator and then lets both the hot and the cold run for a minute to flush the lines before reinstalling the aerator.

16 / 16

The Final Step: Check for Leaks

Once everything is connected and your water is back on, do a thorough leak check. Wipe it all down with a dry rag, and then blot your connections with toilet paper to see if there is any evidence of a slow leak.

Bill Bergmann
“Bungalow” Bill Bergmann is an associate editor at Family Handyman. He’s been a licensed contractor/builder for more than 20 years. For him, there’s nothing better than taking out a few walls to make people happier in their homes.