


Bathtub spouts don't last forever. If yours is corroded, isn't working properly or is just ugly, you can replace it yourself in no time.
Less than 1 hour
Beginner
$25- $50
Introduction
Perhaps more than any other bathroom fixture, the bathtub spout is vulnerable to the staining and corrosive effects of hard water.
Luckily, this is one of the easiest bathroom problems to fix. All you have to do is replace the spout, a job you can do yourself, even with limited plumbing skills. You just need to know how to use a wrench and/or a screwdriver.
The easiest scenario? Swapping out a disfigured spout for one of the same type. I've done this job multiple times, and it usually takes a little longer than it takes coffee to brew. It's a different story if you want to change types, or if there's a problem with the piping behind the wall.
As Josh Rudin of ASAP Restoration puts it: "Changing out spouts is usually the extent of DIY tasks that a person who isn't a licensed plumber can successfully attempt on their own. The reason for this is because almost all other repairs or replacements require getting into the wall where the piping and valve assemblies are."
You'll need a new spout, of course. But before you buy one, determine which type to buy. That depends to a large extent on the type you already have. So grab your tools, head into the bathroom and let's get started.
How do you know when to replace a bathtub spout?
The motivation may be cosmetic, because the diverter no longer works, or the spout leaks. "Mineral deposits accumulate on the threading of screw-on spouts, even when they are properly tightened," says Rudin. "These deposits can cause small leaks that eventually become an issue."
How to tell what type of tub spout you need
Spouts can screw onto a threaded nipple or slip onto a smooth pipe protruding from the wall. Some feature diverter levers that stop flow from the spout and direct water to the shower. You can tell which type you need by removing the old one.
When to call a pro
If water has been leaking into the wall from behind the spout, you may need to break into the wall to repair the pipes. This is a messy job best left to a plumber. Also, Rudin says, "Going from a diverter spout to a non-diverter or vice versa is usually an involved process that requires a professional to do properly."
About the Expert
Josh Rudin is the owner of ASAP Restoration, LLC. A certified restorer, he's based in Phoenix, Arizona.
Tools Required
- Caulk gun
- File
- Flashlight
- Hex wrench
- Internal pipe wrench
- Phillips screwdriver
- Rag
- Slip-lock pliers
- Tape measure
- Tube cutter
- Utility knife
Materials Required
- New spout
- Silicone caulk
- Thread seal tape
- Threaded nipple
Project step-by-step (5)
Step 1
Remove the existing spout
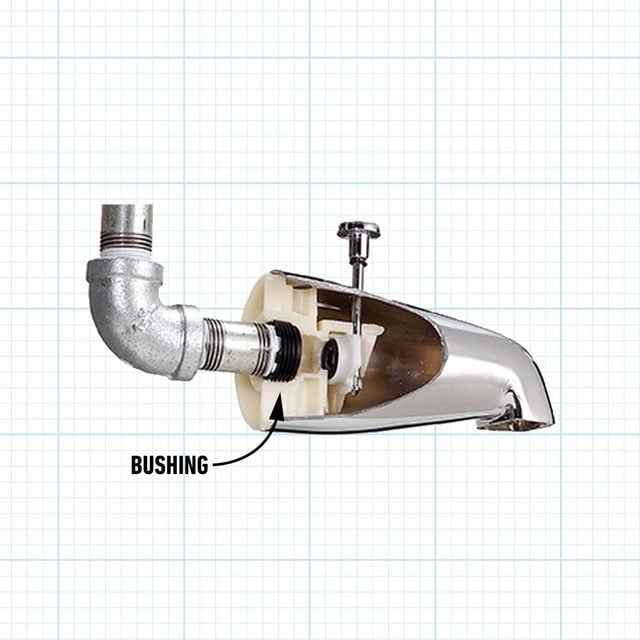
Spouts come in two types: slip-on and screw-on.
Slip-on spouts “are relatively easy to install and remove, and they experience very few issues over their lifetime,” says Rudin. “Screw-on spouts are common in older installations, and because of this, they have usually seen some battles.” Corroded threads and mineral deposits can make them harder to remove.
Here’s how to proceed:
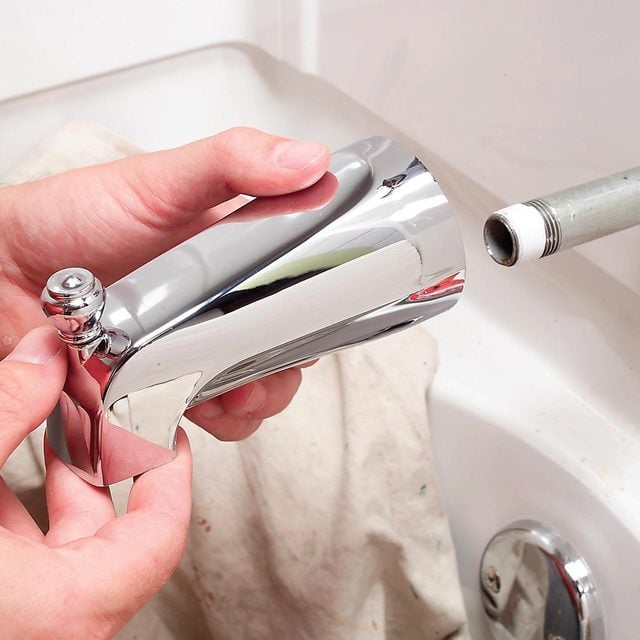
- Use a utility knife to cut through any caulk sealing the spout to the wall. If you don’t do this, the spout is much harder to remove.
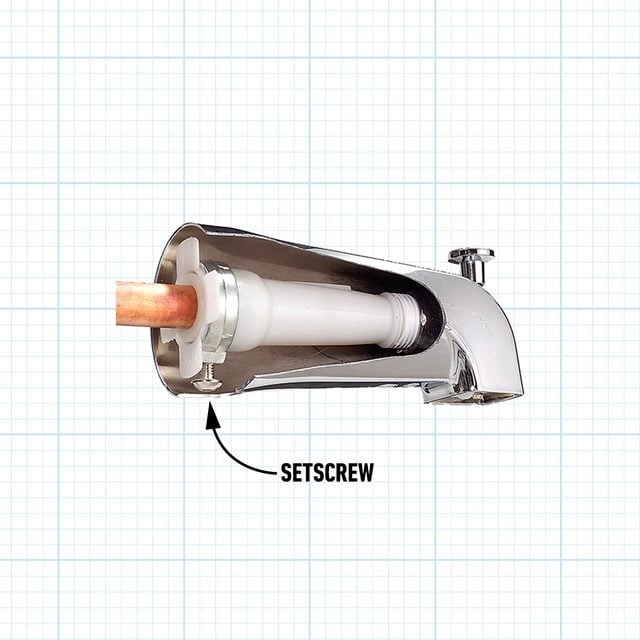
- Using a flashlight, look for a set screw, usually on the underside of the spout near the wall. If I find one, I know it’s a slip-on spout, which is easy to remove
- Loosen the set screw (usually with a hex wrench) and pull the spout off the copper pipe that protrudes from the wall. I usually twist the spout as I gently pull to avoid loosening pipe connections inside the wall.
- No set screw? It’s a screw-on spout. To remove it, I grip the spout with a hefty set of slip-lock pliers and turn it counterclockwise. It sometimes takes a little muscle. But once it loosens, I finish unscrewing it by hand.

Step 2
Remove the nipple, if necessary
The nipple (aka stub-out) is the short length of pipe sticking out from the wall where the spout attaches.
- If the spout is a slip-on, the stub-out is a smooth copper pipe soldered to a fitting behind the wall. It’s usually not a good idea to remove this pipe. Soldering a replacement behind the wall is messy and hard to do properly.
- If the replacement spout requires a shorter stub-out, I cut the pipe with a tube cutter.
- If the spout needs a longer stub-out, I solder a threaded brass adapter onto the pipe and install a screw-on spout. This adapter is cheap and easy to find at any hardware store.
- If the existing spout is a screw-on, the nipple is galvanized steel and threaded. It’s possible to unscrew and replace a threaded nipple with one of a different length, which gives more options for replacement spouts.
- If the nipple is long enough to grip with pliers, I unscrew it.
- If it’s short, I use an internal pipe wrench. I insert the hexagonal end of the wrench end into the pipe, tap on the other end with a hammer to wedge the wrench inside the pipe, then grip the other end with pliers and turn it.

Step 3
Screw in a new nipple
Threaded spouts come in three types: front-end, wall-end and telescoping. Most come with bushings that adapt to 1/2-in. and 3/4-in. pipe.
- Front-threaded: The threaded bushing is near the front of the spout. To determine the length of the nipple you need, measure the distance from the bushing to the end of the spout. Add the distance from the surface of the wall to the plumbing fitting behind the wall.
- Rear-threaded: The bushing is at the wall end of the spout. The nipple should extend 1/2-in. from the wall, which usually means you need a 1-in. nipple to reach the fitting behind the wall.
- Telescoping: The bushing is near the back wall. But its position adjusts to within one inch, so a 1-in. to 2-in. nipple should work. (I always check the installation instructions that come with the spout to make sure.)
After wrapping plumbing thread tape clockwise around both ends of the nipple to prevent leaks, I screw the nipple into the fitting behind the wall. Then I use pliers or an internal pipe wrench to tighten it.
Step 4
Install the spout
- Screw-on spout: I screw the spout onto the nipple and tighten it by hand as much as I can. Then I wrap a rag around it to protect the finish and continue tightening with pliers. When it’s fully tightened, the back end should be flush against the wall. If it isn’t, I replace the nipple with one that’s 1/2-in. shorter.
- Slip-on spout: I start by loosening the set screw on the underside of the spout using a hex wrench or Phillips screwdriver. As a precaution, I de-burr the end of the stub-out with a file to make it smooth, then slip on the spout and push it all the way to the wall. It fits tightly, so I usually have to twist it back and forth to get it to move. Once the spout is seated, I tighten the set screw securely to prevent the spout from rotating or slipping off.
Step 5
Caulk the new spout
I always apply a bead of silicone caulk around the base of the spout to seal it to the wall. This prevents any water that collects on the spout from seeping behind the wall.
Originally Published: November 20, 2019