


First things first: Hay bale gardening bales are most often made of straw. They're a smart, economical version of container gardening, by any name.

How To Start a Hay Bale Garden

Updated Feb. 08, 2024
If you aren’t ready to till part of your lawn and there’s no room in your budget for raised beds, don’t give up on starting a garden! There’s another way to grow tomatoes, cucumbers, lettuce and lots of other vegetables. One option you may not have considered yet is a hay bale garden,
On This Page
What Is a Hay Bale Garden?
More than 20 years ago, Straw Bale Solutions author Joel Karsten created an alternative gardening method when he needed a low-cost way to grow vegetables. He discovered bales of organic straw, hay or other quick-composting materials can replace the need for soil, while offering fresh nutrients to plants. The outer shell of the bales also insulates plants, offering early-season frost protection while keeping roots cool during summer’s peak heat.
“Straw bale gardening is simply a different type of container gardening,” Karsten says. His easily adaptable process, also known as hay bale gardening, has been so successful it’s caught on across the globe, from isolated areas of rural Cambodia to urban areas of the Philippines.
Why Choose Hay Bale Gardening?
Here are four strong reasons to give a hay bale garden a try:
Affordability
A straw bale is considerably easier on the budget than raised beds and soil. While it might cost a few hundred dollars for the wood to build garden beds, a bale averages $5 to $10 if purchased directly from a farm. Bales should last a full season or two.
Accessibility
The height of a bale makes plants easier to reach and tend for anyone in a wheelchair or unable to kneel easily. No tilling or heavy tools are needed, although a small hand trowel and pruner are helpful for planting and harvesting vegetables.
No Soil Required
If you lack good soil, a bale gives you a place to plant. It also elevates plants above the soil line, so they are less vulnerable to soil-borne fungi, diseases and insects.
Bale Basics
Straw Bales vs. Hay Bales
Straw bales are yellow-gold rectangular cubes made of densely packed dried stems or stalks left over after harvesting wheat, oats, barley and other grains. These bales typically hold up best throughout the growing season and provide great insulation.
Hay bales are greenish rectangular cubes of forage crops, such as clover and alfalfa. They may have some stray seeds in them and are not quite as sturdy as straw bales.
Where to Buy Bales
You may be able to find ready-made hay or straw bales at farm, garden or home centers. Another option is to check the online straw bale marketplace, Craigslist and Facebook Marketplace for local farmers selling bales. Another hack from Karsten for penny-pinchers: Watch for autumn displays using straw bales, and ask if you can have the bales when the season’s over. Save them for spring conditioning and planting.
If you go through online retailers, watch carefully for sizes so you don’t end up with a tiny bale meant to accent a flower bouquet or loose straw meant for animal bedding or mulch. Standard bale sizes should be about 16 inches by 18 inches, and run about three feet long. They should be tightly wrapped two or three times with twine.
DIY Bales
Technically, you can use anything dense and compostable to create your own bale. You can try grass clippings or leaves pressed into a rectangular bin for the shape. Add some water to help bind the materials together. Karsten advises wrapping a bale made of looser materials with twine or chicken wire.
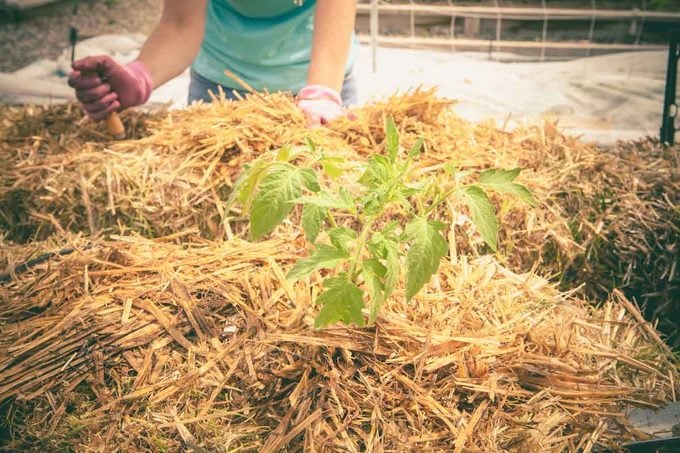
How to Prep the Bale
Successful hay bale gardening requires you to pre-condition the bale for at least 12 days before planting. This should take place two weeks before your area’s typical last day of frost. Conditioning hastens the composting process in the center of the bale, creating growing material to nourish plants. Use a spade or gardening fork to create a few holes along the top of the bale so you can reach the inside.
Fertilize Bales for 10 Days
You’ll need a product that’s at least 20 percent nitrogen; Karsten suggests a cheap lawn fertilizer that’s not a timed-release product. Organic gardeners may opt for blood meal. BaleBuster includes additional boosts of fungi and bacteria for a more thorough composting.
Days 1 to 6
Add 1/2 cup of traditional fertilizer or three cups of organic fertilizer per bale on the first, third and fifth day of conditioning. Water daily, about a gallon of water per bale. Use warm water if possible. Overwatering may wash away needed nutrients.
Days 7 to 9
Use 1/4 cup of fertilizer (or 1-1/2 cups of organic fertilizer) per bale on Days 7, 8 and 9.
Day 10
Add one cup of 10-10-10 fertilizer or three cups of organic fertilizer with potassium and phosphorus, which can bind to the composting material. Water enough to wash the fertilizer into the bale.
Days 11-12
Keep the bale moist on Day 11. Composting generates heat, and that heat needs to cool below 105 F before planting seedlings, such as tomatoes. Seeds will typically germinate better with warmer temperatures.
What to Plant in the Bale
Anything that grows in soil should grow in a hay bale garden. If you’re new to gardening, try planting seedlings, such as tomatoes, peppers and cucumbers, from a local garden center or home store. Seedlings are given a healthy head start in greenhouses and can be easier for first-time gardeners.
You can also plant your straw bale with seeds. Larger seeds, such as peas, beans and squash, can be planted right in the bale.
How to Plant the Bale
For seeds, push them down to about a knuckle’s depth in the newly composted material. If you’re planting vegetables with tiny seeds, such as carrots or lettuce, it’s best to add about an inch of potting soil on top of the composting bale to keep seeds at the correct depth. Dampen the soil, plant the seeds gently and sprinkle with a light layer of additional potting mix, which is sterile and able to hold moisture.
For seedlings, make a hole to place the roots as you would in soil. Add a little potting soil and cover the roots, making sure the seedling is secure and level.
How to Tend the Bale
One of the biggest mistakes new straw bale gardeners make is overwatering. A straw bale can hold three to five gallons of water, which can wash away important nutrients. Stick to about one gallon of water per bale daily when conditioning bales and during hot, sunny days. You don’t have to water as often during cool and cloudy weather. Gently feel inside the bale for moisture, if in doubt.
Another watering approach is to place a soaker or drip hose across the bales for less hassle and even watering.
What to Do with the Bale Post-Harvest
If you’re lucky, you’ll get two seasons of planting out of your straw bales. You can compost spent bales, use them as mulch or recycle with your lawn and garden waste.
Originally Published: May 18, 2021