


How To Build a Garden Arbor

Updated: Apr. 25, 2024
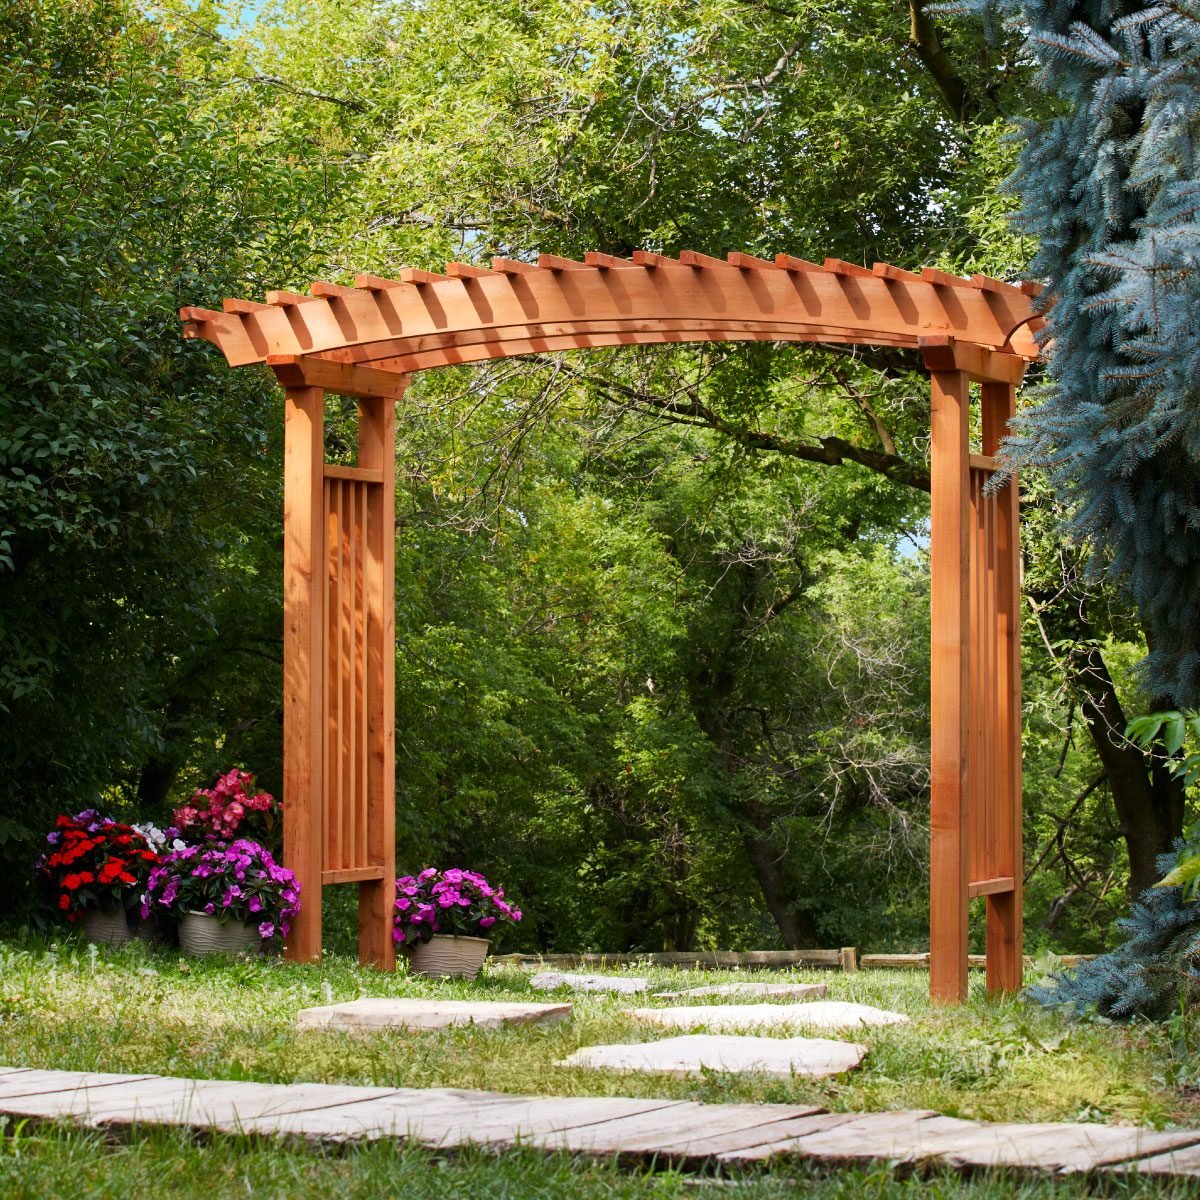
Create this stylish, arched DIY garden arbor in only a couple of days. It’s way easier than it looks.
Multiple Days
Intermediate
$500 - $1500
Introduction
Don't be intimidated by the look of this elegant garden arbor. You can build this and it will look great. Read on for our step-by-step DIY instructions.Tools Required
- 7-1/4" circular saw
- Belt sander
- Chisel
- Clamps
- Combination square
- Countersink drill bit
- Drill bit set
- Drill/driver
- Level
- Mallet
- Posthole digger
- Sawhorses
Materials Required
- 1 - 2x4x8'
- 14 - 2x2x8'
- 3 - 2x12x10'
- 3 - 2x4x10'(for bracing)
- 3" screws
- 4 - 80-lb. bags concrete mix(or four bags of post setting foam)
- 5 - 4x4x8'
- 8 - 6" screws
This garden arbor may look like a challenging, weeks-long project, but it’s not. If you can drive screws and handle a saw, you can build it in a weekend. Don’t be afraid of those curves and coves; we’ll show you a goof-proof way to cut them.
Building and installing the arbor in your outdoor space takes about two days of work, but you’re best off spreading it over a three-day weekend. You can build it in a day, add a coat of finish the next morning, let it dry overnight and set up the arbor the following day.
Project Overview
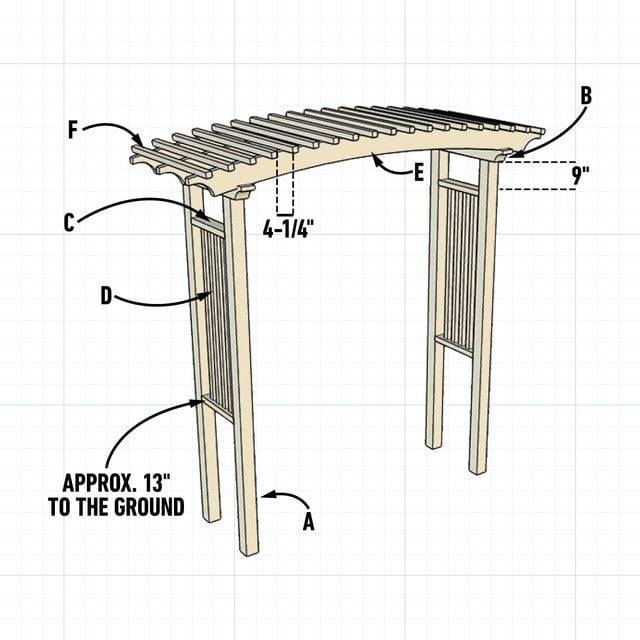
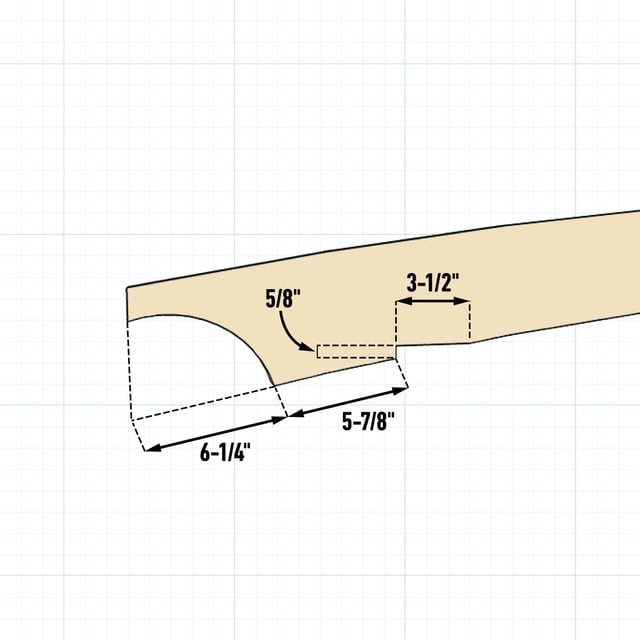
Garden Arch Detail
Cutting List
Overall dimensions: Approx. 104-in. H by 107-in. W by 40-in. D.
| KEY | QTY. | PART | DIMENSIONS |
| A | 4 | Post | 3-1/2″ x 3-1/2″ x 96″ |
| B | 2 | Beam | 3-1/2″ x 3-1/2″ x 36″ |
| C | 4 | Rung | 1-1/2″ x 3-1/2″ x 18″ |
| D | 8 | Side slat | 1-3/8″ x 1-3/8″ x 47″ |
| E | 3 | Arch | 1-1/2″ x 11-1/4″ x 107″ |
| F | 19 | Top slat | 1-3/8″ x 1-3/8″ x 40″ |
Safety considerations
Wear eye, dust and hearing protection when cutting, sanding or mixing concrete during the construction of this garden arbor. Make sure you’re familiar with the tools required and possess the necessary knowledge and confidence to use them in a safe and effective manner.
Project step-by-step (11)
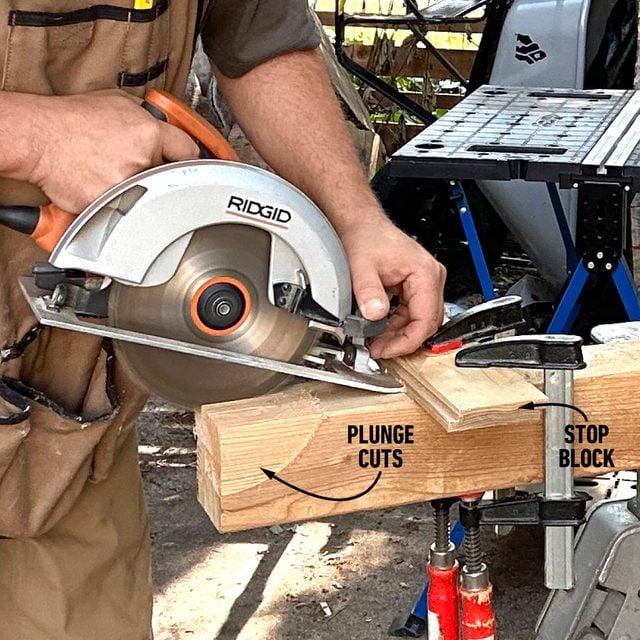
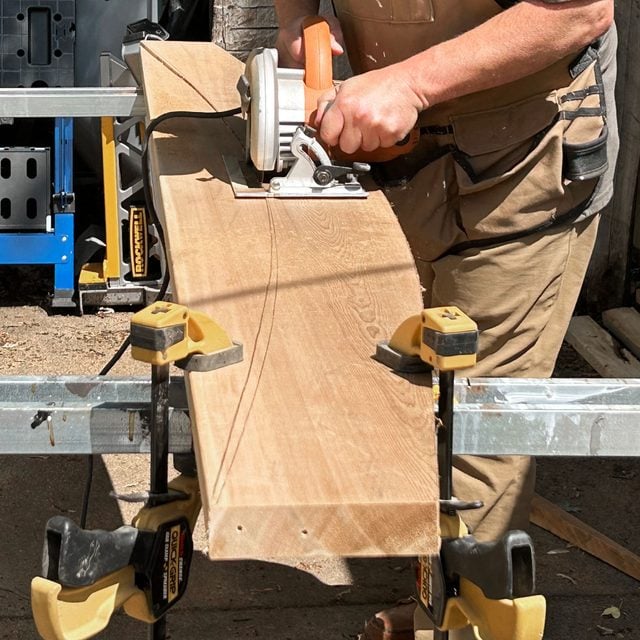
Position the saw
Align the blade’s arbor at the end of the beam (B) and mark at the front of the circular saw’s shoe. This mark tells you where to clamp the stop block to cut the cove.
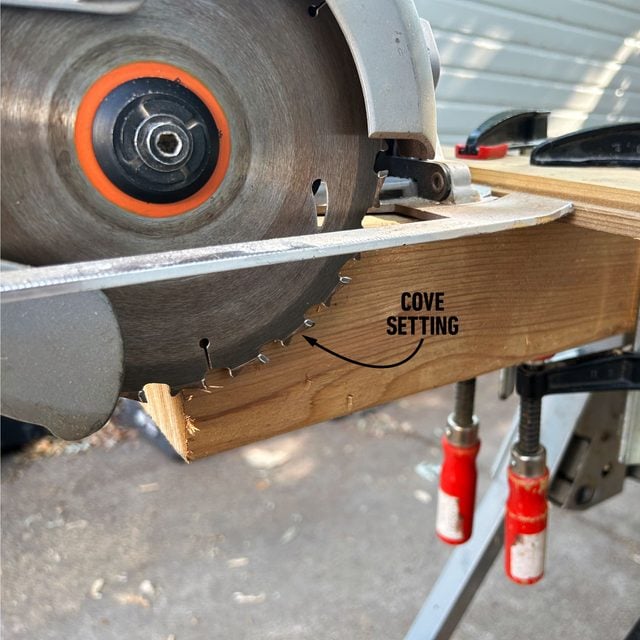
Cut the beams and make plunge cuts
Cut the beams (B) to length and cove the ends with a 7-1/4-in. circular saw. Pivot the saw downward while holding the shoe against the stop block.
Remove the waste
Once you’ve made all the plunge cuts, cut out the waste with a mallet and a chisel.
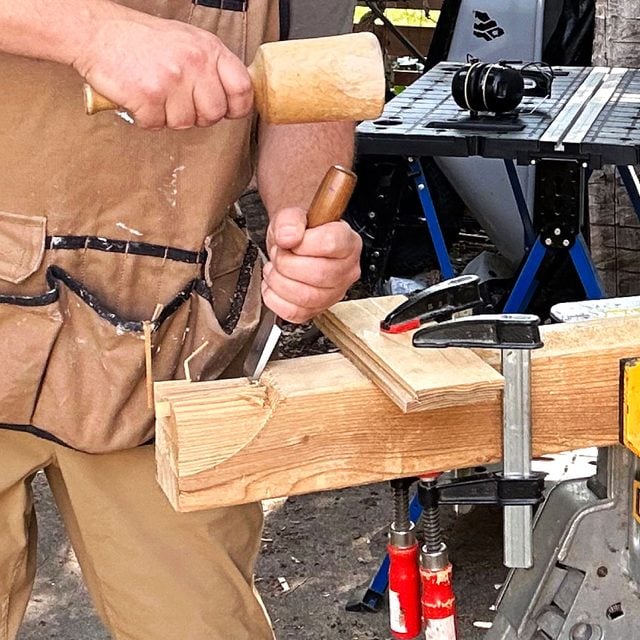
Clean up the cove
After removing the waste, smooth the coves on the beams (B) smooth with a belt sander. The more plunge cuts you made, the easier it will be to smooth the cove.

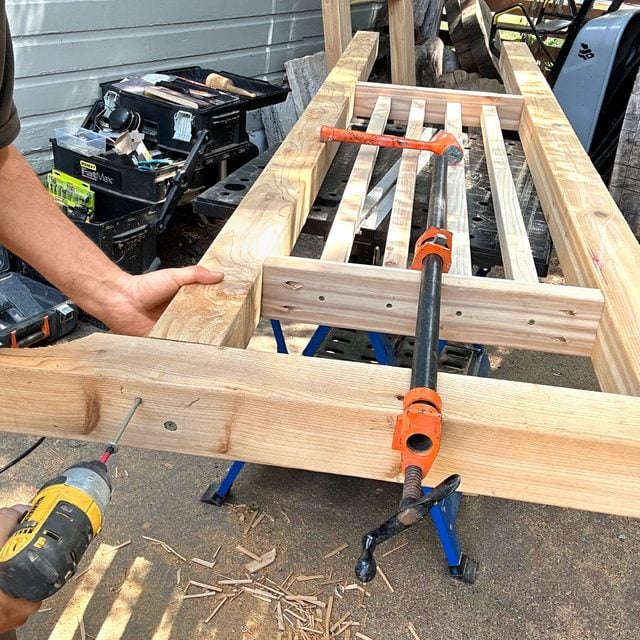
Assemble the sides
Align and evenly space the side slats (D) between the rungs (C). Attach them with screws through the rungs. Next, drive screws at an angle through the rungs (C) and into the posts (A). Driving screws at an angle is a lot easier if you drill pilot holes first to guide the screws.
Fasten the beam (B) to the posts (A) with long six-inch construction screws. When you screw the beams to the posts, make sure the screw heads sink in flush with the surface so they’re not in the way when you set the arches (E) on them. Bore countersink holes if needed.
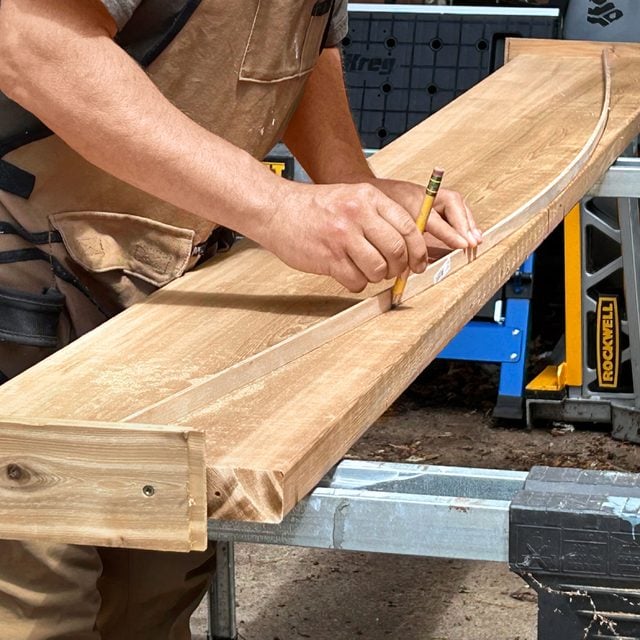
Mark the arches
Cut the 2×12 arch material to length and screw oversize blocks to the ends. Bend a spring stick between the blocks. A spring stick can be any piece of scrap wood 10 feet long with a consistent bend to it.
Trim the ends of the spring stick to decrease its arch. Once you’ve found an arch you like, trace the arch along the stick on the 2×12 material. Move the stick up six inches, then trace again.
Use the first arch (E) as a pattern for the other two. Mark the arch’s (E) end coves using the bottom of a five-gallon bucket as a radius.
Cut the arches
When all your marks are made, set your circular saw blade depth to 1-3/4-in. and cut the curves in the arches (E). Clean up the cuts with a belt sander. Then cut the coves and bird’s-mouths using a jigsaw (refer to the Garden Arch Detail above for placement).
On a gentle curve like this one, a circular saw is faster and easier to control than a jigsaw. Take your time and cut along the outer edge of the mark.
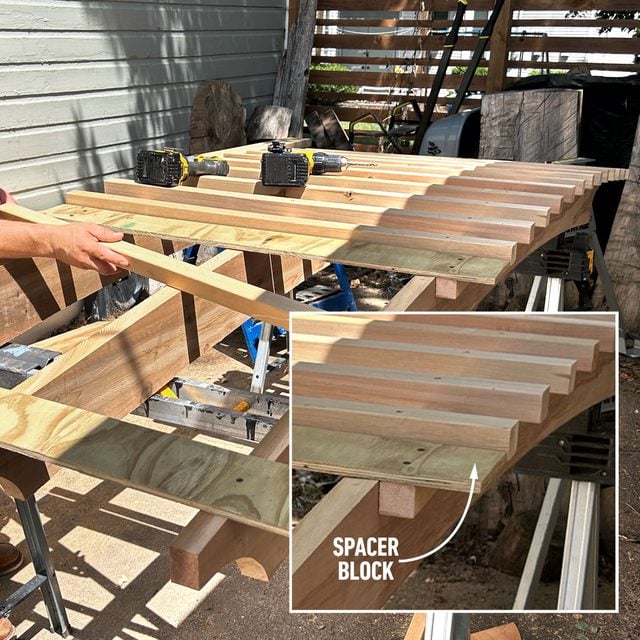
Screw slats to the arches
Check and double-check to make sure you have the arches spaced correctly. Make sure the center top slat (F) and arches (E) are perpendicular to each other using a square.
You may have to nudge the whole assembly to adjust it for squareness. To position the slats quickly and prevent mistakes, make a spacer block from scrap plywood.
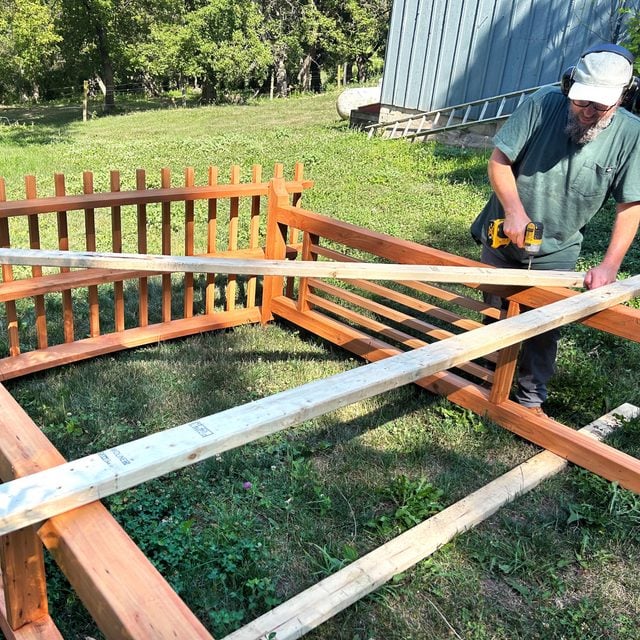
Assemble it, square it, brace it
Screw 2×4 braces to the posts (A) to hold them the correct distance apart. Screw the arches (E) to the beams (B). Take diagonal measurements to square up the arbor and add a diagonal brace to hold it square.
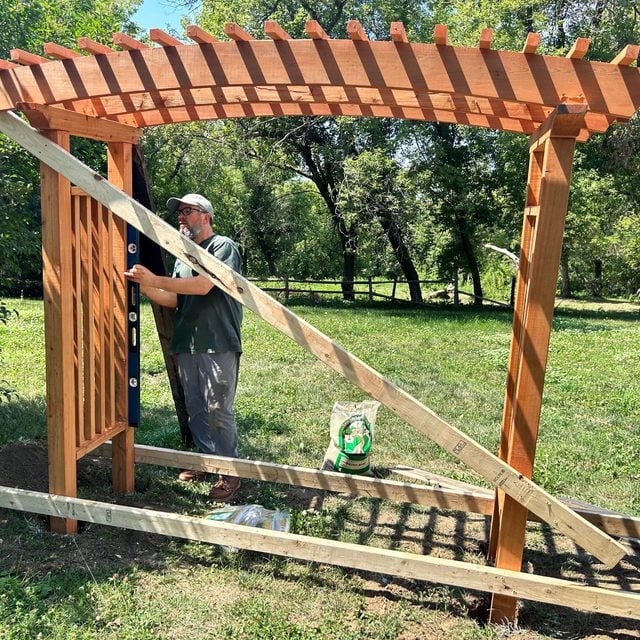
Level the arch
Stand up the arbor exactly where you want it and mark the locations of the postholes. Dig postholes and set the arbor into them. Level the posts by stacking blocks and shims under the braces, or using gravel in the holes.
When the arbor is perfectly positioned, fill the postholes with concrete or post setting foam.
FAQs
What is the best wood for a garden arbor?
Any wood species with natural weather resistance will work. As an alternative to cedar (which we used for this project), pressure treated deck lumber is a durable and much more cost-effective option.
How tall should a garden arbor be?
Eight feet tall is a comfortable height. Generally, a garden arbor should have at least as much clearance as an 80-inch-tall standard door.
What is the difference between a trellis and an arbor?
The distinction is somewhat gray. The arbor is traditionally used to define a pathway, while a garden trellis is a structure used to support plants and vines.
Originally Published: June 20, 2017