
All You Need to Know About Garden Tilling

Updated: Feb. 13, 2023
Spring planting season is here, and tilling is the first step in preparing your garden. This guide walks you through the process.
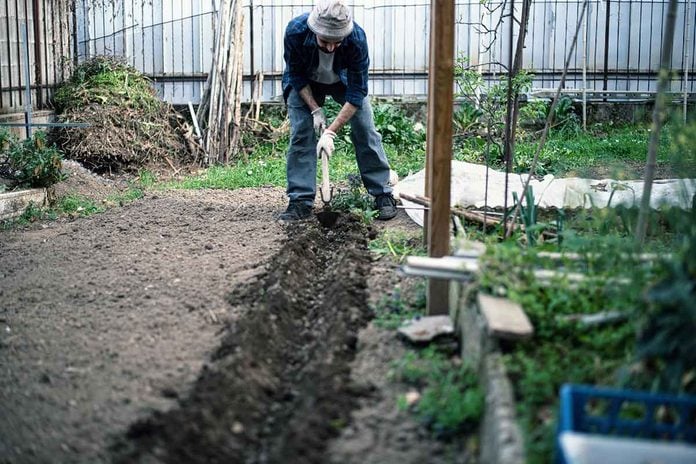
Whether you are starting a new garden from scratch or getting an established plot up and running, you need to prepare the bed by tilling the soil. Tilling may be one of the most labor-intensive parts of gardening, but it’s also one of the most important.
“Garden tilling is an essential process if you want to add a considerable amount of organic matter to make the soil more fertile, or if you need to prepare a garden bed for fresh seedings,” says The Bumper Crop Times gardening expert Bryan McKenzie.
Here are our tips on how and when to till your garden for spring planting and the best tools for the job.
On This Page
What Is Garden Tilling?
Tilling means breaking up the soil to prepare it for planting. Effective tilling churns dirt from eight to 10 inches below the surface, creating a loose, aerated soil bed for planting seeds or seedlings.
“Roots and plants hate thick, hard, clumped-up soil,” says Outdoor Happens expert gardener Elle Meager. “That’s because plants need plenty of oxygen, nutrients and moisture — all of which are hard to come by if the dirt is hard as a rock. When you break up the soil with tilling, your plants have more of a chance to take root, flourish, access oxygen and develop without stress.”
In addition to aerating the soil for better root-to-earth contact, garden tilling offers other advantages:
-
Weed prevention. “Tilling helps prevent weeds because it chops weeds that have already started to grow as well as disturbs any perennial weeds that have taken root so they won’t return,” says Garden Media Group President Katie Dubow, a gardening expert.
-
Fertilization. Tilling helps elements decompose into the soil, giving more nutrients to the plants. If you are adding compost to the plant bed to boost nutrients, tilling helps spread and mix the organic matter uniformly throughout the soil.
-
Pest control. According to Dubow, tilling is a good way to reduce pests because it disrupts the lifecycle of larvae that have lain dormant in the soil during winter.
When to Begin Tilling a Garden
Depending on the climate in your region, the best time to begin spring tilling varies from March to May. Do it when your soil has sufficiently thawed from the winter freeze and dried out from early spring rains.
“In spring, one of the biggest challenges of gardening is soil that warms slowly,” says Dubow. Check to see if your soil is thawed by sticking a shovel or trowel into the ground. Soil that has thawed will yield easily while frozen soil will be rigid and hard to penetrate.
Once the ground is thawed enough, tilling will kickstart the growing season. “By tilling, you’ll mix in more air and help the soil warm sooner and your plants will grow more quickly,” Dubow says.
Avoid tilling wet soil. That compacts the ground and makes it harder for roots to penetrate after it dries out, McKenzie says. To determine if the soil is dry enough to till, work a small clump of soil between your fingers. If it crumbles easily, start tilling. If the clump sticks together, the bed needs more time to dry.
There is no strict rule about how far in advance to till your garden bed before spring planting.
“I say there’s no perfect time for tilling your garden,” Meager says. “Any time before planting your veggies or crops works for me. I’ve had tremendously successful yields when I’ve tilled my garden minutes before transplanting directly in the freshly tilled soil! I’ve also had luck breaking up the dirt week before transplanting.”
Tools to Help With Tilling
Multiple hand and power tools will effectively break up your soil to encourage hearty, thriving plants:
-
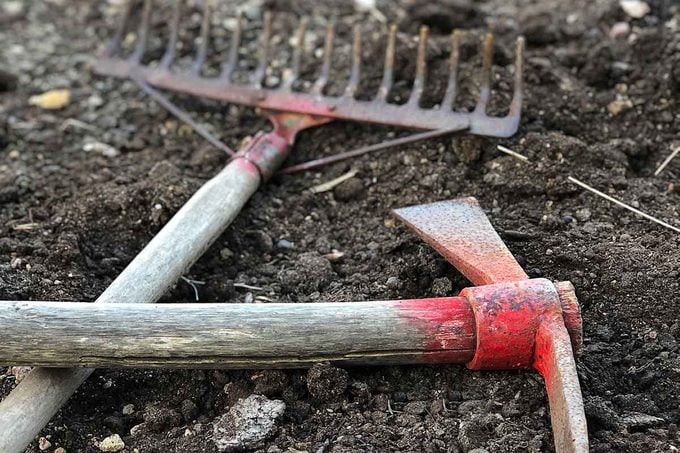
Rake. If your garden doesn’t need a thorough tilling, go over the surface with a cultivator rake to loosen up the top layer of soil for leveling out the bed, planting seeds or spreading mulch. (Compost needs to be worked deeper into the soil.)
-
Hoe. This old-school tool is the most labor-intensive way to prepare your garden for planting. Leave the smaller jobs like removing weeds to the garden hoe before going over the garden with a rotary tiller or for working the soil in tight spaces without damaging the roots of nearby established plants.
-
Hand tillers and twist tillers. Like rakes and hoes, hand tillers and hand twist tillers require hard work. Use them to till small patches of your garden bed, or to work the soil between established plants where you need more precision.
-
Broadfork. Also known as a U-bar, this hand tool features a pitchfork-like base with tines that you drive deep into the soil with your body weight. Then pull back on the two handles to break up the soil.
-
Auger. An auger takes some of the back-breaking work out of tilling, especially for new gardens or large spaces, according to Dubow. This drill attachment digs precise holes into the ground quickly and with little effort, loosening the soil and helping mix compost deep into the ground.
-
Motorized rotary tiller. The most effective way to till a large patch of garden or entire bed is with a rototiller. It’s powerful enough to break up large soil clumps, mix compost deep into the soil or cover last year’s dead plants with soil. Garden tiller rental is an option for those who don’t want to purchase one.
Steps: How to Till a Garden

Here’s a step-by-step guide to tilling your garden plot for spring planting:
-
Prepare the area. Remove all weeds, stones, tree and shrub roots and other waste. McKenzie recommends using a hoe to loosen up weeds, and a pick axe to dislodge stubborn rocks and roots. If you don’t clear all that out, he says you’ll risk damaging the tiller.
-
Mark the area. Trace clear lines on the soil, or use string or even spare lumber to mark the boundaries and rows of your garden bed.
-
Spread compost. If you are planning on working compost into the soil, spread it four or five inches deep across the marked area before you begin tilling to make sure it’s distributed evenly.
-
Work slowly. Maintain a slow and steady pace, especially if you are using a motorized tiller. Don’t push the machine ahead too quickly. Give it time to work each row thoroughly.
-
Never go back. Till row by row like you would if you were mowing grass to avoid overtilling the already processed patches. Overtilling compacts the soil. You want loose and aerated.
Originally Published: May 04, 2021