


The perfect solution for an ugly ceiling.
Multiple Days
Intermediate
$101–250
Introduction
Do you want to remove or patch a popcorn ceiling? First, remember that removing a popcorn ceiling is a really dirty job. Second, patching a hole is just, well, patching a hole. You should consider simply covering the whole ugly mess with a new layer of drywall instead. It’s probably the easiest way to get the best results.Tools Required
- Caulk gun
- Chalk line
- Drywall sander
- Drywall saw
- Dust mask
- Extension cord
- Framing square
- Knockdown knife
- Mud pan
- Safety glasses
- Screw gun
- Taping knife
- Utility knife
Materials Required
- Drywall screws
- Drywall sheets
- Joint compound
- Painter's tape
- Tear-away bead
Covering an old ceiling with new drywall is a big job—it requires an understanding of basic drywall skills, heavy lifting, a serious time commitment and a major mess. But in some cases, it’s the smartest way to go. We talked to a dozen remodelers, and every one of them made the same point: In many cases, covering up an old ceiling saves time, money and headaches in the long run.
One of the best things about a ceiling cover-up job is that you can cut holes in the ceiling without fussy repairs later. So it’s the perfect time to add or move light fixtures, install a ceiling fan or run networking cables. If there’s living space above the ceiling, you can even fix floor squeaks or run new plumbing for a future bathroom remodel.
We’ll focus on the details that make this job different from other drywall projects. Go to the drywall section for everything else you need to know about hanging and finishing drywall.
Is this the solution for your problem?
Damaged drywall—The ceiling shown in this article had flaking texture, plus stains and holes, so covering it all with a new layer of drywall was actually faster and easier than repairing it. If you have only a few holes or stains, repairing them probably makes more sense. While you’re at it, get to know the difference between sheetrock and drywall.
Popcorn ceiling—If you have a heavily textured ceiling and just don’t like the look, you have a few options. With unpainted texture, the most common approach is to mist it with a spray bottle and scrape off the softened texture. Removing popcorn ceiling that way makes a big, sloppy mess and almost always leaves you with repairs to do afterward.
With painted texture, some pros scrape as best they can and then ‘skim coat’ the entire ceiling with a thin layer of joint compound. Scraping dry texture is a dusty mess, and skim coating requires some practice. And if your home was built before 1979, the texture might contain asbestos, which can do serious damage to your lungs. So before removing texture, it must be tested (you’ll find lots of labs and instructions online). You can remove texture that contains asbestos yourself as long as you carefully follow safe procedures. For all of these reasons—mess, time, skill level, asbestos—covering a ceiling is often easier than removing texture.
Cracked plaster—If you have a plaster and lath ceiling with a few short, tight cracks, repairing them is probably smarter than covering the ceiling. But if cracks span the entire ceiling or the plaster alongside the cracks feels loose when you press on it, making lasting repairs is tough. Plaster cracks often come back, even after careful repairs. That’s why several pros told us they routinely cover plaster ceilings: it’s the best way to be sure that they won’t have to come back and repair the ceiling again in a year or two. Remove any loose or sagging plaster before covering the ceiling.
Money, time and materials
For a 12 x 12-ft. room, the total materials bill will fall in the neighborhood of $160, including drywall, joint compound, paint and drywall lift rental. With a helper or two, you can cover an average-size ceiling in one day. Finishing, or “taping,” all the joints is much more time-consuming and requires drying time between coats. Then comes sanding and painting. Even if you can devote a few hours every evening to this project, expect it to span at least a week.
We recommend 1/2-in.-thick “light-weight” drywall for this project. It’s not only lighter than standard drywall but also stronger, so you can hang it from joists centered 24 in. apart. UltraLight, High Strength Lite and ToughRock are some brand names you’ll find at home centers. If possible, get sheets that are long enough to span the room. Shorter sheets are easier to handle, of course, but you’ll pay dearly for that convenience when it’s time to finish the “butt joints” where ends of sheets meet. Unlike the tapered joints along the long edges of drywall, butt joints are tough to finish. Avoid them if you can.
Most home centers carry 8- and 12-ft. sheets. Specialty drywall suppliers usually carry those lengths, plus 10-, 14- or even 16-ft. sheets. Just be sure you can get long sheets into the room before you buy; sometimes 8-ft. sheets are the only option. Everything else you’ll need is available at home centers: 2-in. screws, 10-ft. lengths of 1/2-in. tear-away bead, mud rings for junction boxes, joint tape and compound, primer and paint.
Project step-by-step (10)
Step 1
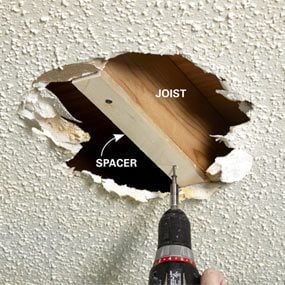
Shim out exposed joists
If you have a hole in the ceiling, hold a straightedge across it, measure to the framing and cut spacers to that thickness. Screw a spacer to the joist or truss to create a flush surface for the new drywall.
Step 2
Mark the joists
Locate joists with an electronic stud finder, or just probe for joists by driving a nail through the drywall. All the joists should be centered either 16 or 24 in. apart, but double-check with a nail. Mark each joist location with a chalk line on the ceiling and with tape on the wall.

Step 3
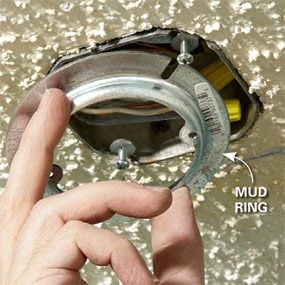
Extend electrical boxes
Screw a 1/2-in. “mud ring” to any junction boxes in the ceiling. This extends the box so that it will be flush with the new drywall.
Step 4
Measure to joists and cut the rock
Cut sheets so that the ends fall on the centers of joists. Measure from the wall to the chalk line and subtract 1/4 in. to allow for a gap along the wall. Also cut off the tapered edge that will run along the wall.

Step 5
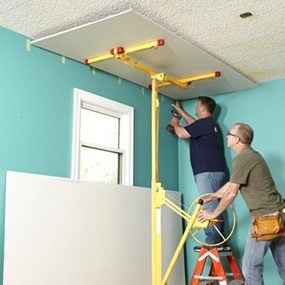
Raise rock the easy way
Hoist each sheet with a rented drywall lift. Be sure to leave 1/4-in. gaps between the sheet and the wall. Those gaps allow you to slip tear-away bead behind the edges of the drywall bead later.
Step 6
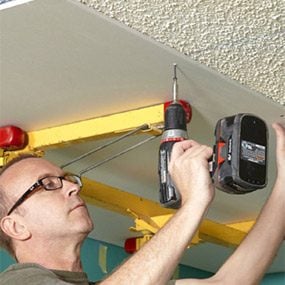
Screw to the joists
Screw each sheet along the tapered edges, then add a couple near the center. That will be enough to hold it in place. Later, when all the sheets are up, snap chalk lines and drive the remaining screws.
Step 7
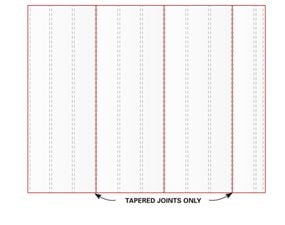
Joist direction matters
Drywall is normally hung perpendicular to the joists. But sometimes it’s smart to break that rule. Let’s say you have an 11 x 14-ft. room with joists spanning the 11-ft. length (as shown here) and that you can’t get sheets longer than 12 ft. into the room. You could run sheets across the joists as usual, creating three hard-to-finish butt joints (Figure A). Or you could run the sheets parallel to the joists (Figure B) and eliminate butt joints completely.

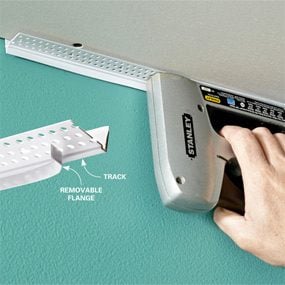
Install tear-away bead
Staple the bead to the drywall every 8 in. Be sure to hold the bead tight against the wall before you fasten it.
Step 8
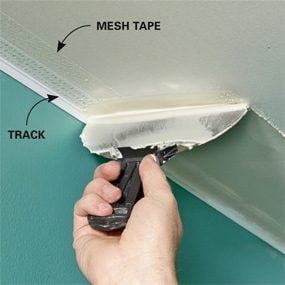
Mud the bead
Skim joint compound over the bead, using the track to guide your knife. Mesh tape isn’t essential, but it’s cheap insurance against cracks.
Step 9
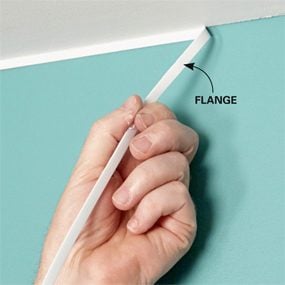
Tear off the flange
After sanding and painting, rip the protective flange off the bead. To avoid scraping off the fresh paint, pull the flange downward along the wall, not outward along the ceiling.
Step 10
Expert advice from Field Editor Tom Dvorak
I’ve sheeted over dozens of ceilings and always finish up with a knockdown texture. Ceilings show every little flaw in the taping job, and knockdown is the easiest way to hide them. To see how I apply knockdown texture, see How to Apply Knockdown Texture.