This cove lighting project from crown molding brings soft light and rich drama to any room.
Multiple Days
Intermediate
Varies
Introduction
Bored with your living space? Cove lighting can add an understated elegance and breathe life into the most uninspiring room. We'll show you how we built ours using LED strip lighting and demonstrate how to wire it up. We'll also give you the lowdown on this type of lighting and share other cove and lighting options that might be a perfect fit for your budget and decor.
Is cove lighting right for you?
You may think your ceiling looks good now. But when the cove lighting rakes across the surface, you may discover seams and popped drywall nails you never knew existed.
Stand on a ladder and shine a flashlight across the surface of the ceiling. If it’s ugly or damaged, you may want to abandon the idea in favor of a light fixture or a cove that provides light to the walls.
Our cove lighting design
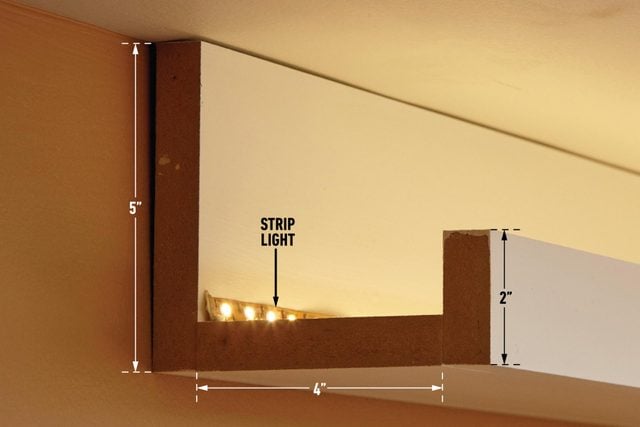
Our cove is built from crown molding and set two inches down from the ceiling. We installed the crown on top of a baseboard to create a wider space for the light, and tacked a small cove molding onto the bottom of the base to finish it.
We fastened a LED light strip to the wall so the lights would rake across the ceiling. To maximize the light, we kept the strip as high as we could without it being seen from the ground.
Make a small mock-up and experiment with different positions for the cove and lights. Every room is different, and the cove we made may not be the best style for your room.
Paint first
It’s easier to paint all the cove parts before you install them. Touching up a few nail holes after installation is a lot easier than taping off entire walls. Painting the part of the wall that will be seen above the cove will help tie everything together.
Choose either the color of the ceiling or the color of the cove. Lighter colors reflect more light, so paint the back of the cove components as well.
Choosing LED lighting
It’s important to think of low-voltage LED lighting as a ‘system.’ Transformers are available in 12-volt, 24-volt, magnetic, nonmagnetic, dimmable and nondimmable. The transformer, strip lighting and dimmer switch all need to be compatible.
Also consider how much lighting you need. Two transformers may be required for large rooms because each transformer can only provide power for a specified length of strip lighting. The lights at the end of a long run will be dimmer than the others if hooked up to an undersized transformer.
White light is most often used in commercial settings or for outdoor lighting, with warmer colors preferred for homes. Brighter (more lumens) strip lighting costs more but is a good option. Strip lighting run at less than full power will last longer. Some lighting systems can last up to 50,000 hours.
Cove lighting ideas
You don’t have to build your cove exactly the way we did. Here are a couple of alternative styles:
A Simple Cove
This easy-to-build, easy-to-install cove is made from 3/4-in. medium density fiberboard (MDF) ripped to size on a table saw. Countersink the screws. Fill the holes and touch up the seams with wood filler or surfacing compound.
Valence Style

Shine light on the ceiling and down the wall with this valance-style cove. This one is made from straight 3/4-in. clear pine. The sharp edges of the valance have been softened with a router fitted with a 1/8-in. round-over bit.
Install the T-shape base to the wall first, then fasten the valance to the base. Plan to buy twice as much lighting.
Tools Required
- 18-gauge brad nailer
- basic electrical tools
- Compressor
- Drill/driver - cordless
- Miter saw
- Table saw
Materials Required
- 1/2" Cove molding
- 1x3 Pine or 3/4-inch MDF strips
- Crown molding
- Dimmer switch
- Electrical remodeling boxes
- LED strip lights
- Trim head screws
Project step-by-step (9)
Step 1
Mark the wall
Draw reference lines to indicate the bottom of the light strip and the bottom of the base. Don’t worry whether the lines are level. Instead, measure down from the ceiling in several places and connect the dots to achieve a consistent distance between the cove and the ceiling.
Years of settling can throw a ceiling out of level. A cove not in line with the ceiling will create a noticeably uneven gap. Save time by cutting a couple of blocks of wood to use as marking gauges before installing LED lights.
Step 2
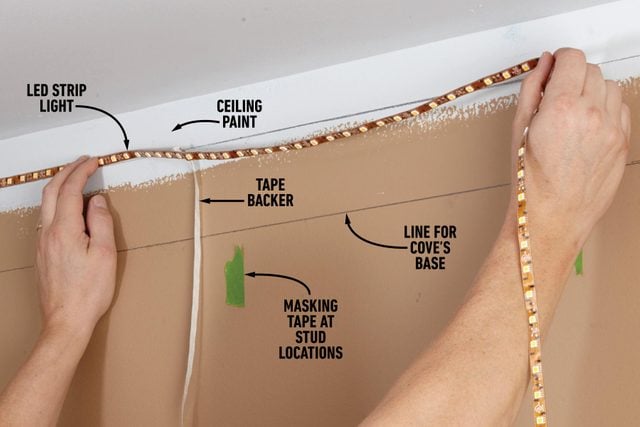
Install LED strip lights
When you’re placing the LED strip on the wall rather than inside the cove, it’s easier to install most of it before the cove is up.
Begin at the point of the room where the transformer will be installed. Leave the tape backer on the first few feet of the LED strip so it can be pulled away from the wall when it comes time to connect it to the transformer.
The tape on the back of the strip is super sticky. Once it’s on the wall, it’s tough to remove without pulling off the paint along with it.
To start, press the strip to the wall in one spot, hold it there, pull the tape out a couple of feet and press it to the wall at that point as well. Do this a few times in a row and check to see if it’s straight. If it is, go back and press the rest of the tape tight to the wall.
Strip lights like these can be cut to size but only in certain intervals, usually two to four inches. There will be clearly marked cutting lines on the strip.
Step 3
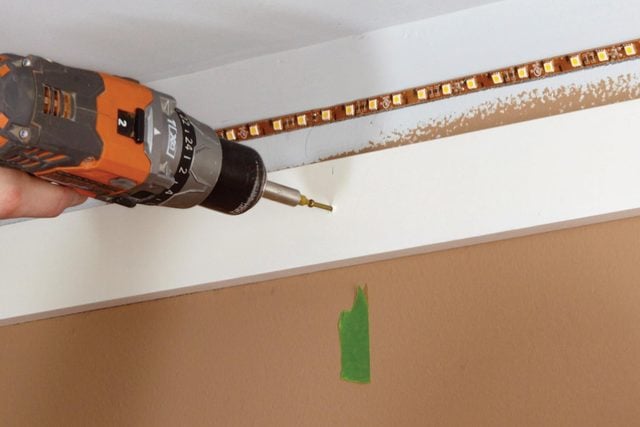
Fasten the base
Secure the base (painted, 1×3 clear pine boards, or strips of 3/4-in. MDF) to the wall with two-inch screws into every stud. Line the bottom of the base up with the line you made for the cove base molding. Self-tapping trim-head screws work great.
Sink the screws flush and place them high enough so the crown molding covers them. Depending on the size of the transformer, you may need to notch out a section of the base to make room so it’s not visible from the floor.
Step 4
Attach the support blocks and cove molding
Cut blocks to support the crown molding. Here’s one easy way to figure out the angle for the blocks: Hold a section of crown next to your table saw blade and adjust the blade to the same angle as the crown. Rip a 2×4 at that angle.
Before installing the blocks, indicate with a marker which way is up. Stagger the blocks about every 16 inches or so, and fasten them with two-inch, 18-gauge brads. Finish up by installing the small cove mold at the bottom of the base. Fasten the cove with 1-1/4-in. brads angled up into the base material.
Step 5
Cut out an existing outlet box
Pick an existing outlet on an interior wall to pull power from so you don’t have to deal with insulation when you fish the new cables.
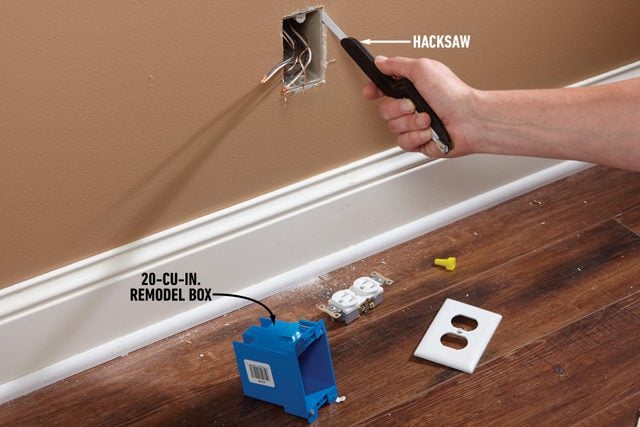
There’s a good chance the existing electrical box may not be big enough for additional wires, so plan to replace it with a larger 20-cubic-inch remodel box (sometimes called an ‘old work’ box). It’s also easier to fish the wire to it when the existing box is removed.
Shut off the power, then poke a hacksaw blade on either side of the existing box to find which side the stud is on, and cut out the nails that hold it in place.
The existing receptacle will need to be replaced with one that’s tamper resistant (TR) and protected with an arc fault circuit interrupter (AFCI). AFCIs protect homes from fire and are now required in most locations of the home. The AFCI has ‘line’ and ‘load’ terminals and cannot be connected with ‘pigtail’ wires like the existing outlet may have been.
Step 6
Fish the cable
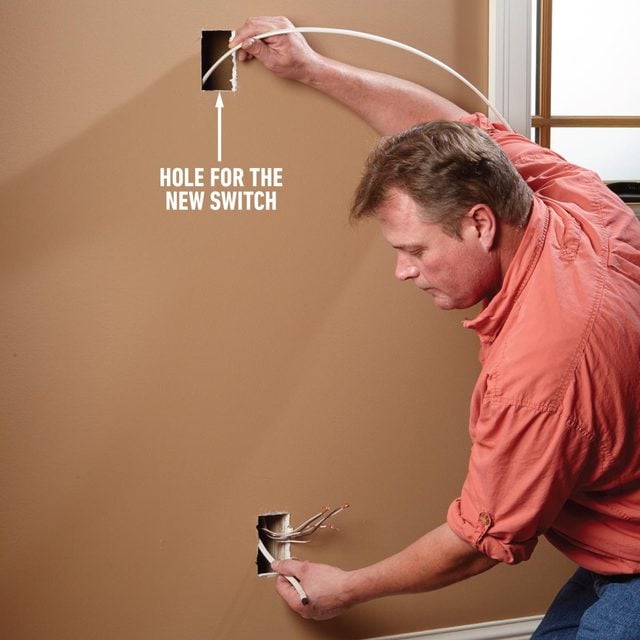
Use the remodel box as a template to cut a hole in the wall for the new light switch. There’s no need to cut the hole next to the stud. Remodel boxes are held in place with wings that clamp onto the back of the drywall.
Cut the hole for the switch box with a jab saw or utility knife at the same height as the other switches in the room. Fish the new cable from the switch box hole down and out through the existing hole below it. Put a slight bend on the cable so it hugs the back of the drywall, which makes it more easily accessible.
It’s extremely important for the dimmer switch to be compatible with the LED light strip you install. You need a ‘low-voltage’ compatible switch, not an ‘LED’ compatible switch. The wrong switch will cause the lights to flicker or not work at all.
We used a transformer that’s hardwired, so it wasn’t necessary to hide an outlet behind our cove . We just had to drill a 3/4-in. hole in the drywall above the cove and run a cable down to the switch.
Other lighting options may require an outlet above the cove. The procedure is the same; just be careful to place the new outlet so it’s completely hidden behind the cove. It will also help to install a recessed outlet box for the light’s power cords.
Step 7
Install the new boxes
Be generous and remove 10 inches of the cable’s sheathing and strip the end of each wire before pulling them into the box. Make sure there’s at least 1/4-in. of sheathing extending into the box and three inches of wire length extending beyond the face of the box.
Then, install the electrical box. Make sure not to over-tighten it onto the drywall, or you could strip the screws or damage the portion of the drywall that holds it in place.
Step 8
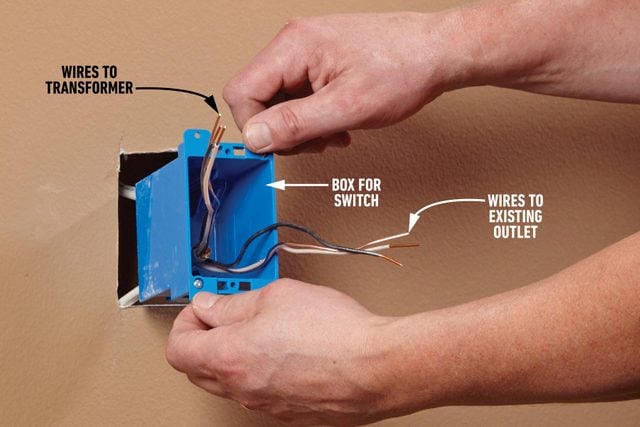
Connect the transformer
Leave extra cable up top so the transformer can be pulled away from the cove when you’re wiring the LED lights. Transformers come in many shapes and sizes. Follow the wiring directions on your particular transformer.
Once you’ve connected the transformer, slide the excess cable back into the wall cavity and finish securing the strip light. Notch out the base so the transformer can sit lower in the cove. Stick the transformer to the wall with Velcro strips if it won’t stay in place, and install cable straps with drywall anchors.

Step 9
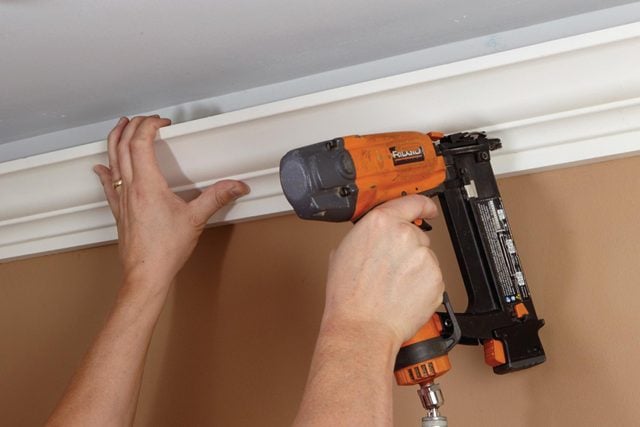
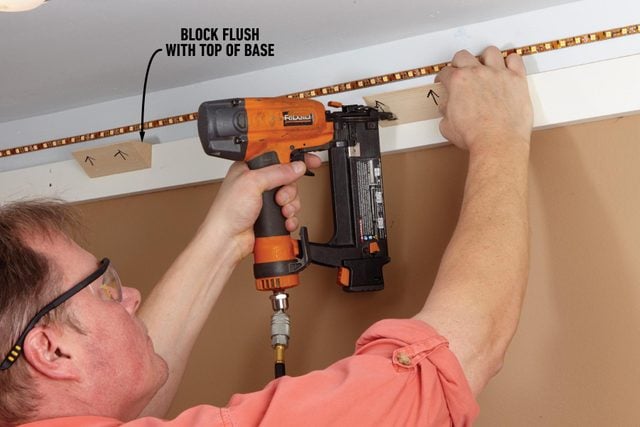
Install the crown
Install the crown molding, fastening the bottom to the base every 16 inches with 1-1/4-in., 18-gauge brads. Secure the center of the crown to the blocks with two-inch brads.
To avoid nailing through the tops of the blocks, aim the gun straight in toward the wall rather than angling it up toward the ceiling. You don’t want to poke yourself on an exposed brad or damage the light strip with a wayward shot.
All that’s left is flipping the power back on and planning that dinner party so you can show off to all your friends. Here are a few tips to cut crown molding.