
How To Cut and Install Crown Molding
Updated: Oct. 23, 2023
This three-piece crown molding technique simplifies installation and the results are spectacular.

Multiple Days
Intermediate
Varies
Introduction
This three-piece system for installing crown molding removes all sorts of potential problems typical to crown molding. Achieve an elegant look with fewer errors and re-dos.Tools Required
- Air compressor
- Air hose
- Brad nail gun
- Coping saw
- Level
- Miter saw
- Rasp
- Tape measure
- Utility knife
Materials Required
- Masking tape
Crown Molding Installation
Crown molding can be intimidating, because walls often aren’t flat and nailing is difficult. This three-piece system solves those problems. In this article, we’ll show you how to install trim on the walls and ceiling first, then add the crown.
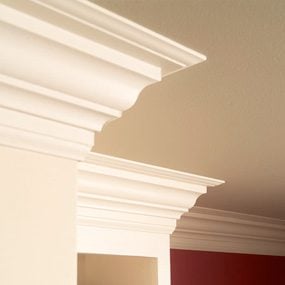
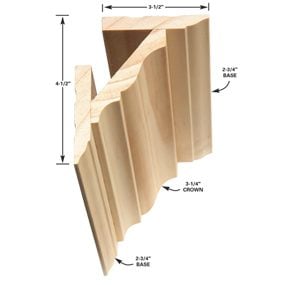
The built-up type of crown molding we chose for this project combines standard crown molding with two pieces of base trim. The result is a large, dramatic crown that’s easier to install and less expensive than single-piece crown molding of similar size. Check out this method to cut crown molding.
Project step-by-step (24)
Experiment with Different Molding Profiles
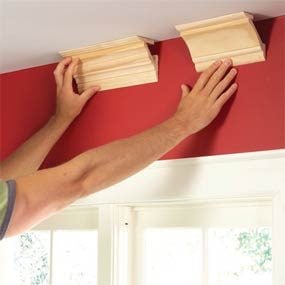
- Purchase a few sample pieces of base trim and crown molding.
- Nail or glue samples together and hold them against the ceiling in order to decide which combination to go with.
Sketch and Measure
- Make a simple sketch of the room.
- Jot down the length of each wall.
- Calculate how many pieces of base trim and crown molding you’ll need for each wall.
- Note: Remember, for each wall, you need two pieces of base trim and one of crown molding.
Shop for Crown Molding Carefully
- Inspect each piece before you buy. Look for splits at the ends and deep milling marks that will be hard to sand out.
- If you plan to use a light-colored stain (or no stain at all) select pieces that are of similar tone.
- If you don’t already have them, purchase a miter saw and brad nailer.
- Pro tip: These tools don’t just make the work faster—they provide better results. A miter saw lets you shave paper-thin slices off moldings until the length is perfect.
- If possible, buy pieces that are long enough to completely span each wall.
Built-up Crown
Although crown molding is usually installed alone, you can easily combine it with other trim for a larger, richer look. The stock trim available at any home center provides dozens of possibilities. You could combine more pieces than we show here or use contrasting woods for a two-tone effect. But don’t get carried away. Select a style that’s compatible with your existing trim. A crown that protrudes more than 5 in. onto the wall or ceiling might be too dominant or heavy looking in a room with an 8-ft. ceiling.
Aside from style, built-up DIY crown molding has this big benefit: It eliminates nailing frustrations. With one-piece crown, you can only drive nails where there’s framing behind the drywall. In other areas, you have to add nailing blocks or use glue (which often makes a mess or can’t form a strong bond on the narrow edge of the crown molding). With built-up crown, you deal with these trouble spots more easily when you install the rail trim. Then, when you install the crown molding, you have solid, continuous base to nail into.
Whether you copy one of the designs shown here or create your own, put together a sample and preview it in the room. Traditional lumberyards often have the largest selection and usually have free samples on hand. At a home center, you may have to buy short pieces to create your sample.
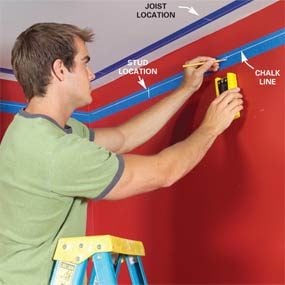
Apply Masking Tape to Walls
- Run 2-inch wide masking tape around the walls and ceiling so that about 1/2-inch of the tape will be covered by the rail trim.
- Mark the rail positions with a chalk line.
- Locate studs and ceiling joists.
Start with the Long Wall and Work in One Direction
- Install the longest piece of base trim to the ceiling first.
- Note: A long piece of trim or molding is clumsy to handle and hard to measure and cut accurately. Installing it first makes it easier because the first piece has square cuts at both ends—no coping.
- With the first piece of base trim in place, next add the piece to the right and work around the room in that direction.
- Note: When you work to the right, you’ll make most of your 45-degree cuts with the miter saw set to the left. With the saw set to the left, the motor is out of the way. That makes the trim and molding easier to hold and the cut mark easier to see.
- Use construction adhesive on all rail—even where you can nail into studs and ceiling joists.
- Pro tip: Use just enough nails to hold the trim in place until the adhesive sets, and you’ll have fewer nail holes to fill. Apply the adhesive lightly so the excess doesn’t squeeze out and make a mess.
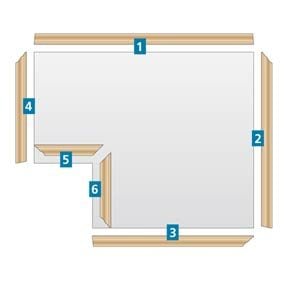
Order of Installation
At inside corners, a coped end fits over a square-cut end. In rectangular rooms, the last piece is often coped on both ends. In odd-shaped rooms like this one, you can usually avoid double-coped pieces. Outside corners are formed by two miter cuts.
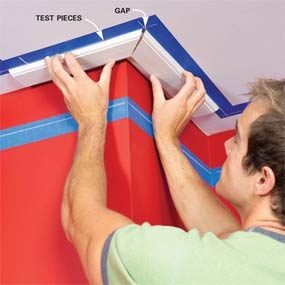
Test the Miter Angle
- Find the right miter angle for the ceiling rails at inside and outside corners.
- Miter scraps to 45 degrees and hold them in place along the chalk lines.
- If there’s a gap, adjust your saw’s angle and cut again until they fit tight.
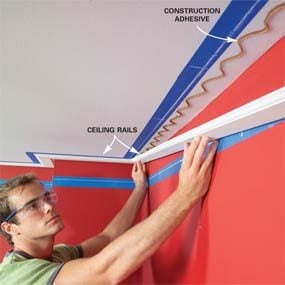
Install the Ceiling Rails
- Glue the ceiling rails into place with construction adhesive.
- Nail the rails to joists wherever possible.
- Where you can’t hit ceiling joists, drive nails into the drywall at a 45-degree angle.
- Note: Angled nails will hold the rails in place until the adhesive sets.
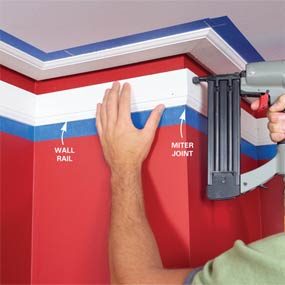
Install the Wall Rails
- Nail the wall rails to studs with 2-inch brads.
- Cut coped ends for inside corners.
- Miter outside corners using the same angle-finding technique shown above.
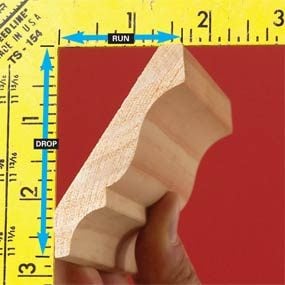
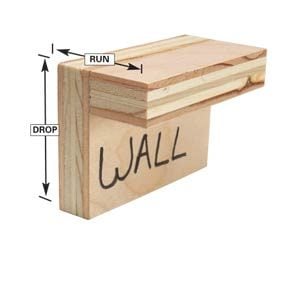
Make a Marking Gauge for the Crown
- Measure the run and drop of the crown molding.
- Nail two blocks together to make a marking gauge that duplicates the run and drop.
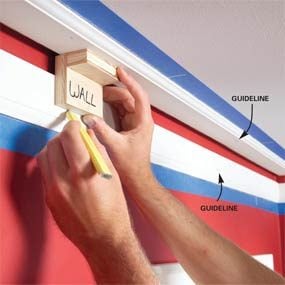
Mark the Rails
- Mark the position of the crown molding’s edges on the rails using your gauge.
- Place guidelines at all corners and every 2 feet along walls.
- Use the marks to position the crown molding.
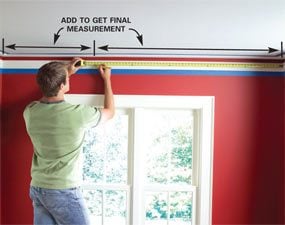
Take Accurate Measurements
- Measure accurately using a two-step technique.
- First measure from a corner and make a mark.
- Then measure from the other corner to the mark and add the two measurements.
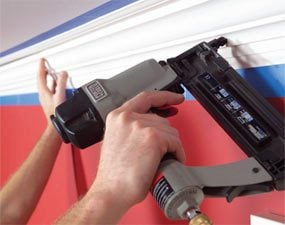
Begin the Crown Molding Installation
- Square-cut both ends of the first piece of crown and nail it into place.
- Note: All the other pieces are cut square (or mitered) at one end and coped at the other.
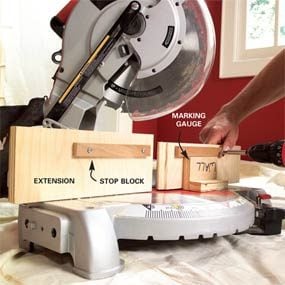
Set Up Your Miter Saw
- Attach extensions to your miter saw’s fence with screws or hot glue.
- Screw on stop blocks, using your marking gauge upside down to position them.
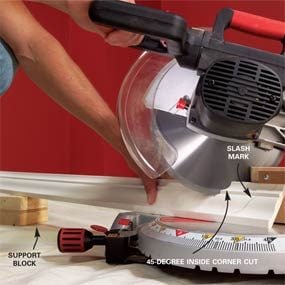
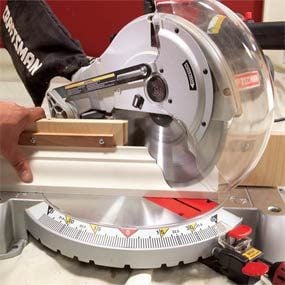
Cut a 45-degree Angle
- Cut crown molding at a 45-degree angle to prepare for coping.
- Place the molding upside down against the stop blocks.
- Pro tip: Before you cut, make sure the direction of the miter matches the slash mark.
Why Cope?
You’re probably wondering why you should go through the slow, fussy process of coping a molding when you could just miter trim at inside corners. The answer is that wall corners are never quite square, and coped joints fit tight even when corners are badly out of square. Whether you’re installing crown molding, chair rails or baseboard, coping a molding is faster than finding the right miter angle through trial and error. If you really want to avoid coping a molding, use corner blocks (available at most home centers and lumberyards). With these decorative blocks placed at inside and outside corners, you only need to make square cuts.
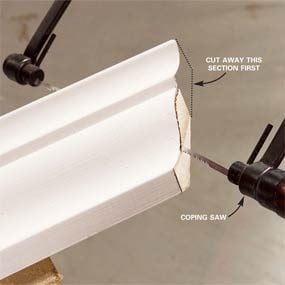
Cope the Molding
- Cut a cope by following the edge left by the miter cut.
- Hold the saw at an angle to undercut behind the face of the molding.
- Pro tip: With many moldings, you have to cut away one section to get at another.
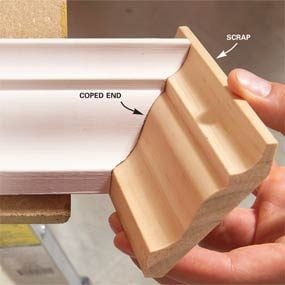
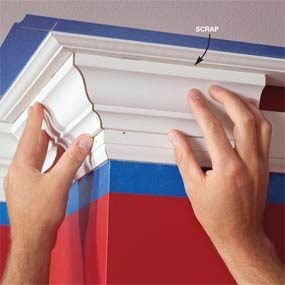
Test-Fit the Molding
- Test-fit the coped end using a scrap.
- Perfect the cut with a rasp.
- If you need to remove lots of wood from the backside of the crown molding, use a sanding drum and drill.
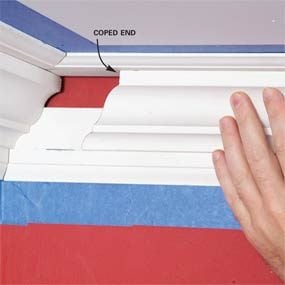
Check the Fit
- Push the coped end into place and check the fit.
- If the cope fits tightly but the piece is too long, shave the square-cut end on the miter saw.
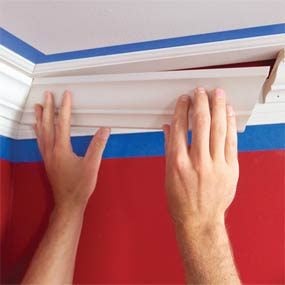
Guide the Molding into Place
- Jam the square-cut end into its corner.
- Bend the middle outward as you guide the coped end into place.
- Let the crown molding straighten to force the coped joint tightly together.

Coping 101
Coping a molding starts with a 45-degree cut on the miter saw, just as if you were going to make a miter joint at the inside corner. This cut leaves an edge along the face of the trim that acts as a guideline for your coping saw. Cut along that edge and the resulting shape will fit against an adjoining piece of crown molding. Chances are your first attempt won’t turn out perfectly, but after a couple of practice runs you’ll be able to make good-looking inside corners. Here are some tips for smooth, successful coping:
- Every time you cut a miter (whether for coping or outside corners), you’ll set the crown molding upside down against the saw’s fence. It’s easy to get confused and cut the angle backward. To avoid mishaps, hold the crown molding up to the corner and draw a slash showing the direction of the cut.
- Clamp the crown molding to the work surface. Sawing is a lot easier with the molding locked into place.
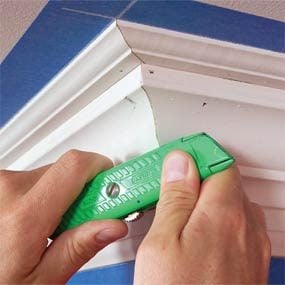
- If the saw blade tends to slide to one side as you start a cut, make a small starter notch with a utility knife.
- Make sure the teeth in your coping saw point toward the handle. That way, the blade will cut smoothly on the pull stroke.
- Don’t force the saw forward. Make even strokes, apply only light pressure and let the blade advance at its own pace.
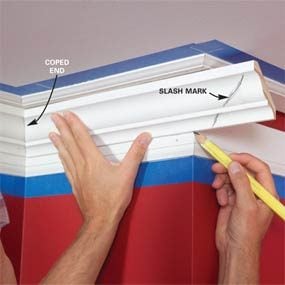
Mark Outside Corner Pieces
- Mark the length of outside corner pieces by coping one end and holding the piece in place.
- Draw a slash mark on the crown to indicate the direction of the miter cut.
Cut Outside Corner Miters
- Miter outside corners with the molding upside down.
- Cut the piece about 1/16-inch beyond the length mark and then shave off a bit if the piece is too long.
Check the Fit
- Check the length at outside corners using a test scrap.
- When the length is right on, set the piece aside.
- Then cope, miter and test-fit the other outside corner piece.
Tips for the Best Crown Molding Fit
Making a piece of crown molding fit between two inside corners is a combination of careful measuring and trial and error:
- Don’t bend the tape measure into crown molding corners and guesstimate the measurement. Instead, measure in from both corners and add the two measurements.
- Make a square cut on the end of the molding. Don’t assume the factory cut is square.
- To prepare for coping a molding, measure from the square end and mark the miter cut position on the bottom edge of the crown molding.
- Don’t make your miter cut exactly at the mark. Instead, cut the piece about a nickel’s thickness too long.
- “Spring” the molding into place. If it’s too long, shave a hair off the square end and try again until it fits just right.
Make Small Cracks Disappear
- Erase small cracks in outside corner joints by rubbing with a utility knife handle.
- Note: This crushes the wood fibers inward and closes minor gaps.
Use “Scarf” Joints on Long Walls
- Join sections of crown on long walls using “scarf” joints.
- Set your miter saw to 22-1/2 degrees and make scarf cuts with the molding upside down just as you did for other miter cuts.
More on Corners and Copes
Outside corners
The joint at an outside corner is formed by two simple miter cuts, but making them fit takes several steps. Don’t rush the process—outside crown molding corners are usually prominent, and so are mistakes. If the crown molding will have a varnish finish, select two pieces with similar grain patterns.
Double copes
If your room doesn’t have any outside crown molding corners or require scarf joints, you’ll finish the job with a piece that’s coped on both ends. This isn’t as tough as you might think. The key is to start with a piece that’s mitered to the right length. Miter both ends and hold the piece in place to check the fit. Then cope the ends as usual.
Scarf joints
On a wall that’s too long for a single piece of molding, you’ll have to ‘scarf’ pieces together. The angled cuts of a scarf joint are less visible than square cuts. If you plan on a varnish finish, select pieces that have similar color and grain patterns. Cut and install the longer piece first so the shorter piece can overlap it at the joint. Glue the joint.
Odd-angle corners
Coped joints only work in square crown molding corners. If you have nonsquare inside corners—such as 45-degree corners in a window bay—you have to miter them. Treat odd angle outside corners just like square outside corners.
Finishing Touches
- Fill and sand all the nail holes.
- Prime and paint as needed.
- Run a sharp utility knife lightly along the rail to slice the tape.
- Finally, remove the tape.
- Pro tip: Don’t wait too long–even painter’s tape will pull flakes of paint off if left for several weeks.
- Pro tip: Be sure to cut the tape where fresh paint from the crown molding dripped onto it so the new paint doesn’t pull away with the tape.

Editor’s Note: Turn the Room into a Workshop
I’ve installed miles of crown molding, so you might think every piece I cut slips perfectly into place on the first try. Wrong. I intentionally cut each piece a smidgen too long and then shave them with my miter saw until they fit perfectly. Sometimes I make three or four trips back to the saw before I finally get it right. To keep the trips short, I set up shop in the room I’m working on. This can take an hour or more and makes a mess, but it saves time in the long run. Here’s some setup advice:
- Get everything you can out of the room. Some pieces of trim might be longer than the room itself. You need space to maneuver.
- Keep the miter saw mobile. You’ll need to move the saw from one end of the room to the other to accommodate long pieces. Setting the saw on sawhorses or a stand is only practical if you can easily move it around. In most cases, I simply set the saw on the floor and support the trim with a small block the same height as the saw’s table.
- You’ll need a sturdy work surface that lets you clamp down the crown molding for coping. It doesn’t have to be big, just stable. I use a Black & Decker Workmate.
- Set up two ladders—even if you’re working alone. Otherwise, you’ll spend half your time dragging a ladder from one end of the wall to the other.
- Cover carpeted floors with dropcloths; hardwood floors with cardboard or hardboard. You can work a lot faster when you’re not worried about damaging the floor.