


Wall molding: Install great-looking baseboards on any problem wall.
A full day
Intermediate
$51–100
Introduction
You can get perfectly tight joints and smooth, clean, professional results when installing trim, even on bad walls. This article demonstrates seven tricks that the pros use to solve the most common problems—like closing gaps along wavy walls and making crisp joints at corners that aren't square.
These are tricks that even a novice can master. You'll get first-class results without hours of frustrating effort. While you sometimes only need one of these tips to solve a problem, often a combination of two or more will be required for polished results. But don't worry—they're all easy, fast and free.
Tools Required
- Caulk gun
- Miter saw
- Screw gun
Materials Required
- baseboard in the style you desire
- Wood glue
Project step-by-step (7)
Step 1
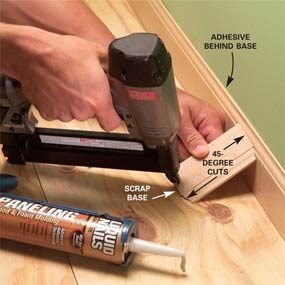
Glue Baseboard to the Wall
- Hold the base molding against the wall after you cut it to length, and look for gaps.
- Cut a few braces from 4- to 6-inch lengths of scrap baseboard and put 45-degree angles on the ends.
- Apply construction adhesive at the top and bottom.
- Nail the floor trim to the studs and then tack the braces to the trim with 1-inch brads.
- Force the gaps closed with the scrap and tack the blocks to the trim.
- Leave it overnight to let the adhesive set, and then pry the blocks free.
- Fill the little holes when you fill the rest of the nailheads.
Step 2
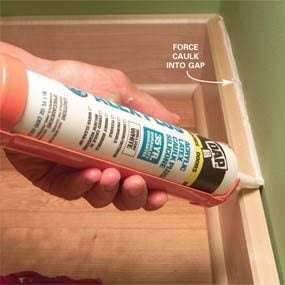
Caulk Gaps
-
- Note: For less flexible baseboard, the best solution is to simply fill any gaps with caulk.
- Select a premium acrylic latex caulk ($3-plus per tube) that says “paintable” on the label.
- Force the caulk into the gap and fill it a little higher than the top of the trim.
- Immediately wipe off the excess with a damp rag.
- The next day, paint the caulk to match the wall color.
Step 3
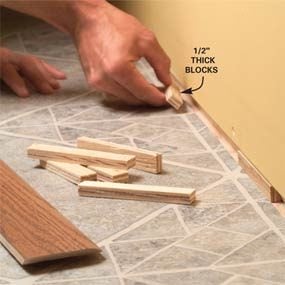
Shim the Floor Gaps to Avoid Tilted Baseboards
- Using chunks of 1/2-inch scrap plywood, cut the blocks and tuck them into the gap every few feet.
- Install the baseboard right over them, tight against the floor molding.
- Note: It’s best to keep the nails at the bottom of the base above the gap so they go through drywall, not air.
Step 4
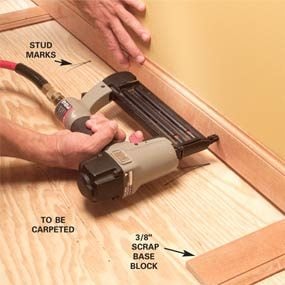
Raise the Baseboard
-
- Note: For floors that will be carpeted, there’s no reason to rest base right on the floor. You can avoid a tilted baseboard by raising it above the drywall gap.
- Cut a few 3/8- to 1/2-inch thick spacers (6-inch scraps of standard base will do).
- Lay them flat on the floor every few feet.
- Cut the base to fit.
- Rest it on the spacers and nail it into place.
- Note: Carpet installers prefer to cut the carpet a little long and tuck the excess into the gap for a neater job.
Step 5
Get Perfect Inside Corners
-
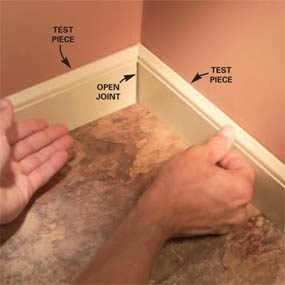
- Note: The key to a clean inside corner is to use test pieces of baseboard molding to help you prepare the corner for the permanent base before you nail anything to the wall.
- Cut a perfect cope on the end of a foot-long chunk of baseboard.
- Use that and another short piece of base with a square end to check the corner.
- Push the pieces tight against the wall (especially at the bottom) to simulate the pressure the nails will exert.
- Note: If the joint looks good, go ahead with the standard installation.
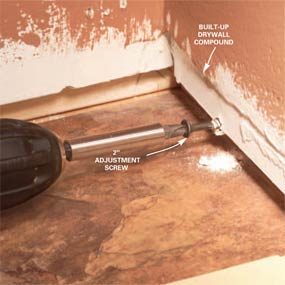
- If there’s a gap at the bottom of the joint, set aside the test pieces and drive a 2-inch screw about 1/2 inch above the floor and an inch or two away from the corner, behind the square-ended piece.
- Sink the screw until the head is protruding slightly beyond the drywall
- Check the joint again with the test pieces.
- Adjust the screw in or out and continue adjusting and testing until the joint is perfect.
- Install the baseboard.
Step 6
Square Up Outside Corners
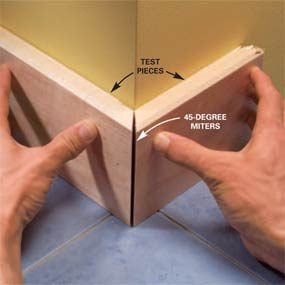
- Cut 45-degree miters on the ends of 10-inch-long base scraps.
- Put them together at the corner to check the fit.
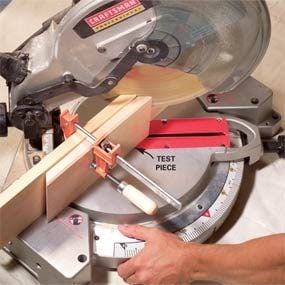
- Recut both pieces at angles slightly more or less than 45 degrees as required.
- Pro tip: After a few cuts and test fits, you’ll find the right angle. After you find the angle, save the miter saw setting and cut the finished base miters. More often than not, the right angle will fall between the marked degrees on your saw.
Step 7
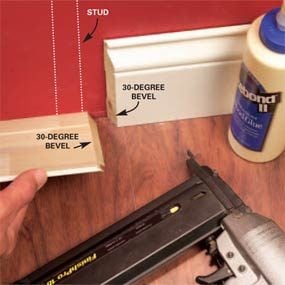
Achieve Perfect Splices
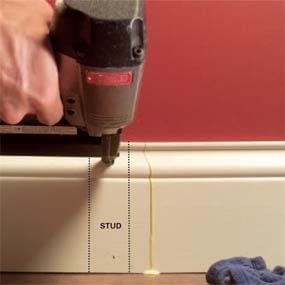
- When splicing two pieces of baseboard in the middle of the wall, make the joint over a stud to keep the ends tight.
- Cut the first trim board about 1 inch short of a stud with a 30-degree bevel facing the room.
- Nail it into all the studs.
- Cut the second board with the same 30-degree bevel but in the opposite direction.
- Assemble the joint (no glue) to check the fit and recut a slightly greater or lesser angle as needed for a perfect joint.
- Smear wood glue on both bevels.
- Push the joint together, and then nail the overlapping piece into the stud near the joint.
- Wipe off the glue squeeze-out with a damp rag right away.
- Pro tip: If you’re installing clear finished baseboards with a prominent grain pattern, select two pieces that match as closely as possible.
Power Nailers Really Pay Off
You can hand-nail trim—carpenters have been doing it for centuries—but there’s no reason to anymore. The advantages of using a gun over nailing by hand are numerous. You’ll be able to get trim placed exactly where you want it with one hand while you fasten it with the other. Pieces don’t move around while you’re nailing on them, and of course, no more hammer marks or nail setting. And with some trim gun models selling for under $100, it’s worth getting one of your own. Of course, you’ll need a compressor, too, but kits that have hoses, fittings, a gun and a compressor are available at any home center for about $200. If you’re not ready for the investment, we strongly recommend renting the tools (about $50 per day). Nail guns for trim come in three sizes for shooting 15-,16- and 18-gauge nails, with 15-gauge nails being the thickest. If you only buy one gun, get an 18-gauge unit that shoots nails ranging between 5/8 in. and 2-1/4 in. long. Although the thin nails won’t be hefty enough for anchoring door or window jambs, they’ll work fine for most modern trim. When you need extra strength, pull out the old hammer and hand-nail.