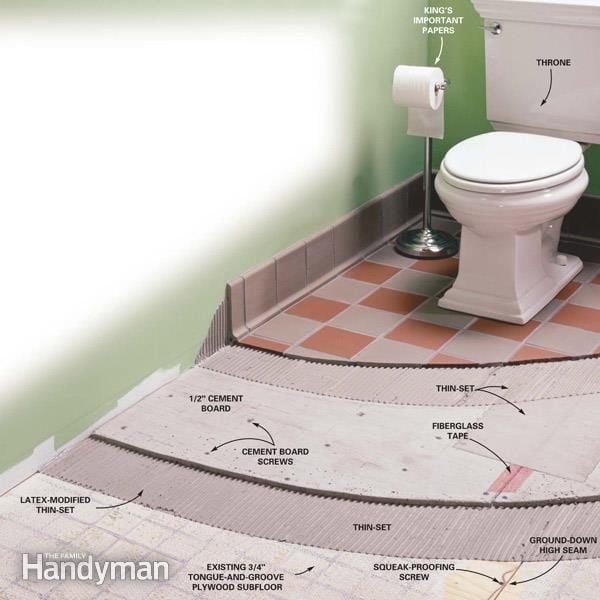
Make a solid, durable base for floor tile.
A full day
Intermediate
Varies
Introduction
Laying cement board is the easiest way to assure a solid, durable base for a ceramic tile floor. We show you how to install a first-class tile base.
If you’ve ever thought about replacing an old, cracked tile floor or another type of flooring with new ceramic tile, it’s imperative that you create a solid setting base for the new tile. If you’re working over a wood subfloor, cement board is the right choice for your tile base.
It’s never a good idea to install tile directly over plywood, especially in a damp area like a bathroom. Because plywood expands and contracts beneath the ceramic tile, grout and tile failure (loose tiles and cracked crumbling grout) is just a matter of time. Correctly installed cement board provides a very stable base that’s permanently bound to the tile with thin-set mortar so your new tile floor will last a very long time. “Correctly installed” is the key.
This outline for how to lay cement board base under your tile floor is from a 2002 issue of our magazine, but the information still holds true today: it’s the easiest way to make sure you’ve got a solid base for a new tile floor that’s durable and long-lasting.
Project step-by-step (5)
Prepare a solid, squeak-free subfloor
One of the keys to a long-lasting tile installation is the underlying subfloor. It has to be rock solid before you lay the 1/2-in. thick cement board. Whatever your subfloor is made of, be sure it’s squeak-free before you install the cement board. Screwing the plywood down to the floor joists should take care of most squeaks.
To determine your subfloor construction, pull off a heating grate and look at the exposed subfloor edges. Here’s how to prepare the most common subfloor types:
- 1/2-in. plywood with 5/8-in. particleboard underlayment. Remove the particleboard and screw the plywood to the floor joists with 1-5/8 in. drywall screws spaced every 6 in. Install a layer of 5/8-in. CDX plywood and screw it to the subfloor with 1-5/8 in. drywall screws spaced every 4 in.
- 3/4-in. tongue-and-groove plywood or OSB (oriented strand board). No extra layers of underlayment are required. Just screw the floor down with 1-5/8 in. drywall screws spaced every 6 in.
- Vinyl flooring glued over 1/4-in. underlayment. As long as the subfloor is 3/4-in. tongue-and-groove material, screw the underlayment down right through the vinyl with 1-1/4-in. drywall screws spaced every 6 in. Use 1/4-in. thick cement board instead of the usual 1/2-in. cement boards that some in sheets. That’ll keep the floor thickness to a minimum.
Get rid of the high ridges and sink the fasteners
Check all plywood seams with a straightedge held perpendicular to the seams. If it teeter-totters over any joints, use a belt sander to grind down the ridge so it’s even with the rest of the floor. Set any “proud” nail- or screwheads.
Embed the cement board in latex-modified thin-set mortar
The main reason for using thin-set between the cement board and the subfloor isn’t as much for bonding as it is for even, void-free cement board support throughout the floor. Precut and fit all the cement board and then lift all of the cement boards out. Then spread thinset mortar with the flat side of a 1/4-in. notched trowel and use the notched edge to “comb” the mortar. Embed the cement board and screw it to the underlayment with special 1-1/4 in. cement board screws spaced every 4 in.
Tape the seams
Lay cement board fiberglass mesh tape over all the seams (it’s sticky on one side). Use a wide putty knife or a flat trowel to spread thin-set mortar over the tape, making sure to knock down any ridges or high spots.
Lay the tile in thin-set
Set the tiles using the same latex-modified thin-set and techniques used for the cement board. Only mix as much thin-set as you can use in a half hour and be sure to have solid support under each tile. If you follow all these steps, you’ll have a stiff, monolithic, crack-free floor.


