


A snap-together fastening system simplifies laminate floor laying. No glue, no nails. You can do it in a weekend.
Multiple Days
Beginner
$501-1000
Introduction
Learn how to lay laminate flooring with snap-together wood. It's so easy to install that you can lay a beautiful, yet durable hardwood floor in a weekend—no messy glue and no heavy nailing. It's prefinished too, so no dusty sanding and painstaking finish work. In this article we'll show you how to prepare your floor and then lay the boards. It's the perfect project for the novice who has some simple carpentry skills.
Buying advice and the tools you need for laminate flooring installation
Floor board interlocking system
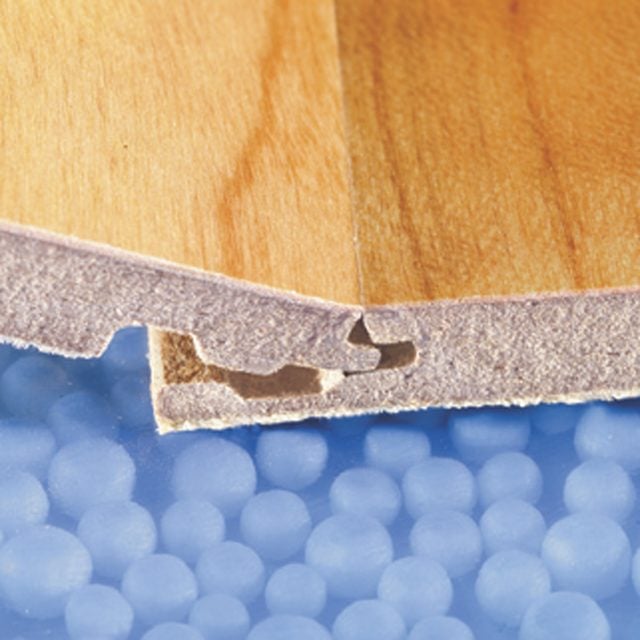
Snap-together floors have specially milled tongues and grooves that lock together tightly when joined when installing laminate flooring. The flooring we’re using for installing laminate flooring is similar to snap-together plastic laminate floors except that it has a surface layer of real wood. The 5/16-in. thick snap flooring has specially shaped tongues and grooves that interlock to form a strong tight joint without glue or nails. Once the click lock laminate flooring is assembled, the entire floor “floats” in one large sheet. You leave a small expansion space all around the edges so the floor can expand and contract with humidity changes.
The cost of wood veneer floors (often called engineered wood floors) varies, depending on the species and thickness of the top wood layer. Most home centers sell a few types of snap-together floors but you’ll find a better selection and expert advice at your local flooring retailer. You can also buy snap flooring online to start a how to install laminate floors project.
Before you go shopping, draw a sketch of your room with dimensions. Make note of transitions to other types of flooring and other features like stair landings and exterior doors. Ask your salesperson for help choosing the right transition moldings for these areas. You’ll need a few special tools in addition to basic hand tools like a tape measure, square and utility knife to know how to install wood flooring. We purchased a laminate flooring installation kit from the manufacturer that included plastic shims, a tapping block and a last-board puller, but if you’re handy you could fabricate these tools. A pull saw works great to undercut doorjambs and casing (Photo 3). It’s difficult to get close enough to the floor with a standard handsaw.
You’ll also need a circular saw and a jigsaw to cut the flooring, and a miter box to cut the shoe molding. A table saw and power miter saw would make your how to install laminate floors job easier but aren’t necessary. Here, we’ll show you how to install laminate floor:
Tools Required
- 4-in-1 screwdriver
- Air compressor
- Air hose
- Brad nail gun
- Caulk gun
- Drill bit set
- Drill/driver - cordless
- Hammer
- Handsaw
- Jigsaw
- Miter saw
- Nail set
- Safety glasses
- Straightedge
- Tape measure
- Utility knife
- Wood chisel
Materials Required
- 4-mil plastic
- 4d finish nails
- Construction adhesive
- Duct tape
- Floor pad tape
- Flooring pad
- Masking tape
- Snap-together wood flooring
- Transition pieces
Project step-by-step (14)
Step 1
Laying laminate wood flooring: Prep the room for laying laminate flooring
Use plastic to test for moisture in concrete

You don’t want to do a laminate flooring installation over a damp subfloor. Test for excess moisture in concrete floors by sealing the edges of a 3-ft. square of plastic sheeting to the floor with duct tape. Wait 24 hours before you peel back the plastic to check for moisture. Water droplets on the plastic or darkened concrete indicate a possible problem with excess moisture. Ask your flooring supplier for advice before beginning a how to install laminated flooring job.
Step 2
Check for low spots in the floor, then fill them in.
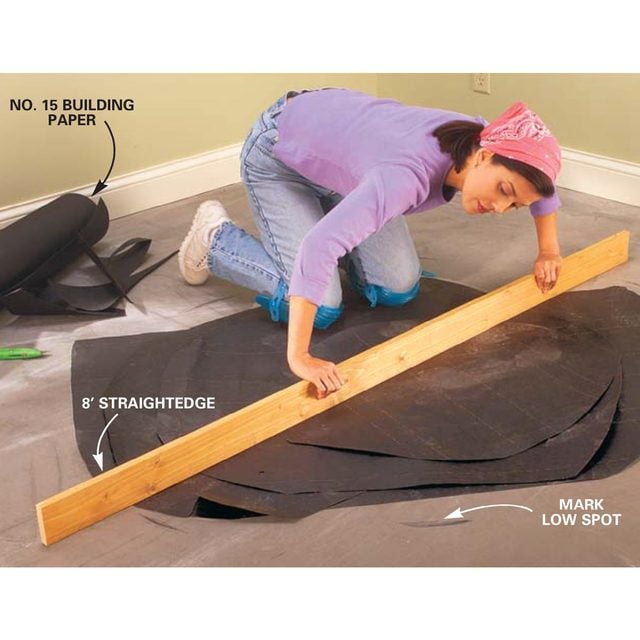
Check for low spots in the floor with an 8-ft. straightedge and mark their perimeter with a pencil. Fill depressions less than 1/4 in. deep with layers of building paper. Fill deeper depressions with a hardening type floor filler available from flooring stores.
Step 3
Use a pull saw to cut the doorjambs and casings
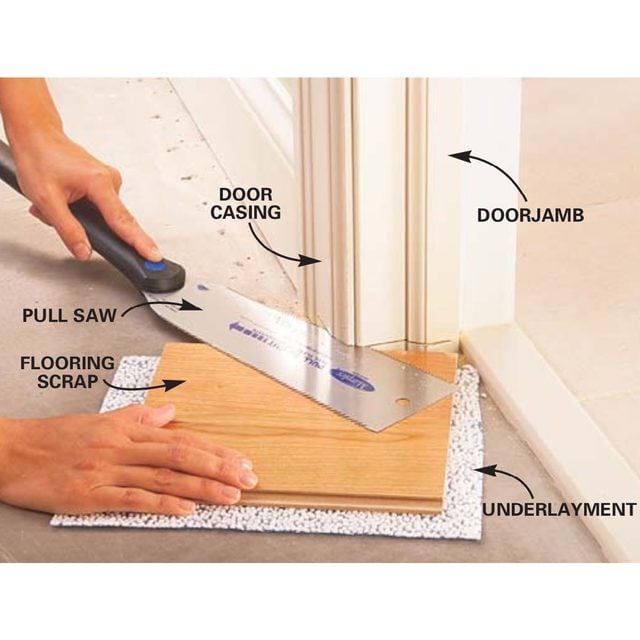
Undercut doorjambs and casings (door moldings) to make space for the flooring to slip underneath. Guide the saw with a scrap of laminate flooring stacked on a piece of underlayment.
Install Prefinished Wood Flooring
Step 4
Finish cutting the jamb and casing
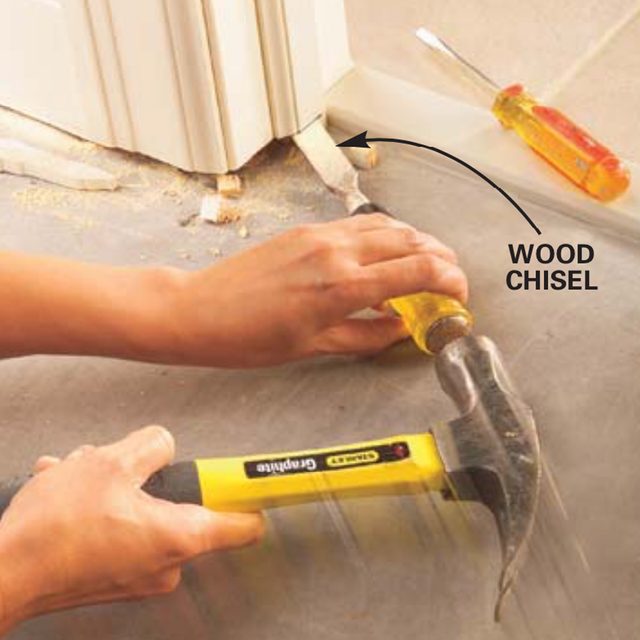
Break and pry out the cutoff chunks of jamb and casing with a screwdriver. Use a sharp chisel or utility knife to complete the cut in areas the saw couldn’t reach. Make sure your floor is dry. Don’t lay this type of floor over damp concrete or damp crawlspaces. Check all concrete for excess moisture. As a starting point, use the plastic mat test shown in Photo 1. Even though some manufacturers allow it, professional installers we spoke to advised against installing floating floors in kitchens, full or three-quarter baths, or entryways, all areas where they might be subjected to standing water.
Then prepare your room for the new laminate flooring installation. You have to make sure the existing floor is smooth and flat before installing a floating floor overtop. Clear the old floor, then smooth it by scraping off lumps and sweeping it. If you have wood floors, now’s the time to fix squeaks and tighten loose boards by screwing them to the joists with deck screws. Check the floor with an 8-ft. straightedge and mark high spots and depressions. Sand or grind down ridges and fill low spots (Photo 2). Most manufacturers recommend no more than 1/8-in. variation in flatness over an 8-ft. length.
Allowing the floor to expand and contract freely is critical. Leave at least a 3/8-in. expansion space along the edges. You can hide the gap under the baseboards or leave the baseboards in place and cover the gap with base shoe molding or quarter round as we did. Cover the expansion space at openings or transitions to other types of flooring with special transition moldings (Photo 13). Buy these from the dealer.
Finally, saw off the bottoms of doorjambs and trim to allow for the flooring to slide underneath (Photo 3). Leaving an expansion gap at exterior doors presents a unique challenge. In older houses, you could carefully remove the threshold and notch it to allow the flooring to slide underneath. For most newer exterior doors, you can butt a square-nosed transition piece against the threshold.
Step 5
Follow these simple how to install hardwood floor techniques
Install the underlayment and the first row of flooring

Unroll the underlayment and lap it up the baseboards or walls 2 in. Temporarily secure the edges with masking tape. Butt the sheets together and seal the seams with the tape recommended by the manufacturer. Cut the first row of boards narrower if necessary to ensure that the last row of flooring will be at least 2 in. wide. Then start the installation by locking the ends of the first row of flooring together. Measure and cut the last piece to fit, allowing the 3/8-in. expansion space.
Step 6
Use a leftover piece to start the second row
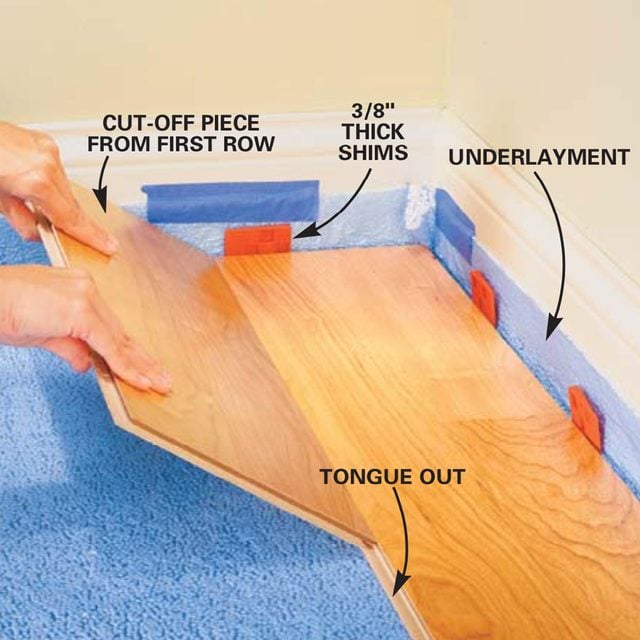
Start the second row with the leftover cutoff piece from the first row, making sure the end joints are offset at least 12 in. from the end joints in the first row. With the board held at about a 45-degree angle, engage the tongue in the groove. Push in while you rotate the starter piece down toward the floor. The click indicates the pieces have locked together. The joint between boards should draw tight.
Step 7
Tap the flooring pieces tightly together
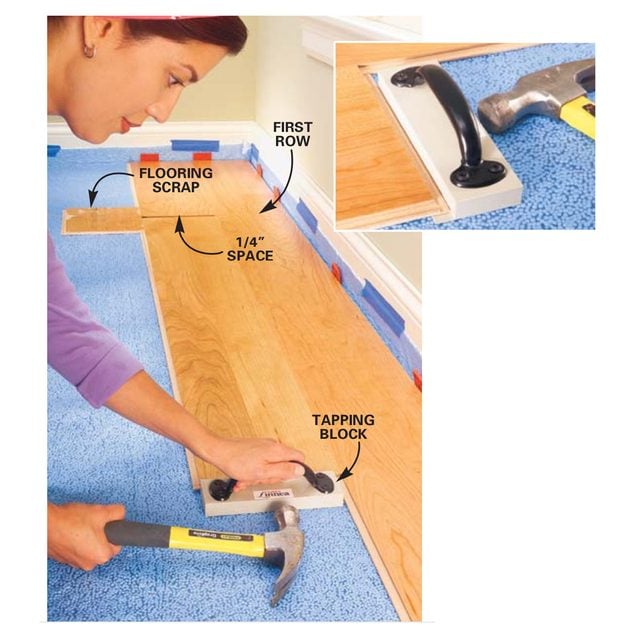
Leave a 1/4-in. space between the next full piece of flooring and the previous piece. Snap this piece into the first row. Snap a scrap of flooring across the ends being joined to hold them in alignment while you tap them together. Place the tapping block against the end of the floor piece and tap it with a hammer to close the gap.
Tapping block detail
A tapping block is one of the special tools in the installation kit and will help you when you learn how to put down laminate flooring.
Step 8
Pull the last piece in a row tight
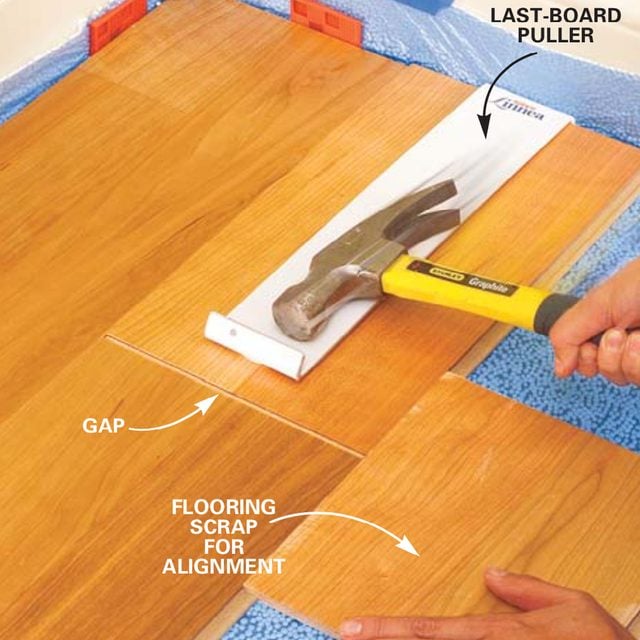
Close a gap at the end of the row by hooking the last-board puller tool over the end of the plank and tapping it with a hammer to pull the end joints together. Floating floors must be installed over a thin cushioning pad called underlayment (Photo 5). Underlayment is usually sold in rolls.
Ask your flooring dealer to suggest the best one for your situation. Some types combine a vapor barrier and padding. Install this type over concrete or other floors where moisture might be a problem. Others reduce sound transmission. Take extra care when installing underlayment that includes a vapor barrier. Lap the edges up the wall and carefully seal all the seams as recommended by the manufacturer. Keep a roll of tape handy to patch accidental rips and tears as you install the floor.
You may have to cut your first row of flooring narrower to make sure the last row is at least 2 in. wide. To figure this, measure across the room and divide by the width of the exposed face on the flooring. The number remaining is the width of the last row. If the remainder is less than 2, cut the first row narrower to make this last row wider. After the first few rows, installation is a snap. Simply follow the guidelines in Photos 6 – 8.
Step 9
Special techniques for corners and transitions
Prep flooring to fit around doorjambs
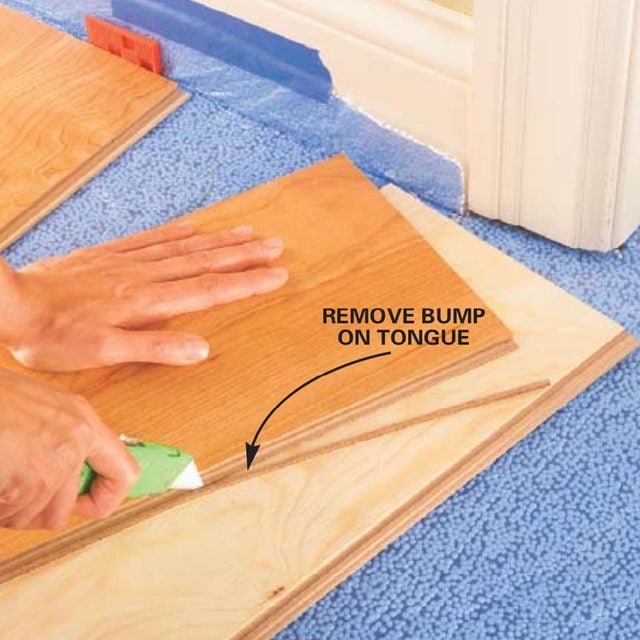
Plan ahead when you get near a doorjamb. Usually you have to slide the next piece of flooring under the jamb rather than tilt and snap it into place. To accomplish this, you must slice off the locking section of the tongue from the preceding row with a sharp utility knife before installing it.
Step 10
Mark a plank to fit a doorjamb

Cut the plank to be notched to length, allowing a 1-in. space for the future transition piece. Align the end with the end of the last plank laid and mark 3/8 in. inside the jamb to make sure the flooring extends under the door trim.
Step 11
Finish marking the plank for cutting
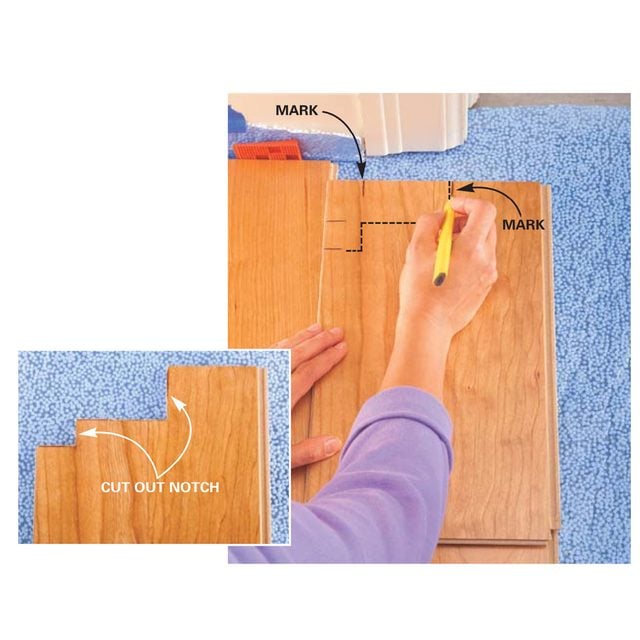
Align the flooring lengthwise and mark for the notches in the other direction, allowing for the floor to slide under the doorjamb about 3/8 in. Connect the marks with a square and cut out the notch with a jigsaw.
Notched plank detail
The notch in the laminate flooring board has been cut to fit the doorjamb.
Step 12
Glue and install the notched piece
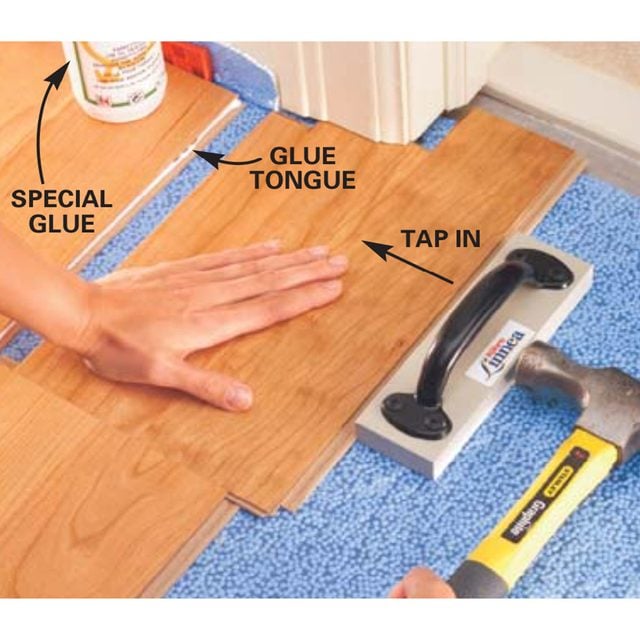
Apply a thin bead of the manufacturer’s recommended glue along the edge where the portion of the tongue was removed. Slide the notched piece of flooring into place and tighten the glued edge by pounding on the special tapping block.
Step 13
Install the transition strip
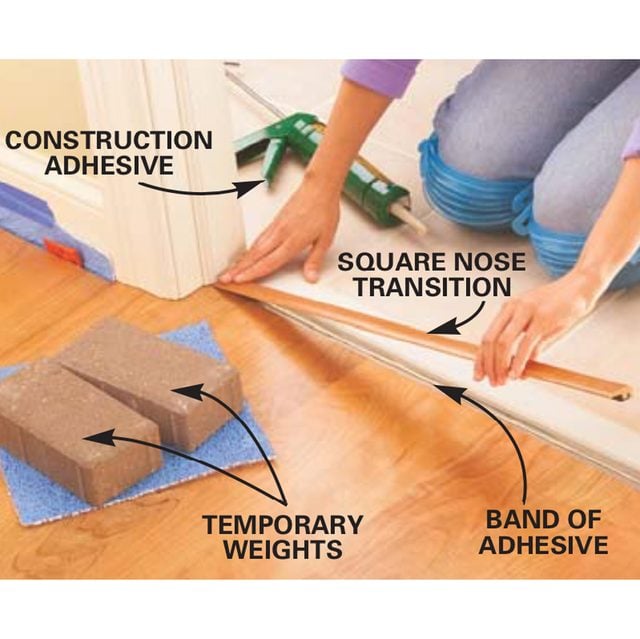
Cut a transition molding, in this case a square nose transition, to fit between the doorstops or jambs. Spread a bead of construction adhesive only on the area of the concrete floor that will be in contact with the transition piece. Set the transition in place and weight it down overnight. You can’t use the same tilt and snap installation technique where the flooring fits under doorjambs. You have to slide the flooring together instead. Photos 9 – 12 show how. If the opening requires a transition molding, cut the flooring short to leave space for it (Photo 13).
How to Buy Wood Flooring
Step 14
Cover gaps with base trim
Reinstall the shoe molding

Complete the flooring project by trimming off the protruding underlayment with a utility knife and installing shoe molding. Predrill 1/16-in. holes through the shoe. Then nail the shoe molding to the baseboard with 4d finish nails. Set and fill the nails. Do not nail down into the flooring. Complete the floor by cutting the last row to the correct width to fit against the wall. Make sure to leave the required expansion space. Finally, reinstall the baseboards if you removed them, or install new quarter-round or shoe molding to cover the expansion space (Photo 14). Next, make sure you know how to clean laminate floors to keep them looking like new.