
A handy guide to laying and setting mosaic tile from one of our most trusted tile experts. Plus, a quick bonus guide on how to set a decorative band!
A How To Guide for Tiling Mosaic Floor

Updated Nov. 14, 2023
1
/
14
Setting Mosaic Tile
In some ways, setting mosaic tile is just like setting any other tile. But because the individual tiles are small (usually two inches or less), mounted on sheets and often made of glass, mosaic tiles present some unique challenges. So we asked Dean Sorem, our go-to tile expert, to show us his best tips for cutting and setting mosaic tiles.
2
/
14
Flatten Wavy Walls
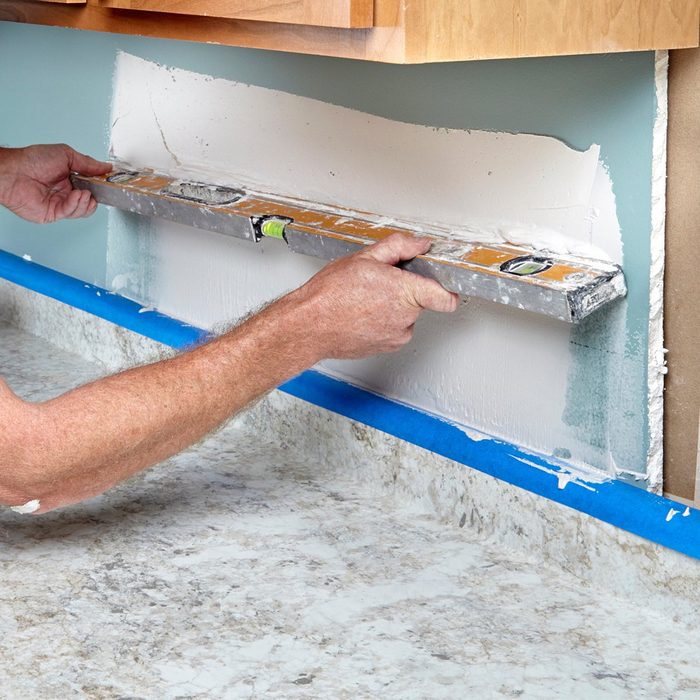
Dean says that one of the most important tips for any tile-setting job, including mosaics, is to start with a perfectly flat surface. Before you begin tiling, check the surface with a straightedge. If you find a dip in a wall, flatten it by screeding a layer of setting-type joint compound over it as shown here. For floors or walls in wet areas, use thin-set instead of joint compound. Let the joint compound or thin-set harden and you’re ready to set tile.
3
/
14
Flatten the Thin-Set
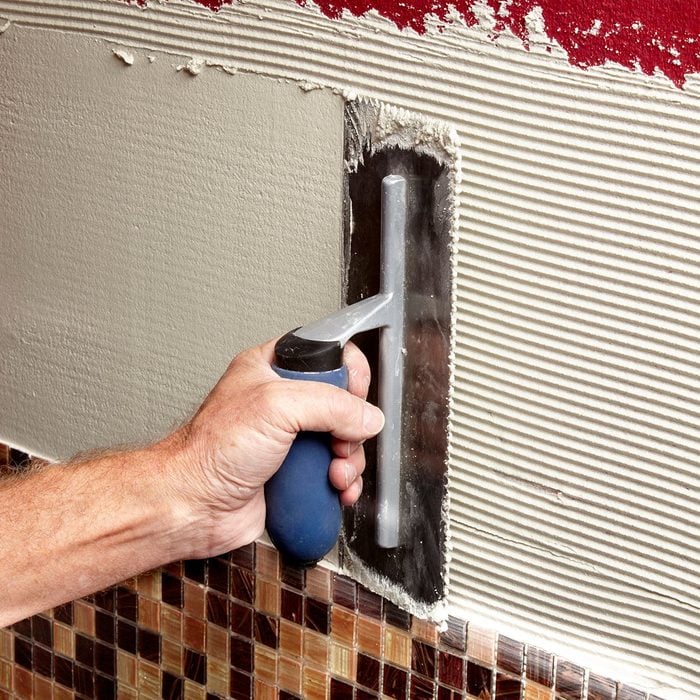
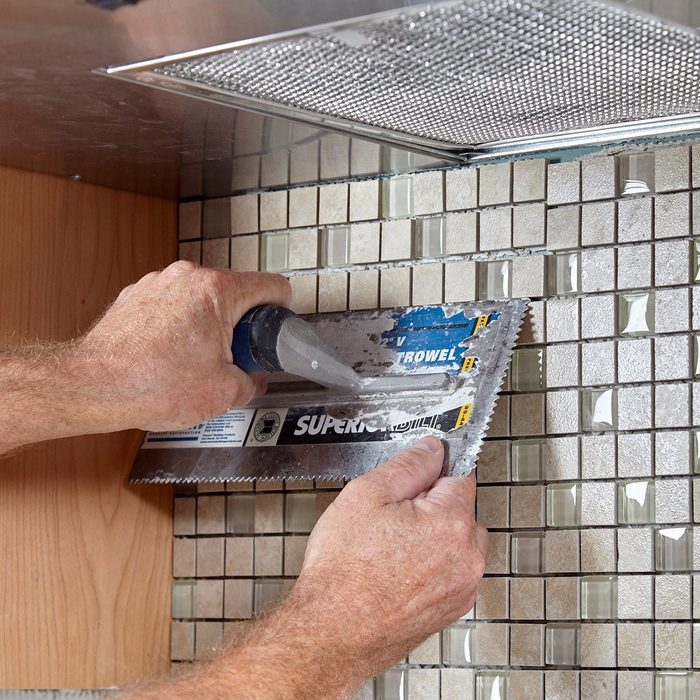
If you’re working with thin mosaic tile or glass mosaic tile that isn’t painted on the back, apply the thin-set with a notched trowel and then flatten it slightly with the flat side of the trowel before setting the tile. Flattening will prevent the ridges and air pockets from showing through transparent glass tile. It will also help keep thin-set from squeezing out between the spaces of thin mosaic tile.
4
/
14

Cut On a Backer
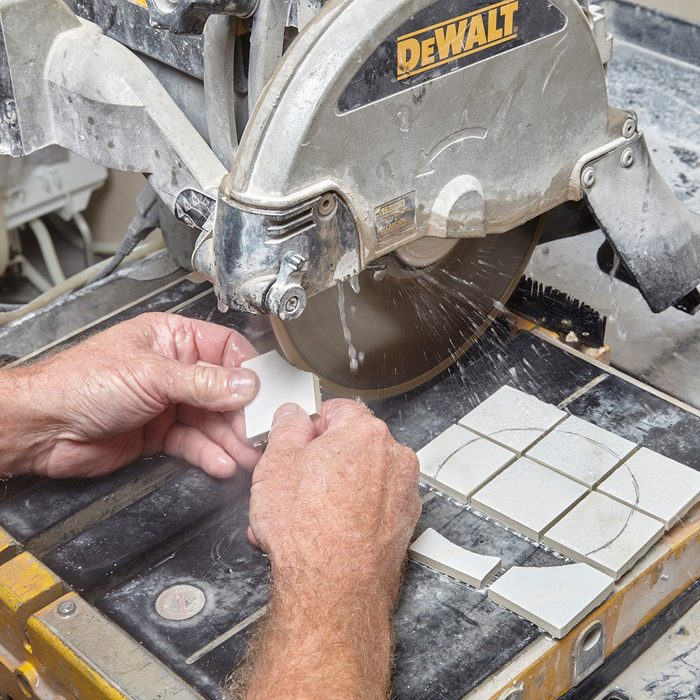
The slot in the bed of most tile saws is so wide that small mosaic tiles will fall in, making them difficult to cut. The solution is to place a thin scrap of plywood under the sheet of mosaic tile as you cut it. Adjust the saw’s cutting depth so you’re not cutting into the plywood. Then just cut as usual.
5
/
14
Carve Out Curves
Cutting curves in mosaic tile is tricky. Here’s how Dean does it. After marking the curve on the sheet of mosaic tile, he brings the sheet to the saw, where he removes individual tiles for cutting. He eliminates the bulk of the waste with straight cuts, or by making a series of fingers and breaking them off. Then he carves along the line, using the blade like a grinder.
6
/
14
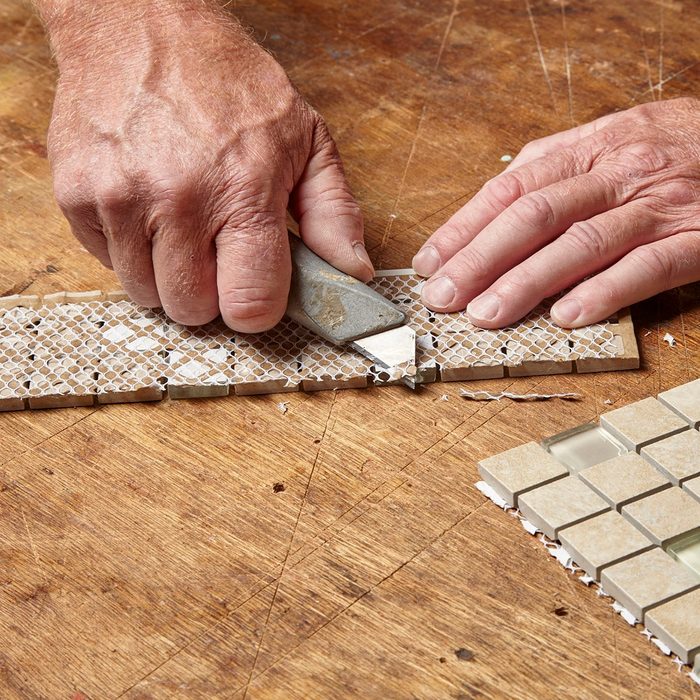
Trim the Backing
The mesh, plastic or paper backing that holds mosaic tiles together can get in the way if you don’t trim the edges. Mesh can stick out into the grout space and cause grouting trouble. And protruding backing can prevent you from pushing adjoining sheets close together. So before you set mosaic sheets, inspect them and slice off any excess backing with a sharp utility knife.
7
/
14
Cheat the Spacing
If you get to the end of a wall or up against an object and are left with a gap that’s too narrow to fill with tile but too wide to caulk, you can close it by spreading the rows of tiles slightly. The bigger the gap, the more rows you’ll have to spread to make an inconspicuous cheat. Cut the mesh between the rows with a sharp utility knife. Then use the edge of your trowel to nudge each row into place, making sure to keep the grout lines between the spread-out rows even.
8
/
14
Tamp Them Flat
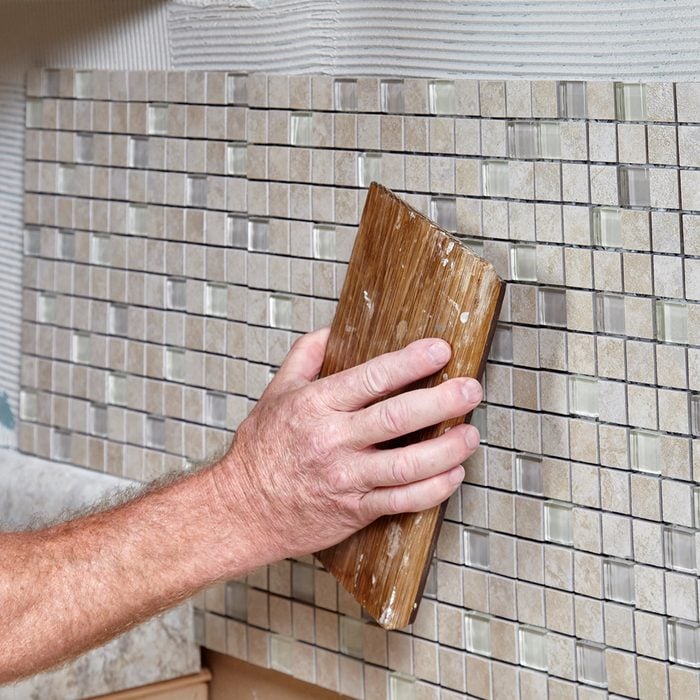
To make sure mosaic tile is fully embedded and the faces of all the tiles are flush with the rest, it’s important to tamp them with a block after setting the sheets in the thin-set. The tamping block Dean uses has beveled edges to make it easier to hold and a thin sheet of rubber glued to the face to protect the tile. But he says a wood float with a handle on it works great too. In a pinch, just use a block of wood, but keep the face free of grout, which could scratch the tile. Hold the block so the face is parallel to the surface and bounce it up and down to set the tile.
9
/
14
Save Your Old Toothbrushes
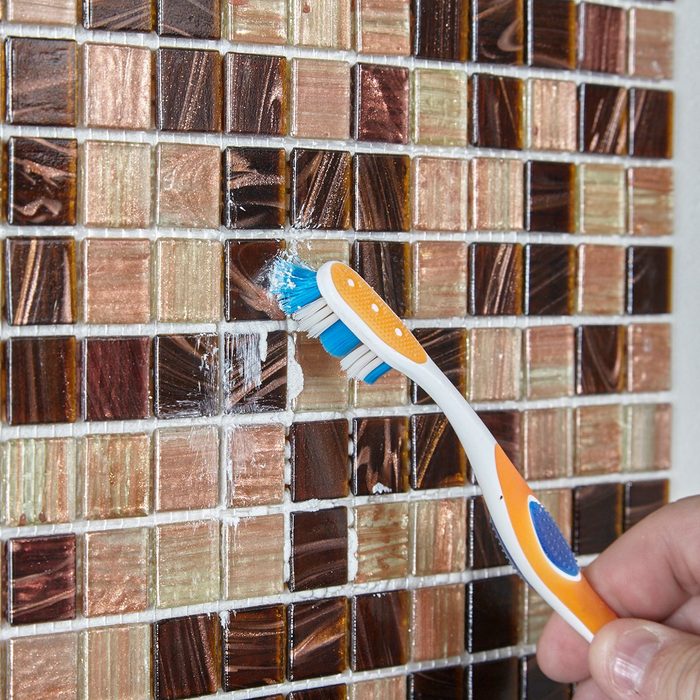
Even if you take all the standard precautions, you’re bound to get an occasional bit of thin-set oozing out between tiles, especially if they’re really thin like these glass mosaics. If this happens to you, wait for the thin-set to firm up a little. Then use a toothbrush to clean the thin-set out of the grout spaces. You don’t want to leave thin-set between the tiles because it may show through the grout.
10
/
14
Bonus: How To Set a Decorative Band
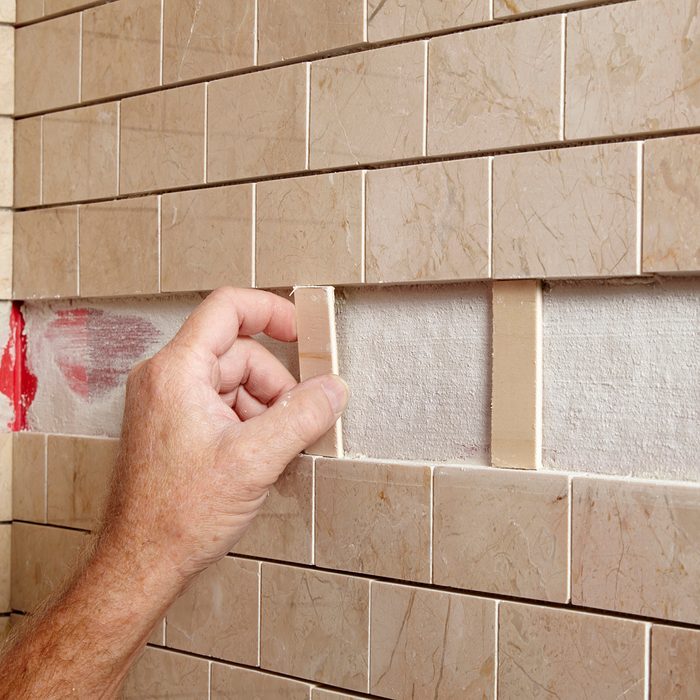
Step 1: Create a precise gap
First Dean carefully calculates how wide the band will be by measuring the width of the tile band and adding the width of two grout spaces. Then he cuts wood spacers and uses them to align the tile and to leave room for the decorative band of mosaic. Here Dean is removing the spacers after the adhesive behind the surrounding tile has set up.
11
/
14
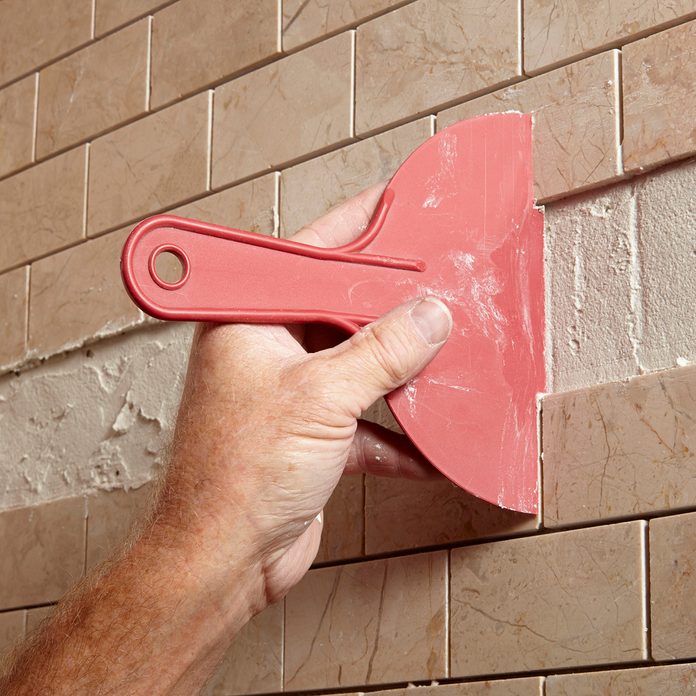
Step 2: Screed With a Customized Putty Knife
Next, Dean creates a custom screed by notching a plastic putty knife. He makes the depth of the notches equal to the thickness of the tile band, plus about 1/8 in. for the thin-set. He spreads a layer of thin-set in the band area and uses the notched trowel to screed the thin-set to the right thickness. Dean lets this layer of thin-set firm up before moving on to the next step.
12
/
14
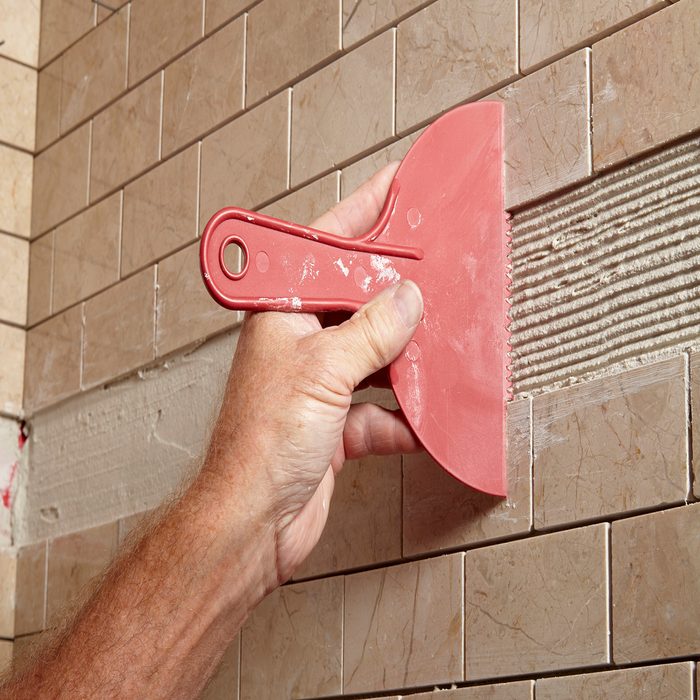
Step 3: Spread the Thin-set
Next, Dean cuts 1/8-in.-deep teeth in the custom trowel. Then he spreads another layer of thin-set over the base layer and uses the notched trowel to create an even layer of adhesive. If the mosaic band is glass tile or thin mosaic, he flattens this layer of thin-set with a flat putty knife.
13
/
14
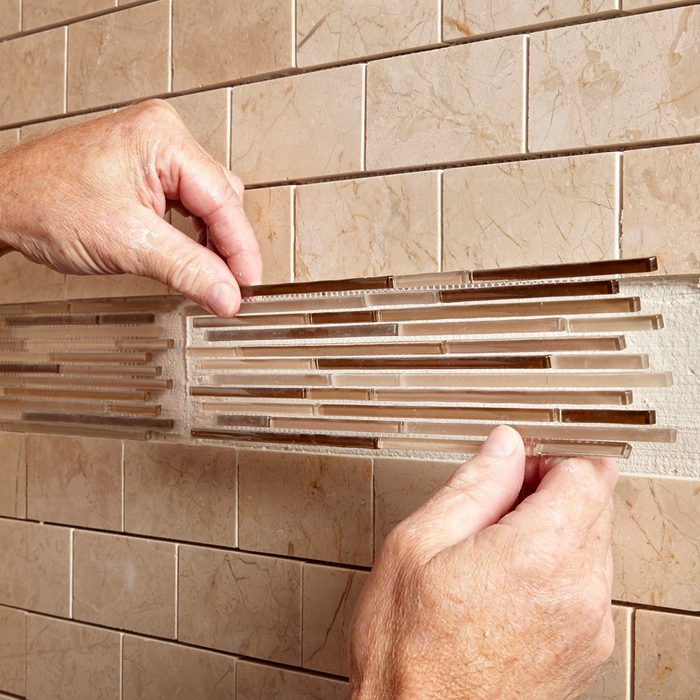
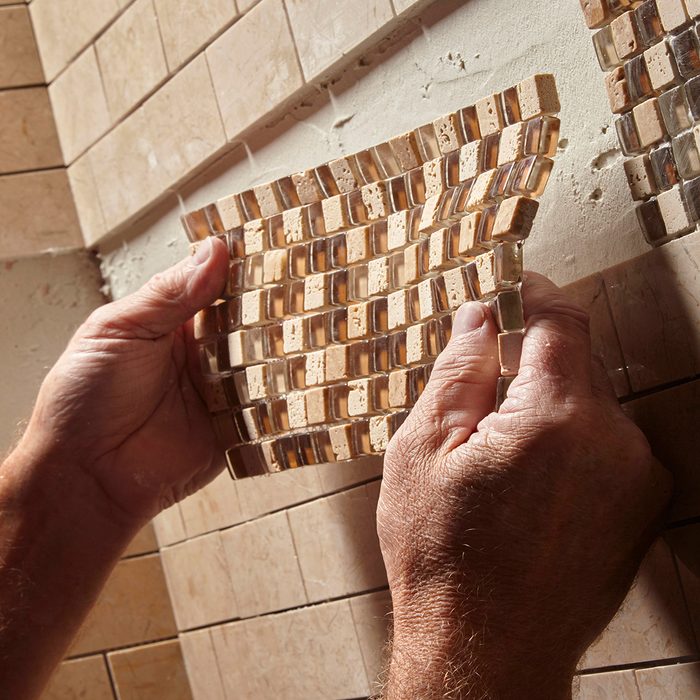
Step 4: Set the Mosaic Band
Finally Dean is ready to embed the decorative band in the thin-set. The built-up thin-set base ensures that the surface of the mosaic band will be perfectly flush with the surrounding tile.
14
/
14

Meet the expert
Dean Sorem installed his first tile in 1979 and has been a professional tile setter for 30 years. He’s done everything from single-tile repairs to an 8,000-sq.-ft. floor, and he currently runs Sorem Tile & Stone in Hudson, WI.