


Don't hire the pros when refinishing hardwood floors. If you are patient and careful, you can easily do this job yourself. Here's how.
Multiple Days
Intermediate
Around $500
Introduction
Don't hire the pros when refinishing hardwood floors. If you are patient and careful, you can easily do this job yourself. Here's how.Watch How to Refinish Hardwood Floors
Tools Required
- Box fan
- carbide scraper
- Floor drum sander
- Floor edging sander
- Floor maintainer
- Hammer
- Nail set
- Pry bar
- Random orbit sander
- Vacuum
Materials Required
- 100-grit sanding discs for ROS
- 220-grit screens for sanding block
- 40-grit 60-grit & 100 grit sanding belts
- 40-grit 60-grit & 100-grit sanding discs for edger
- Ear protection
- Floor polyurethane
- Knee pads
- Painter's tape
- Plastic sheeting
- Polyurethane applicator pads
- Respirator
- Sanding block
- Sanding screens
- Tack cloth
- Wood filler
If you have hardwood floors that are showing their age, you don’t need to hire a pro to refinish them. As long as you’re comfortable working with machines and can work carefully and patiently, you can tackle this job yourself. Be forewarned, however, it’s a very dusty job. Seal off the room as best you can. You’ll need to rent a floor drum sander, a floor edge sander, and possibly a floor maintainer.
The wood flooring we’re working on is called a pegged hardwood floor. Each board has one or two pegs, depending on its width, on both ends. During traditional installation, these pegs were driven and glued into the joists below.
Project step-by-step (11)
Step 1
Prep the room
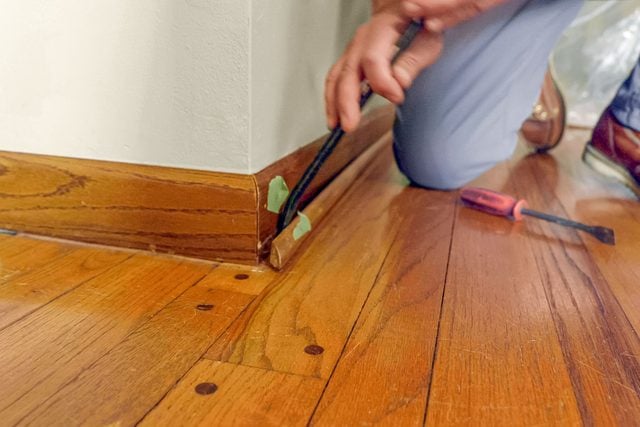
First, remove all furniture from the room. Then pull the quarter round from the baseboard so you’ll be able to sand right up to the baseboard. Thoroughly clean the hardwood floors with a vacuum and damp mop the floor.
Next, seal off the room with plastic sheeting and painter’s tape. We used a purpose-made plastic sheeting that includes a zippered door for easy access. Sealing off the room is paramount for a couple of reasons. First, you want to keep dust from migrating throughout the house. Second, once you’re applying finish, you want to keep any everyday dust that’s floating around your house from settling into the wet finish.
While you’re sanding, take all the dust mitigation measures you can; wear a respirator and set a box fan in a window to exhaust as much dust outside as possible.
Step 2
Sand, or just refinish?
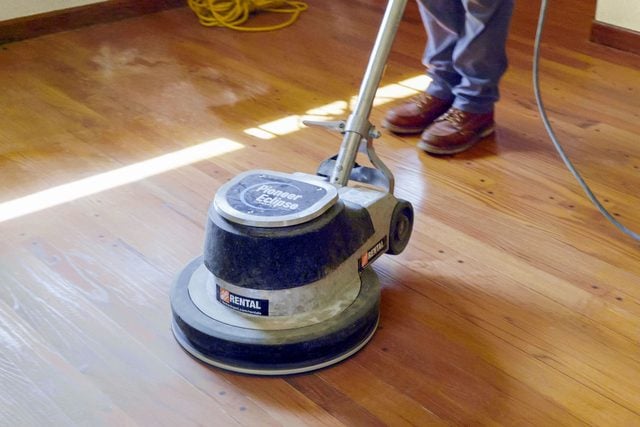
Once your floor is clean, make an assessment. If your floor is in good shape, you can often get by just “screening” it with the floor maintainer and applying new finish. If your floor has some deep scratches that you’d like to get rid of, you’ll need to move right to floor sanding.
Step 3
Start sanding
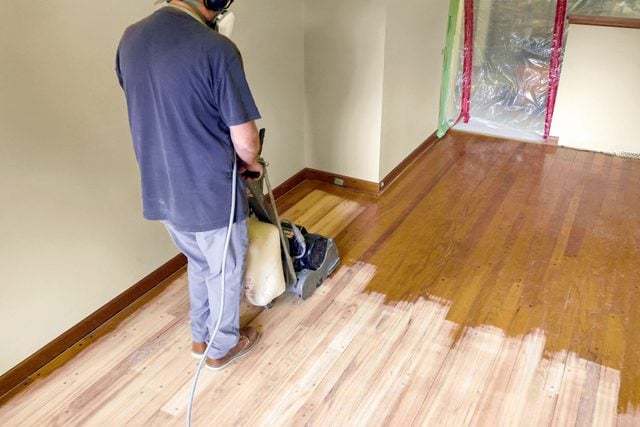
With a 40 grit belt on the drum sander, start sanding in the middle of the room, as close to the wall as you can get, sanding in the direction of the flooring.
The drum sander has a lever that lowers the drum onto the floor. Start rolling the machine, then carefully lower the drum. As you’re nearing the end of the room, raise the drum before you stop rolling. Think of an airplane landing and taking off. This avoids creating burns and dips. Work all the way across the floor, then turn around and sand the other half of the floor.
Step 4
Finish sanding
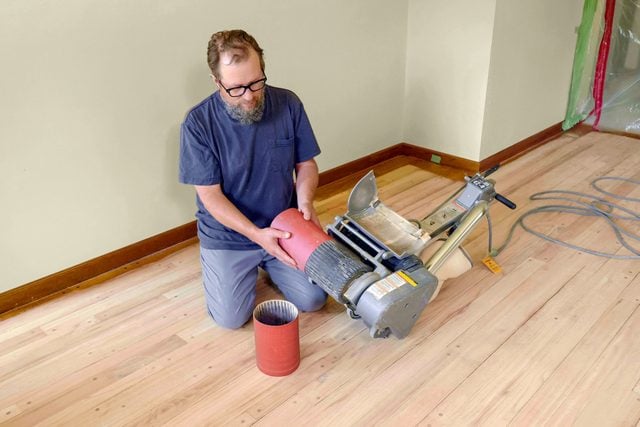
Once the old finish and major scratches are removed using the 40 grit belt, repeat the hardwood floor sanding process. Move up to 60 grit, then 100 grit. Without the old finish on the floor, it’s much more difficult to see where you’ve sanded, so use landmarks on the walls or floor to keep track of where you are. Also, overlap your last pass by about one-third.
Step 5
Sand the edges
The first flooring boards against the wall are often nailed through their face, leaving the nails visible or hidden underneath a dab of putty. Before you start sanding the edges, sink any nails well below the surface using a hammer and nail set. If you don’t, those nails will tear up your sanding discs fast, potentially creating sparks in a dry, dusty environment. Before you start edge sanding, put on non-marring shoes or just take your shoes off.
The edging sander has two swiveling casters near one side so that it rolls easily. To use the edging sander, press the “on” button while tilting the sander back on the casters. Carefully lower the spinning disc onto the floor, working right up to the baseboard.
Always keep the sander moving while it’s in contact with the floor. Work all the way around the room, working up through the grits, just as you did with the drum sander.

Step 6
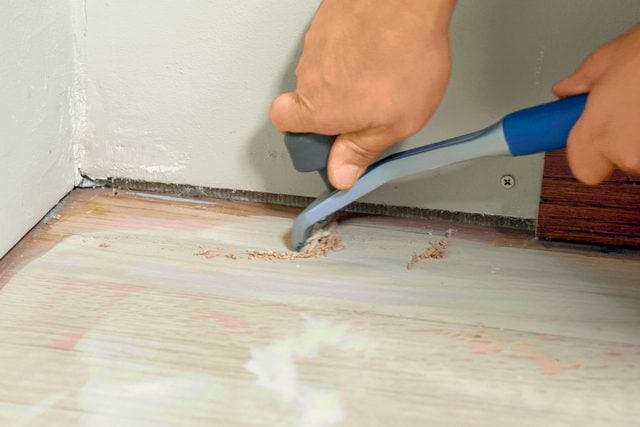
Scrape the corners
None of the machines will get all the way into the corners. To get at those areas, I use a carbide paint scraper. It’s not as fast as 40 grit sandpaper, but it gets the job done.
Step 7
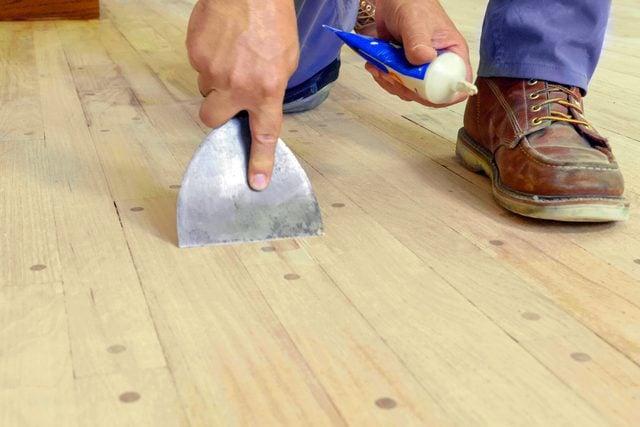
Fill gaps
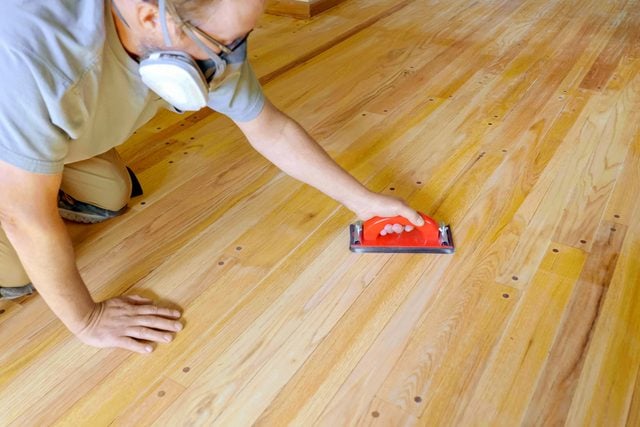
Once the sanding is complete, it’s time to fill any unsightly gaps. I’m a little torn on this. It’s difficult to find a filler that truly matches the floor and doesn’t stand out itself. This floor was in pretty nice condition, so we just spread wood putty in the larger gaps. If you choose to use a filler, apply it as directed and let it dry. Once the filler is dry sand off any excess using a random orbit sander with a 100 grit sanding disc.
Step 8
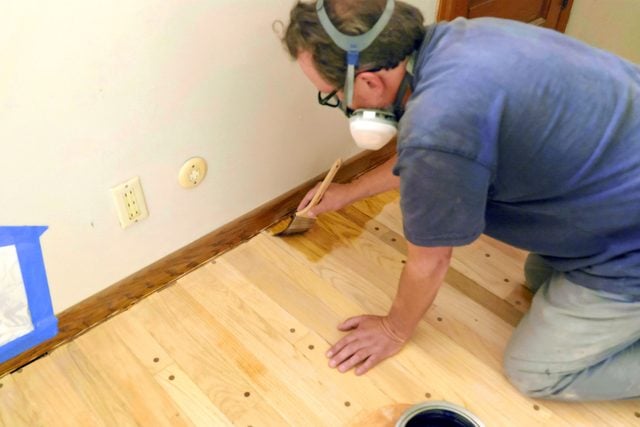
Brush the ends
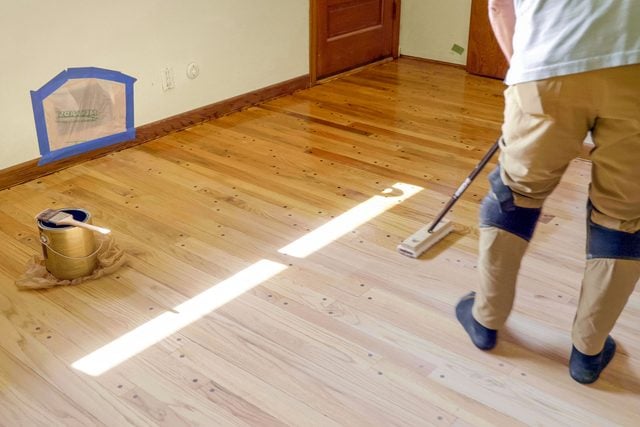
The pad you’ll use for applying the finish gets right up to the wall on the edges of the stroke, but not at the ends. Start with using a brush to apply finish right up to the baseboard where the ends of the floorboards meet the wall. Work in sections of three to four feet at a time to keep the finish from drying before you get to it with the pad. If your HVAC is forced air, cover any vents with plastic before you start applying finish.
Step 9
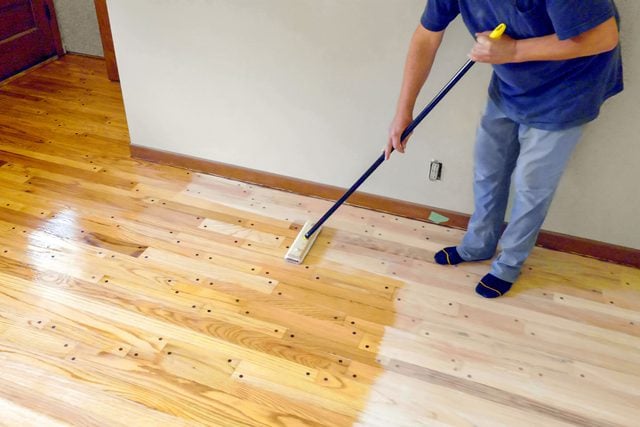
Apply the first coat
Like sanding, you’ll apply the polyurethane floor finish with the direction of the flooring. Plan your finishing so that you end up at a doo— don’t “paint yourself into a corner.” Using a finishing pad on a pole, work carefully, making sure the coat isn’t too heavy and you’re getting good coverage. Multiple light coats are best. Work across the room in reachable sections.
Move as quickly as you can so you maintain a “wet edge” in the finish as you work. As with sanding, overlap the last pass of each stroke of finish by about one-third. The raw floor will really soak up this first coat, so don’t be alarmed when it dries and looks blotchy and terrible.
Step 10
Sand between coats
The finish we applied said that you could apply successive coats within six to eight hours after the previous coat without sanding. But after 10 hours, sanding is recommended. Applying coats that quickly back to back didn’t work with our schedule. Even if it did, I’d still recommend waiting and sanding in between coats. This gives you the opportunity to smooth out rough spots.
After a light sanding using 220 grit, thoroughly vacuum the floor, and then wipe it down with a tack cloth. Using this method also ensures that you’re picking up any dust that may have settled on the floor in the drying process.
Step 11
Apply the next coats
With the floor scuff-sanded and cleaned, apply a second coat of finish just as you did the first. Allow the second coat to dry. Repeat the sanding and cleaning process, and then apply a third coat.
Three coats are sufficient for most floors, but you can apply more if you wish. After the last coat is applied, allow it to cure for at least 48 hours before moving the furniture or area rugs back in. Also, learn about repainting the wood floors.
FAQ
When are hardwood floors beyond repair?
Hardwood floors are known for their durability, but they can reach a point where repair becomes challenging or impractical. Hardwood floors are usually considered beyond repair when they have extensive water damage, severe termite or pest infestations, or if the floorboards are too thin from repeated sanding and refinishing. Additionally, if the subfloor beneath the hardwood is compromised, it may require a costly and extensive replacement. In such cases, it’s often more cost-effective and practical to replace the hardwood flooring entirely.
Can you refinish engineered hardwood floors?
Yes, refinishing engineered hardwood floors is indeed possible, but it comes with some limitations. Unlike solid hardwood, which can be sanded multiple times, engineered hardwood has a thinner top layer of real wood. This means that you have a finite number of times you can sand it down before risking damage to the veneer. Generally, engineered hardwood can withstand one or two sandings, depending on the thickness of the top layer. Therefore, it’s crucial to assess the condition of your engineered hardwood carefully. If there are deep gouges or severe damage, it might be more practical to replace the affected planks or sections rather than refinishing the entire floor.
Can you replace one plank of hardwood floors?
Yes, you can replace one hardwood floor board, and it’s a common repair for minor damage or stains. To do this, you’ll need a few tools, including a circular saw, a chisel, and a hammer. Start by carefully cutting out the damaged plank, making sure to cut along the seams where it joins neighboring planks. Then, use the chisel and hammer to remove any remaining pieces and adhesive. Next, measure the dimensions of the removed plank to ensure your replacement piece matches precisely. Finally, fit the new plank into place, secure it with adhesive or nails, and finish by refinishing the area to match the surrounding floor. While it may sound straightforward, precision and care are crucial to achieving a seamless repair.
When can I put furniture on refinished hardwood floors?
After refinishing your hardwood floors, it’s crucial to exercise patience before moving furniture back into the room. Typically, you should wait at least 24 to 48 hours before placing heavy furniture items or rugs on the freshly refinished surface. This allows the finish to cure properly and harden, ensuring it’s less susceptible to damage or impressions from the weight of furniture. If you can, wait longer, up to a week, to be extra cautious. In the meantime, use felt pads under furniture legs to prevent any accidental scratching or denting when you eventually move them back in. Properly curing your refinished hardwood floors will help maintain their beauty and longevity.
Originally Published: October 08, 2020