


Fit, trim and restretch your carpet in one afternoon with a carpet stretcher.
A full day
Intermediate
$51–100
Introduction
Tired up lumpy, loose carpeting? You can restretch your old carpeting in less than a day. In fact you can fit, trim and restretch a new carpet in a modest size room yourself. With a few special rented tools and the coaching in this article, you can do a great job even if it's your first try. The techniques we show also work to get rid of wrinkles. You won't save a lot by doing it yourself. But the big advantage is that you can get the room back in order on your schedule rather than idling on a carpet layer's backlogged customer list (or taking off work to keep the appointment).Tools Required
- Carpet cutter
- Cold chisel
- Flat-head screwdriver
- Hammer
- Knee kicker
- Needle-nose pliers
- Power carpet stretcher
- Pry bar
- Rubber mallet
- Stapler
- Tin snips
- Utility knife
Materials Required
- 5/16-in. staples
- Carpet
- Carpet pad
- Tack strips
Planning and special tools
Knee kicker
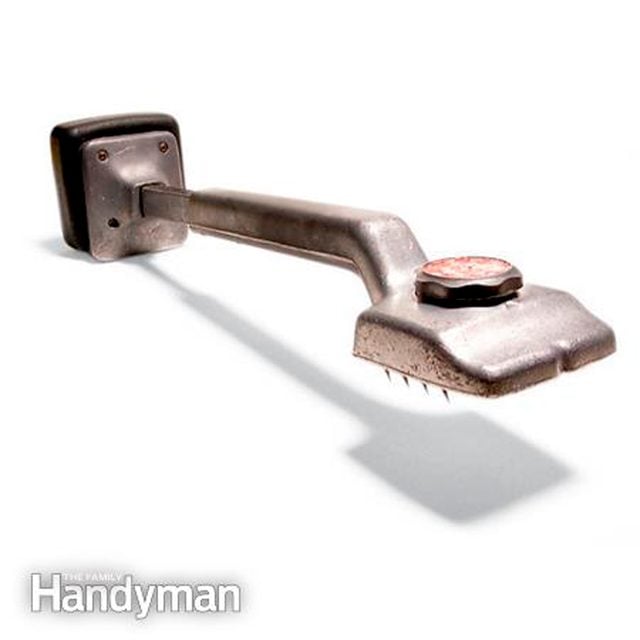
A knee kicker tightens carpeting along the edges (Photo 9).
Carpet cutter
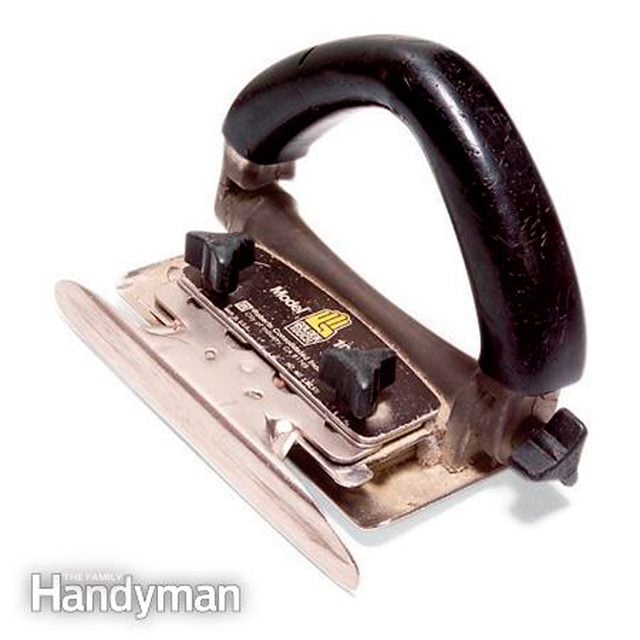
A carpet cutter trims the carpet even with the wall or baseboard (Photo 10).
While the techniques we show are similar to the ones used for installing new carpeting, we don’t recommend installing large tracts of new carpeting. Seaming, layout and hauling are best left to the pros. And compared with the price of new pad and carpet, pro installation fees are relatively cheap.
If you only need to remove wrinkles, skip all of the business on tacking and re-laying the carpet just use the techniques shown in Photo 8 and the carpet stretching sequences we show.
You may be tempted to build a new bookcase or other project on top of your carpet. Resist the urge! It’ll just make your construction work and future carpet replacement harder, not to mention the risk of damaging the carpet while you’re working.
The most important tool to rent is a “power” carpet stretcher (Photo 8). It does the lion’s share of the carpet stretching. If you have tight areas where the power carpet stretcher won’t fit (spaces less than 3 ft. from adjoining walls), you’ll also need to rent a “knee kicker.” If a carpet cutter is available, rent it, too (Photo 10). It’ll cut off carpet edges more cleanly and accurately than a utility knife. In addition to these tools, you’ll need a pry bar to remove the tack strip (Photo 3), a stapler with 5/16-in. staples to reinstall the pad, and a tin snips or a chisel to cut the new tack strips to length (Photo 4).
Tip: Before you run to the rental store to pick up your carpet stretching tools, have the tack strips installed and the pad stapled down. Chances are you’ll only need the tools for a few hours, so you want to be ready to use them right away to save on rental fees.
Project step-by-step (16)
Step 1
Pull back the carpet and pad
Peel back the old carpet

Lift a corner of the carpeting free of the tack strip with a pliers. then peel back the carpet. Once it’s started, it’ll release easily, like pulling on a zipper.
Close-up

Pull the carpet off the tack strips.
Step 2
Pull stapes

Dig the staples out of the carpet pad with a screwdriver or needle-nose pliers. Be patient and get them all. Otherwise the pad will rip. Lift one corner of the carpet with a pair of pliers and gently tease it free of the tack strip (Photo 1). But be careful; it’s easy to unravel the fibers. Then you’ll be able to grab hold of the carpet and pull it away from all the tack strips like a zipper. Also be careful not to pull the carpet past doorways where you might break a seam. You’ll have to hire a pro to come and fix it.
Before you pull back the pad, pull out all of the staples with a screwdriver and pliers (Photo 2). Don’t pull the pad through the staples, or it will rip. If you have any pesky floor squeaks, this is the perfect time to take care of them. Walk around the room with a keen ear and mark the squeaks on the floor. Fix them by screwing the subfloor to underlying floor joists with 2-1/2 in. screws. Now go ahead and install that new bookcase and we’ll show you how to reinstall the carpet.
Step 3
Remove old tack strips and replace with new ones
Remove the old tack strips

Pry out as many 4 ft. sections of tack strip with a pry bar as needed to clear the new built-in. Then discard them. Tack strips have prestarted setting nails that secure them to the floor and needle-sharp nails driven at slight angles that grip the carpet after it’s stretched (Photo 3). Wear gloves when handling them or I guarantee you’ll have blood on your hands! If you have a wooden floor, pull up and discard as many 4 ft. tack strip sections as needed to clear the base of your project. It’s easiest to pry them up by pounding a pry bar under the setting nails (Photo 3).
If you have tack strips in a concrete floor, carefully lay out your project’s footprint on the floor and chisel through the tack strips just outside the layout marks. Then pry out the wood through the concrete nails (they won’t pull out) and break off the nails by hitting them sideways with a hammer. Breaking off the concrete nails will probably leave craters in the concrete, which makes it hard to drive in new ones.
Step 4
Cut new tack strips

Cut new tack strips to length with a pair of tin snips. Wear gloves to protect your hands from the needle-sharp tacks.
Step 5
Nail down the new tack strips

Space the tack strips about 1/2 in. away from the baseboards and nail them into place with the gripping nails pointing toward the walls. Use a cold chisel or pry bar and mallet to sink nails under toe-kicks.
Make sure to point the carpet-gripping nail tips toward the wall when you install them (Photo 5) or they won’t hold the carpet in place during stretching. Position them half the thickness of the carpet away from the wall (e.g., 3/4-in. thick carpet, 3/8 in. away from wall). Installing them is simply a matter of driving the prestarted setting nails into the floor with a hammer. Don’t leave any gaps at corners or between lengths.
Tack strips always come in 4 ft. lengths and are available with concrete nails for slabs or standard nails for wooden floors, so be sure to get the right kind. Cut the strips to length with a tin snips (Photo 4). If you can’t get at the setting nails because of an overlying toekick or an overhang, pull them out and set the tack strip in a bed of construction adhesive. But wait overnight for the glue to set before stretching the carpet. Or use a cold chisel or flat bar as we show in Photo 5.
Step 6
Reset the carpet and stretch it
Cut and staple the padding
Use a utility knife to cut the padding to fit tightly against the tack strip. Then staple the padding back in place with 5/16-in. staples spaced about every 3 in. around the perimeter and along the seams. When you’re ready to reinstall the carpet, trim the pad so it rests right next to the tack strips and staple it every 3 in. or so along the seams and the tack strip (Photo 6).
Step 7
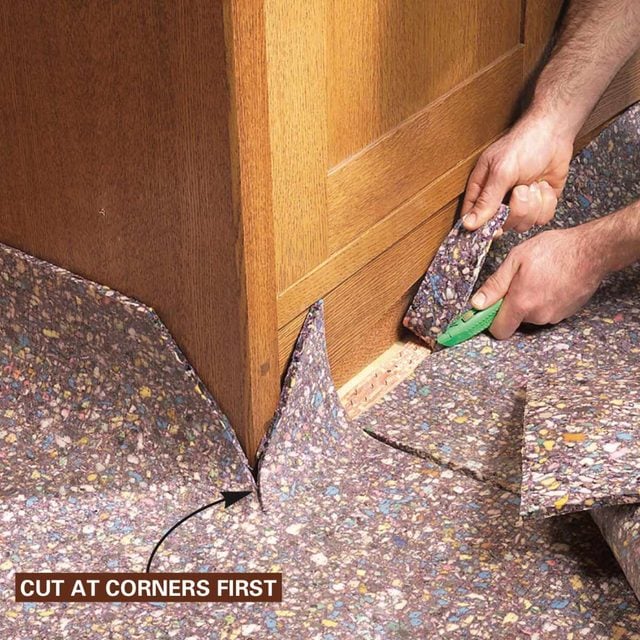
Cut the carpet oversize

Mark the carpet at outside corners and cut angled clearance cuts with a utility knife. Then trim off most of the excess carpet, leaving about 3 in. extra along each side.
Step 8
Stretch and embed the carpet

Plant the power carpet stretcher against the opposite baseboard and add extension sections until the gripping head is about 6 in. away from the wall. Push down on the lever of the power carpet stretcher and embed the carpet backing on the tack strips with your hand. Follow the sequence below.
Basement Carpeting: Installing Carpeting In a Finished Basement
Step 9
Kick tight areas

Stretch any remaining tight areas with the knee kicker. Rest the teeth about 6 in. back from the wall or built-in and “kick” with the spot above your kneecap. Then embed the carpet with your hand.
Then roll the carpet against the new built-in and make diagonal cuts away from the corner (Photo 7). Then cut off all but 3 in. of the excess with a utility knife. Work from the underside to make cutting easier. You’ll cut off the 3-in. overlap after stretching, as we show in Photo 10.
The power carpet stretcher kit comes with extension sections so you can adjust the shaft length to the room dimensions. It works by bracing one end against a wall while you embed the teeth of the head in the carpet about 6 in. away from the unanchored edge. As you force the lever down, the teeth dig through the surface fibers, grip the carpet backing and stretch the carpet. Before you release the handle, push the carpet into the tack strip directly in front of the head. Protect the wall or woodwork by resting the “pushing” end against a short length of 2×4 (see the stretching sequence below).
The dial on the power head determines how deep the teeth dig into the carpet. The deepest setting works best for most carpets. Push down on the power carpet stretcher lever firmly to get a good stretch. You should feel the carpet stretch and see wrinkles disappear. Smaller spans require less pressure. If it takes all your strength to push down the lever, you’re overstretching, and if it pushes down with little effort, the carpet isn’t tight enough. To increase the force, lift the head free of the carpet, raise the handle, embed the head and try again.
After stretching the length, use the knee kicker to set one side (the door side; Photo 9C). Also use the knee kicker to stretch confined areas where the power carpet stretcher won’t fit (Photo 9D). Set the teeth of the knee kicker into the carpet about 6 in. away from the wall and kick against it with the area above your kneecap (Photo 9). Immediately after kicking, embed the carpet in the tack strip with your hand to hold it in place. With more or harder kicks, you can “ratchet” the carpet tighter.
Step 10
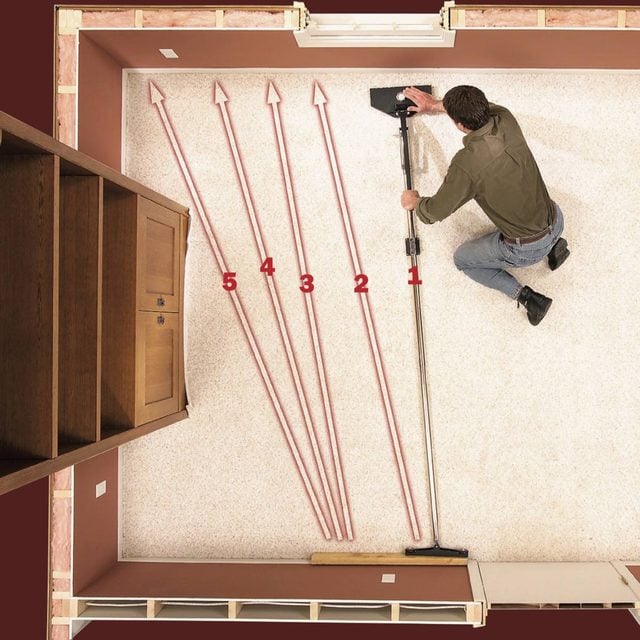
Carpet stretching sequence
Power stretch the length

Power-stretch the length first, following the numbered sequence shown. Beginning at one end of the built-in, stretch the carpet and then push the carpet backing into the tack strip with your hand. Stretch in 18-in. increments, moving first toward any side wall that has a door. Then finish stretching against the built-in and the wall at the other end.
Removing Old Carpet
Step 11
Knee-kick the first side

Stretch the carpet against the baseboard with the knee kicker and embed it into the tack strip. If it’s too hard to stretch with the knee kicker, use the power carpet stretcher.
Step 12
Stretch the opposite side
Stretch the opposite side of the room with the power carpet stretcher. Start stretching beginning about a foot or so behind the point where the carpet was rolled back.
Step 13
Knee-kick the tight areas

Knee-kick the tight areas, working from the front of built-in toward the wall. Follow Photos 9A — 9D for proper stretching technique.
Step 14
Finish with the carpet cutter
Trim with a carpet cutter

Hold the carpet cutter tight to the built-in (or baseboard) and cut through the front side of the carpet.
Step 15
Trim tight areas with a utility knife

Use a utility knife to finish the cuts in corners and to trim around projections and other tight areas. Cut from the backside, leaving the carpet about 1/8 in. overlong to tuck tightly against the built-in.
How to Get Red Wine, Coffee & Tomato Sauce Stains Out of Carpet
Step 16
Embed the edges

Embed the carpet edge firmly in the tack strip and under baseboards by forcing the front edge of the carpet cutter into the carpet and dragging it along the wall. Using a carpet cutter and a utility knife (Photos 10 and 11), cut off the excess after the carpet is completely stretched. Cut an entry point for the cutter with the utility knife from the back. The cutter is designed to trap the carpet against the woodwork and cut it accurately. You’ll have to push hard to force the carpet against the wood, otherwise you may cut it too short or long. If you don’t cut enough, make another pass in both directions. If the rental store doesn’t rent carpet cutters, you’ll have to make all of your cuts with a utility knife, working from the backside. Be careful and work slowly to keep your cut accurate. Looking for a carpet for your patio? Here’s what you need to know about outdoor carpets.