


Installing recessed lighting, even in the toughest situation—by fishing wires.
Multiple Days
Advanced
$101–250
Introduction
Give your room a stunning new look and feel by installing recessed lighting. Even if you don't have access to the ceiling from the attic, you can install these lights by following the directions shown here. You don't have to tear up your ceiling either. We'll show you how to add these lights to your room with minimum ceiling tear-out and patching. You can also use these wiring techniques to install other types of ceiling lighting.Tools Required
- 4-in-1 screwdriver
- Drywall saw
- Electrical tape
- Fish tape reel
- Hacksaw blade
- Hammer
- Needle-nose pliers
- Non-contact voltage tester
- Right angle drill/driver
- Stepladder
- Stud finder
- Tape measure
- Utility knife
- Voltage tester
- Wire stripper/cutter
Installing recessed lighting with minimal tear-out
Dramatic lighting

Recessed fixtures cast dramatic light in the room.
Recessed lighting
The lights give the room a dramatic appearance. Thinking about adding recessed lights or pot lights but don’t want to tear out your whole ceiling to do it? Luckily you don’t have to. With a little ingenuity and special remodeling housings, you can install a roomful of recessed lights or canister lights with minimal drywall tear-out and patching.
We’ll show you how to install recessed lighting, the housing and fish the wires through a narrow, strategically placed slot cut in your ceiling. The techniques we’ll show you will work in almost any situation, but if you’re lucky enough to have access to the ceiling from the attic, the job will be even easier. However, this is not a project for novices. You should know the basics of connecting wires and installing electrical boxes.
In this article, we’ll be focusing on recessed lights (aka can lights or pot lights or canister lights), although you could install any other type of light fixtures using the same techniques to run the wire. Depending on your choice of fixture, lamp and trim, recessed lights can provide general illumination or accent lighting. In this story, we’re installing a number of 4-in. diameter low-voltage fixtures that work best for providing accent lighting. These operate on regular household current but have built-in transformers to power the low-voltage halogen lamps. We’ll show how to add a second switch to control a group of 5-in. diameter recessed lights designed to provide overall illumination.
How to Install Recessed Lighting: Draw a lighting plan
This room is the end result of a good lighting plan.
Start with a drawing and end with lighting like this. Planning ahead is the key to getting the lights in the right spot. Begin by measuring your room. Using graph paper, make a scale drawing in which 1/4 in. equals 1 ft. Sketch in the furniture arrangement and any wall-mounted feature you’d like to accent. Decide what you want to accomplish with the lights. For example, you may want to provide accent lighting for a favorite piece of art, add task lighting over your hobby area and improve the general room lighting.
Take your drawing to a lighting showroom for help with the design. A knowledgeable lighting salesperson will help you choose the right combination of recessed light housings, trims and lamps and help figure out the ideal locations on the ceiling. If you feel confident in your planning ability, buy the lights from a home center instead. You’ll save a little money but have a smaller selection of fixtures to choose from. Make sure to obtain an electrical permit from your local building department and have the work inspected when you’re done.
Project step-by-step (12)
Step 1
Wiring recessed lights: Find a circuit to provide power
Cut holes in the ceiling.
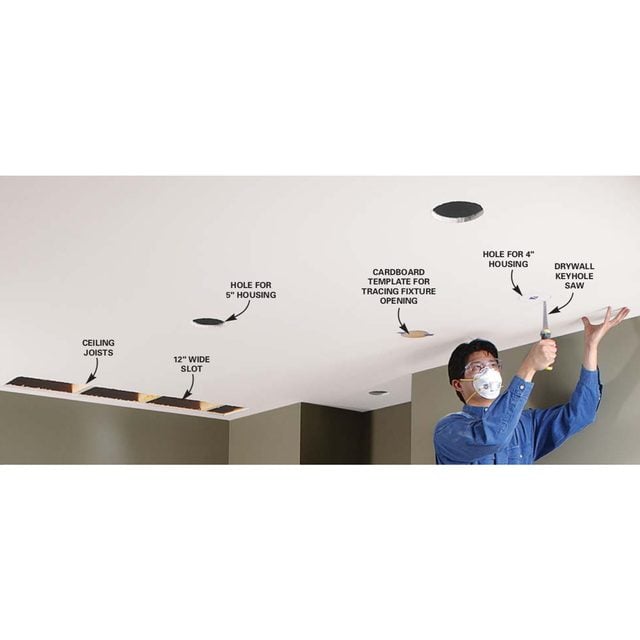
Saw a slot in the ceiling for access to the ceiling joists and top of the wall for wiring. Then lay out and cut holes for the recessed light housings.
Step 2
How to install recessed lights: Identify a power source.
Find an existing box to use as a power source and turn off the power to the outlet at the main electrical panel. Break it out and use the hole to fish a power cable to the new switch location.
Step 3
How to install recessed lights: Locate your new switch box.
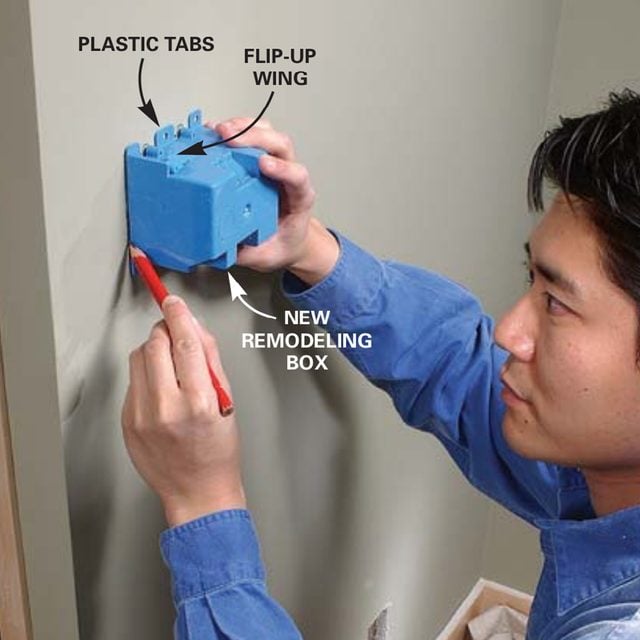
Cut in the new switch box according to your plan (Figure A). Use a remodeling box that has built-in cable clamps. Don’t mount the box until you’ve pulled in cables from the power and lights.
Step 4
How to install recessed lights: Drill a hole in the top plate.
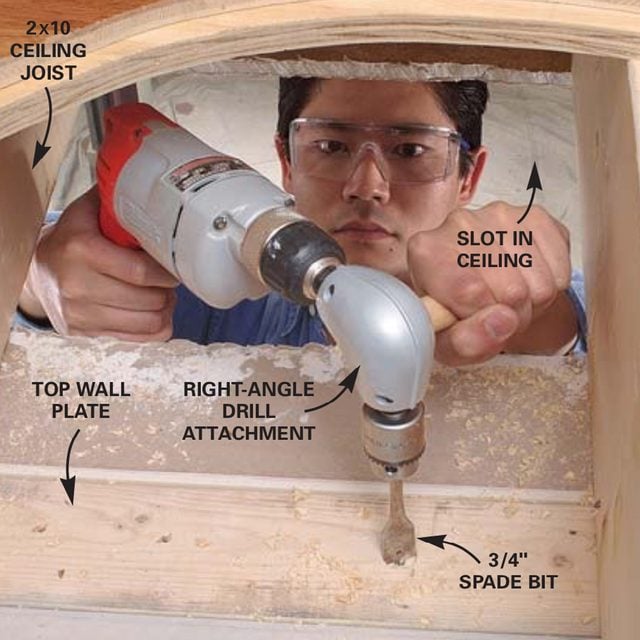
Drill through the top plate and the joists to create a route for the cables (see Figure A). Keep the holes centered on the plate and at least 2 in. from the top and bottom of the joists.
Step 5
How to install recessed lighting: Drill through joists.

Reach through the recessed light holes to drill through joists that aren’t accessible from the slot in the ceiling. To power your new can lights, find an existing receptacle or switch box that contains a “hot” wire on a suitable circuit. The National Electrical Code prohibits any connections to “dedicated” circuits such as 20-amp small-appliance circuits in kitchens or dining areas, 20-amp laundry room circuits and 20-amp bathroom circuits.
Also make sure the circuit you choose won’t be overloaded by the additional lights. To determine this, first shut off the circuit in the main panel. Then go through the house turning on lights and other electrical items to find what is already on the circuit. Add up the wattage of everything that doesn’t go on. Add to this total the wattage of the lights you’ll be installing. We recommend a maximum connected load of 1,440 watts for a 15-amp circuit and 1,920 for a 20-amp circuit. (The amps are printed on the circuit breaker or fuse.) If the total amperage exceeds these amounts, you’ll have to find a new circuit.
Try to find a power source for your new switch that’s convenient to fish wires from, preferably in the same wall (in either the same room or the room opposite, or a basement or attic). After you’ve chosen the electrical box to tie in to, turn off the circuit breaker or unscrew the fuse that controls the circuit. Some electrical boxes contain more than one circuit. Before doing any work in the box, test all the wires with a non-contact voltage tester to make sure they’re “dead.”
Calculating Box Sizes
To figure the minimum box size required by the National Electrical Code, add: 1 for each hot and neutral wire entering the box, 1 for all the ground wires combined, 1 for all the clamps combined, and 2 for each device (switch or receptacle, but usually not light fixtures) installed in the box. Multiply this figure by 2 for 14-gauge wire and 2.25 for 12-gauge wire to get the minimum box volume in cubic inches. Plastic boxes have the volume stamped inside.
CAUTION:
If you have aluminum wiring, call in a licensed pro who is certified to work with it. This wiring is dull gray, not the dull orange that’s characteristic of copper.
Step 6
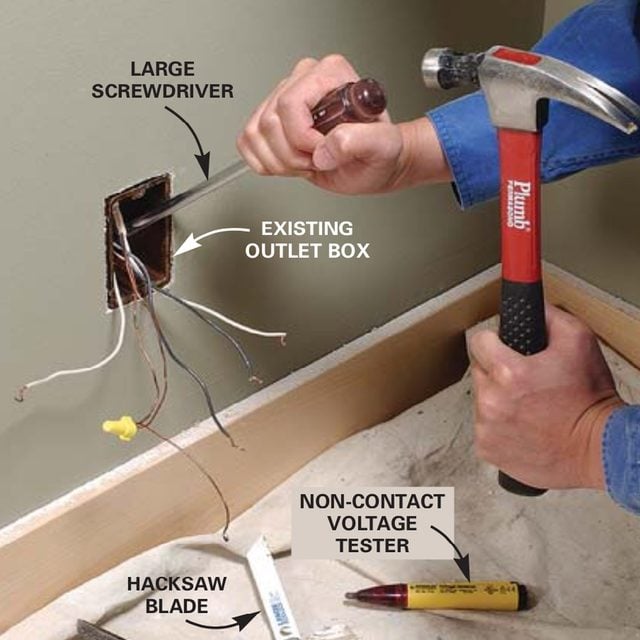
Wiring recessed lighting: Remove the old box
Run a string through the receptacle opening.

Drop a weighted string down through the hole in the top plate and tape the end of the cable to it. Pull the cable up and route it over to the switch hole. Whether you choose a switch or outlet to provide power, replace the existing electrical box with a new one. Photo 2 shows how. With the old box out of the way, you’ll be able to use the hole to fish in the new cable (Photo 6). Then determine the box size required and install a new remodeling box that’s large enough to safely hold all the wires (Photo 11). We used a 20-cu.-in. plastic box. Make sure the new box has built-in cable clamps.
CAUTION:
If you have aluminum wiring, call in a licensed pro who is certified to work with it. This wiring is dull gray, not the dull orange that’s characteristic of copper.
Cut a slot for easy access
You’ll need slots in the ceiling for the wiring and the housings.
You’ll have to cut holes in the ceiling for installing recessed lighting housings. Now that you’ve located a source of power and have a plan showing your recessed light and switch locations, it’s time to figure out how you’ll run the cables. Start by locating the ceiling framing members (joists) with a stud finder and determining which direction they run. They’re usually spaced 16 in. or 24 in. on center. Sketch the joist locations onto your lighting plan. Now draw in the cable route. We installed a standard recessed light housing in the slot where we had access to the ceiling framing. In other areas, we installed remodeling housings that mount in a hole cut in the drywall.
Figure A shows how we ran the cables for our lights. Make sure the junction boxes on the remodeling housings are listed for “through branch circuit wiring” so you can run at least one cable in and one out to the next fixture. Check the labeling on the housing to be sure. Some recessed light junction boxes allow more than two cables.
If you don’t have access to the joist spaces from the attic, remove a 12-to 16-in.wide piece of drywall from the ceiling (Photo 1). Cut the slot perpendicular to the joists about 6 in. out from the wall and make it long enough to include all the joist spaces that will contain a recessed fixture and the power source. Ideally, the opening will be in line with the switch and power source so you can use it to drill down through the top plate (Photo 4). If not, you may have to cut another opening.
Before you cut any holes, make a small hole and measure the depth of the joists to make sure your recessed light housings will fit. Most housings require about 7 in. Look through the slot with a flashlight to check each joist space for obstructions. Then measure and mark the center of each recessed light according to your plan, adjusting the position as needed to avoid joists and other obstacles. Finally, mark and cut the holes for the housings (Photo 1).
CAUTION:
Some insulating materials, ceiling spray textures, plaster and joint compounds made before 1979 contain asbestos. Breathing asbestos can cause cancer and other health problems. Call your local health department for information on testing for asbestos.
Step 7
Wiring recessed lights: Fish the cable
Use a fish tape reel to pull cables through joist spaces.
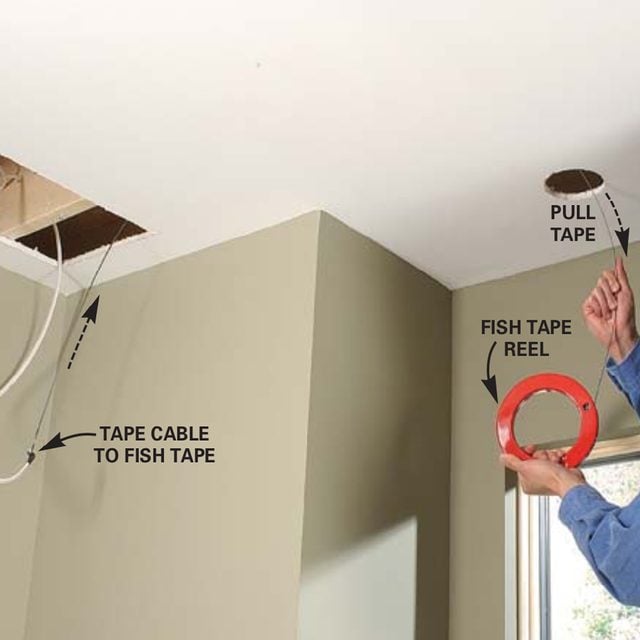
To run cables through difficult areas, tape them to a metal fish tape and pull them back through joist spaces. o run cables through difficult areas, tape them to a metal fish tape and pull them back through joist spaces.
Step 8
Wiring recessed lights: Connect the low-voltage fixtures.
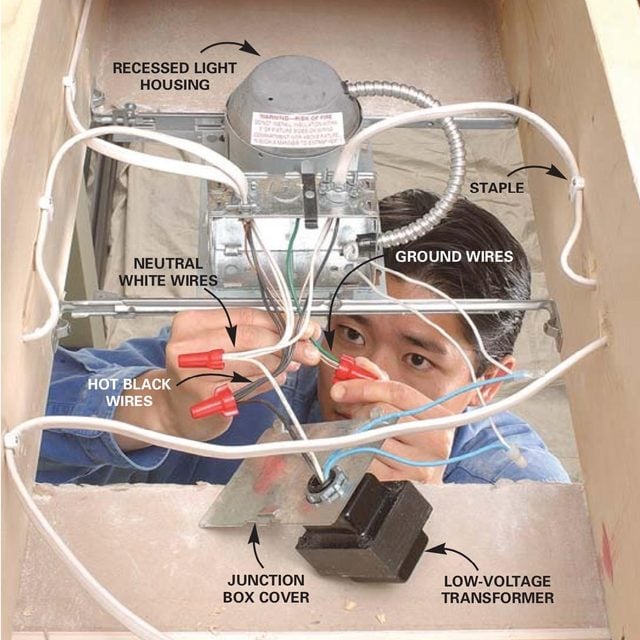
Nail up standard “new work” housings in open ceilings. Use the junction box on this low-voltage fixture to connect wires leading to other low voltage fixtures.
Step 9
Wire and then install the remodeling housings.
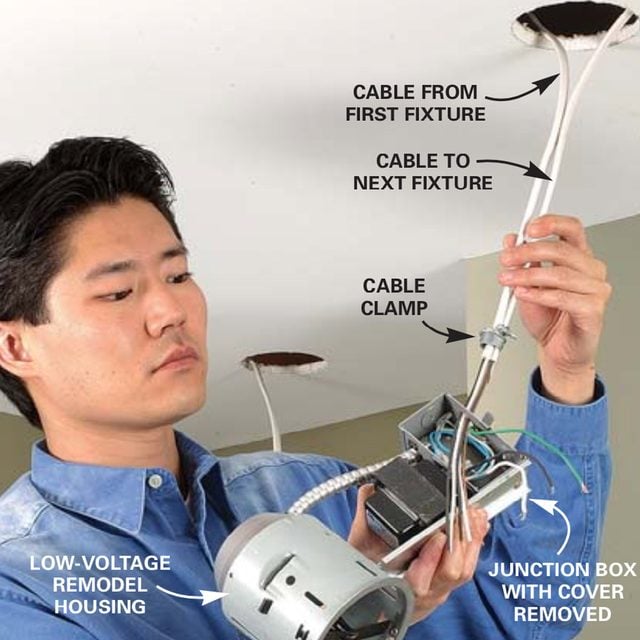
Wire remodeling housings before you slide them into the ceiling. Follow the manufacturer’s instructions for wiring the fixture and mounting the box.
Step 10
Push the cables into the remodeling box and label them.
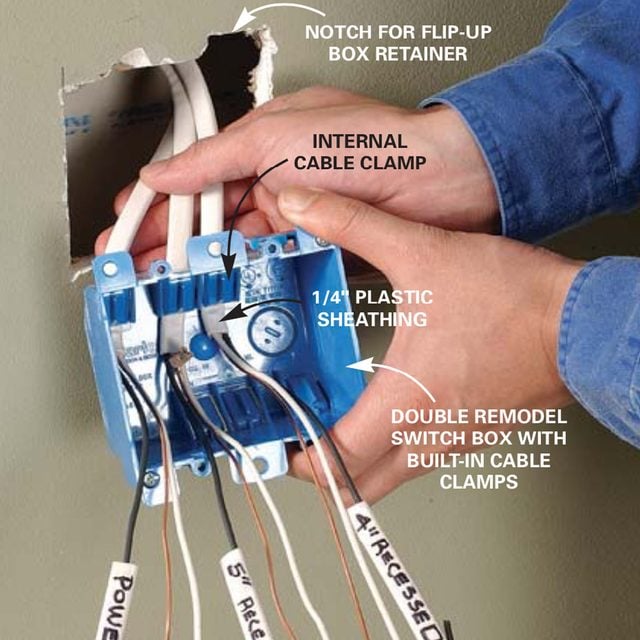
Push the power and switch cables into the remodeling box and label them. Then slide the box into the opening and tighten the screws to secure it. Connect the wires according to Figure B.
Step 11
Reconnect the outlet.

Install a new remodeling box at the old outlet location. Connect the new wires to the power source, then reconnect the outlet.
Step 12
Install the trim and lamps.
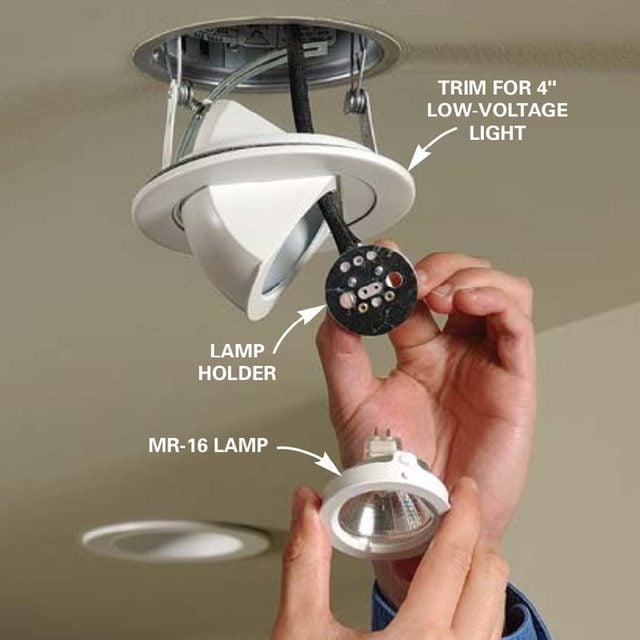
Call for an electrical inspection, then patch and paint the ceiling. Finish up by installing the trims and lamps according to your plan.
Select cable according to the circuit rating—14-gauge for 15-amp and 12-gauge for 20-amp. Photos 4 – 7 show methods of drilling and fishing the plastic sheathed cable.
Here are a few tips:
- Uncoil, cut off and straighten a length of cable at least 15 percent longer than you think you’ll need before fishing it through the framing.
- Leave about 2 ft. of extra cable at each opening.
- Staple the cable to the joists where you have access (Photo 8).
- Run only one or two cables through each 3/4-in. hole you’ve drilled. Keep holes at least 2 in. from the top and bottom of the joists.
- Strip 12 in. of sheathing from the cable before sliding the cable into the electrical box. The sheathing should extend 1/4 in. beyond the clamp (Photo 10).
When you’re through running cables, make final connections at the lights, switch and receptacle (Photos 8 and 11 and Figure B) and install the remodel housings in the ceiling (Photo 9). If you’re using low-voltage lights like ours and want to dim them, install a special magnetic dimmer. Replace the ceiling drywall and patch the ceiling after the electrical inspector has approved the work. Then paint the ceiling and finally install the recessed light trim and lamps (Photo 12). Follow the instructions included with your recessed light for exact installation procedures.
Buying Recessed Lights
A recessed light assembly consists of the housing (Photos 8 and 9), trim (Photo 12) and lamp. Labels inside the housing list the compatible trim styles and lamps for each. Deviating from the specifications can cause inefficient lighting, and more important, dangerous overheating.
Home centers stock a selection of basic housings and trim that cost from $20 to $40 depending on style. You’ll have to special-order less-common lights like the 4-in. low-voltage fixtures we’re using. Lighting showrooms usually have a wider selection and salespeople who can help you design your lighting and order the fixtures. Manufacturers’ catalogs are another great source of information, including a complete list of housings, trim styles and lamps as well as design tips and technical information.
For open framing, buy standard housings that include mounting brackets (Photo 8). If you’re fishing wires into an existing ceiling, purchase remodeling housings (Photo 9). Make sure to buy IC (insulation contact) rated housings if your recessed lights will be covered with insulation. Non-IC housings require a 1/2-in. minimum separation from combustible material and a 3-in. minimum separation from thermal insulation. For extra energy efficiency in insulated ceilings, look for airtight housings. Low-voltage housings operate on standard 115-volt wiring but have built-in transformers that allow the use of small 12-volt MR-16 lamps.
The quality of light and the ability to precisely focus the beam by changing lamp types or trim styles make low-voltage recessed can lights especially useful for accent lighting. The trade-off is higher price. Including housing, trim and lamp, the average cost of each fixture is about $100.