
46 Garage Storage Ideas You Can DIY
Updated: May 22, 2024
Organizing a garage isn't a one-size-fits-all project, so we've compiled some of our best garage storage ideas. Check out these tips to find ways to make your garage more organized and better to use.
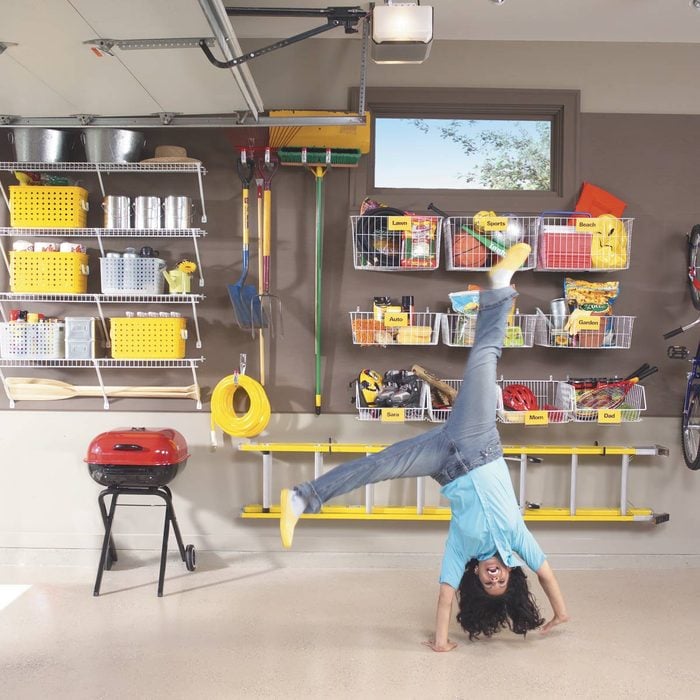
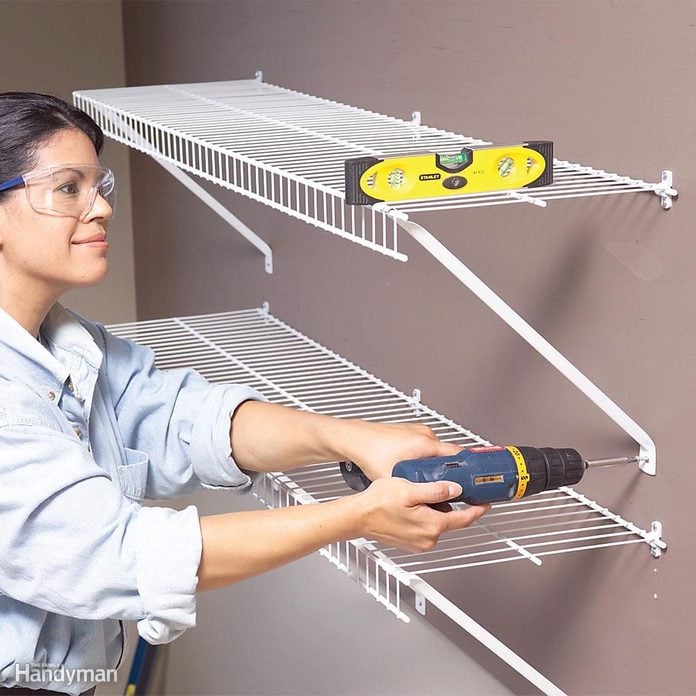
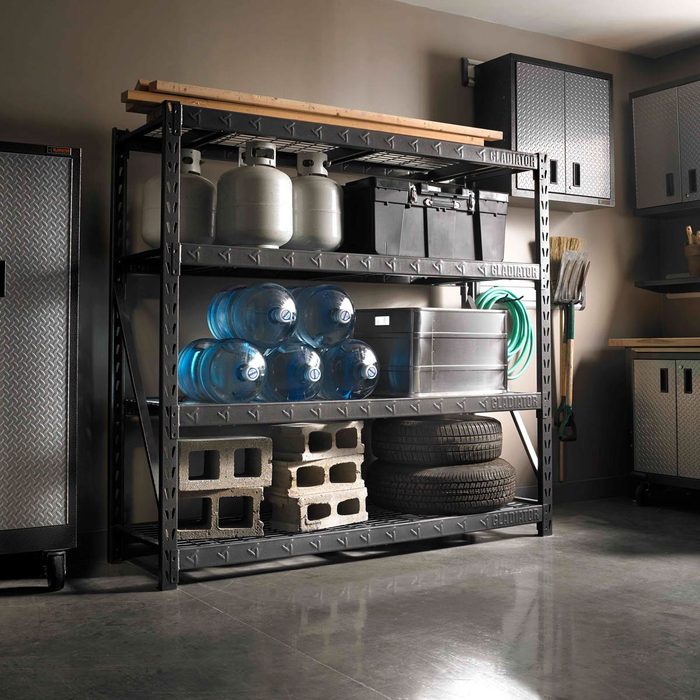
Wire Shelving In the Garage
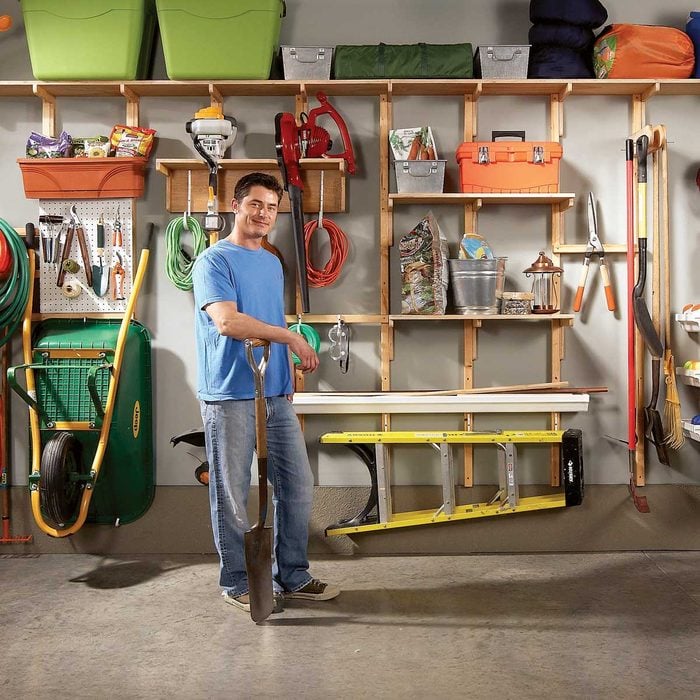
While no two garages are alike, one thing they might very well have in common is a deep need to be more organized. The walls are an obvious place to start.
Wall-mounted shelves are a simple fix that will help you maximize your garage storage space quickly and easily. Shelves, baskets and hooks are simple to install and inexpensive while offering you an endless array of customizable options. Save space and money with these affordable DIY garage storage projects.
The garage storage racks pictured here are an easy DIY project that will only take you one morning to set up.
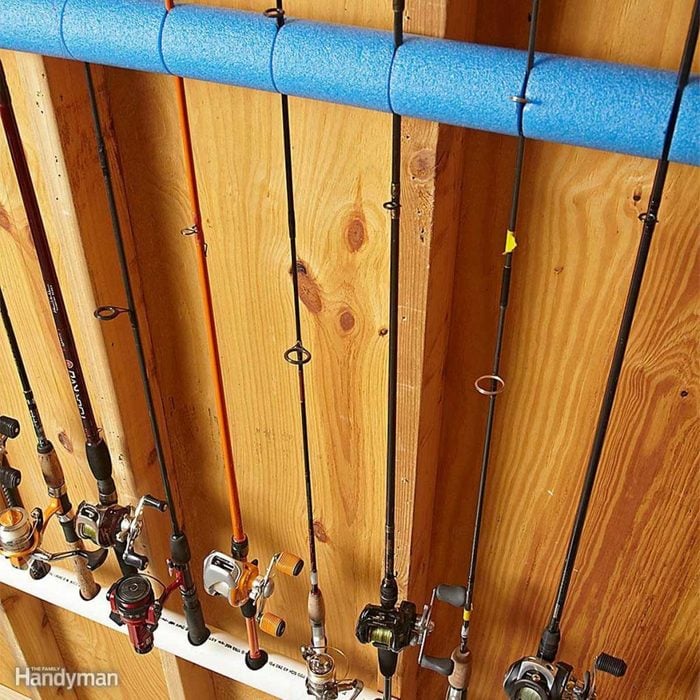
Garage Storage Ideas for Fishing Gear
We got sick and tired of our fishing rods getting tangled, so we came up with this easy fishing rod organizer. All you need is a length of 3-in.-diameter PVC pipe and a foam swimming pool noodle for this DIY garage storage system.
- Drill 1-in. holes spaced every 4 in. in the PVC pipe.
- Use a utility knife to cut slits in the foam noodle, spacing them 4 in. apart.
- Line up the pool noodle on the wall so that at least two of the slits sit over studs.
- Pull those slits apart, slide in a fender washer, and screw the noodle to the wall with 2-in. screws.
- Finally, screw the PVC pipe to the wall beneath it at a comfortable height and insert your fishing rods.
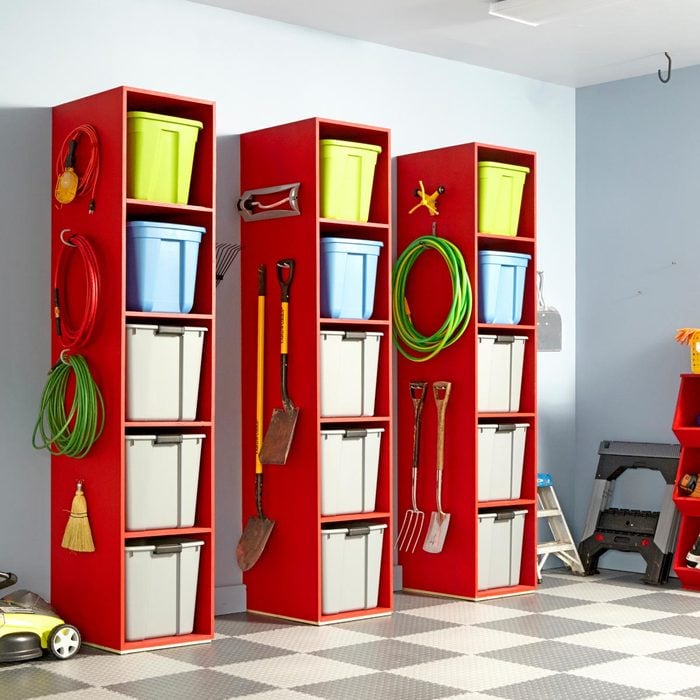
Stack Bins Vertically To Save Floor Space
Plastic storage bins are one of the great garage storage systems to separate and organize your equipment by sport or season. Unfortunately, they usually get stacked against a wall somewhere, which makes getting to the bottom bins difficult, especially for your household’s littlest teammates.
Luckily, a permanent DIY garage solution is only a weekend away with our easy-to-build storage towers, an attractive and ingenious way to provide easy access to your bins. Consider different color bins for each sport to make finding what you need a breeze, and utilize the sides of the wooden frame for wall-mounted accessory items such as fishing rod holders or utility hooks for lightweight equipment.
Also check: To keep your home safe and pest-free and your belongings in good shape, see what not to store in the garage.
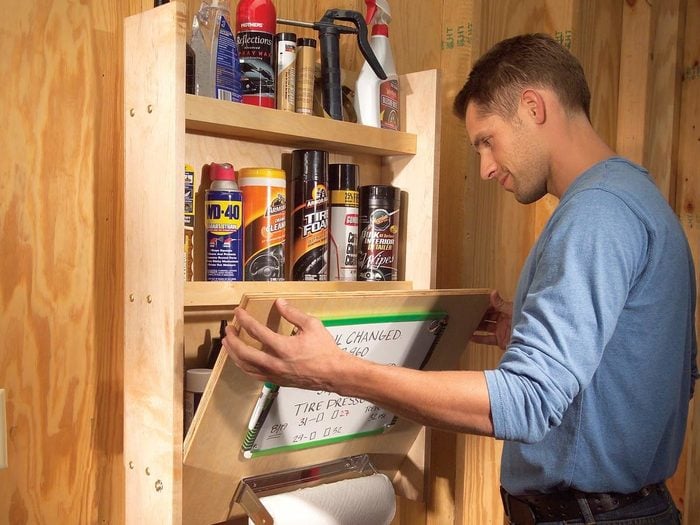
Car Care Products Cabinet
Organize your auto lubricants, fluids, and other items in this simple shelf/work table cabinet. Here’s your guide to DIY garage cabinets. You can mount a fold-up door on special hinges, but we’ll show you a faster method of how to organize your garage that requires just a couple of dollars’ worth of hardware.
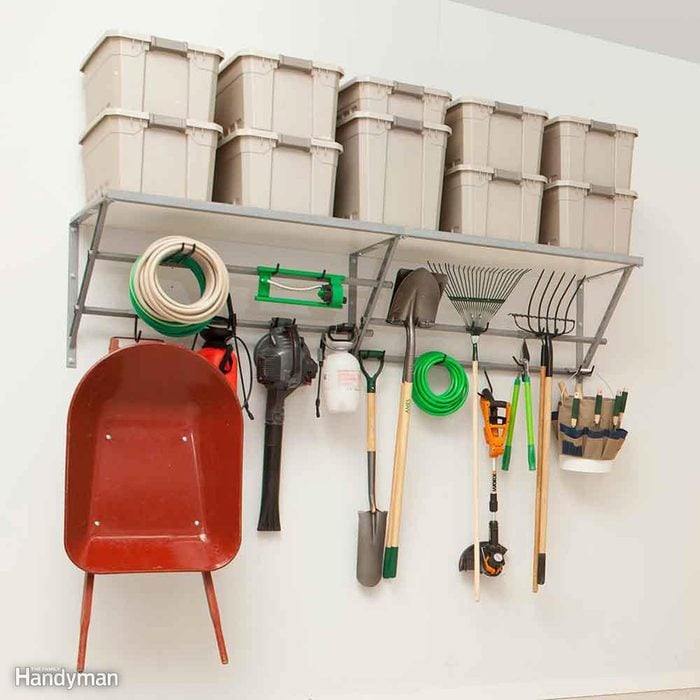
Store More on Walls
If you mount hooks, brackets, and other hardware only on studs, you’re wasting lots of opportunities for garage wall storage ideas. The best strategy is to add a layer of three-quarter-inch plywood over the drywall or bare studs. That gives you a continuous fastening surface so you can mount storage hardware easily, arrange items in a space-efficient way and cram more stuff onto the wall. Looking for more options? Learn how to DIY hardware organizer.
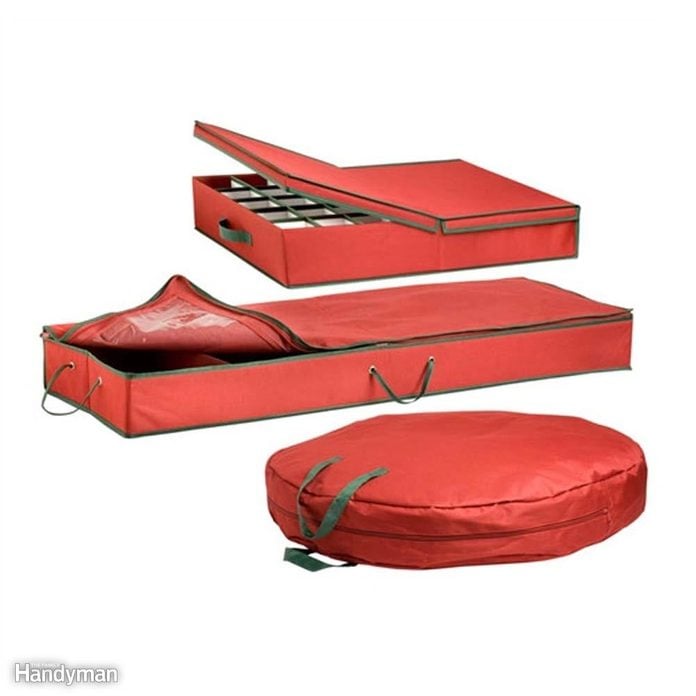
Canvas Storage Bags Protect Decorations
Protect bulky seasonal decorations like artificial trees and wreaths from garage dust and dirt by storing them in canvas storage bags. Tuck a dryer sheet in before zipping to deter insects and critters.

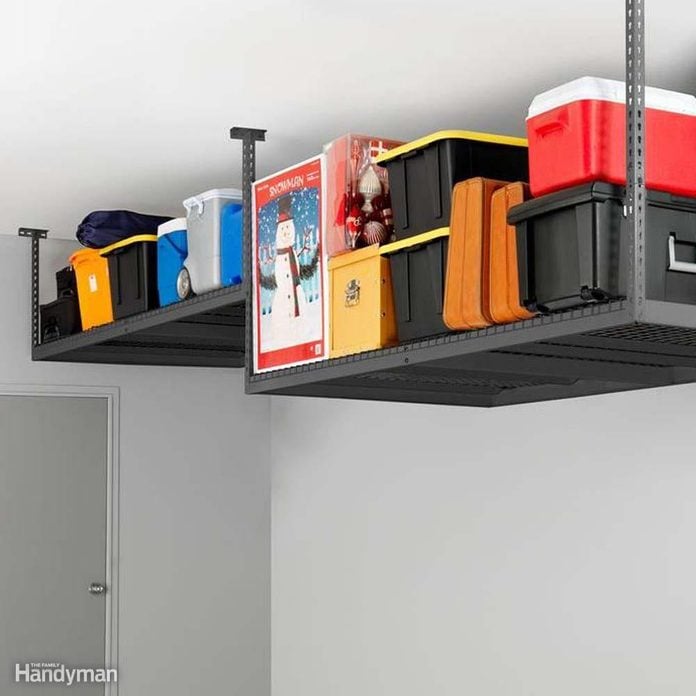
Garage Overhead Storage
The garage ceiling is a perfect place to store light and medium-weight seasonal items like holiday decorations and camping gear. Get those big plastic storage bins up off the garage floor and onto the ceiling!
- Screw 2x2s to the ceiling framing with 3-1/2-in. screws spaced every 2 ft.
- Use the bins as a guide for spacing the 2x2s. The lips on the bins should just brush against the 2x2s when you’re sliding the bins into place.
- Then, center and screw 1x4s to the 2x2s with 2-in. screws.

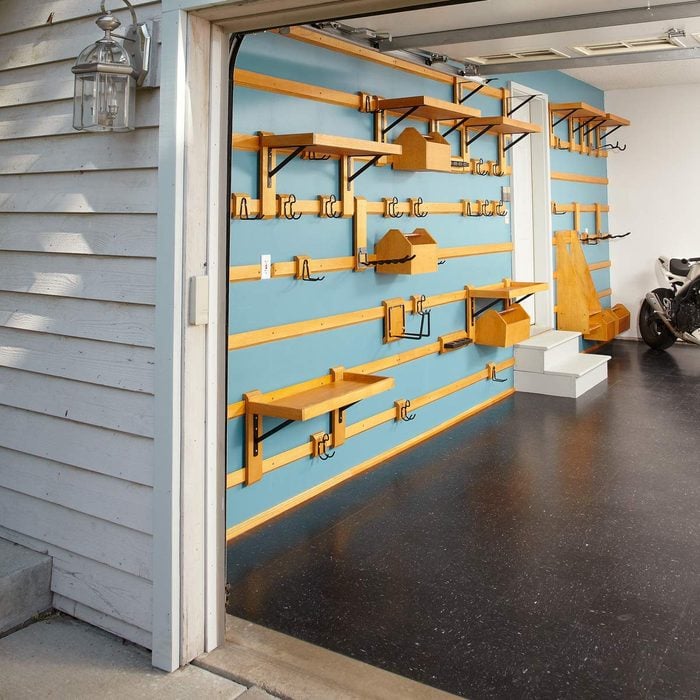
Flexible Garage Storage Wall
This storage system solves two challenges: first, how to design storage space for the narrow alley between the garage side wall and your car; and second, how to create a solid mounting surface to hold shelves and hooks that are capable of carrying hundreds of pounds of stuff.
The solution is to create a framework of horizontal wood strips and inexpensive shelf standards. It can hold almost any arrangement of shelving and hooks, at any point on the wall, and it’s easy to rearrange.
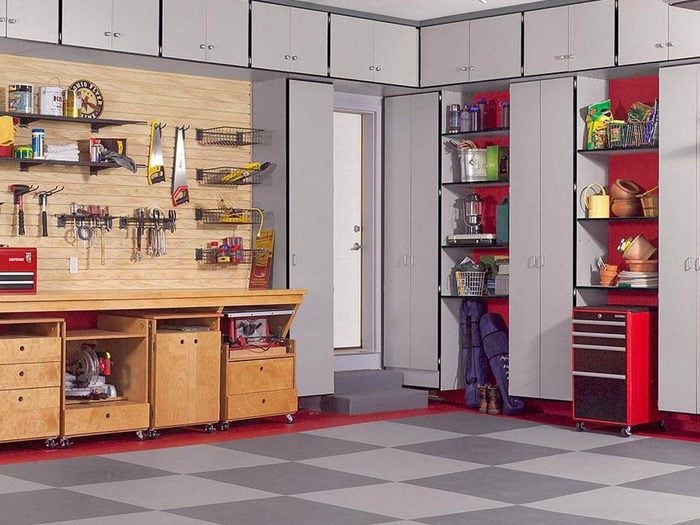
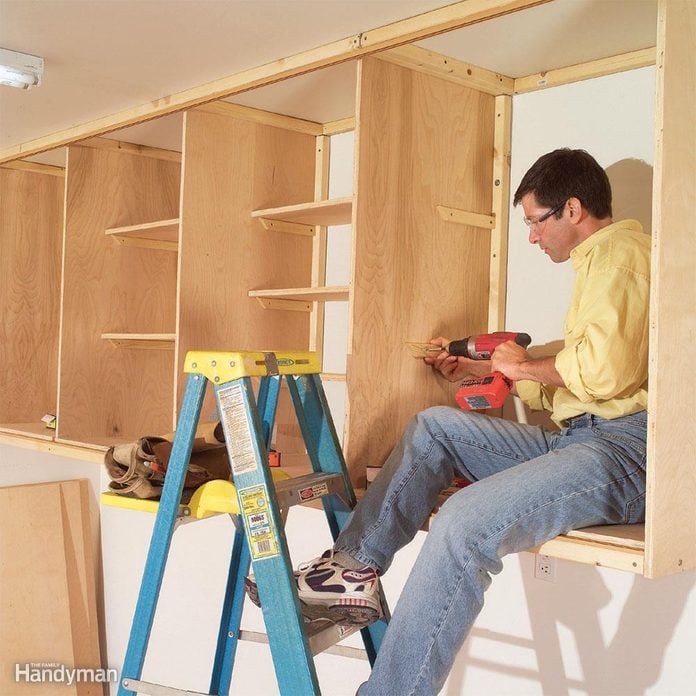
Add Garage Storage Cabinets
The garage is so frequently used as a catch-all for home improvement projects and off-season gear, these easy cabinets will be well worth your time and dollar. We’ve come up with plans for an easy storage system that can be modified to suit any garage.
The best part? An 8-foot tall unit clocks in at only about $27 per linear foot–less than what pre-assembled shelving at the home center would run you. The materials include melamine, selected for its reasonable cost and the fact that is needs no finish, plus pine 1x4s.
Plan out your configuration with masking tape on the wall and floors, ensuring that each cabinet has at least on stud behind it so it can be securely fastened.

Garage Corner Shelves
Who couldn’t use a few more shelves in the garage? You probably already have shelves in the obvious spots, but what about in the corners? This nifty corner shelf unit takes advantage of existing studs, and it’s fast, easy, and cheap. And it’s great for can storage ideas. Use scrap plywood or oriented strand board to make shelves that fit snugly between the corner studs and support them with 1×1 cleats. These corner shelves are perfect for storing smaller items such as glues, oils, waxes, and polishes, which get lost on larger shelves.
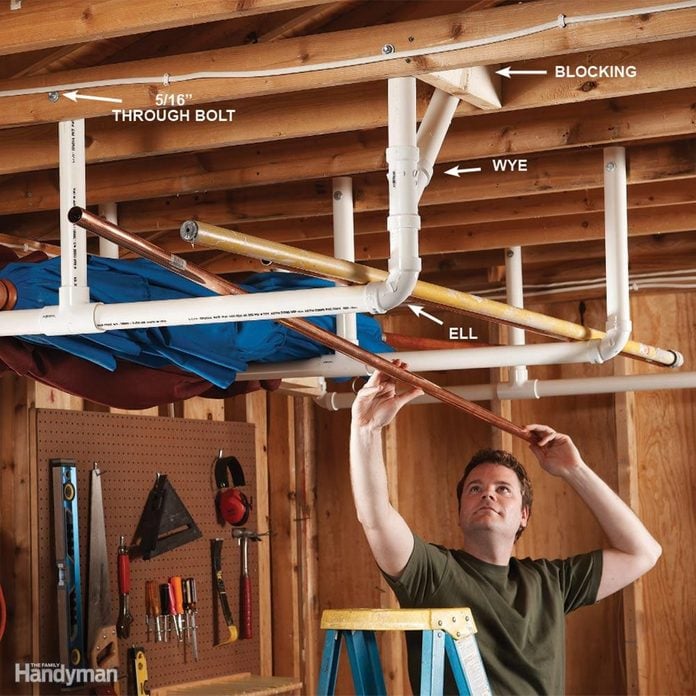
Easy Overhead Garage Storage
Stow bulky items overhead by cementing together a simple rack from 2″ PVC pipes and fittings. Bolt the straight pipe to the ceiling joists to support heavy loads, and screw the angled pieces from the ‘wye’ connectors into the cross brace to stabilize the whole rack. The PVC’s smooth surface makes for easy loading and unloading.
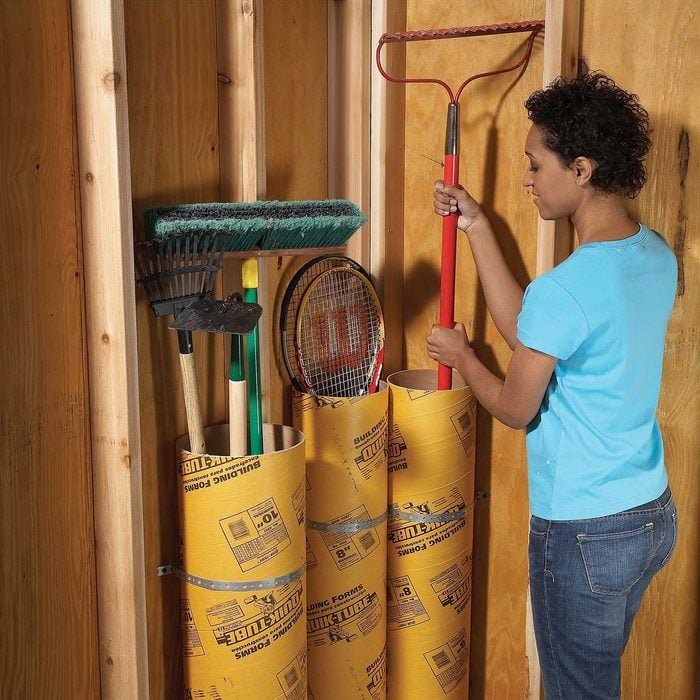
Garage Storage Tubes
Cardboard concrete-forming tubes are inexpensive and provide a great place to store baseball bats, long-handled tools and rolls of just about anything. Rest the tubes on a piece of 2×4 to keep them high and dry and secure each tube to a garage stud with a plumbing strap
Monkey Bars Wall Unit
If you need storage above your wall unit, these monkey-bar-style shelves might be the solution. Engineered of steel for durability, the system offers custom solutions to get tools and materials off the garage floor and out of your way—but still within reach. You can modify the hook-and-bar system to fit changing storage needs in the future.
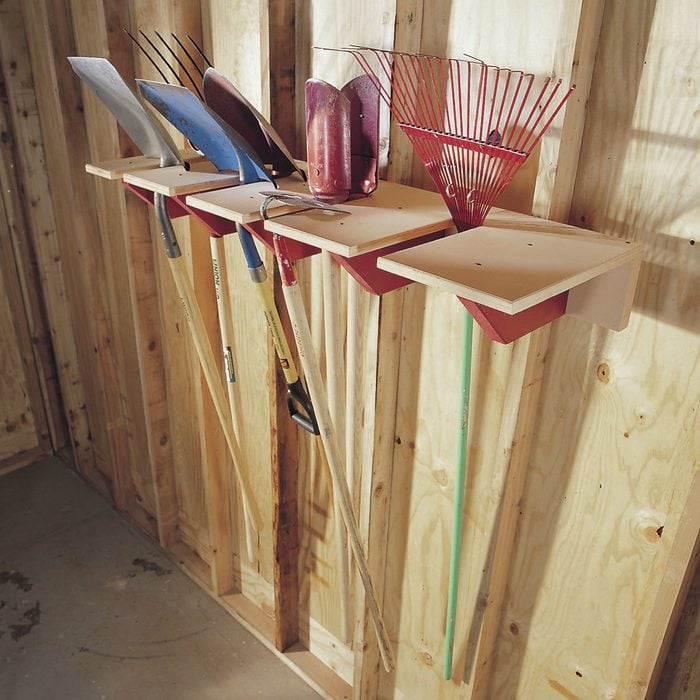
Long-Handled Tool Rack
This compact tool storage rack is strong and simple to build. You can store shovels, rakes, a sledgehammer—any long-handled tools—conveniently up and out of the way. The unit holds up to 14 items, giving you more flexibility and storage capacity than nails pounded in the wall. It’s an easy and useful storage idea for small garages.
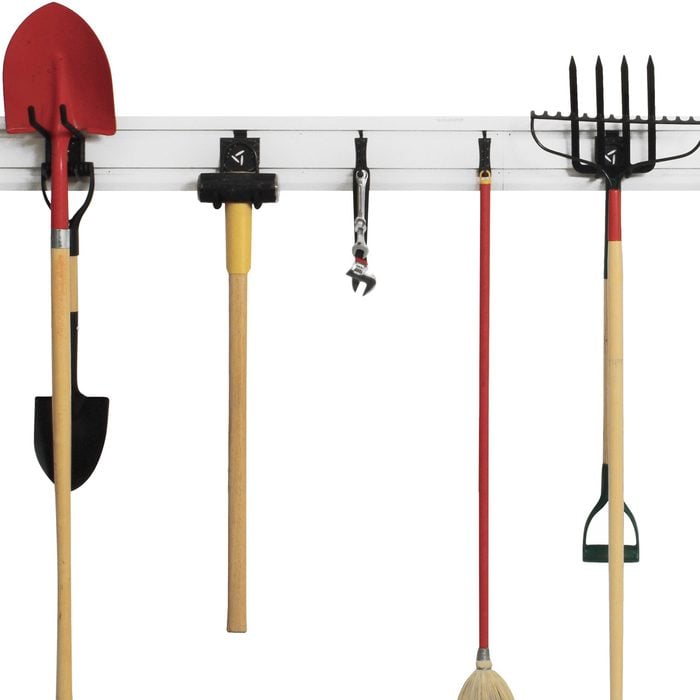
Gladiator GearTrack
Gladiator GearTrack wall storage offers flexibility: You can mount the horizontal track, then choose suitable hangers and slide them where needed. The best small garage storage ideas make use of vertical space.

Gladiator GearWall
Storing large, awkward items such as wheelbarrows can be challenging. Gladiator’s GearWall makes it simple to peg a wheelbarrow safely and securely to the wall.
Gladiator Heavy-Duty Rack
Talk about sturdy and heavy-duty. This Gladiator shelving unit is made of welded steel and holds up to 2,000 lbs. per shelf. It’s available in various widths: 48-inch, 60-inch, and 77-inch (shown).
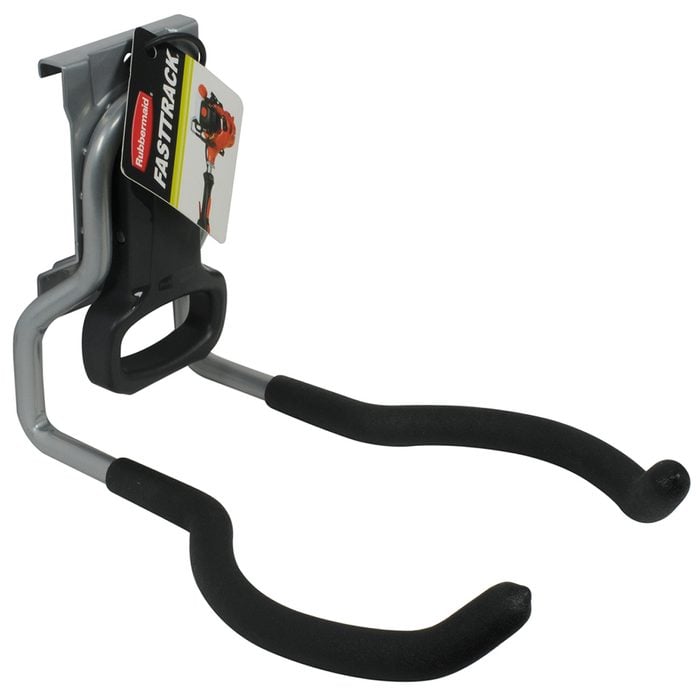
FastTrack Power Tool Hook
Got power tools such as leaf blowers and cultivators? Rubbermaid’s FastTrack power tool hook can take care of them. It holds up to 50 pounds, and the powder-coated finish resists rust and chipping.
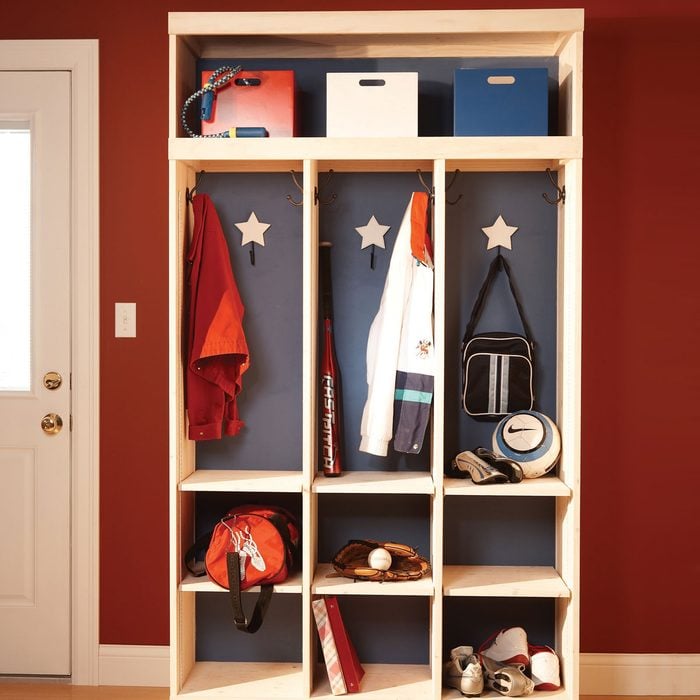
Sports Equipment Storage
Every sports kid dreams of being in the big leagues. Why not make that dream a reality by building a sports storage locker just like the pros? This entryway storage and organization center is the perfect way to give them a dedicated space to store their sports gear while keeping clutter to a minimum. The open design allows you to air out sweaty equipment and provides tons of space for all your sports accessories. Add a personalized nameplate to the top of the cubby, and your child will feel like their favorite sports-star!

Corral Sports Gear
This sturdy ball corral holds a herd of balls and lets kids easily grab the balls at the bottom without unloading all the ones on top. It’s built from 3/4-in. plywood and 2x2s. We made our ball corral 24 in. wide x 33 in. high x 12 in. deep.
The hooks on Bungee cords can be a safety hazard for both kids and adults, so cut the hooks off the cords (or use elastic cords that come hookless). Thread the cord through predrilled holes and secure it with knots. Drill the holes slightly larger than the cords to make threading them easier.
We added plumbing hooks and short gutter troughs on the outside of the corral to make it easy for kids to stash smaller balls, helmets, and mitts.
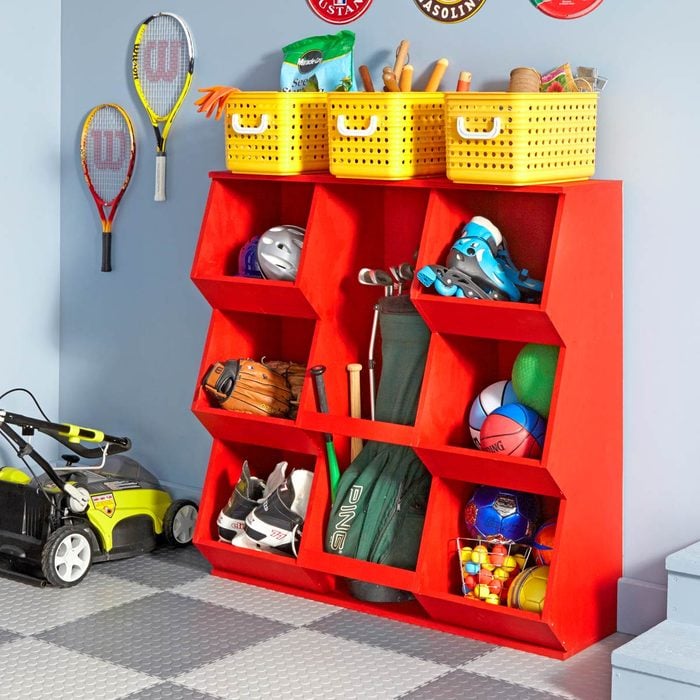
Throw and Go
Shelves and cabinets are great, but when you’re in a hurry (and kids always are), it’s nice to just throw and go. These DIY toy storage cubbies are perfect for holding sports gear, garden supplies or any other small garage items.

Recycling Bin Rack
Recycling bins tend to take up way too much floor space. Here’s an easy project that will get your recycling bins up off the floor and out of the way, and it costs almost nothing.
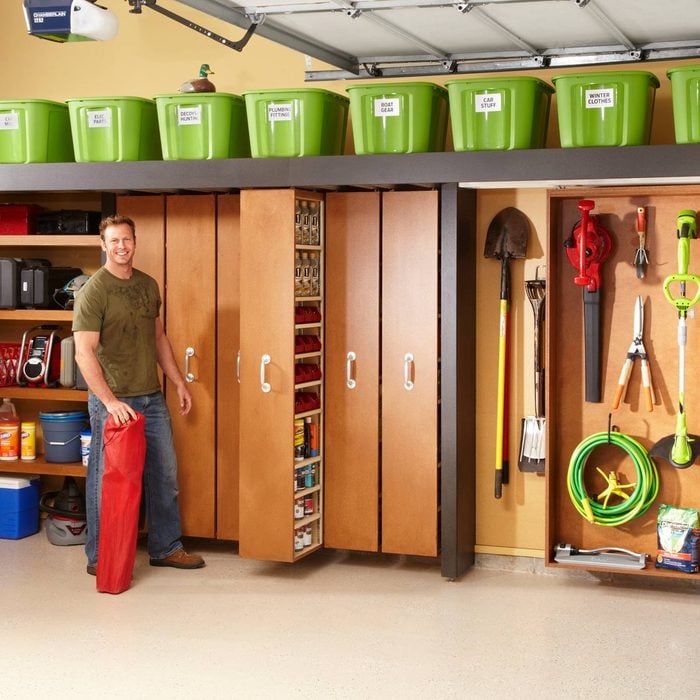
Customizable Wall of Storage in One Weekend
This DIY garage storage system has the versatility of expensive store-bought systems, but you can make it yourself for a few hundred dollars in a single weekend.
Space-Saving Sliding Shelves
Rollout shelves and sliding bypass units can make more efficient use of the sidewalls of your garage. The bypass unit adds 50 percent more storage for long-handled tools and all sorts of items that take up too much wall space. You simply slide the shelves to either side to access the stuff behind.

Double-Duty Shelf Brackets
Shelf brackets designed to support clothes hanger rods aren’t just for closets. The rod-holding hook on these brackets comes in handy in the garage and workshop, too. You can even bend the hook to suit long tools or cords.
Store Lawn Chairs
Here’s how to store your lawn and folding chairs so they’re out of your way. Take two pieces of 1×4 lumber (any scrap lumber will do) and create some simple, cheap, and useful brackets on the wall. Cut each board 7-3/4 in. long with a 30-degree angle on both ends. Fasten pairs of these brackets with three 2-in. screws to the side of the exposed wall studs, directly across from each other, and you’ve got a perfect place to hang your chairs.

Don’t Waste the High Space
If all the stuff in your garage is within easy reach, you’re probably wasting lots of storage space. The high spaces may not be prime real estate for often-used tools, but they’re perfect for long-term storage. Deep shelving or cabinets near the ceiling can hold a ton of seasonal stuff like holiday decorations or camping gear.
Roll-Around Workshop
If your garage does double duty as parking space and workspace, a rolling workbench is essential. It lets you convert your garage into a workshop quickly and rolls up against the wall to restore parking space. The version shown here began as a standard rolling bench made from 2x4s and plywood. Here are a few tips for converting your garage into a living space.
Build Big Cabinets in Place
You don’t have to be a cabinetmaker to build big, sturdy cabinets, especially if you build them in place. All you have to do is screw 2x2s to the wall and ceiling and then screw plywood panels to the 2x2s to form the top, bottom, and sides of cabinet boxes. This approach is simple, fast, and economical; the materials cost about $250. This cabinet would also be a great place for garage TV ideas, don’t you think?
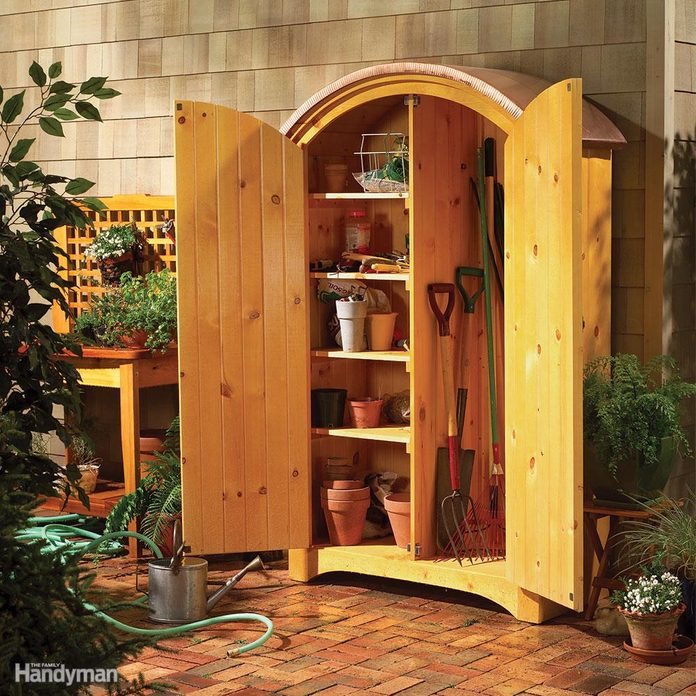
Add Outdoor Storage
Sometimes the best cure for garage chaos is to add storage space elsewhere. A small locker that holds garden gear, for example, provides big relief to a crowded garage. Build your own garden storage closet to free up space in the garage.
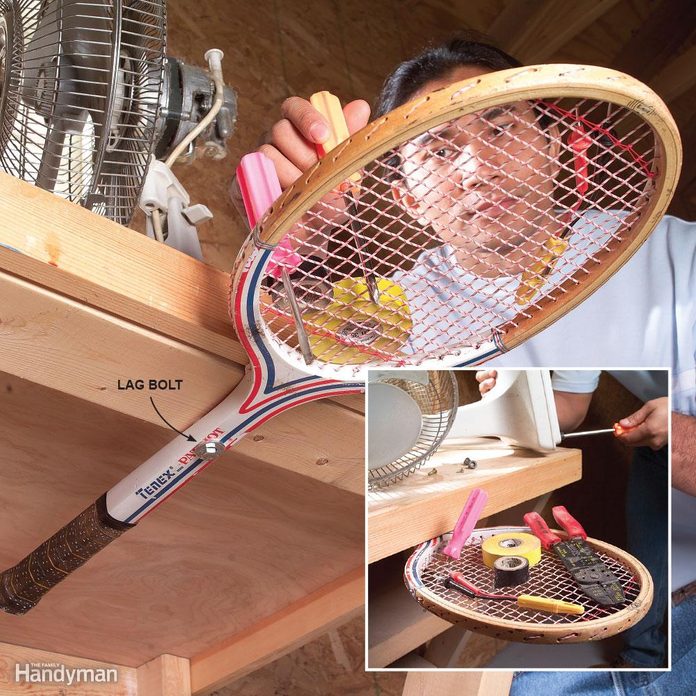
Upcycled Garage Storage Idea
Here’s a creative hack for that old wooden tennis racquet that’s gathering dust in the garage. Drill a hole in the handle and screw it to the underside of a workbench. Position the racquet so it can swing in and out from under the table. Use it to hold tools, parts, or other small items.
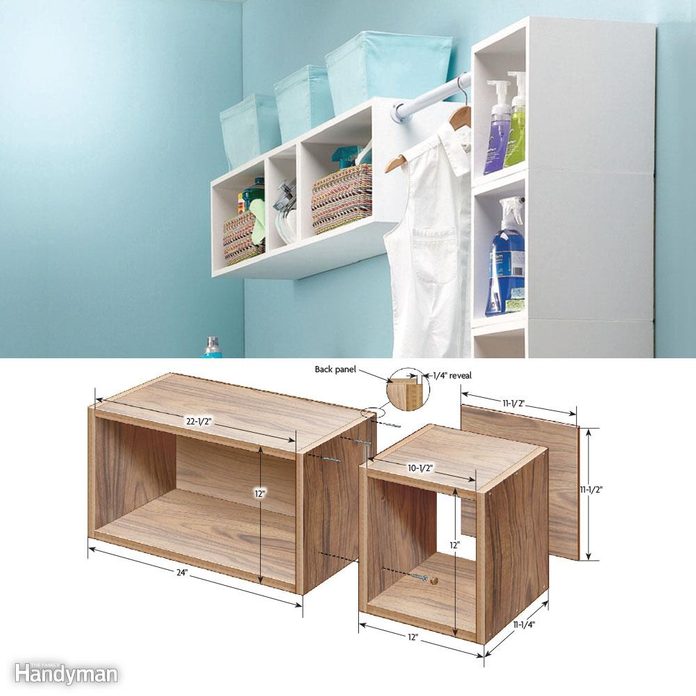
Pretty and Practical Box Shelves
These simple box shelves work equally well in a formal setting and a utilitarian room, like the laundry or garage. They offer an unlimited number of uses and arrangements. Hang some above the washer and dryer to store detergent, dryer sheets, and other laundry room necessities without taking up any valuable floor space.
Basic Garage Storage and Seating
Great storage doesn’t have to be complicated. With a few modifications to our simple box shelves and the addition of some legs, you can have a perfect place to sit and put on your shoes with ample storage to boot.
Spring-to-Action Claws
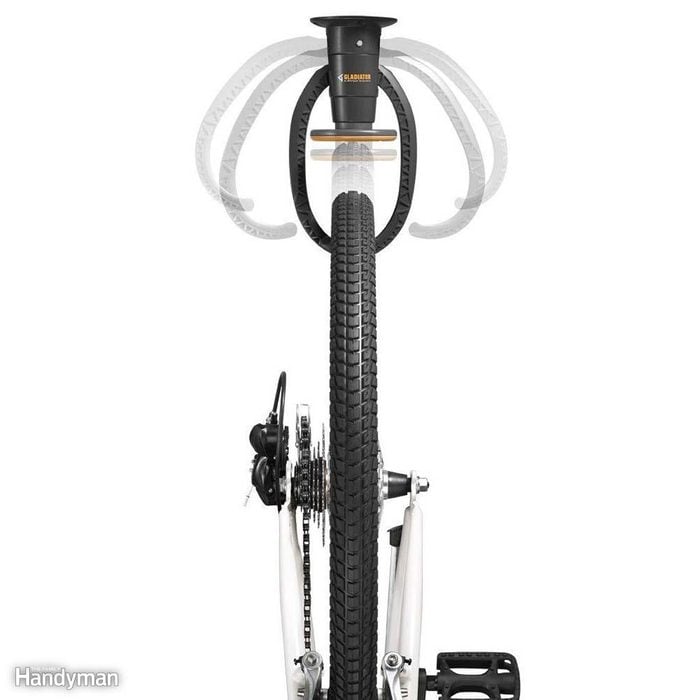
Use spring action to store your bike by mounting a claw-style bike hook on your garage ceiling or rafters.
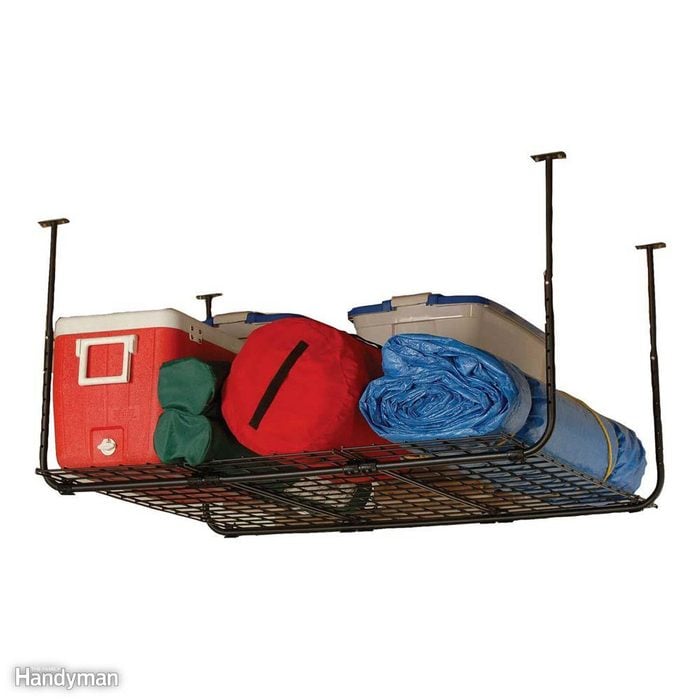
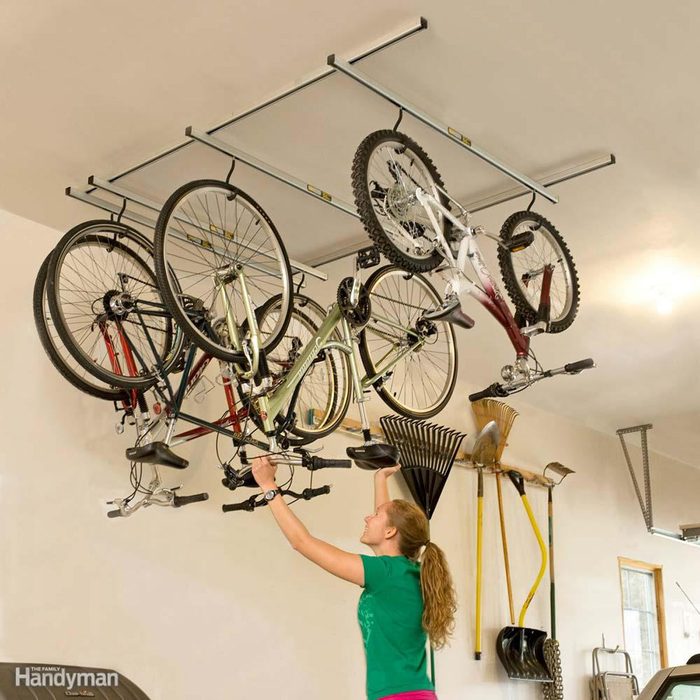
Ceiling-Mounted Shelves
Add a simple shelf for additional overhead garage storage with an adjustable height ceiling storage rack.
Mix-Match Heights
No two garages are the same, so choose a ceiling storage rack with adjustable heights to fit your needs or garage space. Hang a shallow rack above the open garage door and deeper shelf where your garage door track stops to maximize your vertical space
Build a Customizable System
Visit any sporting goods store and you will likely see walls of vertical slats with various hooks and bins that can be rearranged easily based on the display needs. Why not incorporate this easy-to-manage system in your own home with our DIY customizable garage storage? Incorporating many of the same features which make the retail systems so useful, this system is a great weekend project that can grow and change as your needs evolve—and is a cinch to install.
Efficient Small Garage Bike Storage
Hanging bicycles from the rafters is a great way to save garage space. But even hanging bikes can take up a bunch of room. Here’s a cool space-saving product that puts a new twist on the humble bike hook. The Saris Cycle Glide is a system of hooks mounted on glides. Once the bikes are on the hooks, they can be slid closer to the wall on the glides that mount perpendicular to the wall. And because the hooks slide back and forth on the lower set of glides, the bikes can be nestled neatly together, taking up a lot less space. Here are some more garage bike storage products to organize your space.
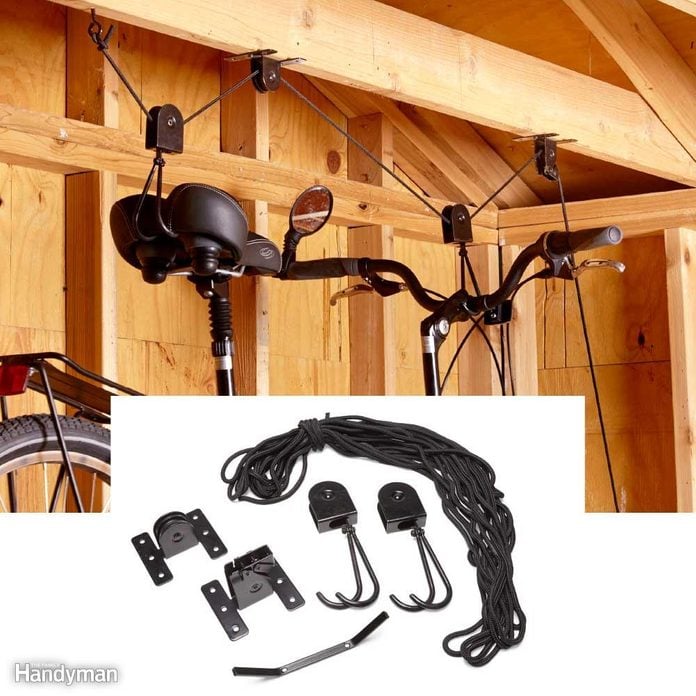
For the Cyclist: Hoist Your Bike Out of the Way
When it comes to garages, there’s no such thing as enough space. One product we find useful to free up some floor space is a bicycle hoist. It’s easy to install and very easy to use. When shopping for a garage hoist, beware of models that have undersized ropes. They can slip off the pulley wheels and jam. Look for one with a good, hefty rope.

Beyond Hardboard
Most home centers carry only hardboard pegboard, but you’ll find other materials by searching online for ‘metal pegboard’ or ‘plastic pegboard.’
- Metal pegboard has 1/4-in. holes and L-shape edge flanges that create built-in standoffs. The panel sizes are normally in 16-in. and 24-in. increments. Metal pegboard has a cool industrial look and is darn near indestructible.
- Metal pegboard strips are ideal for situations where you need a single, sturdy strip of pegboard—like in the garage for hanging long-handled tools. The strips have 1/4-in. holes and built-in edge flanges for standoffs, and they’re outrageously sturdy.
- Plastic pegboard has 1/4-in. holes, folded edges to create standoffs, and center ribs for rigidity. Many systems come with slide-in connectors for joining panels. It’s at least as sturdy as hardboard pegboard.
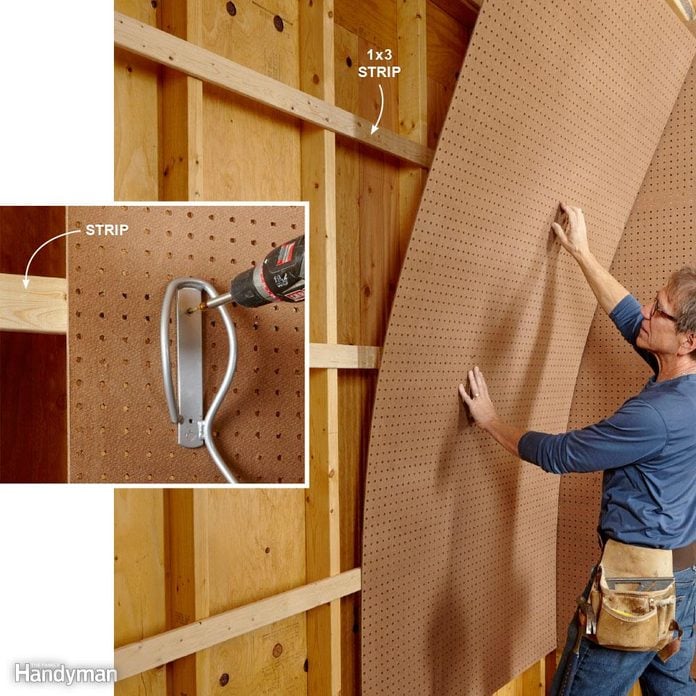
How to Mount Pegboard Walls
Create pegboard walls by running 1×3 strips horizontally at the top and bottom of the panel and every 16 in. or 24 in. between. Use 1/4-in. pegboard and attach it to the strips with washer-head screws. The strips will also allow you to mount screw-on hooks to the wall for heavy items like bikes and wheelbarrows.
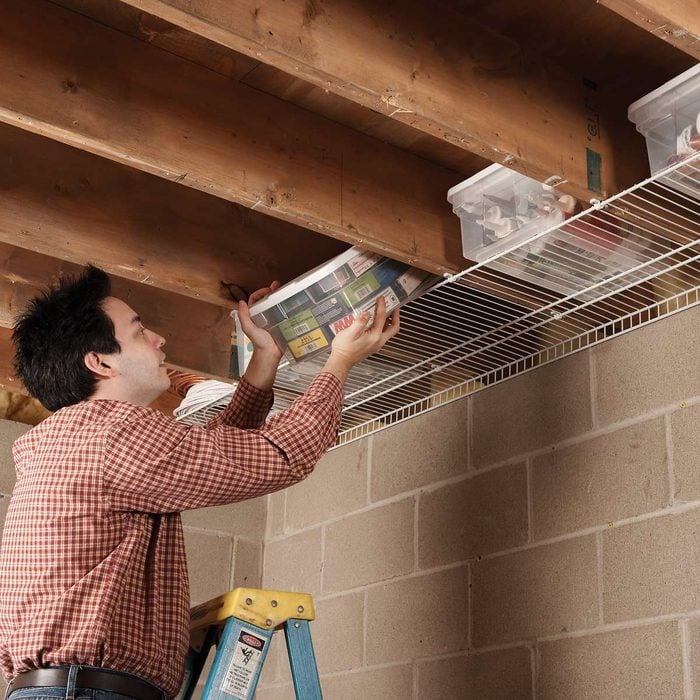
Joist Space Storage
Don’t waste all that space between joists in a basement or garage. Screw wire shelving to the underside of the joists. An 8-ft. x 16-in. length of wire shelving and a pack of plastic clips (sold separately) costs about 20 bucks. Don’t forget that wire shelving also shines on walls.

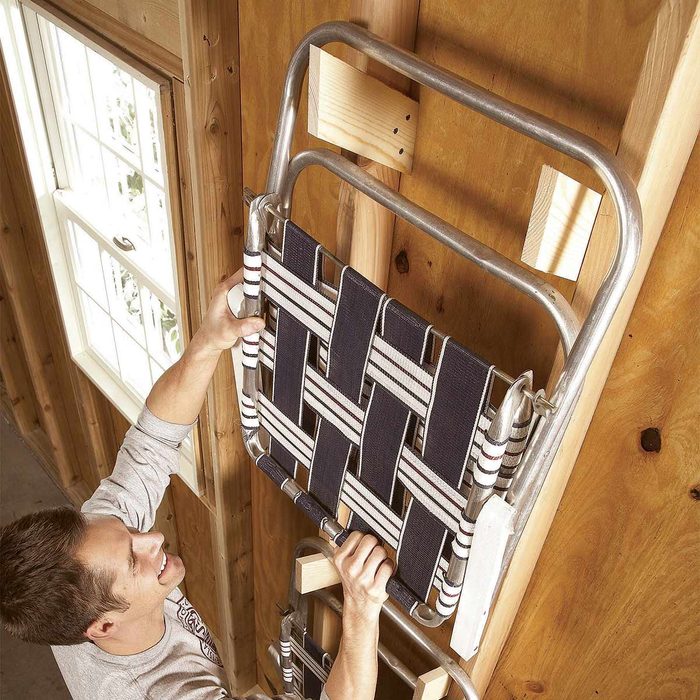
Extension Ladder Storage
An extension ladder is one of the most difficult things to store. When you need to use it, it has to be easy to get to. But there are long stretches when it just gets in the way of everything else in your garage.
Here’s a good solution: Mount it on your garage ceiling on sturdy racks made of scrap 2x4s that are screwed into the ceiling joists. Use two 3-1/2-in. screws at each joint to make the rack secure. These racks make it easy to slide the ladder out when you need it. Just make sure to position the racks where they won’t interfere with your garage door.

Ball Storage
If you have kids, you have balls—basketballs, soccer balls, rubber balls, and other round objects that roll around underfoot. Here’s a perfect way to use that narrow gap between a pair of garage doors (if you’re blessed with such an awkward spot). Just install angled “ball ramps” made from scrap wood. The balls fit neatly in the gap, and because the ball ramp is right there at the edge of the garage, kids are more likely to use it.

Pegboard Cubbyholes
Here’s a tool storage technique for all those slender tools and shop accessories. Cut short lengths of PVC pipe (1-1/2- and 2-in.-diameter pipes work well for most items) and slide them over pegboard hooks. Then load them up with files, hacksaw blades, zip ties, pencils, stir sticks…you get the skinny.

Pegboard Shelves
Here’s a slick idea to store a whole cluster of tools on a pegboard with only two pegs. Cut some 2-1/2 in. wide mini shelves; drill holes or slots for router bits, screwdrivers, chisels, and files; then drill a couple of 1/8-in. holes in the edges for the 1/8-in. diameter pegs. With a vise and pliers, bend the pegs to about 85 degrees and hammer them into the holes. Be sure the pegs fit tightly in the wood so the shelves can’t fall off.