
Organize Your Garage in One Morning
Updated: Jun. 28, 2024
Organize your garage quickly.

Introduction
Maximize your garage storage space quickly and easily with simple and inexpensive shelves, baskets and hooks. And it will only take you one morning to achieve garage happiness.Tools Required
- 4-in-1 screwdriver
- Chalk line
- Circular saw
- Drill bit set
- Drill/driver - cordless
- Stud finder
- Tape measure
Materials Required
- 10d finish nails or 2-1/4-in. trim screws
- 3/4-in. plywood
- Brackets/hooks
- Masking tape
- Shelves / baskets
Overview
There are lots of ways to create more storage space in your garage, but you won’t find another system that’s as simple, inexpensive or versatile as plywood garage walls. It begins with a layer of plywood fastened over drywall or bare studs. Then you just screw on a variety of hooks, hangers, shelves and baskets to suit your studs. And because you can place hard- ware wherever you want (not only at studs), you can arrange items close together to make the most of your wall space. As your needs change, you’ll appreciate the versatility of this storage wall too; just unscrew shelves or hooks to rearrange the whole system.
We used three types of storage hardware: wire shelves, wire baskets, and a variety of hooks, hangers and brackets. Selecting and arranging these items to suit your stuff can be the most time-consuming part of this project. To simplify that task, outline the dimensions of your plywood wall on the garage floor with masking tape. Then gather all the stuff you want to store and lay it out on your outline. Arrange and rearrange items to make the most of your wall space. Then make a list of the hardware you need before you head off to the hardware store or home center.
Looking for a little more guidance with building an ultimate garage storage system? Check out our online quick class that offers just that!
Money, materials and planning
The total materials bill for the 6 x 16-ft. section of wall shown here was about $200. Everything you need for building plywood garage walls is available at home centers. We used 3/4-in.- thick “BC” grade plywood, which has one side sanded smooth. You could save a few bucks by using 3/4-in. OSB chip board” or MDF. But don’t use particleboard; it doesn’t hold screws well enough for this job. Aside from standard hand tools, all you need to complete this project is a drill to drive screws and a circular saw to cut plywood. You may also need a helper when handling plywood—full sheets are awkward and heavy.
This project doesn’t require much planning; just decide how much of the wall you want to cover with plywood. You can cover an entire wall floor-to-ceiling or cover any section of a wall. We left the lower 3 ft. of wall and upper 18 in. uncovered, since those high and low areas are best used for other types of storage. To make the most of our plywood, we combined a course of full-width sheets with a course of sheets cut in half. If your ceiling height is 9 ft. or less, a single 4-ft.-wide course of plywood may suit your needs.
Also check: To keep your home safe and pest-free and your belongings in good shape, see what not to store in the garage.
Project step-by-step (8)
Cover the wall with plywood
To begin installing plywood garage walls snap level chalk line and locate studs
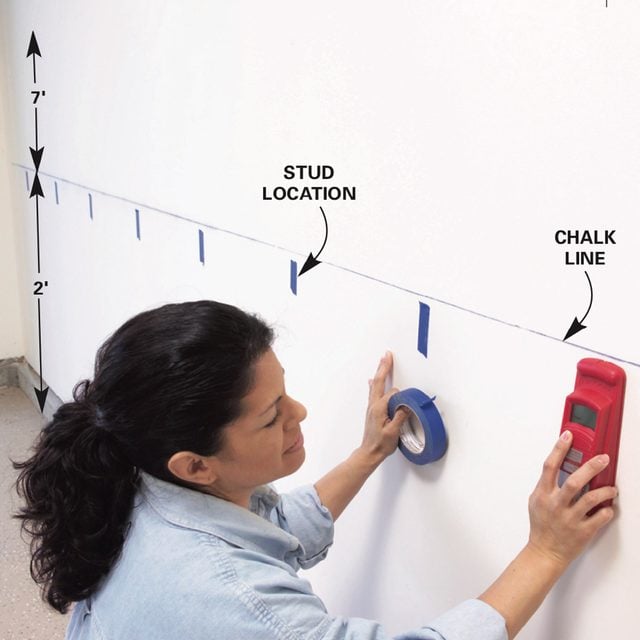
Snap a level chalk line to mark the bottom edge of the plywood. Locate studs and mark them with masking tape.
Install plywood
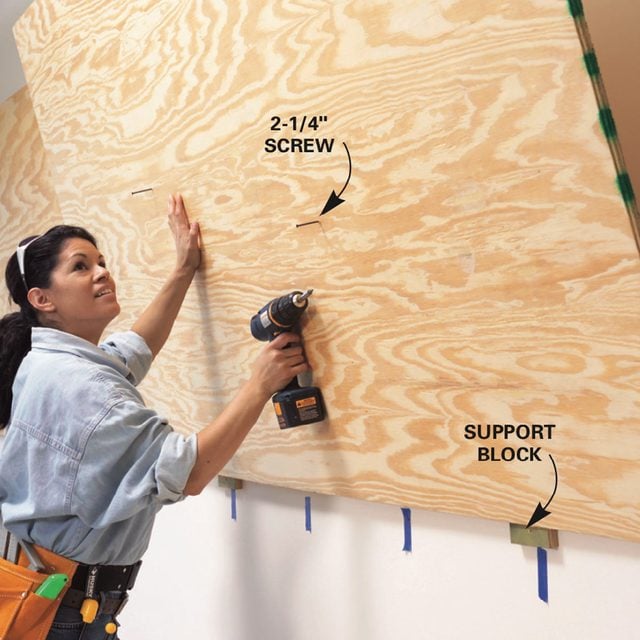
Screw temporary blocks to studs at the chalk line. Start a few screws in the plywood. Rest the plywood on the blocks and screw it to studs.
Install upper plywood
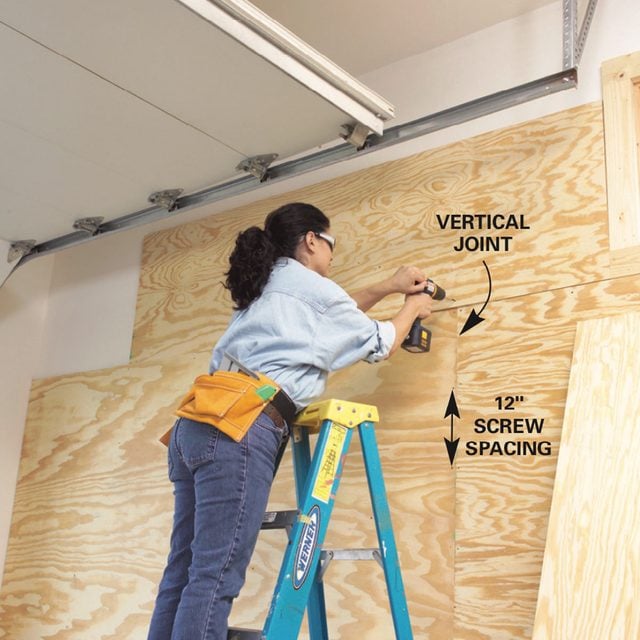
Set the upper course of plywood in place and screw it to studs. Stagger the vertical joints between the upper and lower courses.
Install shelves

Fasten the back edge of shelves with plastic clips. Set a level on the shelf and install the end brackets. Then add center brackets every 2 feet.
Acrylic photo frame label holders
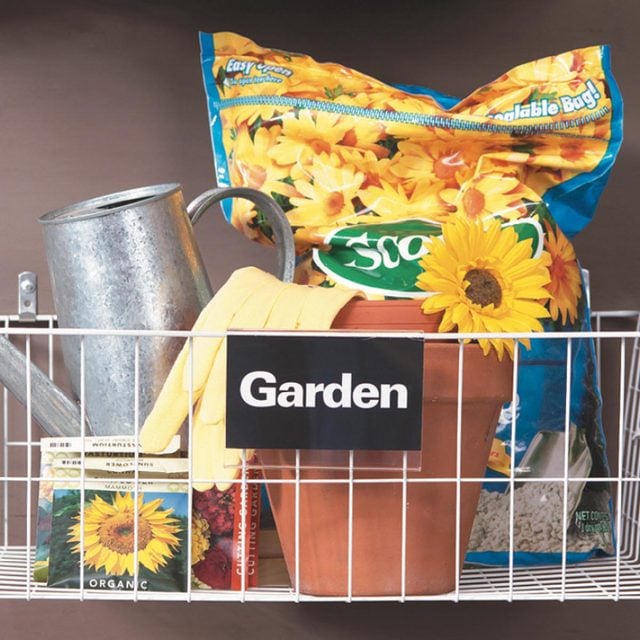
Acrylic photo frames make great label holders. Just slip in your labels and hot glue the frames to wire baskets. Frames are available at office supply and discount stores.
Label your baskets
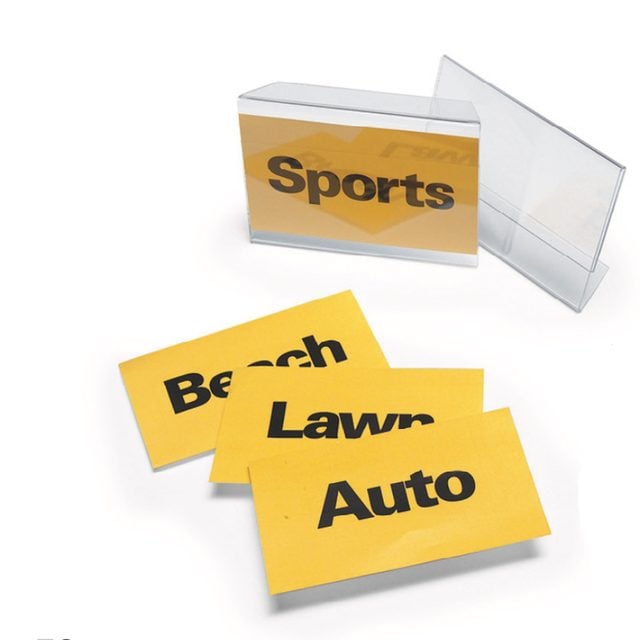
Organize your supplies for quick access by any family member.
When you’ve determined the starting height of the plywood, measure up from the floor at one end of the wall and drive a nail. Then measure down to the nail from the ceiling and use that measurement to make a pencil mark at the other end of the wall. (Don’t measure up from the floor, since garage floors often slope.) Hook your chalk line on the nail, stretch it to the pencil mark and snap a line (Photo 1).
Cut the first sheet of plywood to length so it ends at the center of a stud. Place the end you cut in the corner. That way the factory-cut edge will form a tight joint with the factory edge of the next sheet. Be sure to place the rough side of the plywood against the wall. Fasten the plywood with 10d finish nails or screws that are at least 2-1/4 in. long (Photo 2). We used trim screws, which have small heads that are easy to cover with a dab of spackling com- pound. Drive screws or nails every 12 in. into each stud. If you add a second course of plywood above the first as we did (Photo 3), you’ll have to cut the plywood to width. You can’use a circular saw, but a table saw gives you faster, straighter cuts. Some home centers and lumberyards cut plywood for free or for a small charge.
With all the plywood in place, you could go ahead and mount your hardware. But we took a few extra steps to dress up our wall: First, we added 3/4-in. cove molding along the lower edge of the plywood. This gave us a neater look and covered up the chalk line and screw holes left by the support blocks. We also framed the window trim with doorstop molding to hide small gaps between the trim and the plywood. Then we caulked gaps between the sheets of plywood and filled screw holes. Finally, we primed the plywood, lightly sanded it with 100-grit sandpaper and painted it.
Storage Supplies for Every Need
Wire closet shelves are sturdy and inexpensive, and they don’t collect dust like solid shelving. They come in lengths up to 12 ft. and you can cut them to any length using a hacksaw or bolt cutters. Standard depths are 12, 16 and 20 in. You’ll get more shelving for your money by cutting up long sections than by buying shorter sections. Brackets and mounting clips (Photo 4) are usually sold separately.
Double Decker Garage Storage Shelves
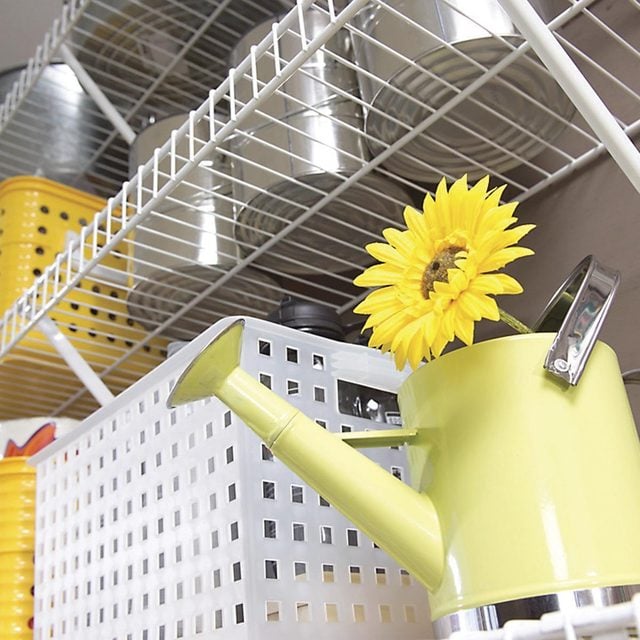
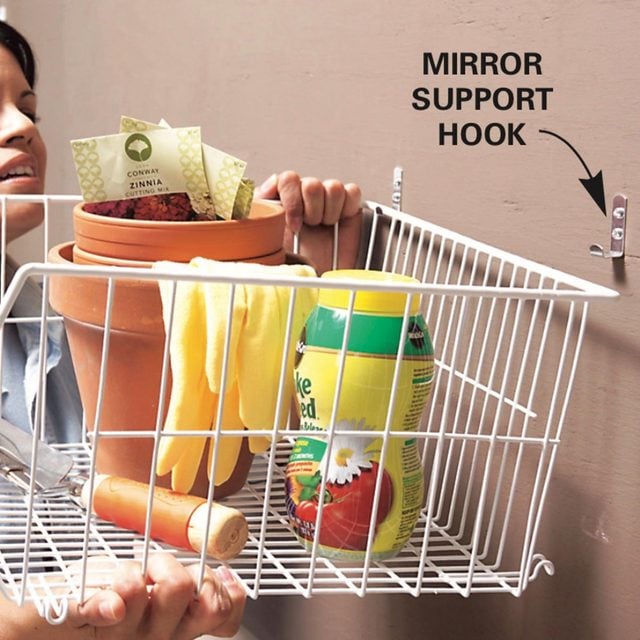
Wire baskets are perfect for items that won’t stay put on shelves (like balls and other toys) and for bags of charcoal or fertilizer that tend to tip and spill. They are also convenient because they’re mobile; hang them on hooks and you can lift them off to tote all your tools or toys to the garden or sandbox. You’ll find baskets in a variety of shapes and sizes at home centers and discount stores. You can use just about any type of hook to hang baskets. Heavy-duty mirror supports fit our baskets perfectly.
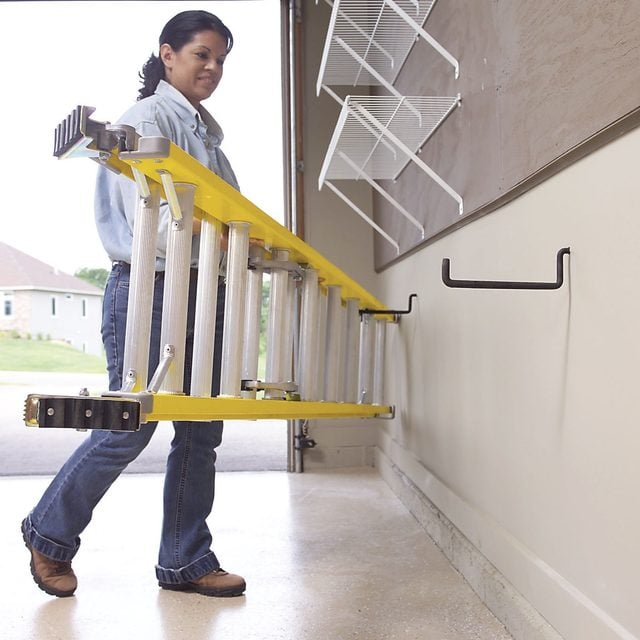
Hooks, hangers and brackets handle all the odd items that don’t fit on shelves or in baskets. Basic hooks are often labeled for a specific purpose, but you can use them in other ways. Big “ladder brackets,” for example, can hold several long-handled tools. “Ceiling hooks” for bikes also work on walls. Don’t write off the wall area below the plywood—it’s prime space for items that don’t protrude far from the wall. We drove hooks into studs to hang an extension ladder.


Handy Garage Hooks
When you’re out shopping, you might find elaborate hangers designed to hold specific toys and tools. These specialty garage hooks are neat, but you don’t have to spend money just to hang a bike or garden tools. With a little ingenuity, you can hang just about anything on simple screw-in garage hooks that are inexpensive. You can place garage hooks anywhere on your plywood wall. If you don’t put them on the plywood, be sure to locate the garage hooks at studs.
16 Clever Space Saving Ideas for Your Garage

Editor’s Note: Now’s the Time to Add Outlets
I have a gripe with the National Electrical Code. It requires only one outlet in a garage—and a single outlet is all most builders install. That’s an insult to all of us garage dwellers and our beloved power tools.
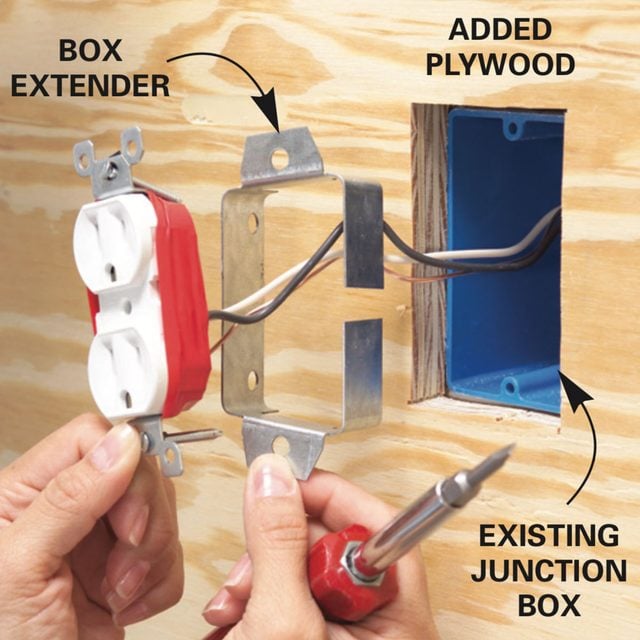
If your garage has bare stud walls, adding outlets is easy anytime. But if your walls are covered, our plywood storage wall makes adding outlets or extra circuits easier because you can cut big holes in the drywall to run wire and cover up the damage with the plywood. No patching needed. Since the plywood itself will be covered with shelves and hangers, place new outlets below it for easier access. If you have an existing outlet that will be covered with plywood, cut a hole in the plywood about 1/8 in. larger than the junction box and add a box extender (see photo). All garage outlets must be either GFCI outlets or connected to a circuit that’s GFCI-protected, so you may need to replace your existing outlet with a GFCI version.