75 Best-Ever Storage Tips for Your Home

Updated Jun. 11, 2024

Some of these storage ideas were submitted by Family Handyman readers, others were dreamed up by the editors, but all will help you get organized ASAP.

Our editors and experts handpick every product we feature. We may earn a commission from your purchases.
Learn more.

Now Trending

1 / 75
DIY Small Kitchen Coffee Storage and Organization
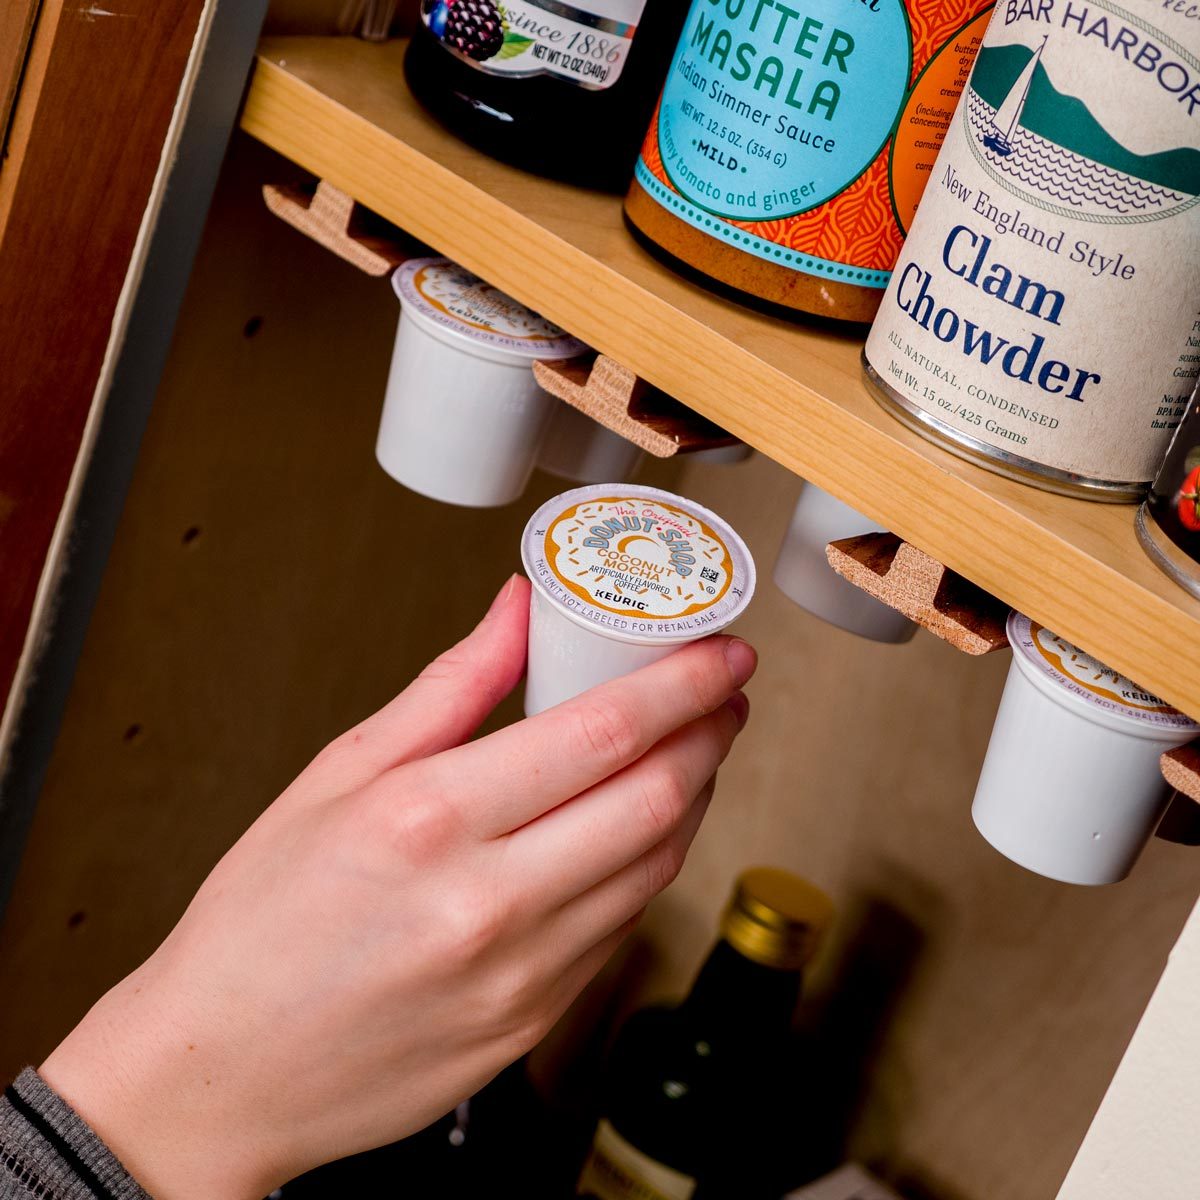
DIY Small Kitchen Coffee Storage and Organization

Coffee pods can be a disaster to keep organized. But this hack uses simple t-molding as an ideal organization system for your coffee pods (Keurig, Nespresso or any other type of coffee pod).
2 / 75
Closet to Cabinet
Photo: Courtesy of Brett Gardner

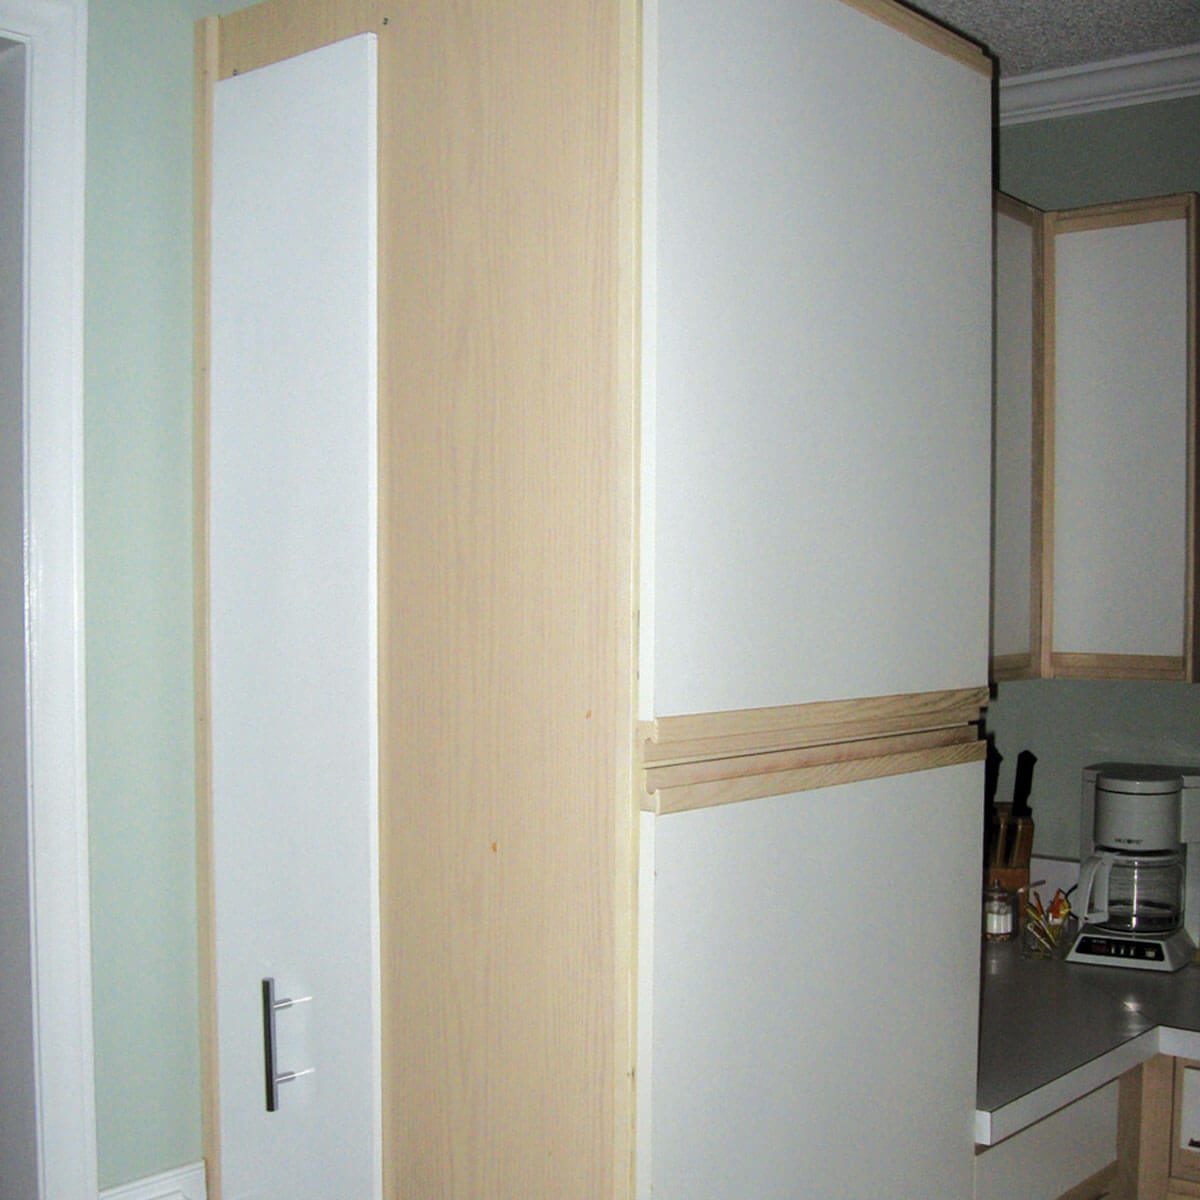
Closet to Cabinet

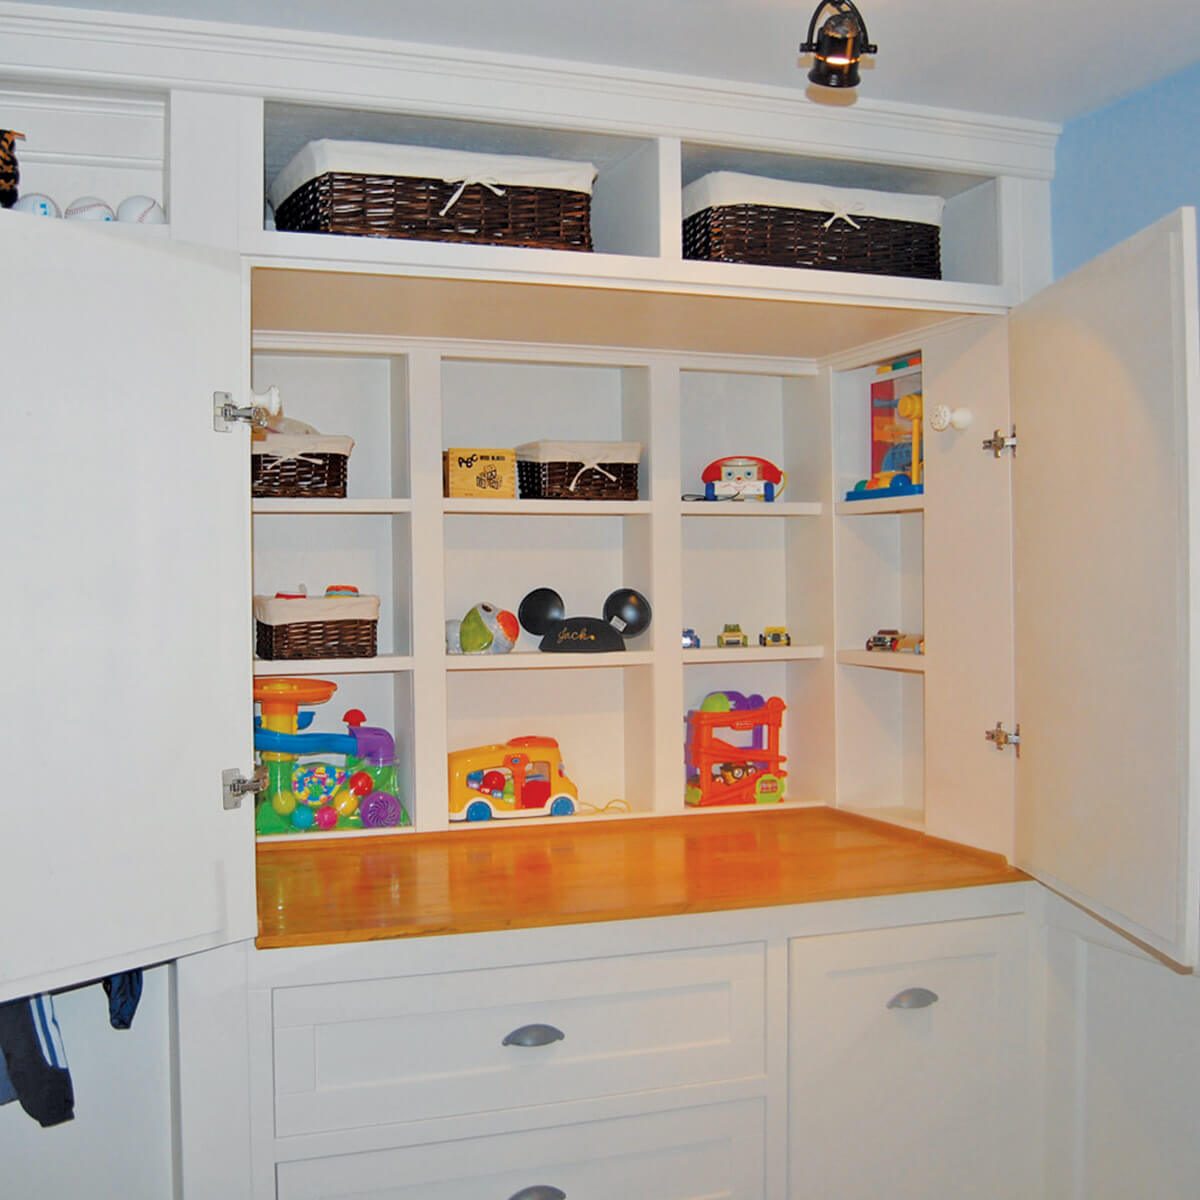
We like the custom built-in cabinets, drawers and shelves that reader Brett Gardner created much better than the closet that was once there.
3 / 75
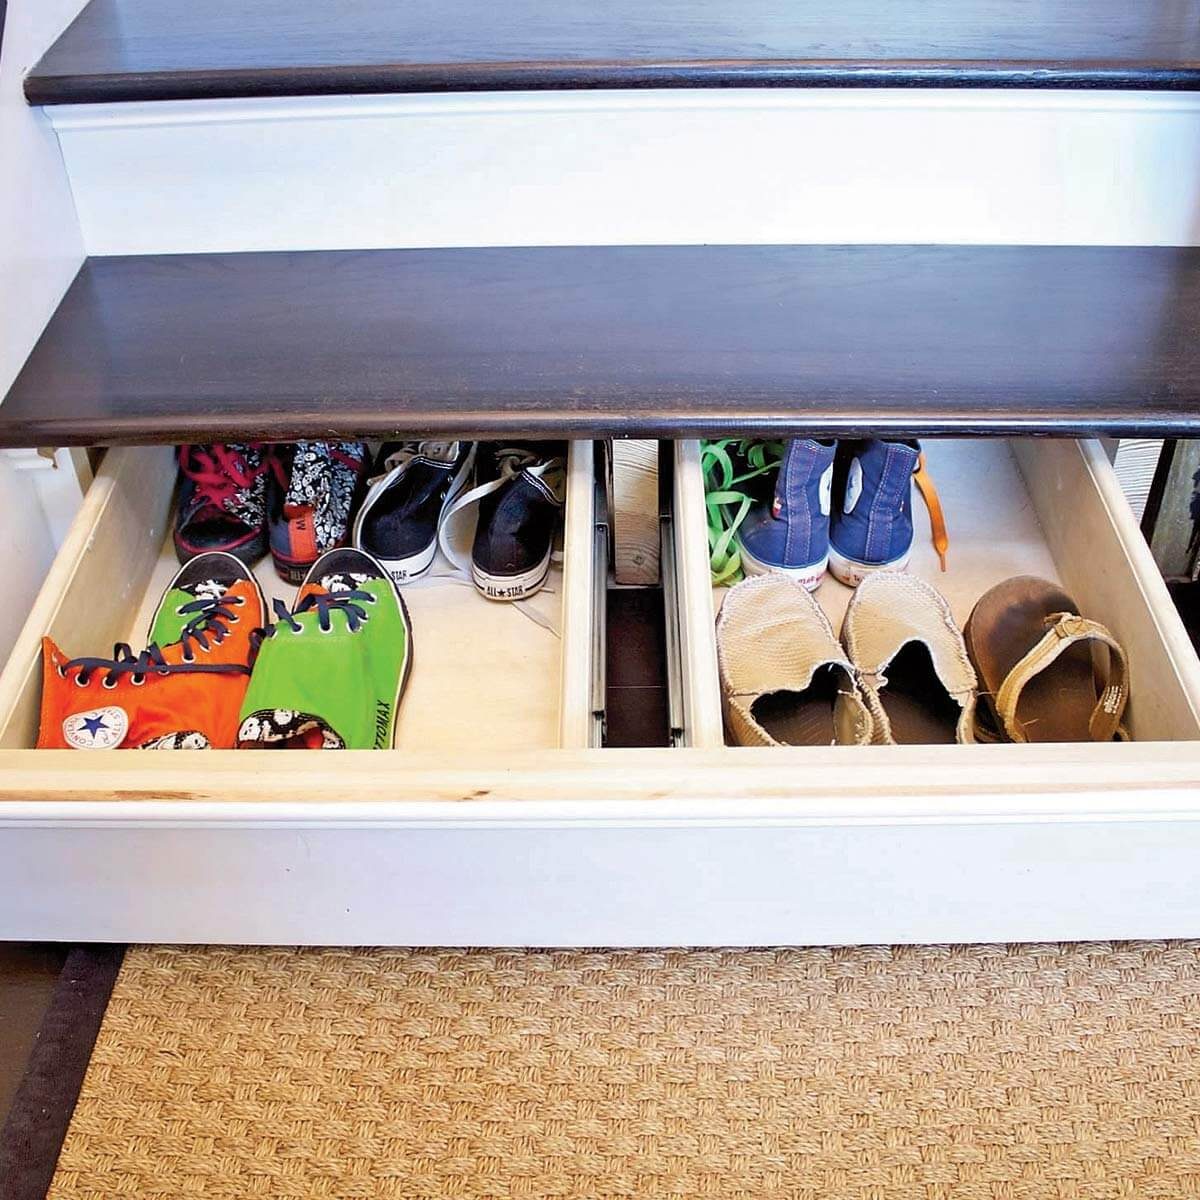
Hidden Staircase Drawer
Photo: Courtesy of Mark Maixner

Hidden Staircase Drawer

Oh the possibilities! Check out this awesome hidden drawer that reader Mark Maixner built into his staircase. Think of all of the storage space you could harness with this project!
4 / 75
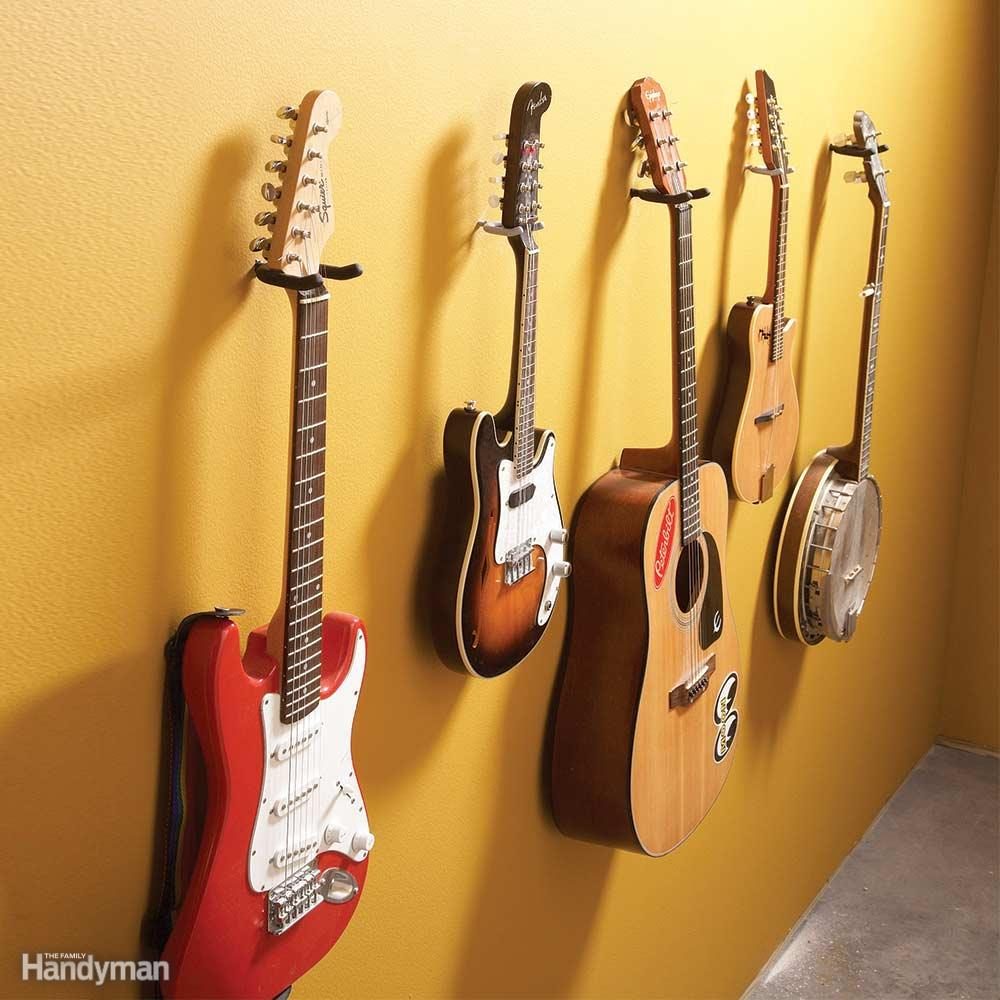
Musical Instrument Storage
Family Handyman

Musical Instrument Storage

If you occasionally put your hammer down to strum a guitar or banjo, you know how tricky it can be to store them. Floor stands are pricey and they leave your instrument accessible to curious children, rambunctious pets and people who can't carry a tune. It's a better idea to hang your instruments on the wall, but instrument wall hangers cost $20 a pop. Instead of hitting the music store, hit the home center. Plastic-coated utility hooks will hold most instruments at a fraction of the cost ($2 to $4), and they're just as tough.  
5 / 75
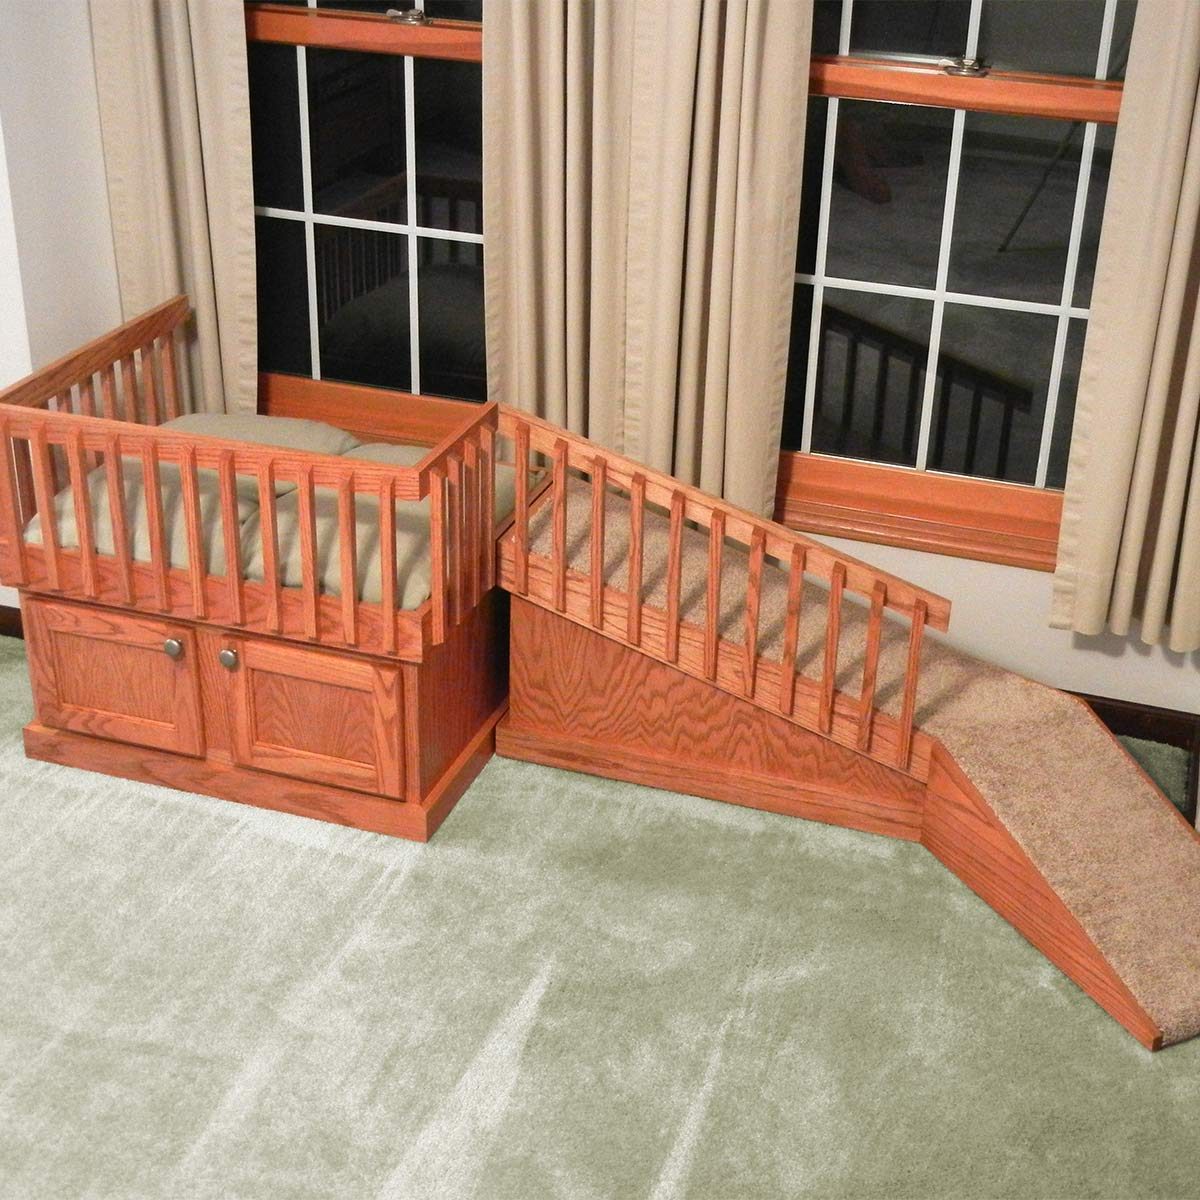
Modular Pet Ramp

Modular Pet Ramp

Reader Doug Swanson has two lucky dachshunds. He built a custom ramp with window seating and a safety railing so they can look out the window despite one of the pet’s back issues. The ramp also features built-in storage cabinets and casters, so it can be moved easily when it’s time to vacuum the floor.
6 / 75
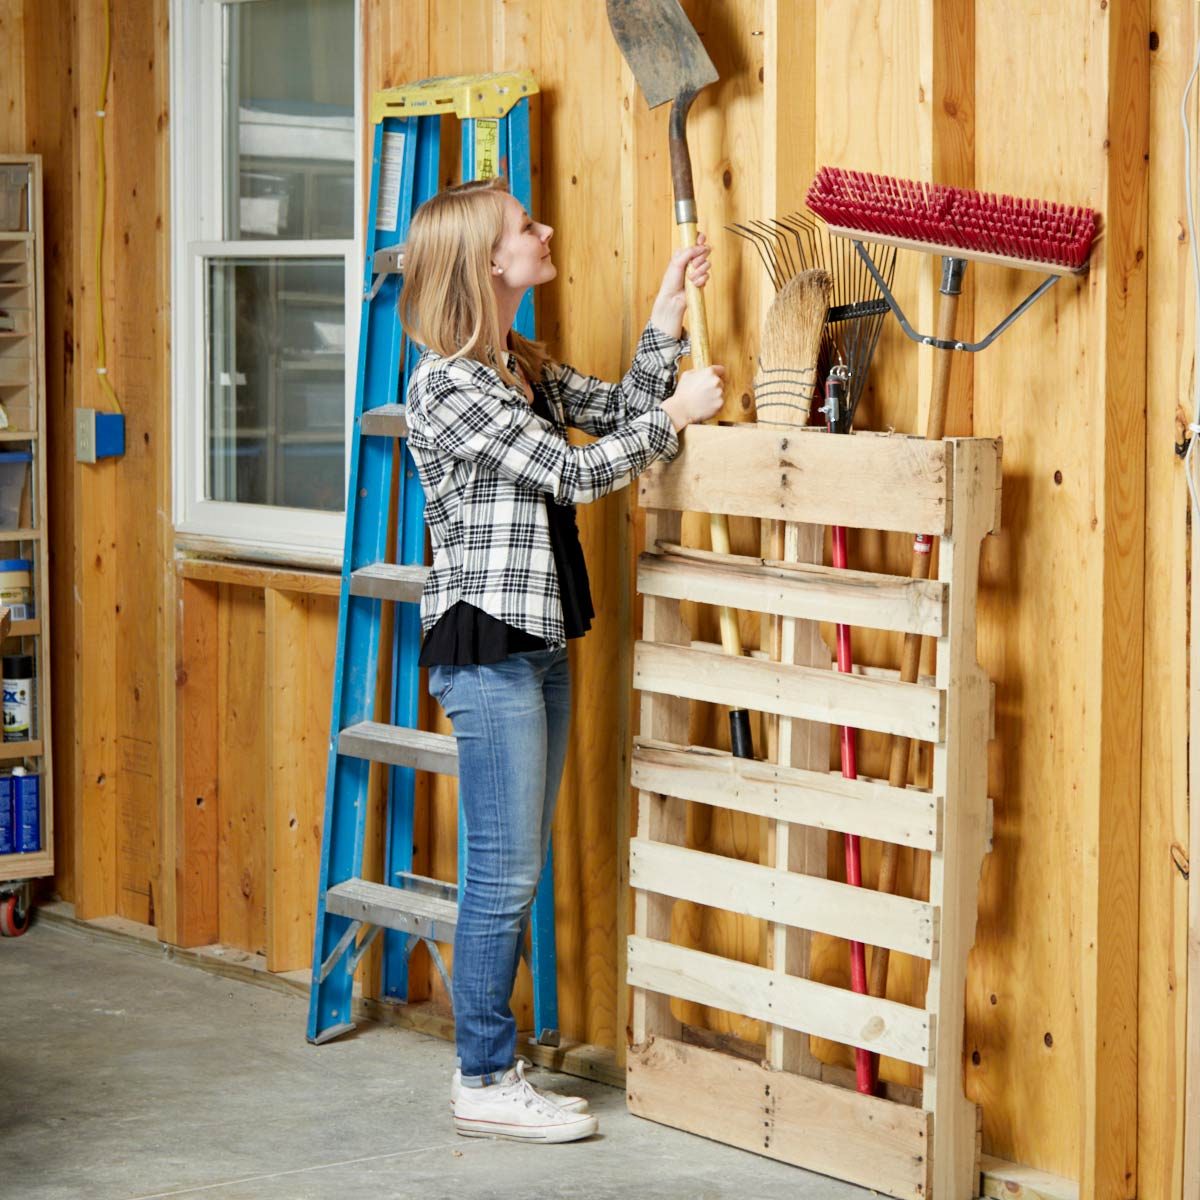
A Garage Pallet Organization Hack
Family Handyman

A Garage Pallet Organization Hack

If you have a yard or a garden, you know that there are a lot of long-handle tools involved. You probably also know how obnoxious it is when you need the shovel or the rake and have to walk all over to find it. All you need for this pallet organization hack is a pallet, a couple of screws and a drill. And if you don’t have any pallets lying around, they are easy to get for free. Many businesses will give them to you, but you should call first! Another great place to check is local Craiglist ads. Looking for more ways to work smarter in your workshop? Here are 19 tips from a seasoned woodworker and do-it-yourselfer.
7 / 75
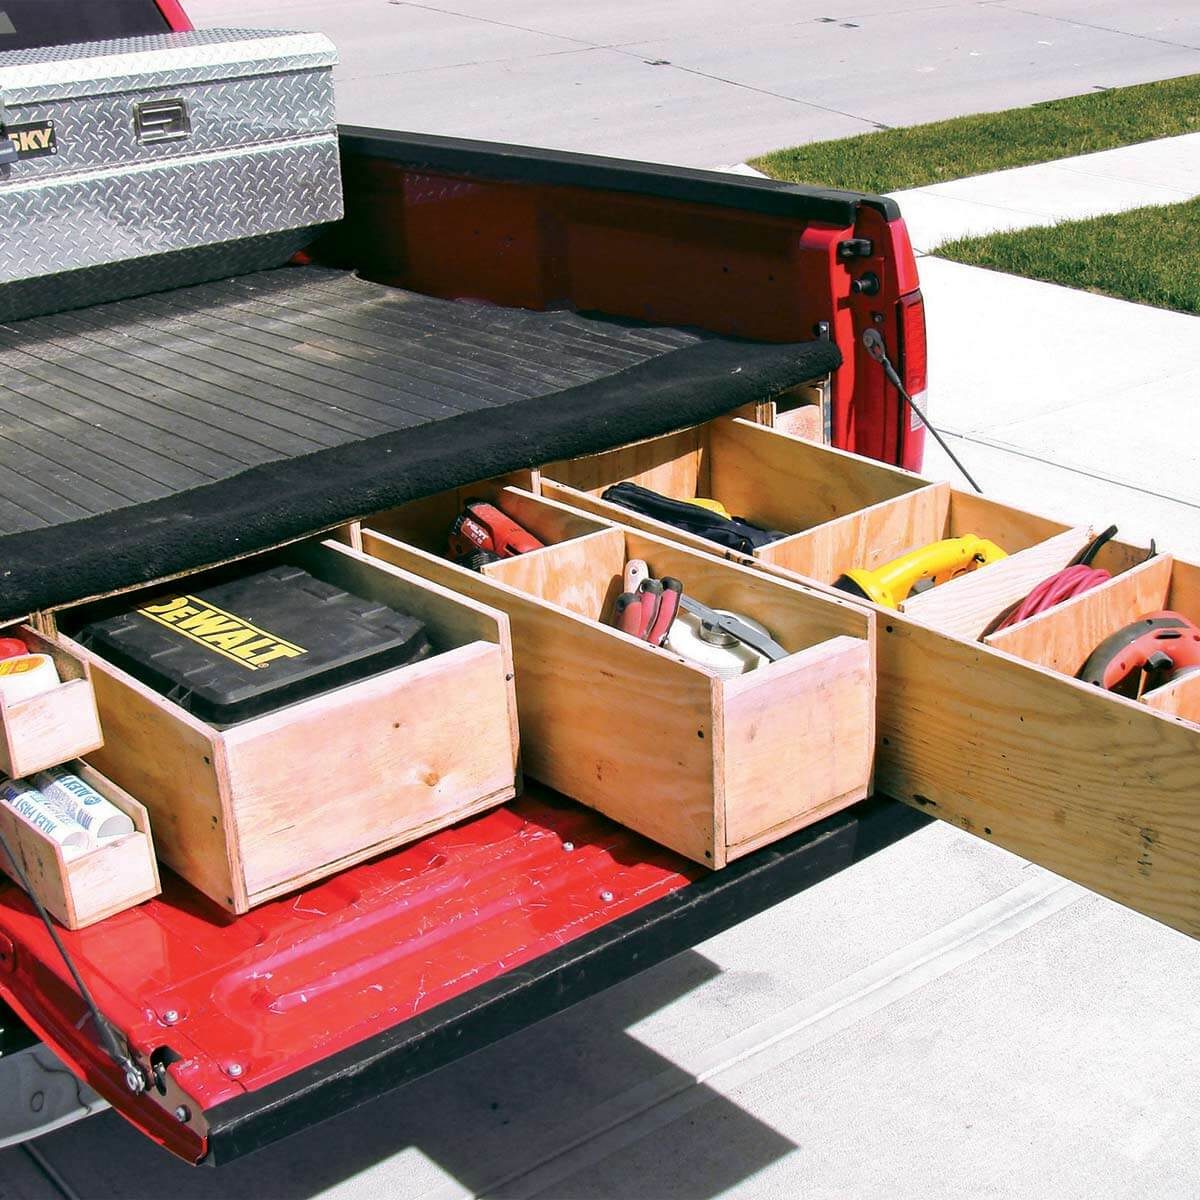
Custom Truck Bed Drawers

Custom Truck Bed Drawers

The drawers are perfect for organizing his tools, and a rubber bed liner protects the drawers and tools from rain and other outdoor elements.
8 / 75
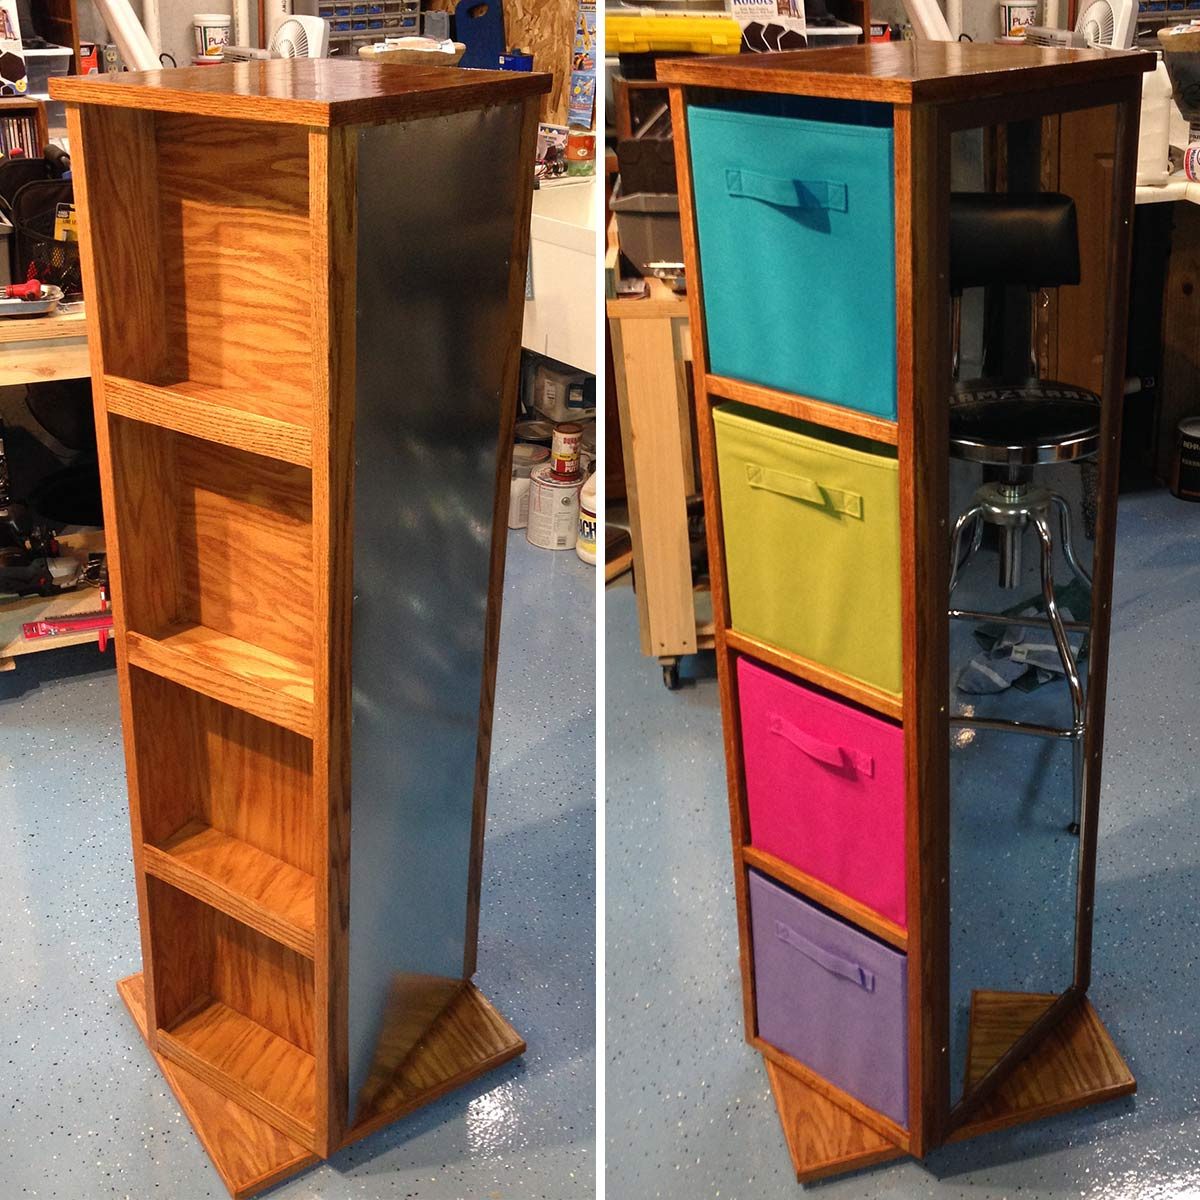
Dorm Room Spinning Storage Unit

Dorm Room Spinning Storage Unit

Reader Michael Kirby created this spinning storage unit out of necessity for his daughter, who is a dorm-dwelling college student. Space is at a premium for his daughter, so this storage unit features four hardworking sides - cubbies with bins, small shelves, a full-length mirror and a magnetic board for hanging photos. Plus, the unit spins on a turntable, which is genius!
9 / 75
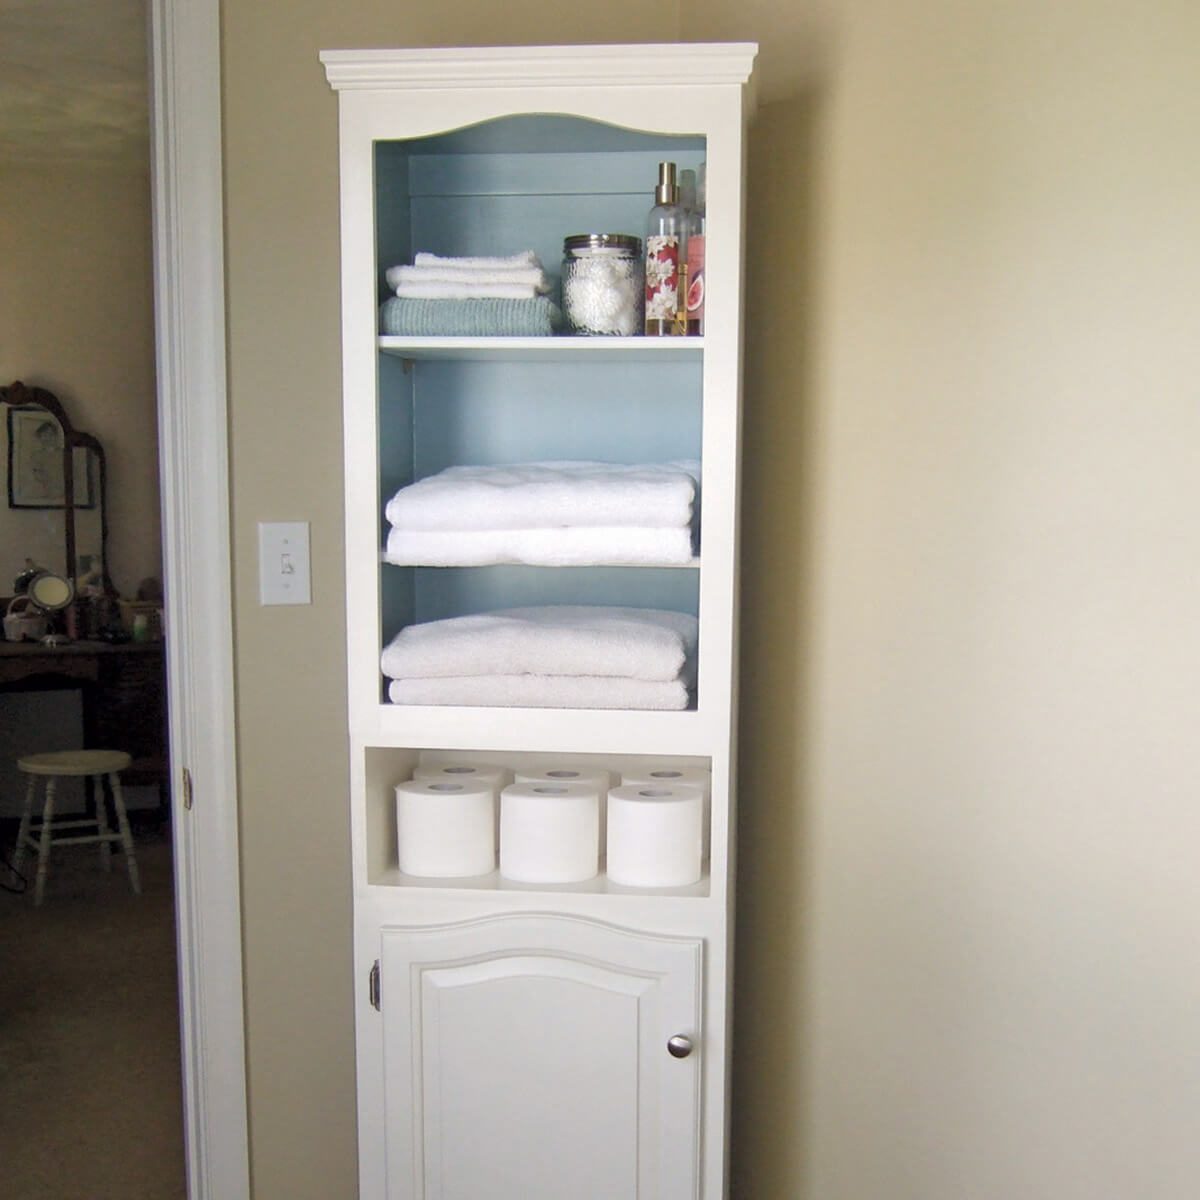
New Use for Old Cabinets

New Use for Old Cabinets

Reader Janet Johnson turned two secondhand kitchen cabinets into one tall and trendy bathroom cabinet.
10 / 75
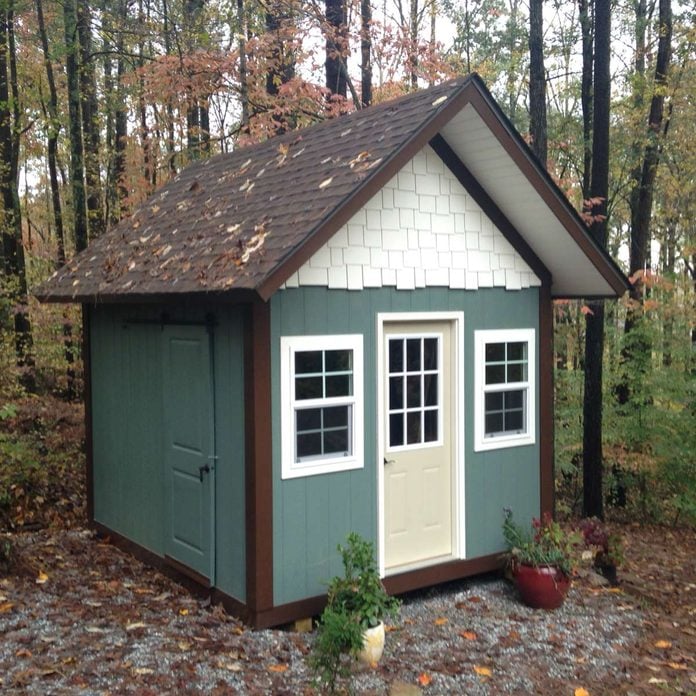
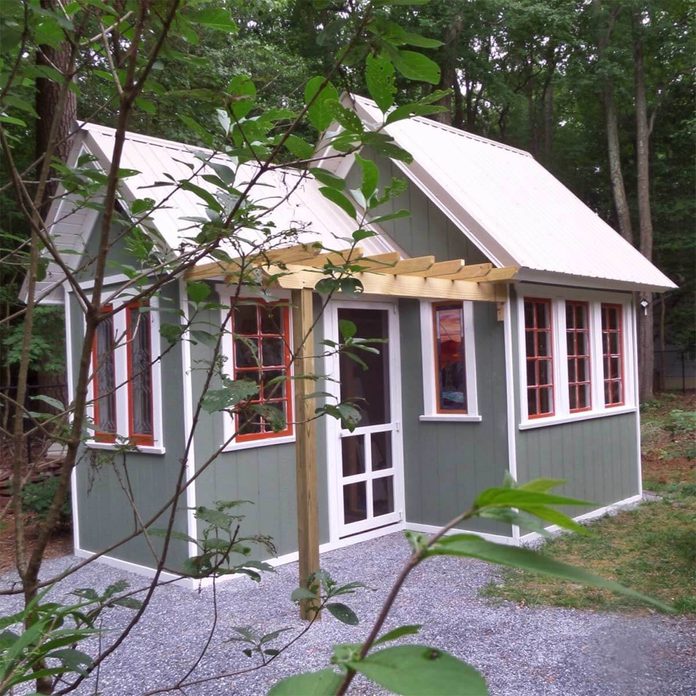
reader dream shed cottage

Cottage Shed

This creative cottage-like shed was built by reader Alan Luebs. He used our Dream Shed plans, originally published in the July/August 2013 issue of Family Handyman. He modified the doors and windows and added awesome siding materials and colors. We absolutely love it!
11 / 75
joist storage shelving

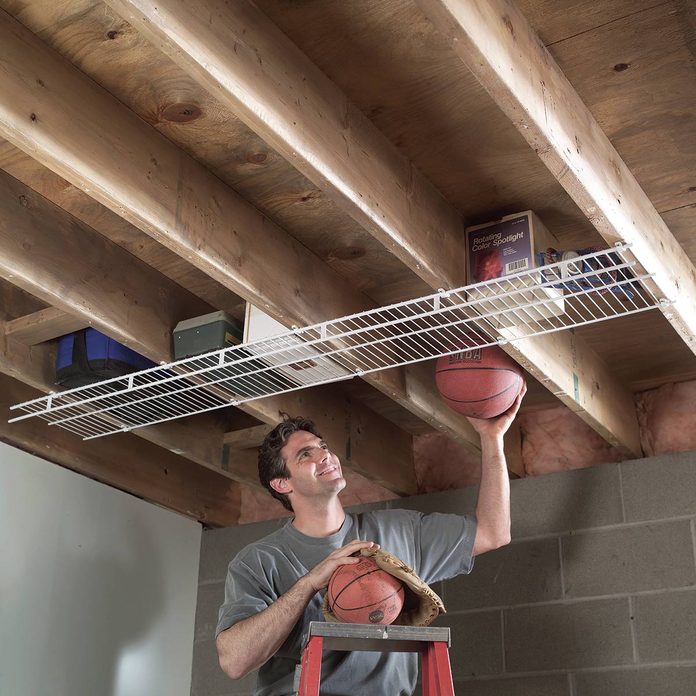
Under-Joist Shelf

The unused space between overhead joists in a basement or garage is a brilliant place to install a heavy-duty wire shelf. The wire shelving is see-through, so you can easily tell what’s up there. Store outdoor sports equipment, tackle boxes, coolers and other less-frequently used items out of the way yet still easily accessible. Depending on the width, wire shelves cost from $1 to $3 per foot at home centers.
12 / 75
Light-Duty Extension Cord Storage
Family Handyman

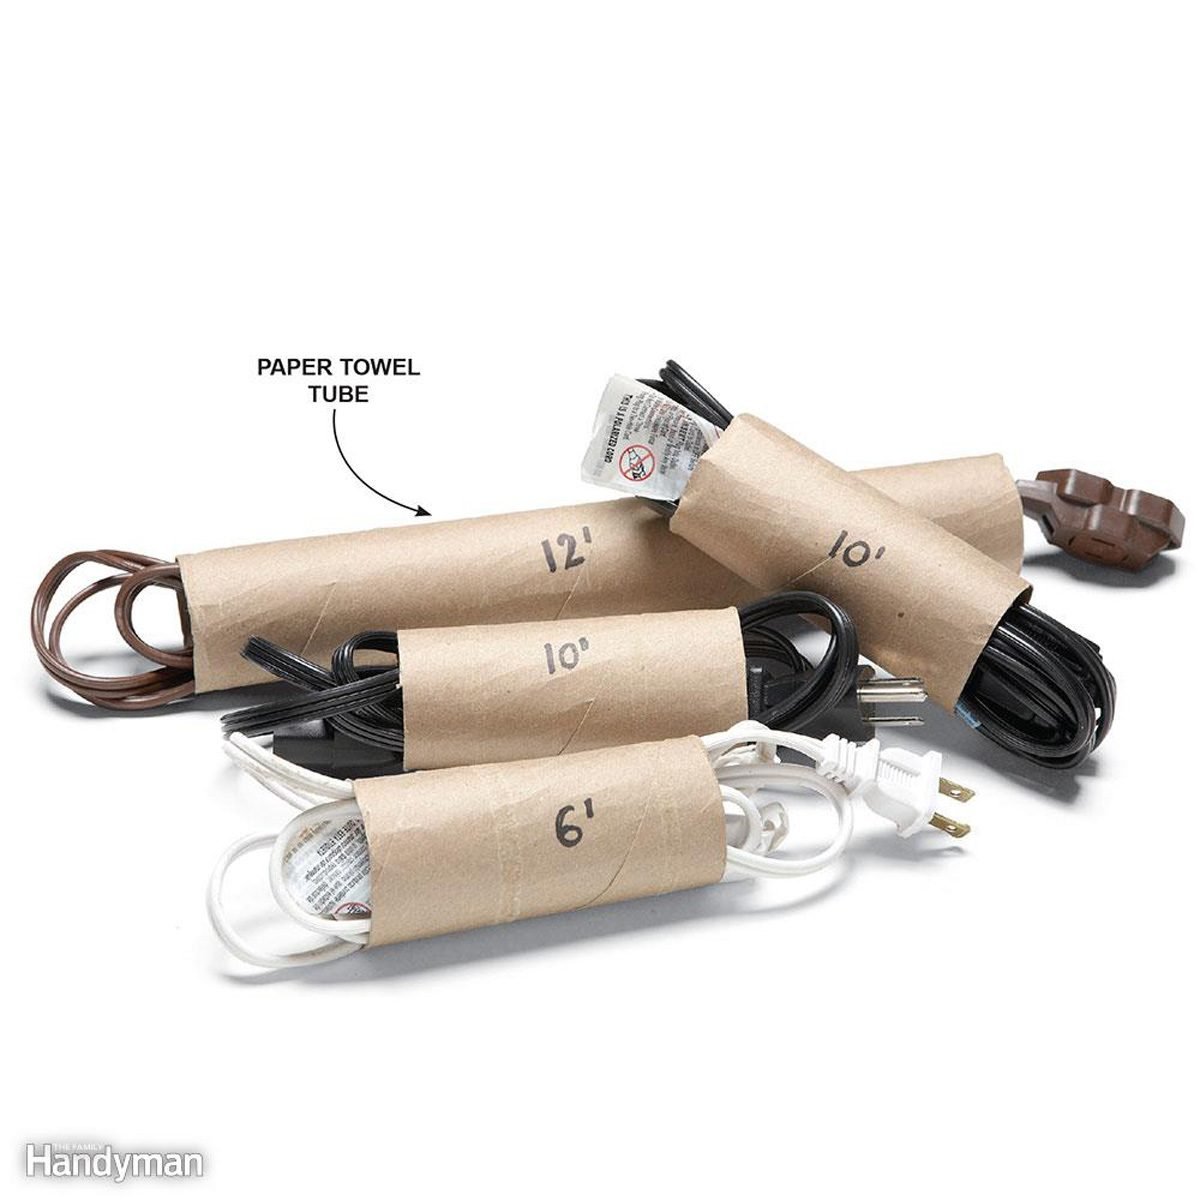
Light-Duty Extension Cord Storage

To keep light-duty extension cords organized, slide them into toilet paper or paper towel tubes. Write the length of the cord on the tubes before you put them in a drawer or bin. You'll be able to find the right cord easily with this extension cord storage hack, plus you've made good use of the tubes. Check out these other cardboard tube hacks.
13 / 75
Tangle-Free Jumper Cable Storage
Family Handyman

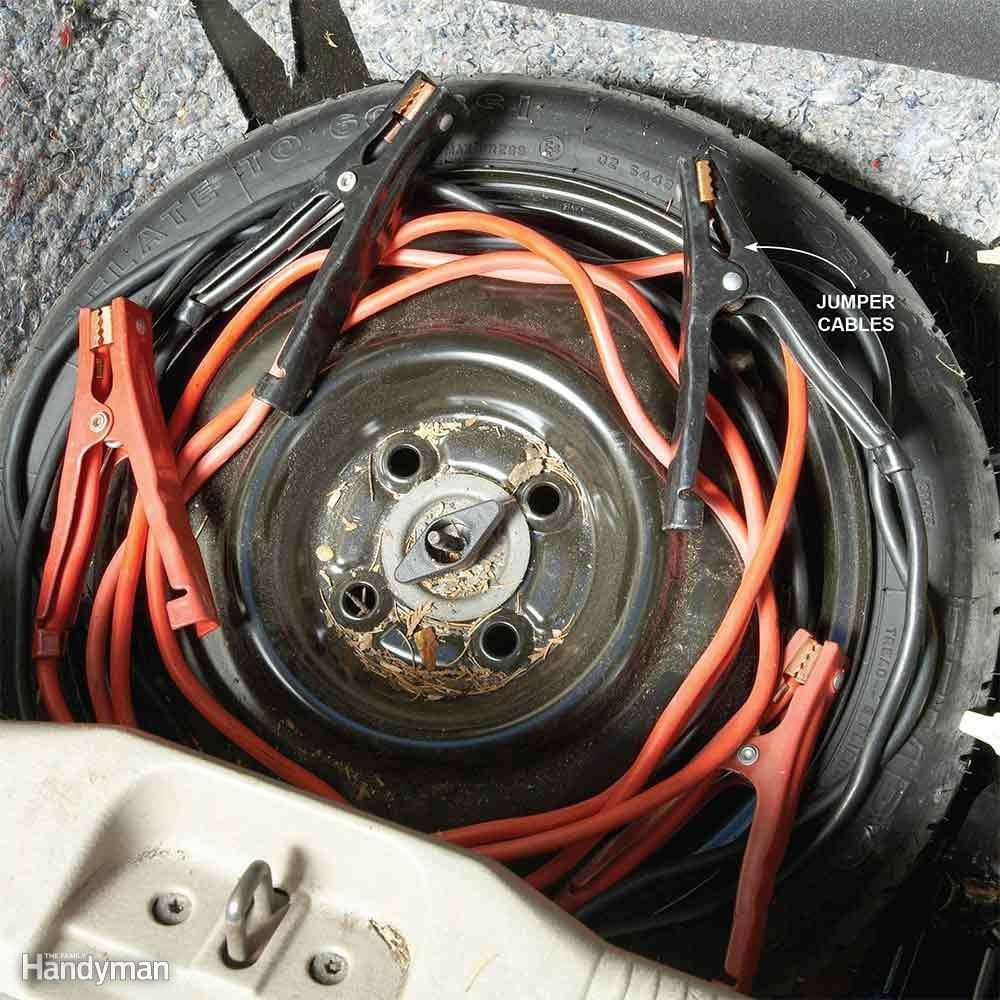
Tangle-Free Jumper Cable Storage

Having jumper cables at the ready is serious business in cold climates. Store the cables coiled around the spare tire under the false floor of the trunk. You'll always be able to find them and they'll never be tangled.
14 / 75
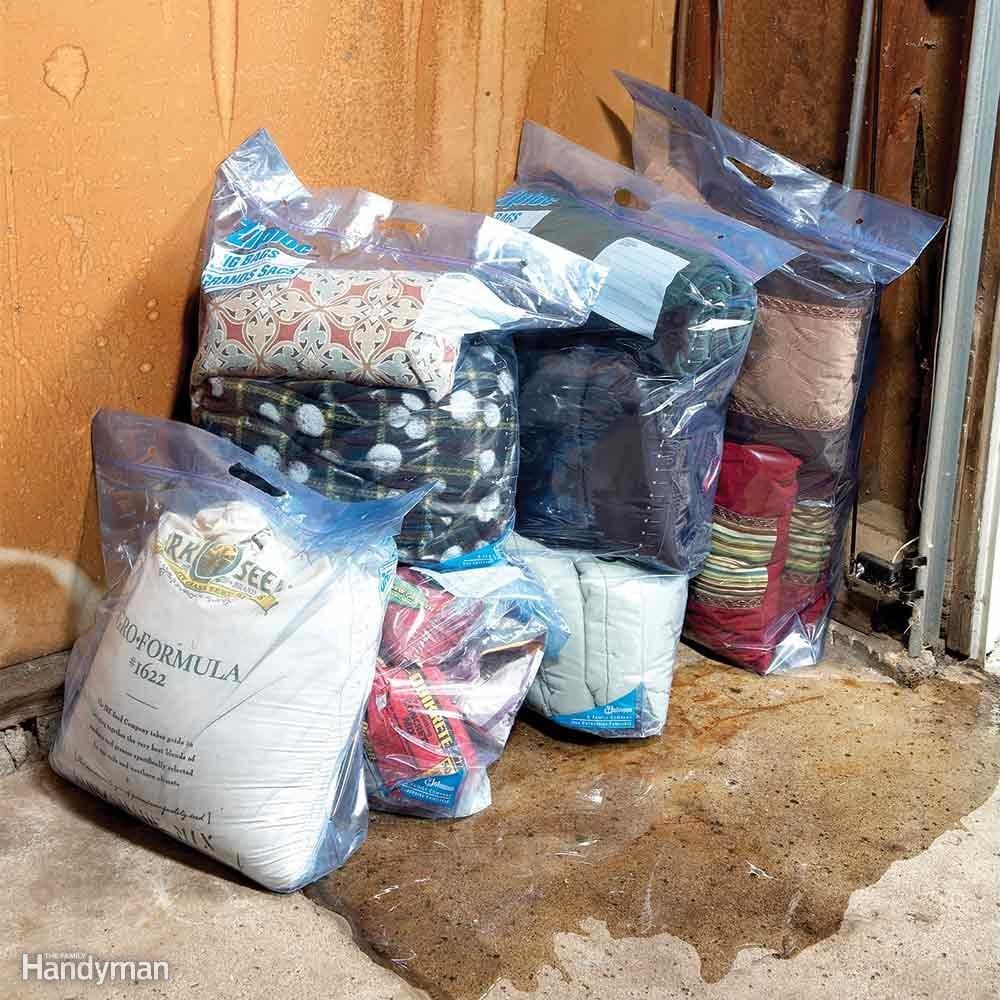
Storage Tips for Bulky Items
Family Handyman

Storage Tips for Bulky Items

Extra-large Ziploc bags (about $2 each at home centers and online) are great for storing camping gear, patio cushions and out-of-season clothes. Here's a slick trick for getting all the air out of the bag before you seal it. Put your items inside and push out all the air you can by hand. Then seal the bag but leave an opening large enough to fit a drinking straw. Use the straw to suck out the remaining air and then finish sealing the bag.
15 / 75
Magazine Storage
Family Handyman

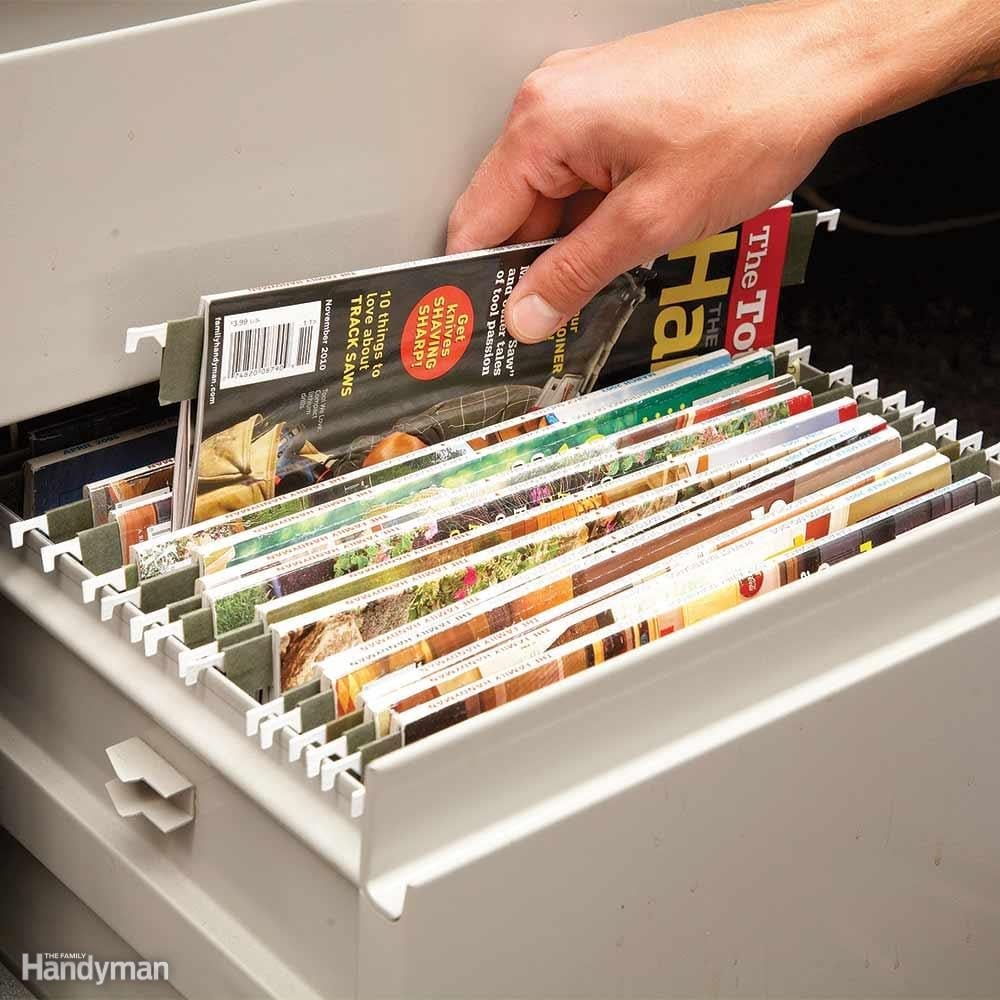
Magazine Storage

Can you actually find what you're looking for in your stack of saved magazines? Here's a great way to archive magazines, a method that one of our editors has been using at work for years. All you need is a bunch of hanging folders and a drawer that's set up for hanging them. Cut off the bottom of each folder about an inch below the rod. Drape your magazine over the rod and hang it in the drawer. The spines are easy to read, so you can find what you need quickly.
16 / 75
garden shed complete

Grand Garden Shed

Ever think about putting an outdoor shower in a garden shed? Neither have we! But that’s just what reader Emlyn Jones did, and he used shed plans from Family Handyman. Don’t forget to check out these shed organization ideas.
17 / 75
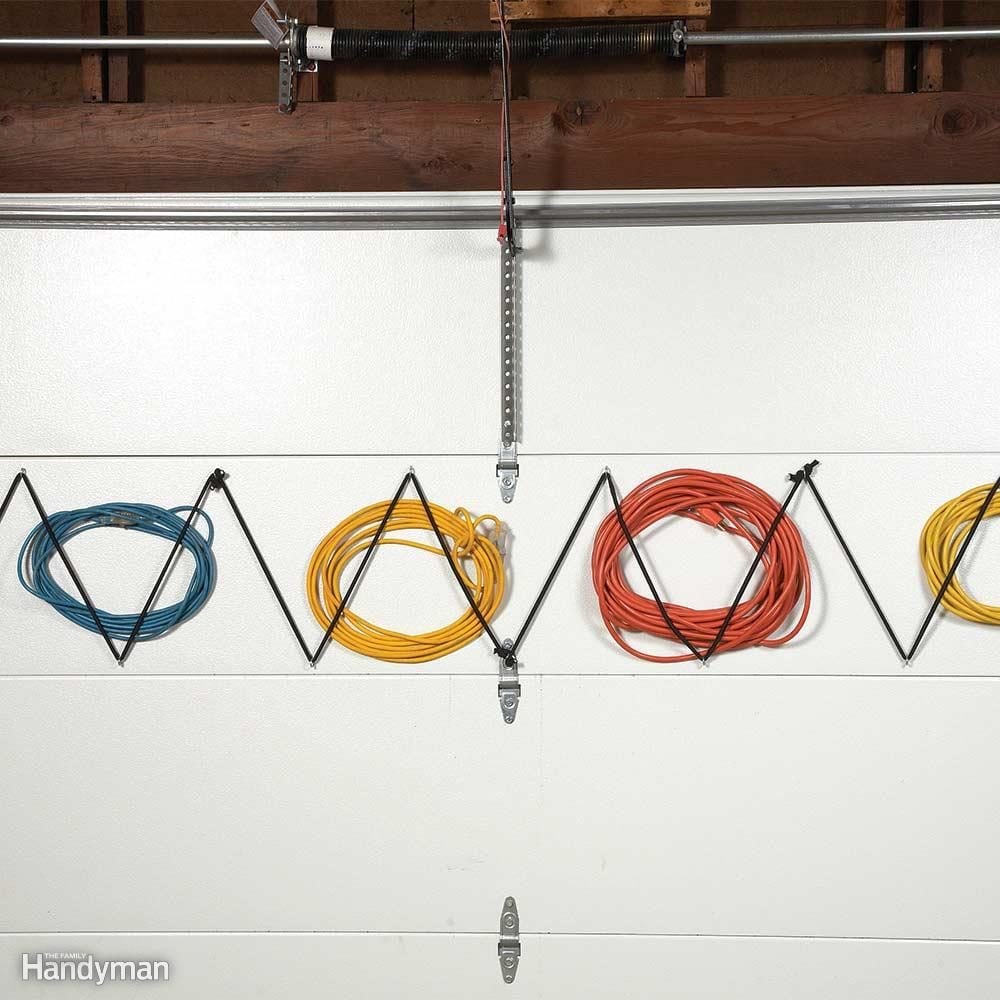
Garage Door Extension Cord Storage
Family Handyman

Garage Door Extension Cord Storage

Ever wish you had one more garage wall to hang stuff on? Well, you do. Your garage door is a perfect place for extension cord storage. (Yes, they'll stay put when the door opens and closes.) Install screw eyes diagonally about eight inches apart and thread bungee cords (with the ends cut off) through them for perfect extension cord storage. Now you have a perfect bungee “corral” to hold your extra extension cords.
18 / 75
Extension Ladder Storage
Family Handyman

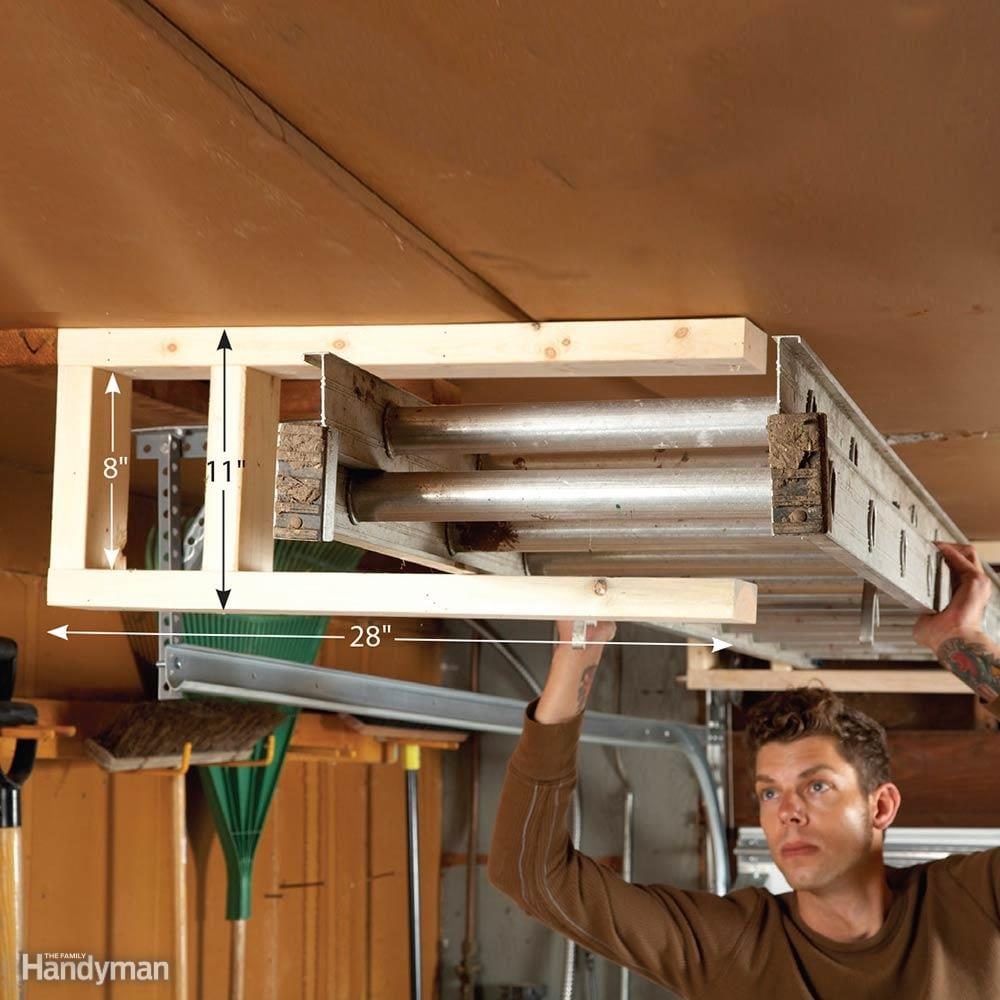
Extension Ladder Storage

An extension ladder is one of the most difficult things to store. When you need to use it, it has to be easy to get to. But there are long stretches when it just gets in the way of everything else in your garage. Here's a good solution: Mount it on your garage ceiling on sturdy racks made of scrap 2x4s that are screwed into the ceiling joists. Use two 3-1/2-in. screws at each joint to make the rack secure. These racks make it easy to slide the ladder out when you need it. Just make sure to position the racks where they won't interfere with your garage door.
19 / 75
Loft Bed

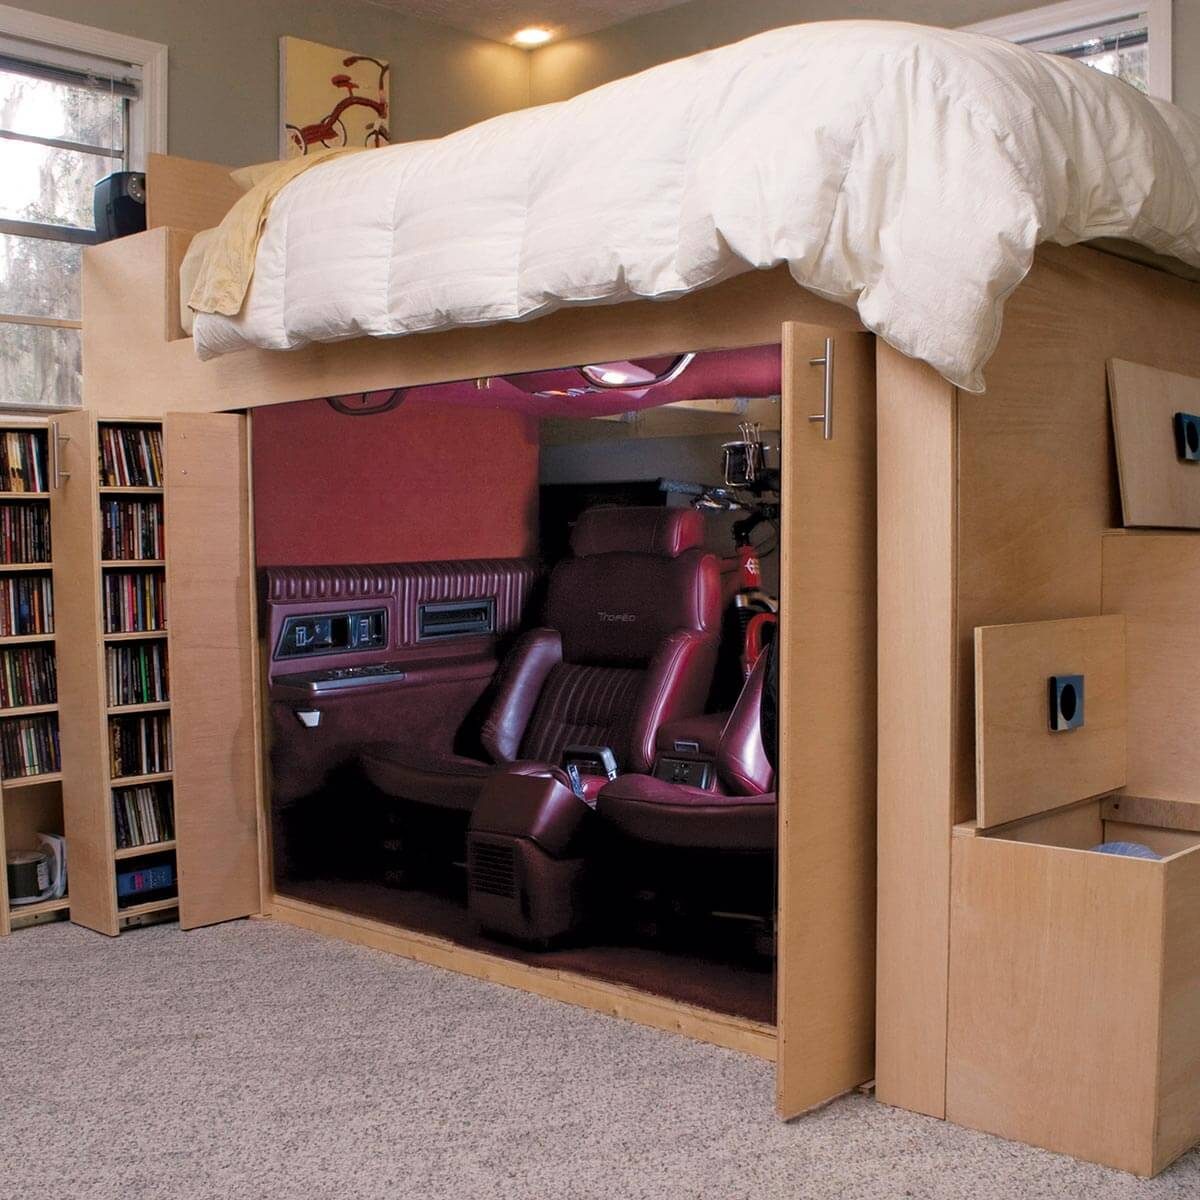
Loft Bed

Reader Jak Krumholtz built a loft bed with enough room below it for, well, a room! He added retro automotive seats with a console, a dome light, pullout shelves and space to store his bicycles.
20 / 75
Belt and Other Hang-Ups
Family Handyman

Belt and Other Hang-Ups

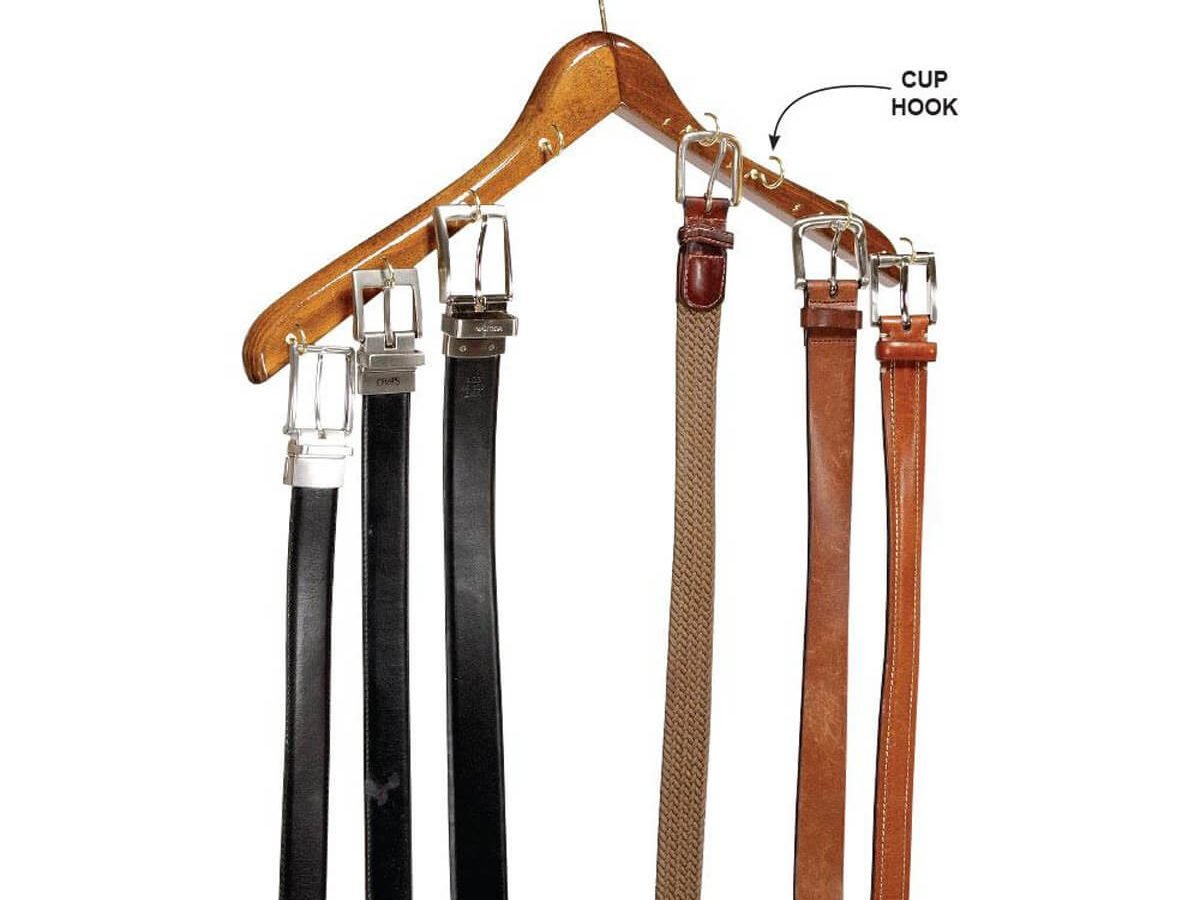
Where do you store your belts? How about on this inexpensive and easy-to-make belt holder? All you need is a wooden hanger and some cup hooks. If some of your belts have unusually thick buckles, just widen the cup hook slightly with a needle-nose pliers. This is a great way to hang small handbags, too. We also have tons of storage ideas for the kitchen.
21 / 75
Screws, Doodads and Other Hardware Storage
Family Handyman

Screws, Doodads and Other Hardware Storage

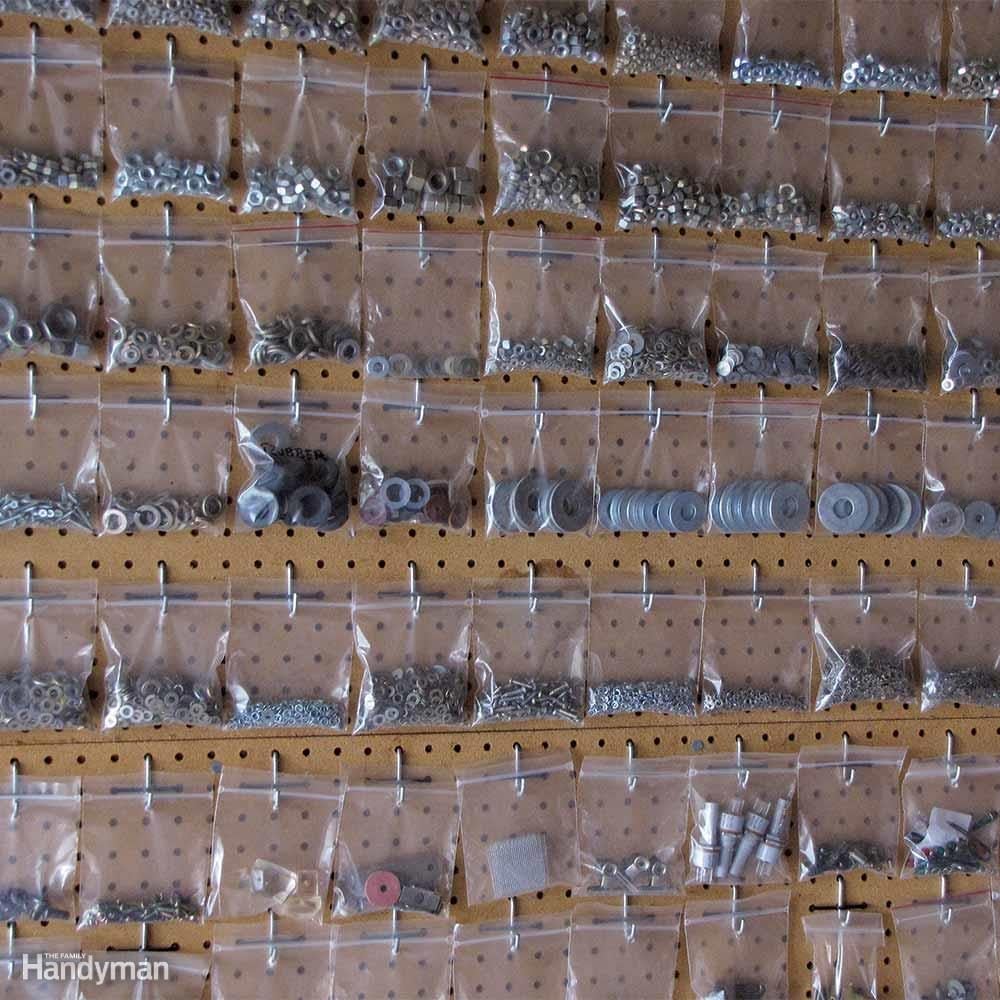
If you have lots of small hardware on hand, constantly opening drawers or containers to find what you need is a pain. Here's one solution: Store hardware in small, sturdy zippered craft bags (thicker than sandwich bags and available at hobby stores). Punch a hole in the bag and hang it on pegboard. The clear bags make finding what you need a snap and keep dust, rust and moisture at bay. If you need to find a matching piece of hardware, just hold it up for a side-by-side comparison.
22 / 75
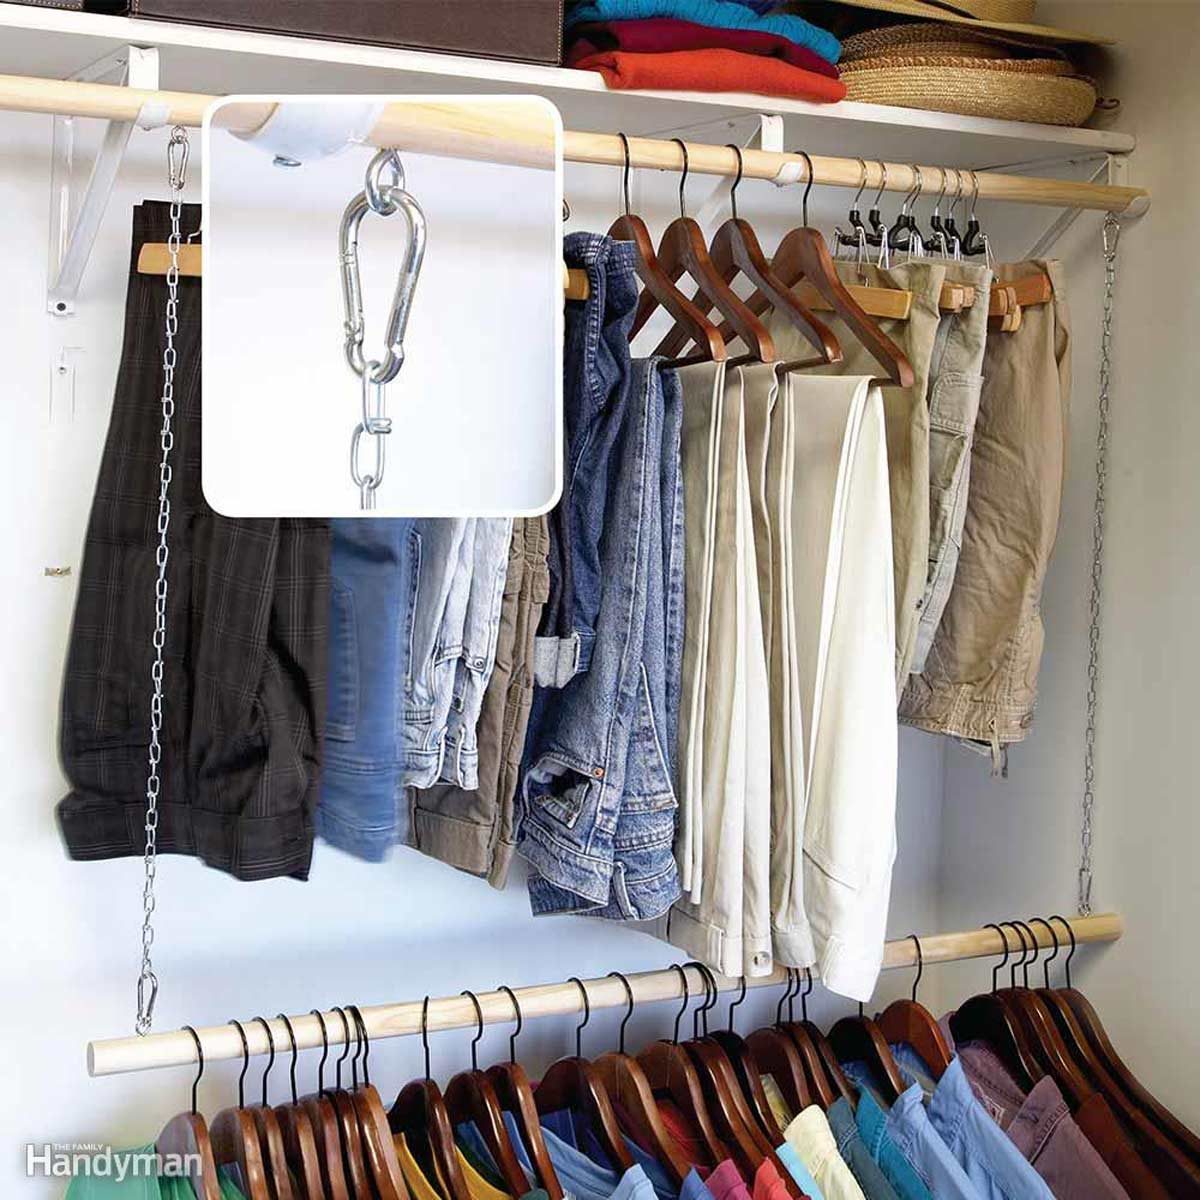
Add-On Clothes Rod
Family Handyman

Add-On Clothes Rod

Very few people have too much closet space (and if you do, don't brag). This DIY closet rod is an easy way to add space for hanging clothes (or at least clothes that don't require a tall space). Hang a second clothes rod from the upper rod with lightweight chain. Attach the chain to screw eyes directly or use S-hooks or carabiners. Carabiners make adjusting the height of the extra rod a snap. This system works well in kids' closets since they grow quickly (and their clothes grow along with them). It also works well in an adult closet—you can hang pants on one rod and shirts on the other. Check out these 11 other clothes storage ideas.
23 / 75
Ball Storage
Family Handyman

Ball Storage

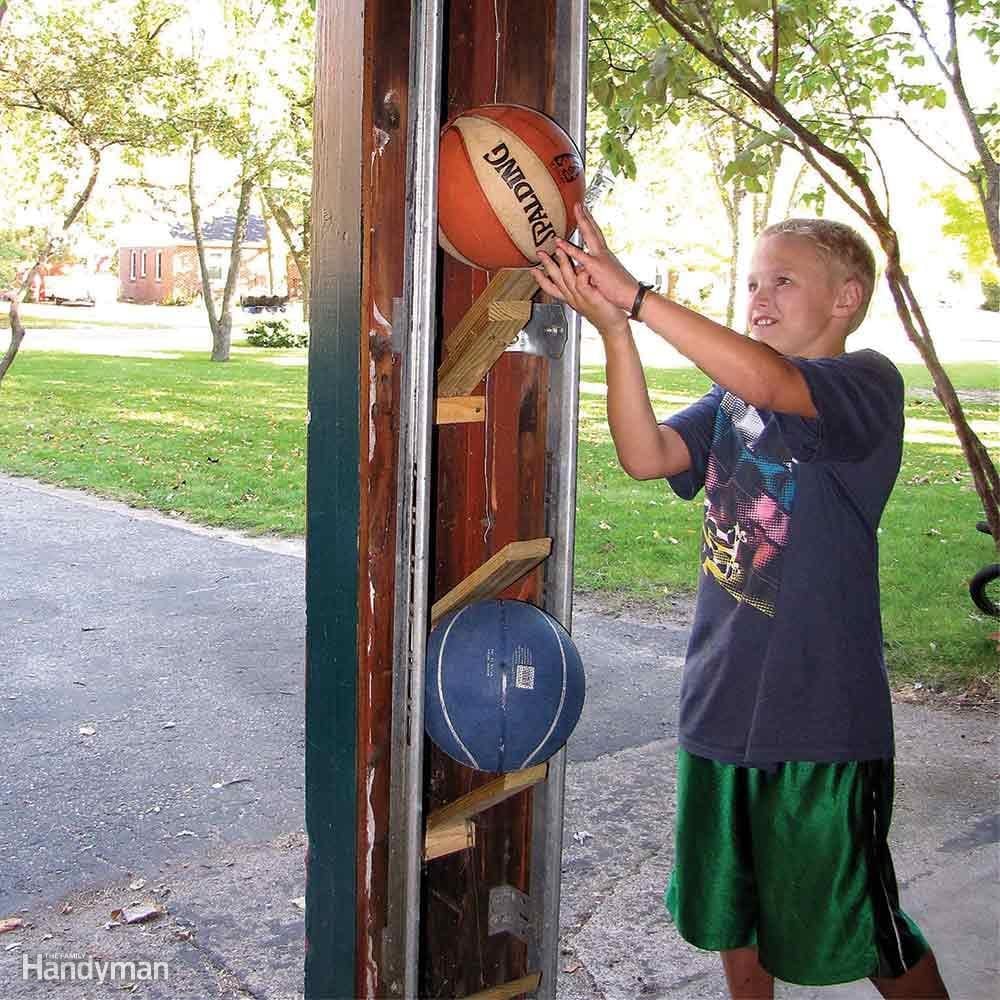
If you have kids, you have balls—basketballs, soccer balls, rubber balls and other round objects that roll around underfoot. Here's a perfect way to use that narrow gap between a pair of garage doors (if you're blessed with such an awkward spot). Just install angled “ball ramps” made from scrap wood. The balls fit neatly in the gap, and because the ball ramp is right there at the edge of the garage, kids are more likely to use it.
24 / 75
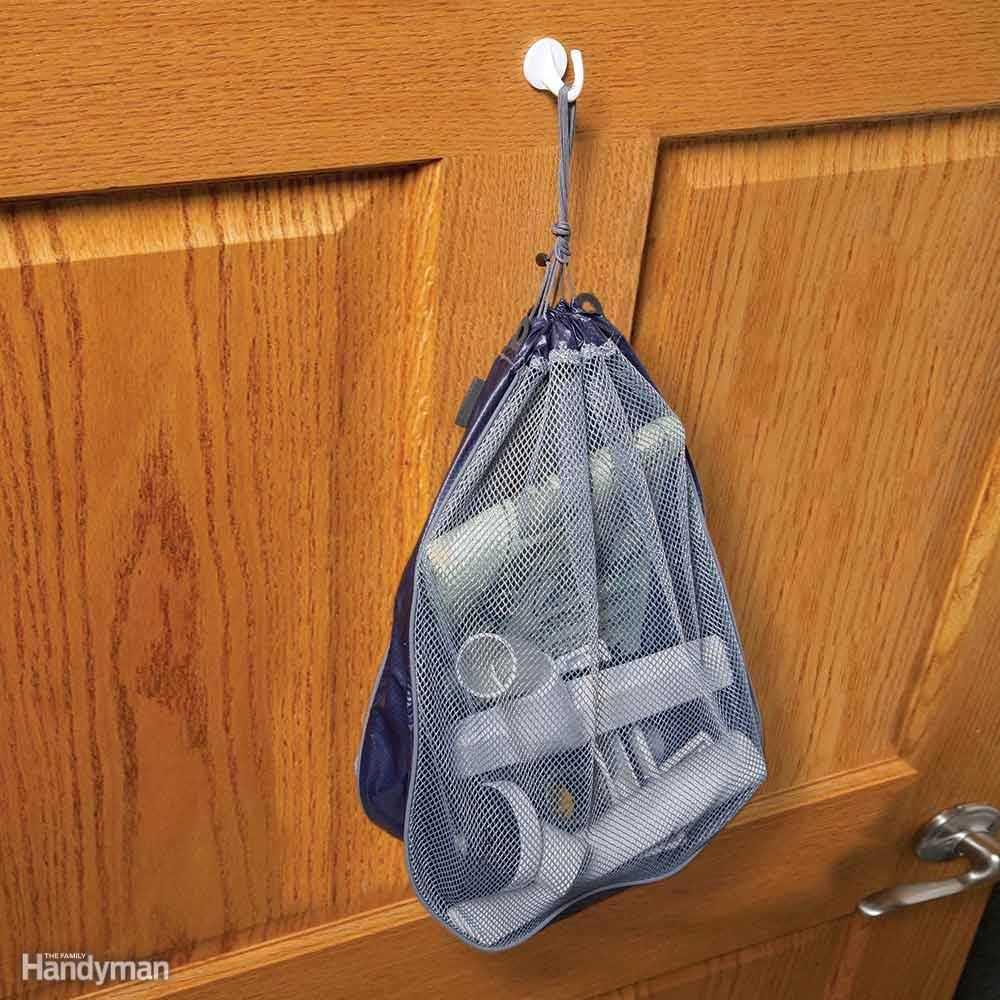
Vacuum Gear Storage
Family Handyman

Vacuum Gear Storage

It seems like the vacuum cleaner always ends up in one closet and the vacuum cleaner bags in another, and the attachments get shoved under a bed or permanently misplaced. Here's a simple tip that will keep everything together and out from underfoot. Screw a hook to the door of your storage closet and hang a mesh or cloth bag on it. You can store all your vacuum cleaner bags and attachments in one place, and the bag lets you carry everything you need from room to room or up and down the stairs in one trip. Vacuum cleaner broken? We'll show you how to fix it.
25 / 75
Behind the Door Storage: Closet Glove Rack
Family Handyman

Behind the Door Storage: Closet Glove Rack

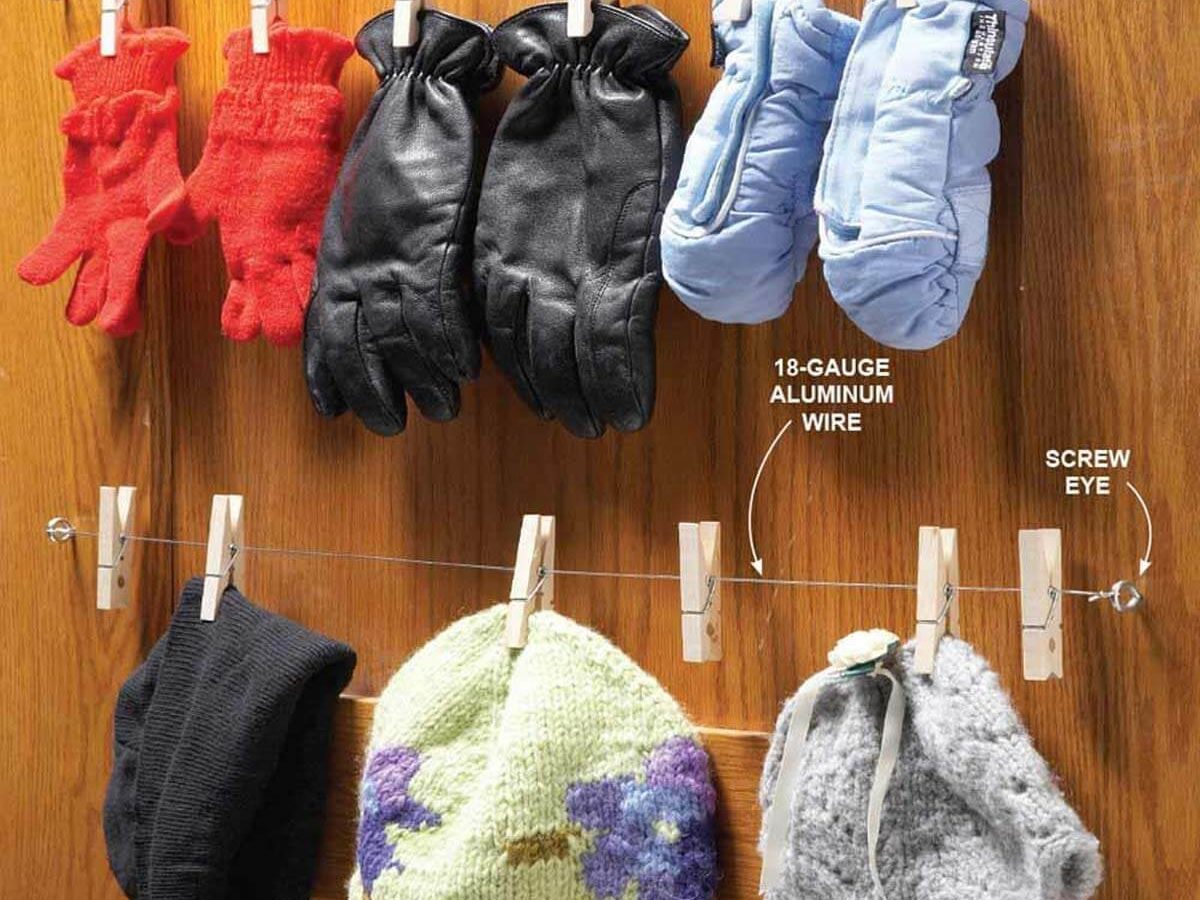
If you don't have radiators, finding a good spot to dry wet hats and mittens can be tough. Tossing them into a plastic bin gets them out of the way, but they never dry and it's no fun putting on damp mittens in the morning. This simple back-of-the-door glove and cap rack allows wet things to dry and keeps easily misplaced items organized. Just string clothespins on aluminum wire (it won't rust) and stretch it between screw eyes on the back of a closet door. This also works great out in the garage for drying garden and work gloves. Make your own mitten drying rack with these inspirational ideas.
26 / 75
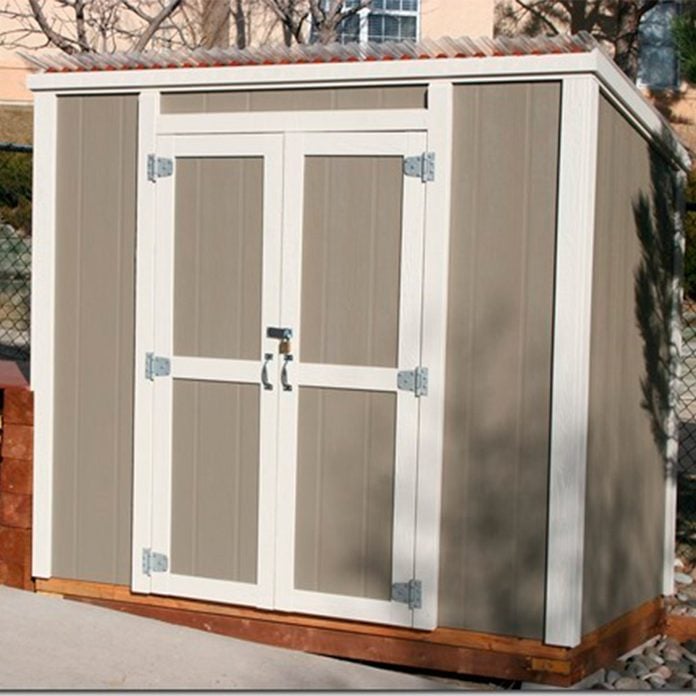
reader storage locker

Big and Little Storage Lockers

We’re impressed with reader J. Macpherson’s modifications to Family Handyman’s Outdoor Storage Locker project from March 2008. Both versions of the shed were based on the project plans that he found on the website. Way to go!
27 / 75
Garage Corner Shelves
Family Handyman

Garage Corner Shelves

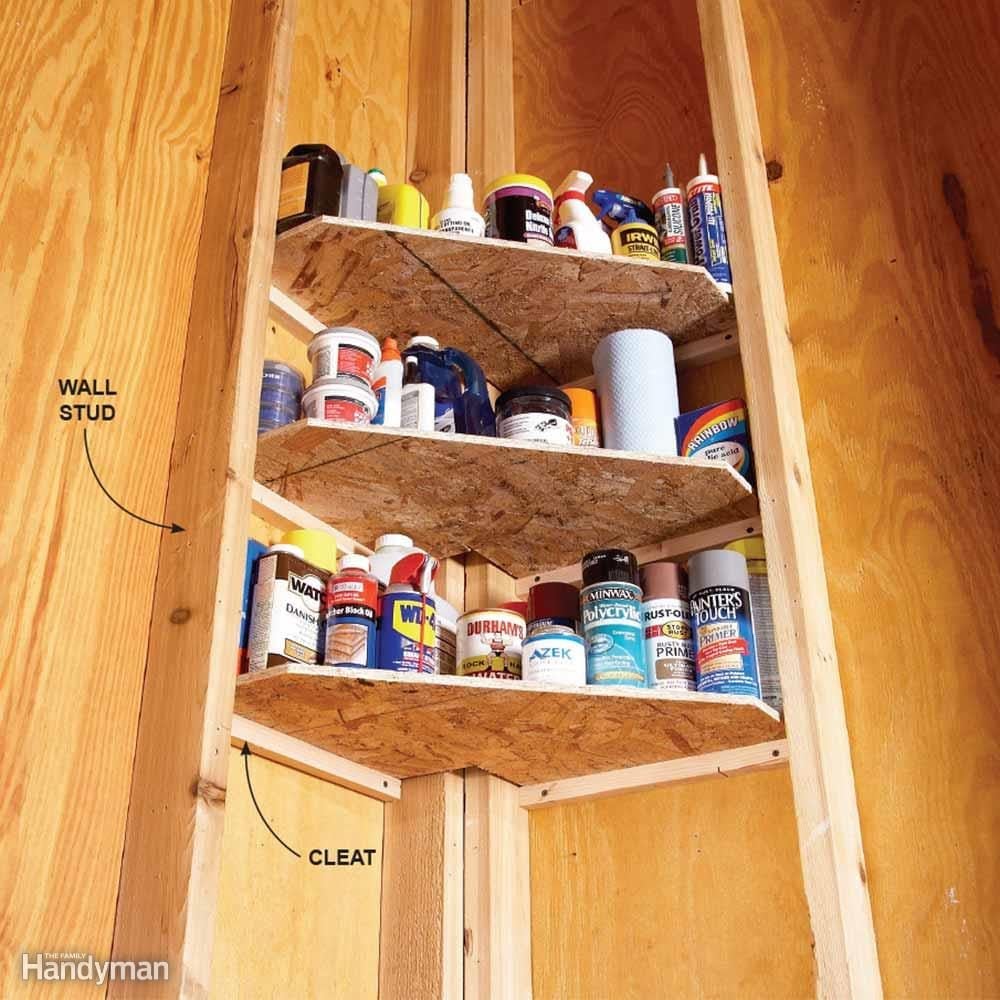
Who couldn't use a few more shelves in the garage? You probably already have shelves in the obvious spots, but what about in the corners? This nifty corner shelf unit takes advantage of existing studs, and it's fast, easy and cheap. And it's great for can storage ideas. Use scrap plywood or oriented strand board to make shelves that fit snugly between the corner studs and support them with 1x1 cleats. These corner shelves are perfect for storing smaller items such as glues, oils, waxes and polishes, which get lost on larger shelves.
28 / 75
Basement Junk Storage
Family Handyman

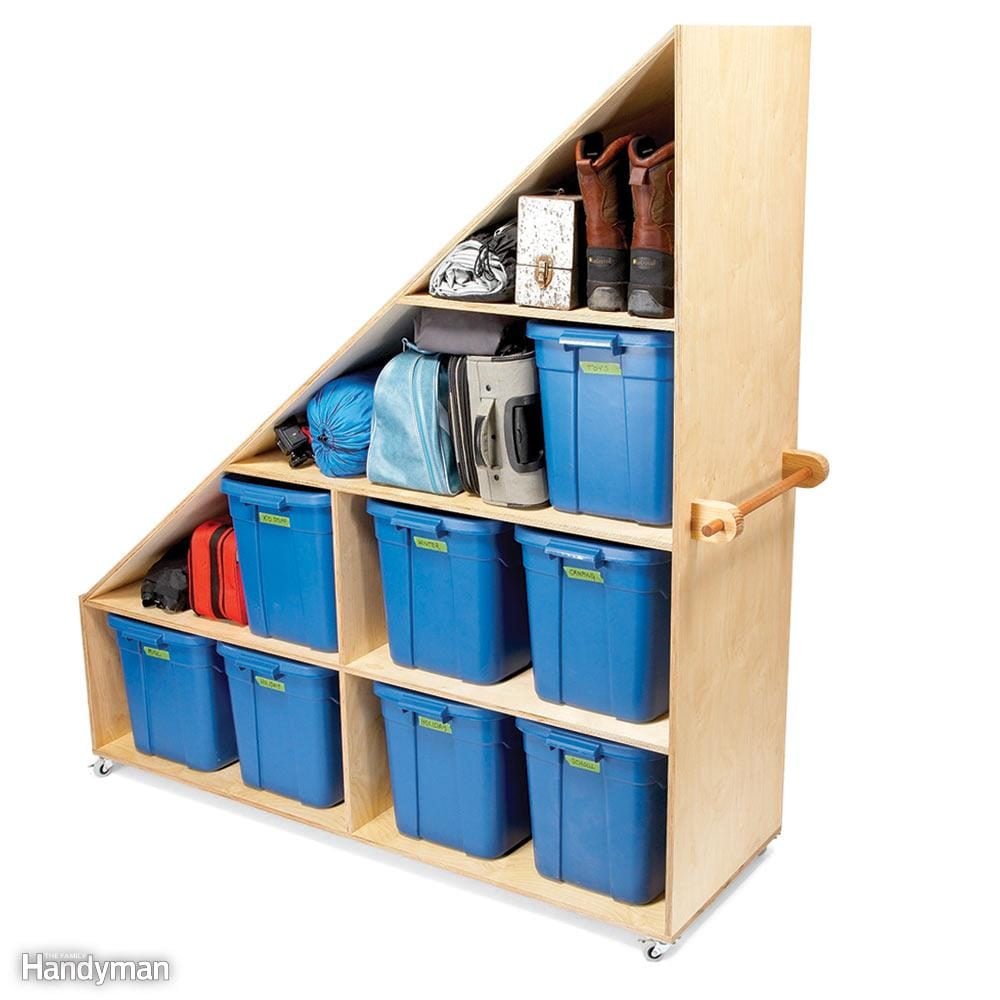
Basement Junk Storage

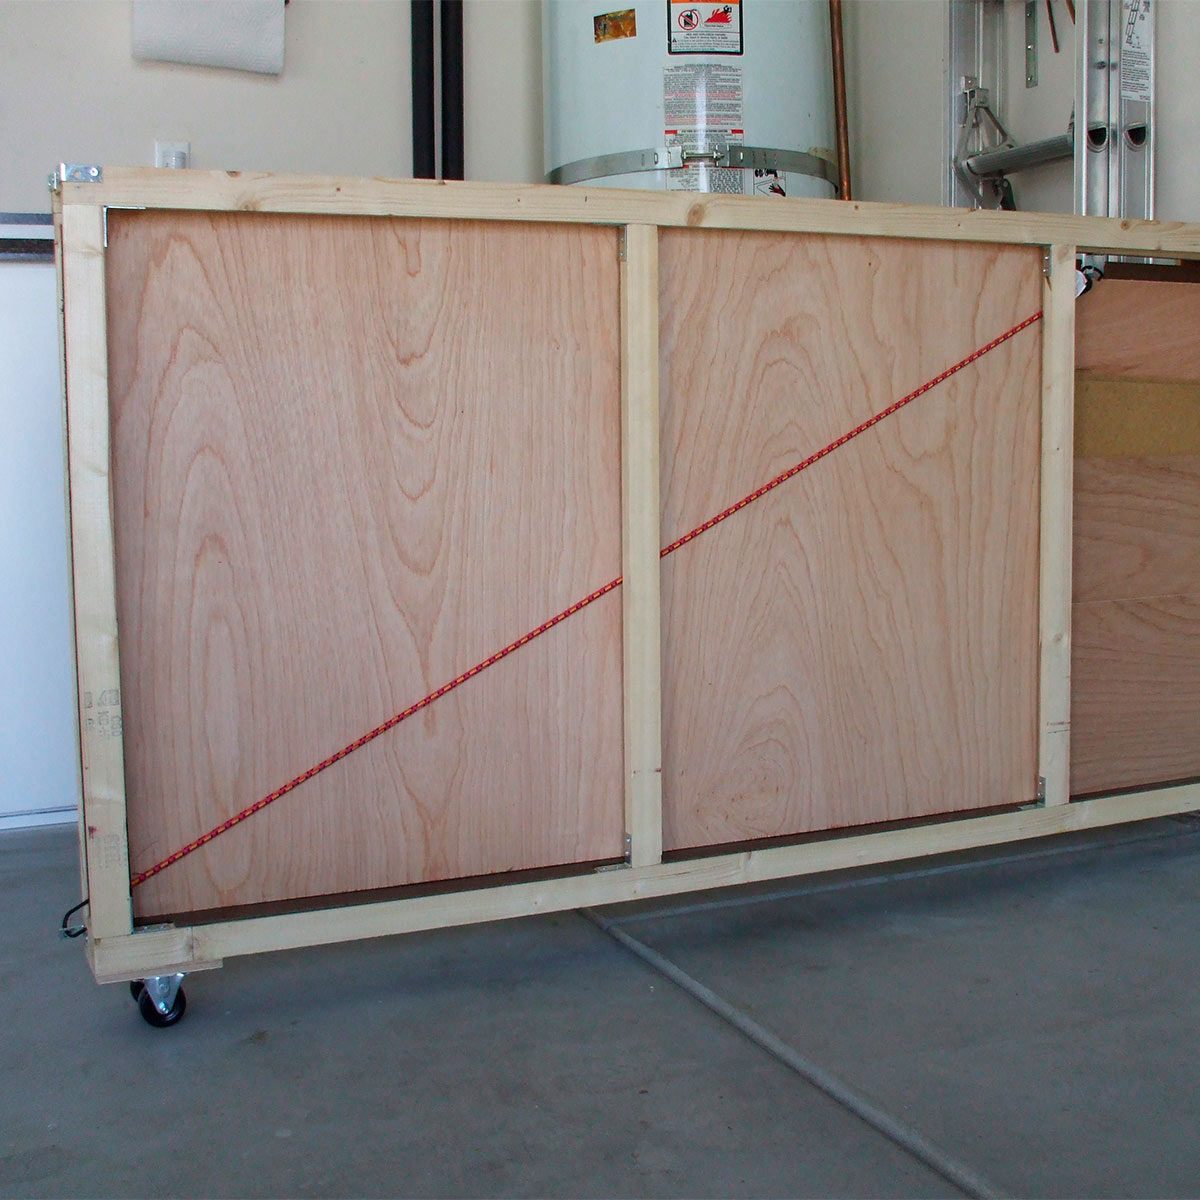
OK, maybe junk is too harsh a word. We're talking about luggage, camping gear, the ugly vase Aunt Martha gave you for your wedding—stuff you need to keep but don't use all the time. If your house has a set of stairs with a sloped closet underneath, you have a huge amount of space that's mostly wasted. Here's how to get the most out of that black hole. Build a custom rolling cart that fits perfectly in the closet. This one is built like a shelf unit and rides on fixed casters so it slides straight out to keep things organized and accessible. When Aunt Martha comes to visit, just roll it out, grab the vase and you're golden. Take a look around and see what you can throw out before tossing it in storage.
29 / 75
Fishing Rod Storage
Family Handyman

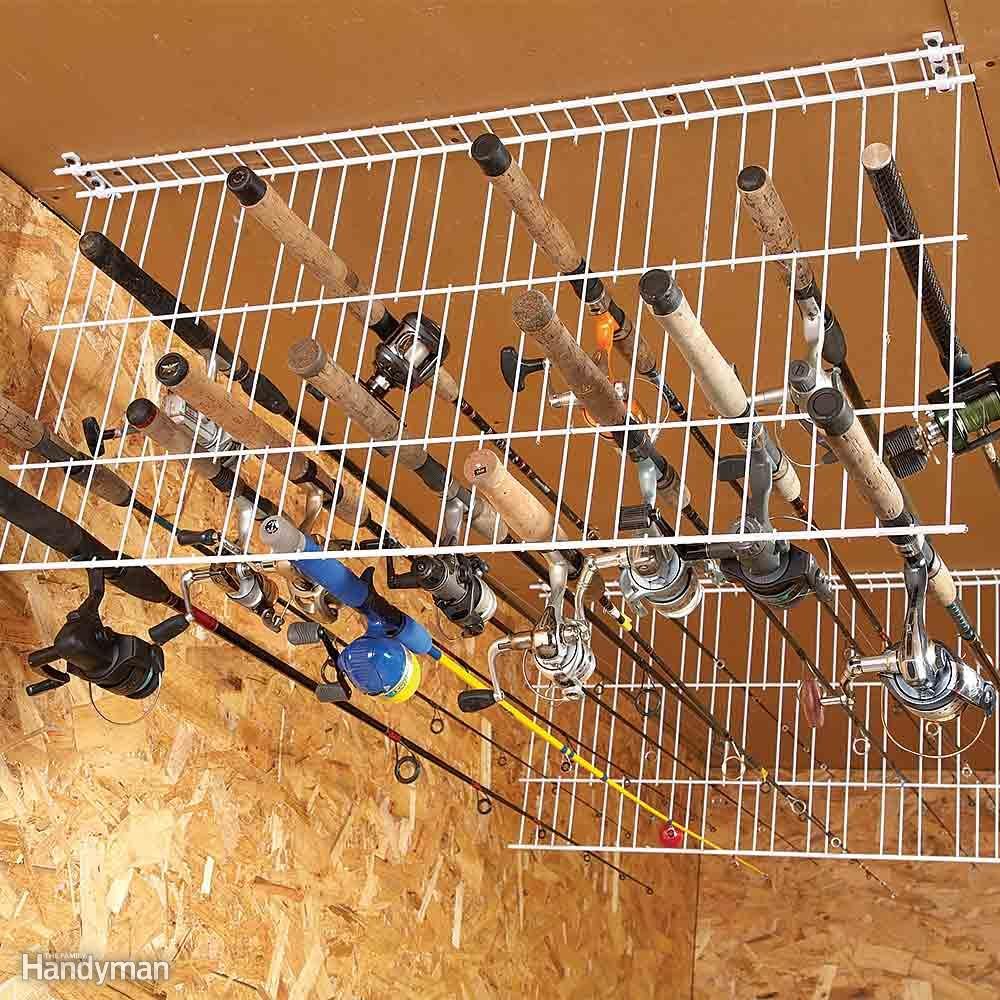
Fishing Rod Storage

This is for all you fishing addicts out there. When the season ends and the gear comes out of the truck, where do you store your rods? You can buy a fancy storage rack or make one of your own. But either way, you're giving up precious wall space until spring. Here's a quick solution: Screw short sections of wire shelving to your ceiling. If the handles don't fit, just clip out some of the wire with bolt cutters. Your rods will be safely out of the way until your next fishing trip. You can also use PVC pipe for fishing rod storage—check it out!
30 / 75
Kitchen Rollout

Kitchen Rollout

To make the most out of the space in a really tall, deep cabinet, reader Jason Gilliam made the following modifications. He moved the cabinet’s back panel forward, cut a hole in the side and built a slide-out shelf.
31 / 75
Spring Clamp Storage
Family Handyman

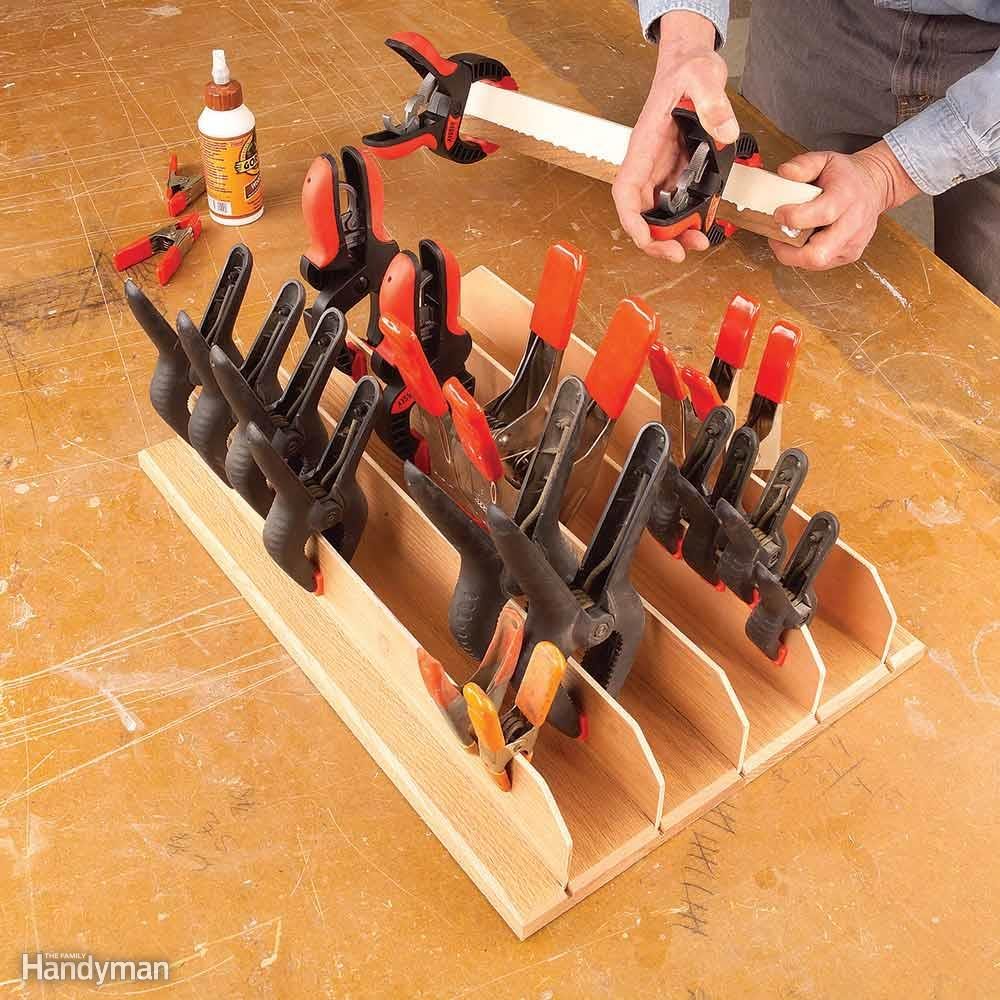
Spring Clamp Storage

This tray is a nifty way to store spring clamps. It's a slotted piece of 3/4-in. plywood with 1/4-in. plywood fins glued in the slots. Store the tray on a peg and remove clamps when you need them. When you're done, stick the clamps back on the fins and hang up the tray. These are our all-time favorite clamping tricks from woodworkers.
32 / 75
Heavy-Duty Utility Shelves
Family Handyman

Heavy-Duty Utility Shelves

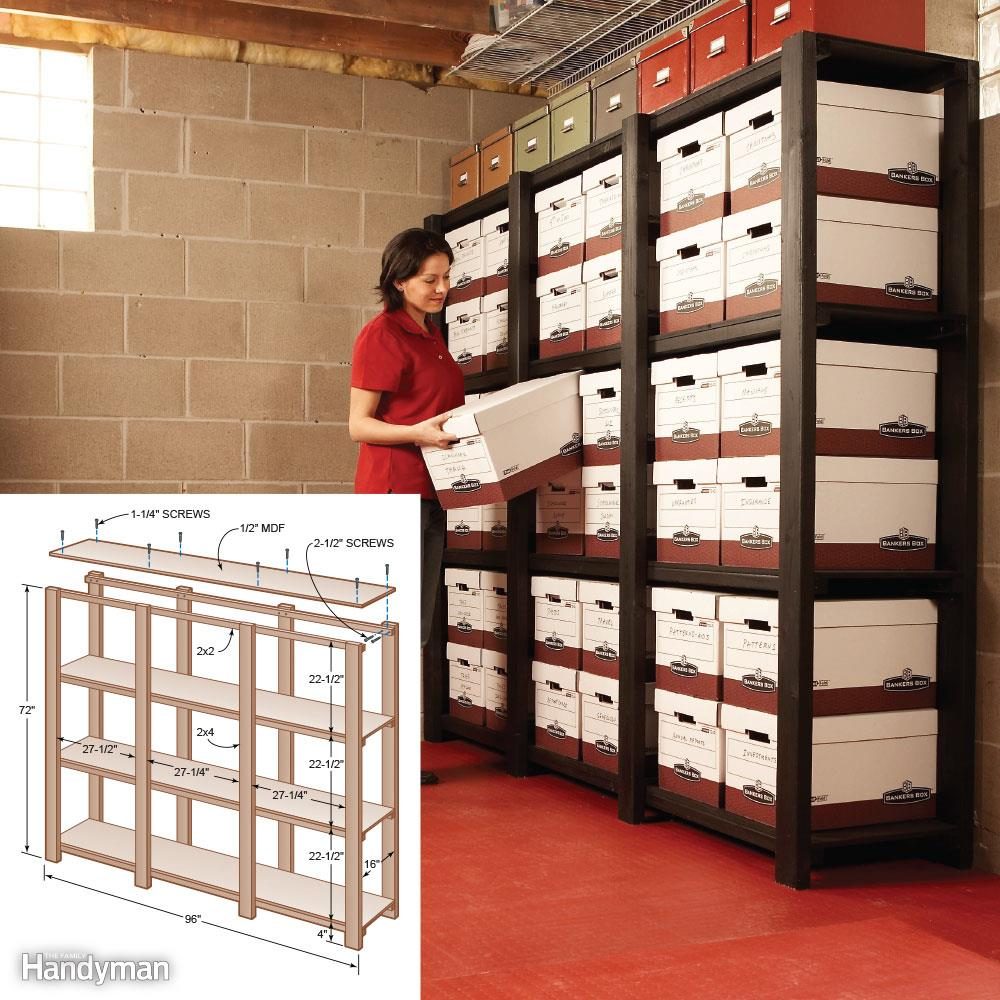
Store-bought shelving units are either hard to assemble and flimsy or awfully expensive. Here's a better solution. These shelves are strong and easy to build and cost about $70. We sized this sturdy shelf unit to hold standard records storage boxes ($4 each). If you want deeper storage, build the shelves 24 in. deep and buy 24-in.-deep boxes. If you prefer to use plastic storage bins, measure the size of the containers and modify the shelf and upright spacing to fit. Refer to the dimensions shown to mark the location of the horizontal 2x2 on the back of four 2x4s. Also mark the position of the 2x4 uprights on the 2x2s. Then simply line up the marks and screw the 2x2s to the 2x4s with pairs of 2-1/2-in. wood screws. Be sure to keep the 2x2s and 2x4s at right angles. Rip a 4 x 8-ft. sheet of 1/2-in. MDF, plywood or OSB into 16-in.-wide strips and screw it to the 2x2s to connect the two frames and form the shelving unit. If you choose plastic bins rather than cardboard boxes, label the plastic with a wet-erase marker. When it's time to relabel the bin, just wipe away the marks with a damp rag. No room for floor-standing shelves? Build this sliding storage system on the ceiling.
33 / 75
Narrow Storage Shelves: Stud Space Cabinet
Family Handyman

Narrow Storage Shelves: Stud Space Cabinet

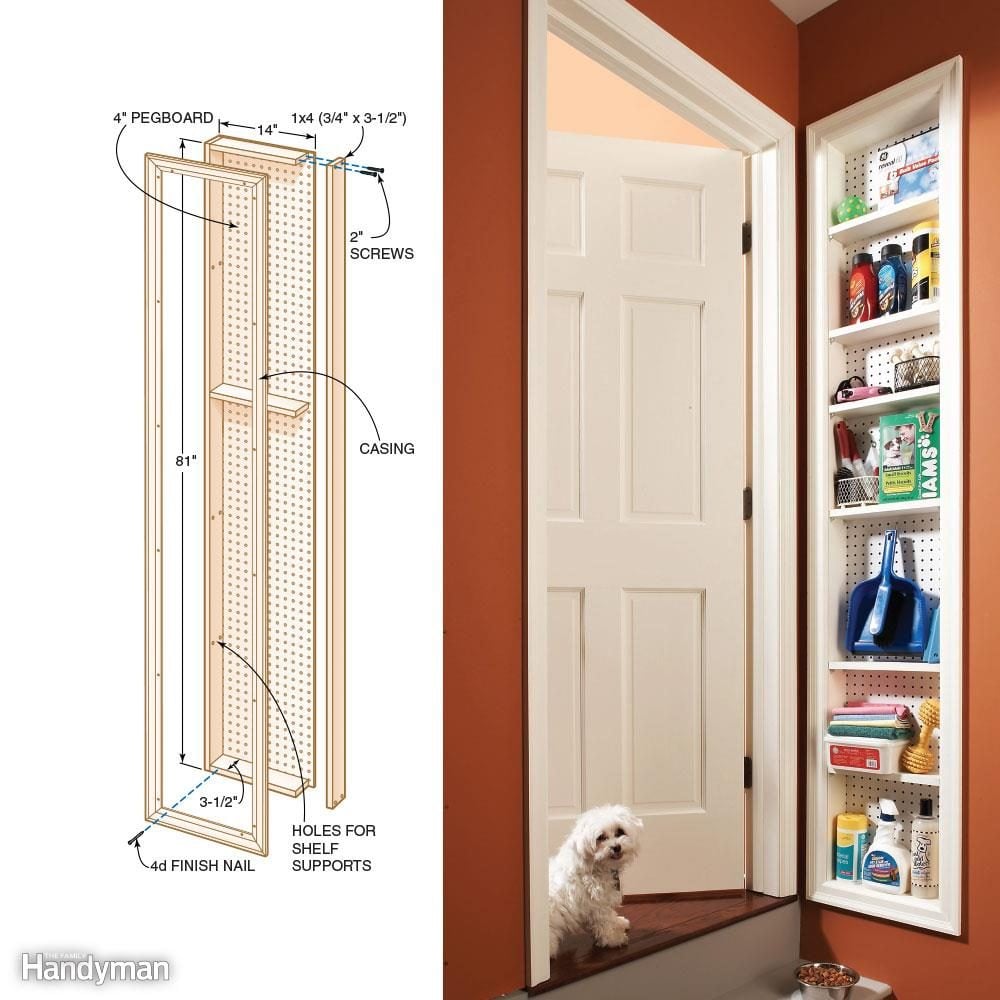
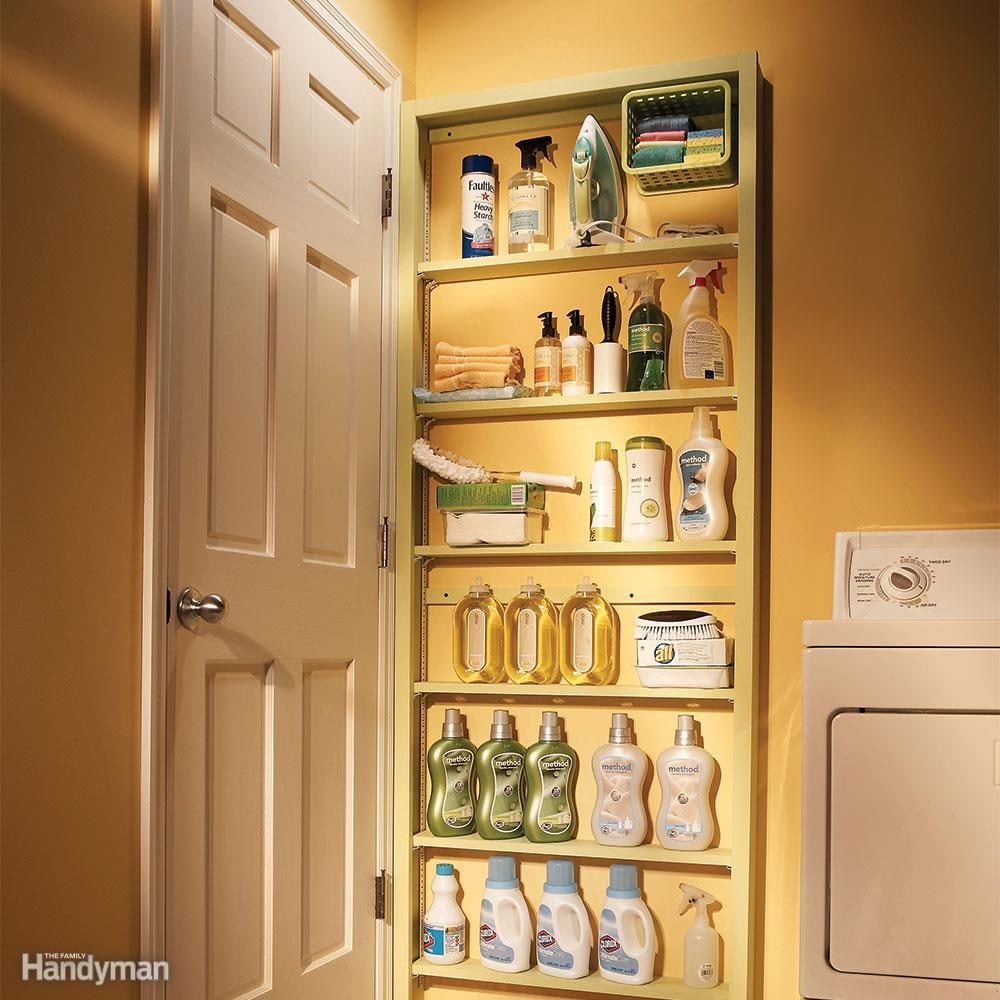
When you can't find a convenient nook for a set of narrow storage shelves, you can often create one by recessing the shelves into the wall itself. Choose the location  for your shallow shelving unit before you build the project to make sure it will fit. Start by looking for a space with no obvious obstructions. Locate the studs with a stud finder. Some stud finders can also locate electrical wires and plumbing pipes inside walls. When you've found a promising spot, cut a 6-in.-square inspection hole between the studs. Use a flashlight and a small mirror to inspect the stud cavity for obstructions. You often can modify the size of the cabinet to avoid obstructions. When you find a good space, mark the perimeter of the opening and use a drywall keyhole saw to cut it out. Measure the opening and subtract 1/4 in. from the height and width to determine the outer dimensions of your behind the door shelves. For standard 2x4 stud walls with 1/2-in.-thick drywall, build the cabinet frame from 1x4s that measure 3-1/2 in. wide (see illustration). If your walls are different, adjust the depth of the frame accordingly. Then add a 1/4-in. back.We screwed 1/4-in. pegboard to the back so we could hang stuff from pegboard hooks. Add casing that matches the trim in your house. Drill holes into the sides to accept shelf supports. Shelf supports fit in 3mm, 5mm or 1/4-in. holes depending on the style. Install the cabinet by slipping it into the opening, leveling it and nailing through the trim into the studs on each side. Use 6d finish nails placed every 12-in. along both sides. Don't want to open your walls? Check out these other easy shelving ideas.
34 / 75
Behind-the-Door Storage

Behind-the-Door Storage

The space behind a door is a storage spot that's often overlooked. Build a set of shallow shelves and mount it to the wall. The materials cost about $40. Plus, when you close the door they become storage shelves with doors! Measure the distance between the door hinge and the wall and subtract an inch. This is the maximum depth of the shelves. We used 1x4s for the sides, top and shelves. Screw the sides to the top. Then screw three 1x2 hanging strips to the sides: one top and bottom and one centered. Nail metal shelf standards to the sides. Complete the shelves by nailing a 1x2 trim piece to the sides and top. The 1x2 dresses up the shelf unit and keeps the shelves from falling off the shelf clips. Locate the studs. Drill clearance holes and screw the shelves to the studs with 2-1/2-in. wood screws. Put a rubber bumper on the frame to protect the door. Don't have an electronic stud finder handy? Learn how to locate studs without a stud finder here.
35 / 75
Closet Nook Shelves

Closet Nook Shelves

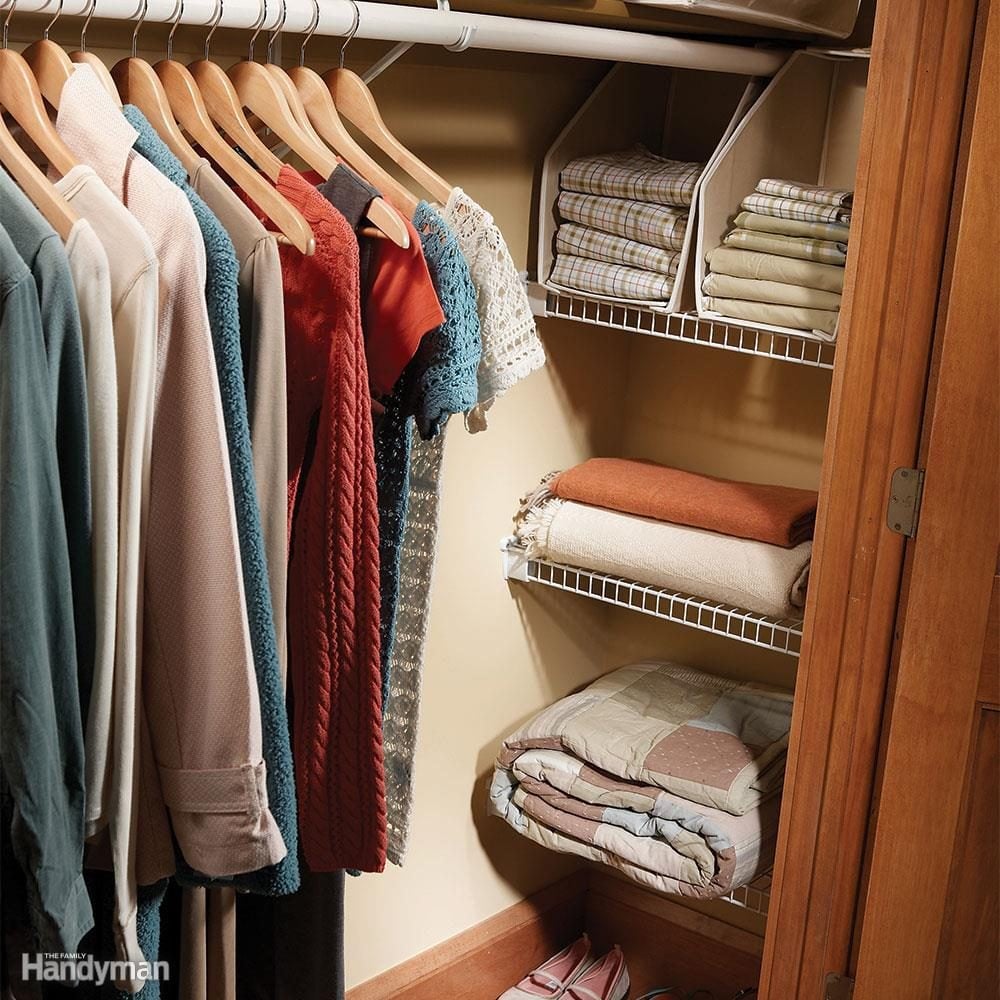
Salvage the hidden space at the recessed ends of your closets by adding a set of wire shelves. Wire shelves are available in a variety of widths. Measure the width and depth of the space. Then choose the correct shelving and ask the salesperson to cut the shelves to length for you. Subtract 3/8-in. from the actual width to determine the shelf length. Buy a pair of end mounting brackets and a pair of plastic clips for each shelf. Want more tips on organizing your closet? Check out these 11 clothes storage ideas.
36 / 75
Shoe Storage Booster Stool

Shoe Storage Booster Stool

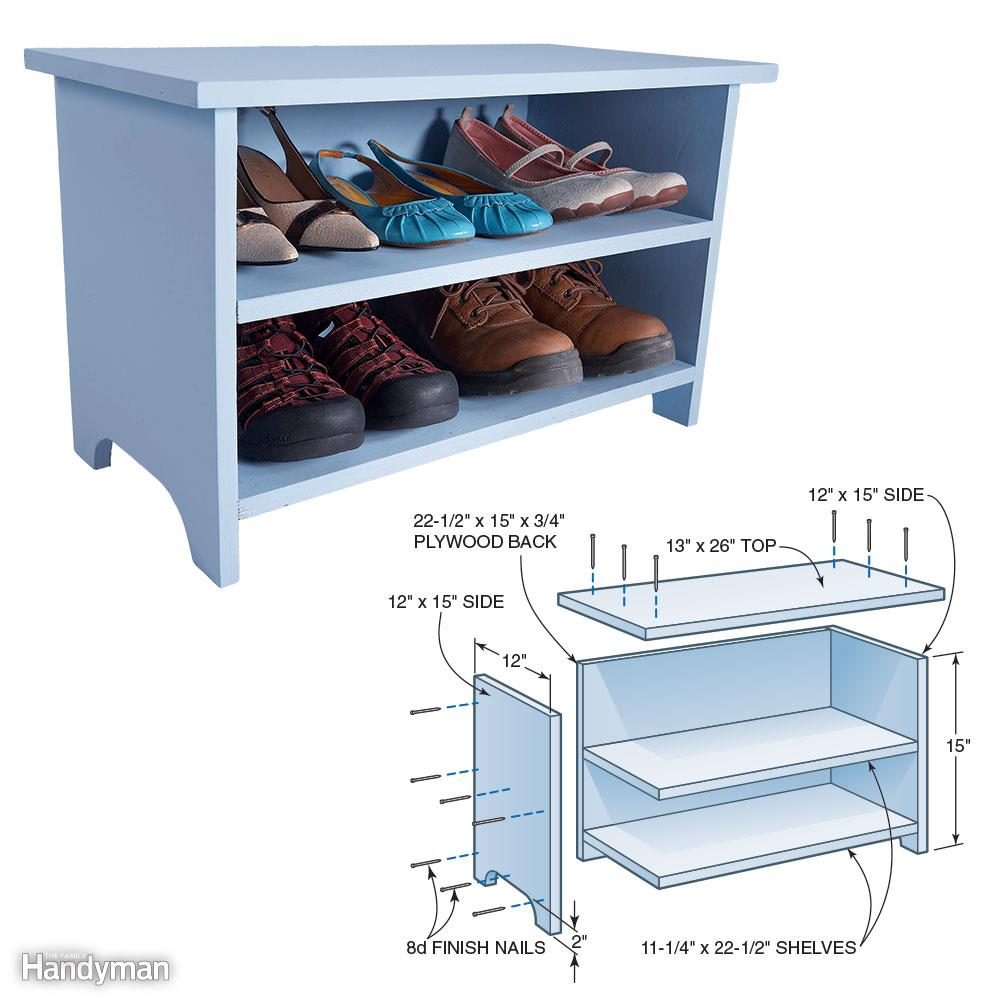
Build this handy stool in one hour and park it in your closet. You can also use it as a step to reach the high shelf. All you need is a 4 x 4-ft. sheet of 3/4-in. plywood, wood glue and a handful of 8d finish nails. Cut the plywood pieces according to the illustration. Spread wood glue on the joints, then nail them together with 8d finish nails. First nail through the sides into the back. Then nail through the top into the sides and back. Finally, mark the location of the two shelves and nail through the sides into the shelves. Don't have floor space to spare? Build these super simple wall-mounted shoe organizers instead!
37 / 75
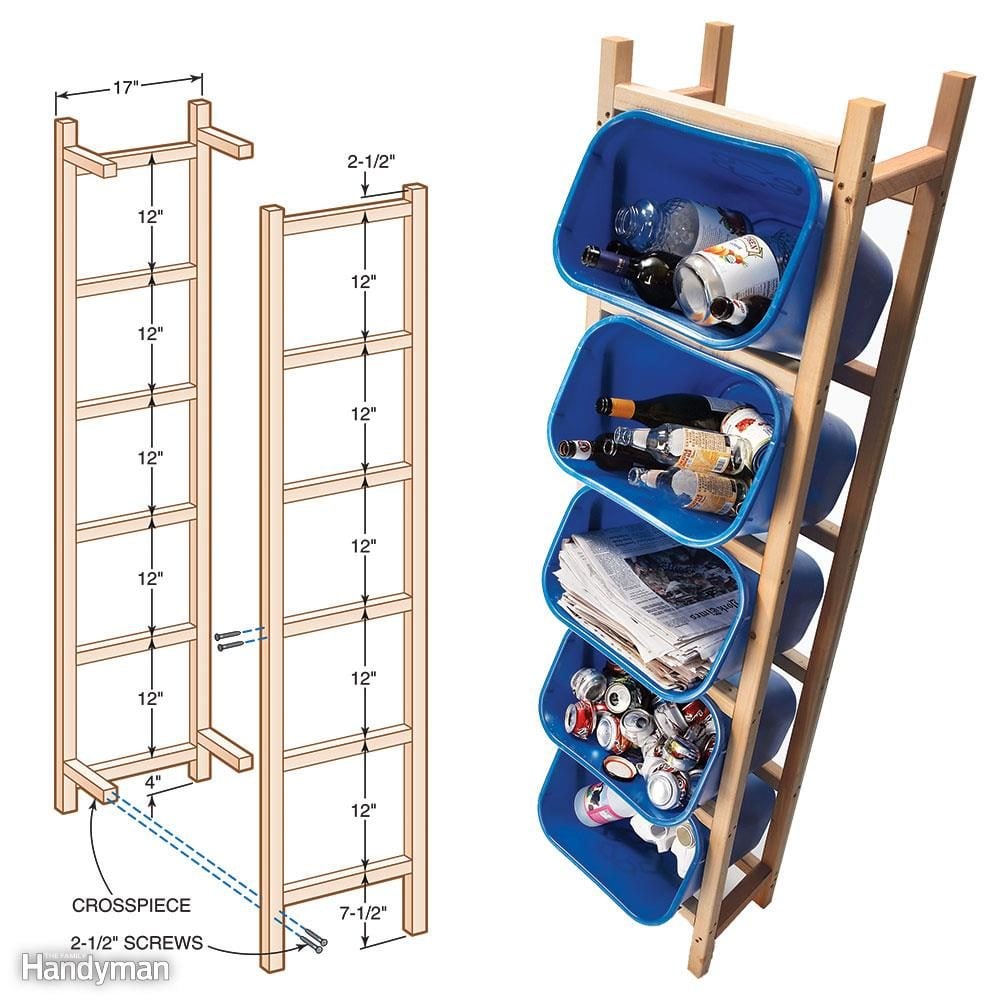
Stacked Recycling Tower

Stacked Recycling Tower

Five plastic containers, six 2x2s and screws, and one hour's work are all it takes to put together this space-saving recycling storage rack. Our frame fits containers that have a top that measures 14-1/2 in. x 10 in. and are 15 in. tall. Our containers were made by Rubbermaid.

If you use different-size containers, adjust the distance between the uprights so the 2x2s will catch the lip of the container. Then adjust the spacing of the horizontal rungs for a snug fit when the container is angled as shown.

Start by cutting the 2x2s to length according to the illustration. Then mark the position of the rungs on the uprights. Drill two 5/32-in. holes through the uprights at each crosspiece position. Drill from the outside to the inside and angle the holes inward slightly to prevent the screws from breaking out the side of the rungs.

Drive 2-1/2-in. screws through the uprights into the rungs. Assemble the front and back frames. Then connect them with the side crosspieces. Want even more space in the garage? Check out these DIY garage storage tips.
38 / 75
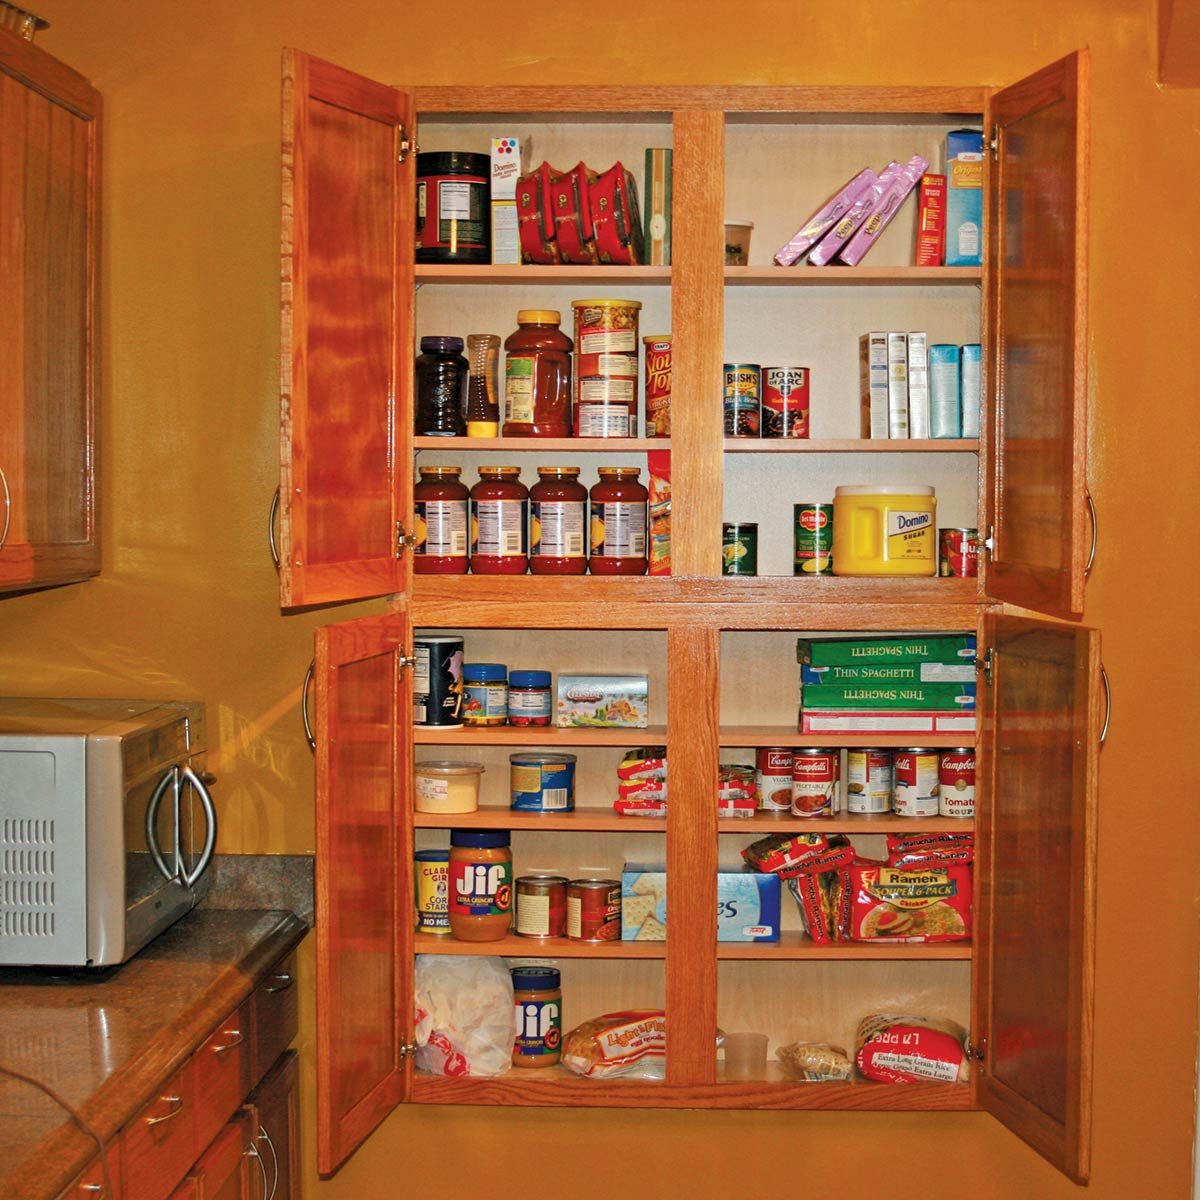
In-Wall Kitchen Cabinets
Photo: Courtesy of Vern Schleyer

In-Wall Kitchen Cabinets

Reader Vern Schleyer didn’t have enough room in his kitchen for more cabinets, so he built them into the wall.
39 / 75
Assemble a Sandwich Bag Parts Organizer
Family Handyman

Assemble a Sandwich Bag Parts Organizer

Keep screws, connectors, nails and other small parts in sight and handy with this resealable bag holder. You can build it out of a 3/4-in. thick scrap of plywood. Start by cutting two pieces of plywood as shown. Draw lines one inch apart across the shorter piece with a square, stopping one inch from the edge. Now cut along the lines with a jigsaw. Screw the two pieces of plywood together and screw the unit to the wall. Fill resealable bags and slip them into the slots.
40 / 75
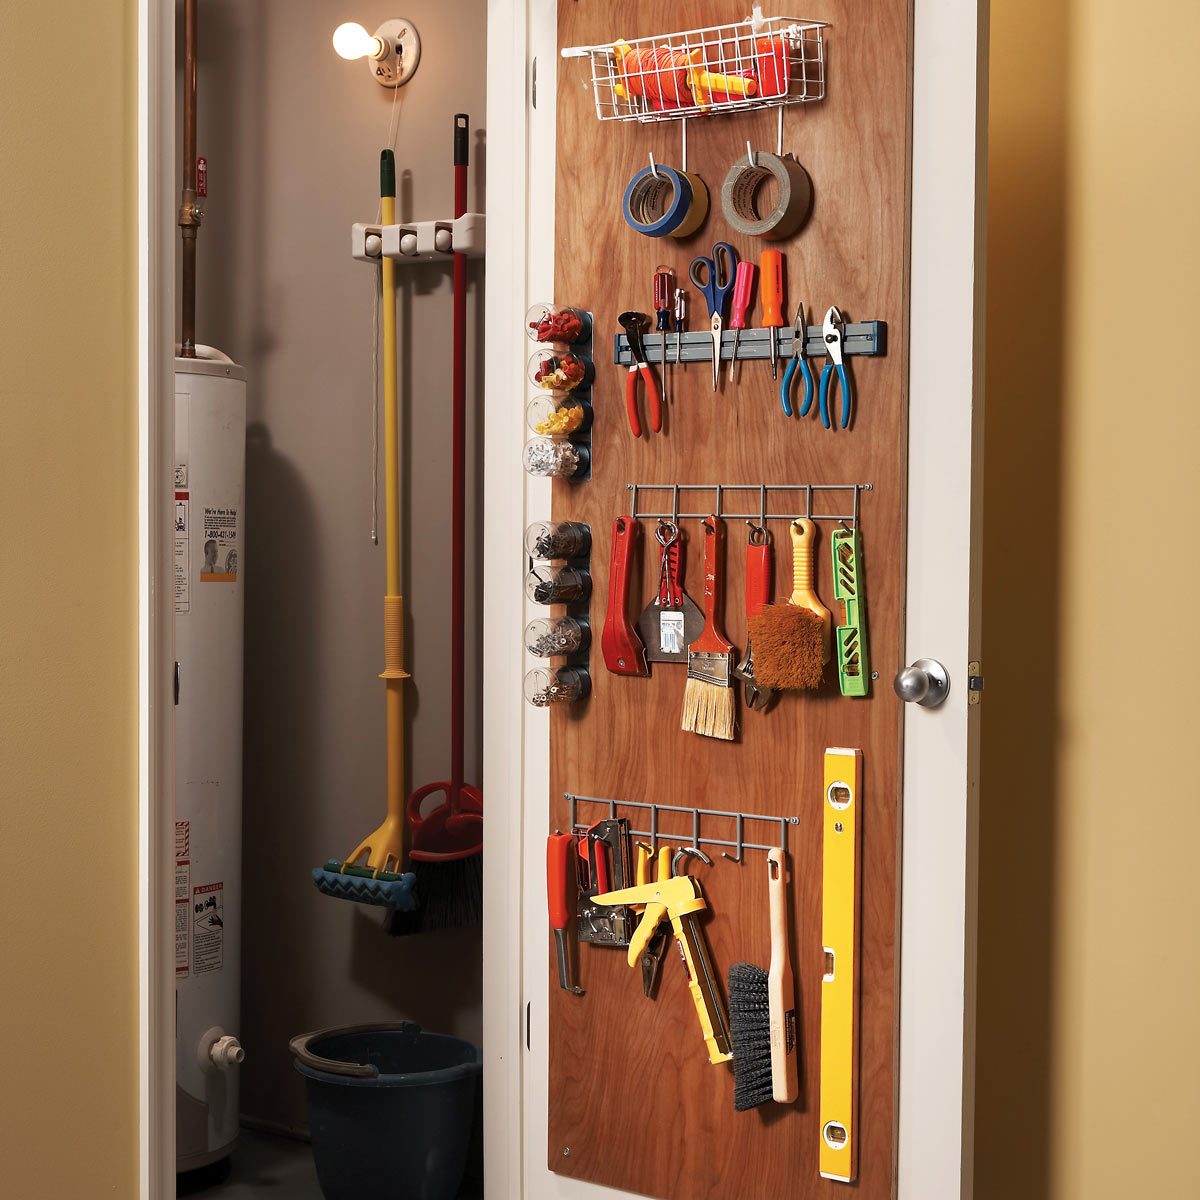
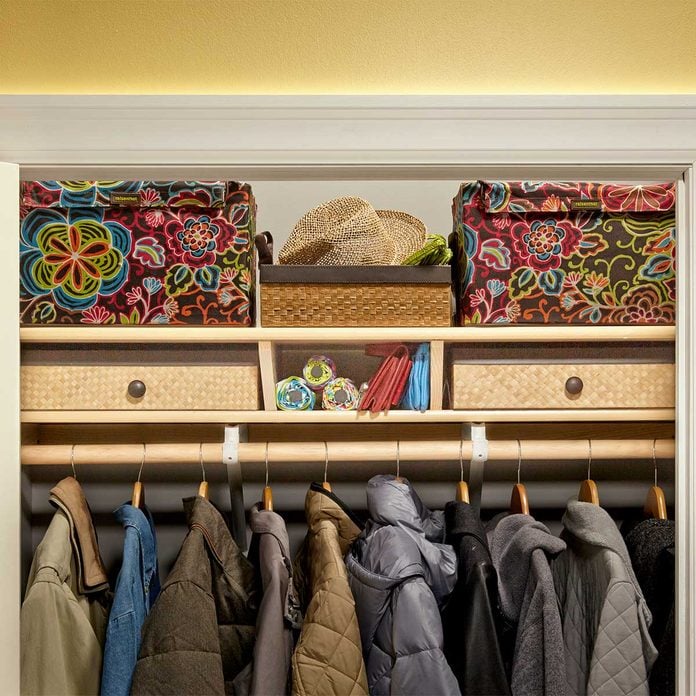
Two-Story Closet Shelves

Two-Story Closet Shelves

There's a lot of space above the shelf in most closets. Even though it's a little hard to reach, it's a great place to store seldom-used items. Make use of this wasted space by adding a second shelf above the existing one. Buy enough closet shelving material to match the length of the existing shelf plus enough for two end supports and middle supports over each bracket. Twelve-inch-wide shelving is available in various lengths and finishes at home centers and lumberyards. We cut the supports 16 in. long, but you can place the second shelf at whatever height you like. Screw the end supports to the walls at each end. Use drywall anchors if you can't hit a stud. Then mark the position of the middle supports onto the top and bottom shelves with a square and drill 5/32-in. clearance holes through the shelves. Drive 1-5/8-in. screws through the shelf into the supports. You can apply this same concept to garage storage. See how to build double-decker garage storage shelves here.
41 / 75
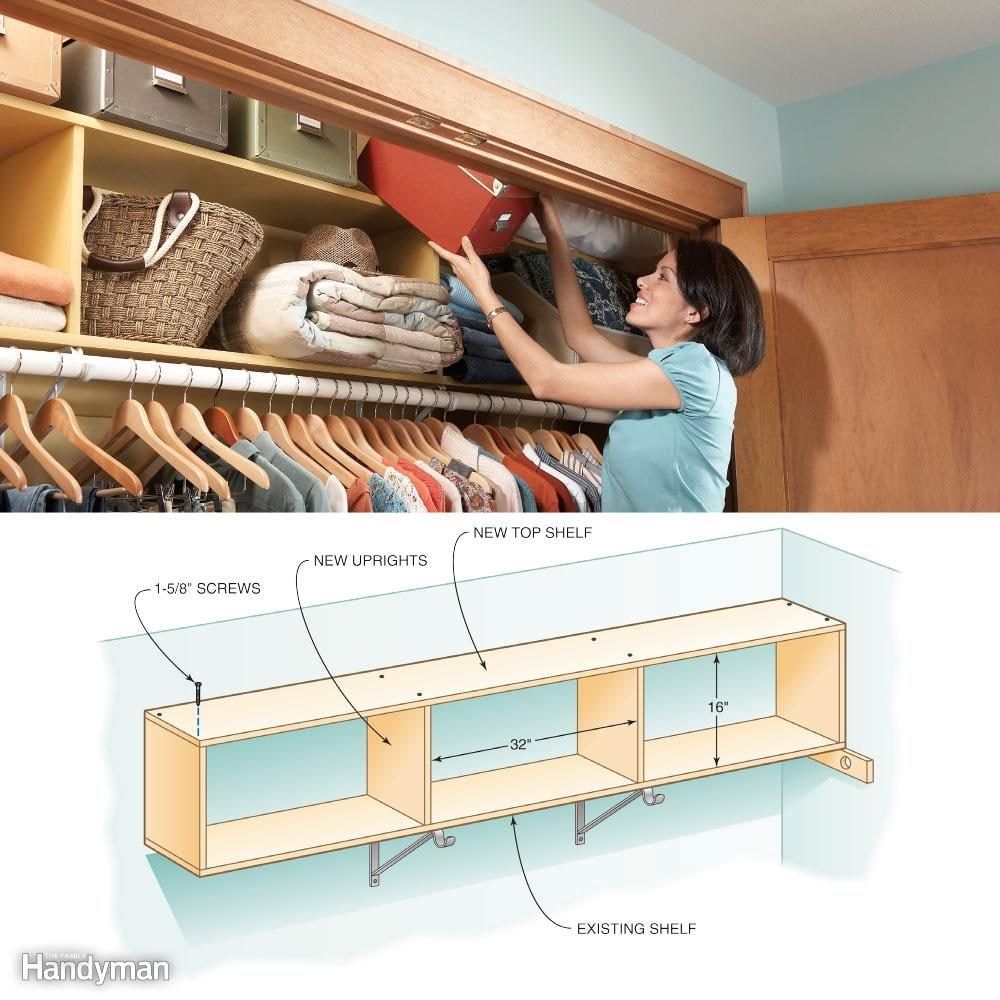
Back-of-Door Organizer
Family Handyman

Back-of-Door Organizer

The back of a door that opens into a utility room or closet makes a handy hanging space. The trouble is that most doors don't offer a good mounting surface for hardware. The solution is to screw a piece of 3/4-in. plywood to the back of the door. Add construction adhesive for hollow-core doors. Cut the plywood 3 or 4 in. shy of the door edges to avoid conflicts with the doorknob or hinges. Now you can mount as many hooks, magnets and other storage gizmos as you like. Want more behind the door storage? Check out these inside-cabinet door storage ideas.
42 / 75
Clothes storage ideas for small spaces: Double-decker closet rod
Clothes storage ideas for small spaces: Double-decker closet rod

All you need to gain a lot of hanging space in your closet is two metal closet brackets and a length of closet rod. If your existing closet rod is at least 66 in. from the floor, there's enough space to add a second rod below it and still hang shirts and slacks. We placed the top of the rod 35 in. from the floor, which allowed just enough room to hang two levels of pants. Locate studs on the back wall of the closet with a stud finder. Then attach metal brackets to the studs. Use a level to align the brackets along the top. Space the brackets no more than 32 in. apart. Need even more storage? Check out these easy ways to expand your closet space.
43 / 75
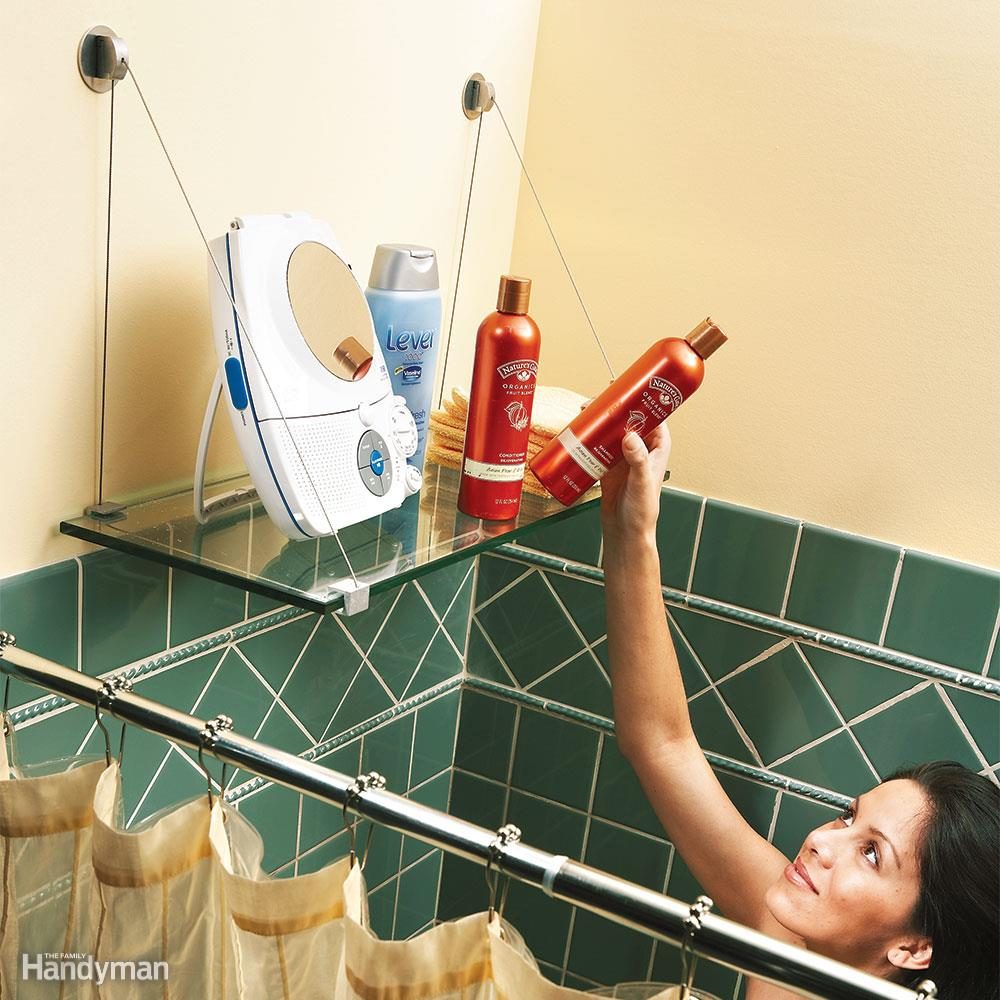
Glass Shower Shelf

Glass Shower Shelf

Tired of the clutter of shampoo and conditioner bottles along the rim of your tub? This tempered safety glass shelf on a cable shelf bracket is an easy solution. The cable shelf bracket requires only two screws for support. If studs aren't located in the right positions, use toggle bolts to anchor the shelf brackets. The glass hangs on the cables. The cable shelf brackets (No. CSB5B) are available online from expodesigninc.com. Order a tempered glass shelf from a local glass company. We installed a 3/8-in.-thick, 12-in.-deep shelf. Want to add some more flair to your bathroom? Learn how to frame your mirror with glass tile here.
44 / 75
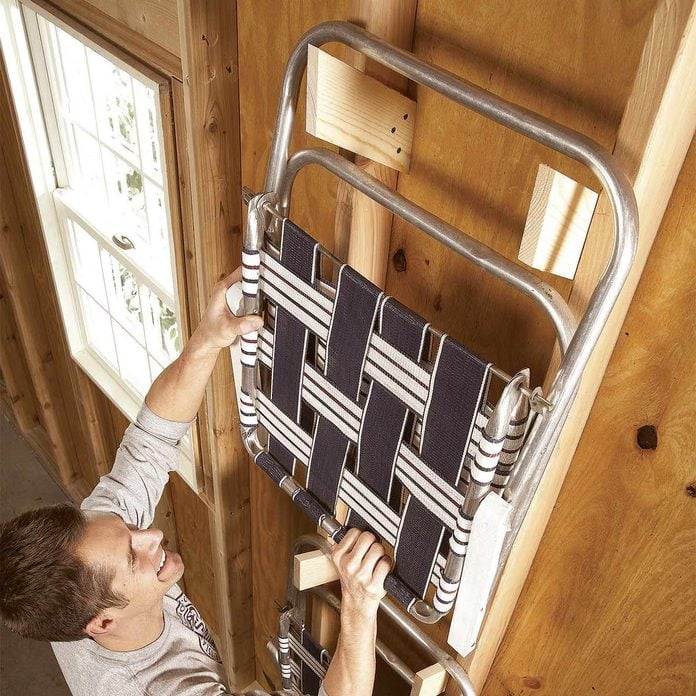
garage storage brackets

Scrap Wood Brackets

Here’s how to store your lawn and folding chairs so they’re out of your way. Take two pieces of 1×4 lumber (any scrap lumber will do) and create some simple, cheap and useful brackets on the wall. Cut each board 7-3/4 in. long with a 30-degree angle on both ends. Fasten pairs of these brackets with three 2-in. screws to the side of the exposed wall studs, directly across from each other, and you’ve got a perfect place to hang your chairs. You also need to check out these 38 handy hints under $5.
45 / 75
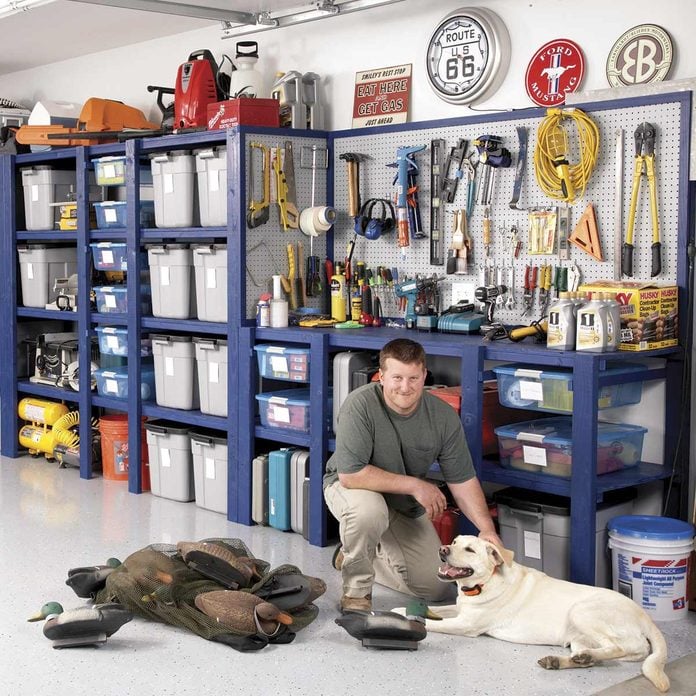
blue garage storage shelves

Easy-on-the-Wallet Shelves

These simple DIY garage shelves can be built in less than a day for less than $300. Here’s how.
46 / 75
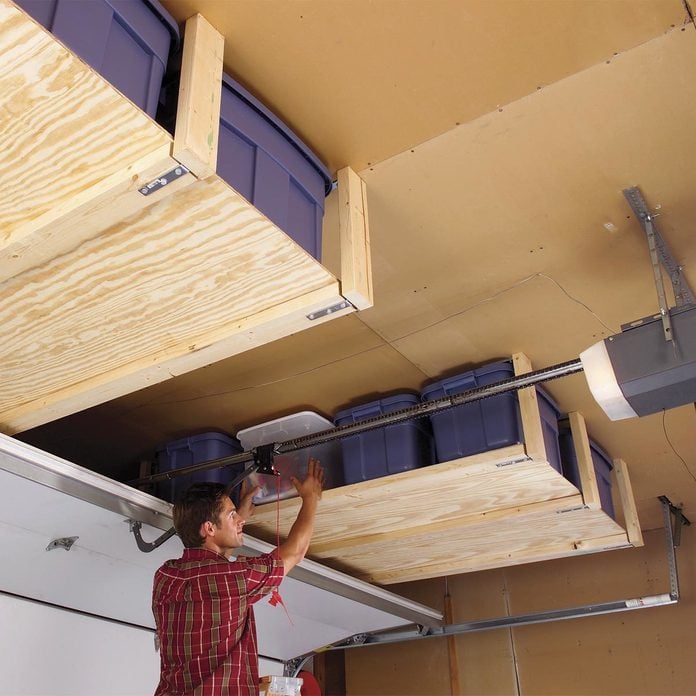
plywood garage ceiling shelves

Plywood Ceiling Shelves

Tuck medium and lightweight stuff onto shelves suspended from the ceiling. The shelves are designed to fit into that unused space above the garage doors (you need 16 in. of clearance to fit a shelf and standard 12-1/2 in. high plastic bins). However, you can adjust the shelf height and put them anywhere. The only limitation is weight. We designed this 4 x 6-ft. shelf to hold about 160 lbs., a load that typical ceiling framing can safely support. Click here for the full plans.
47 / 75
Yard Tool Organizer
Family Handyman

Yard Tool Organizer

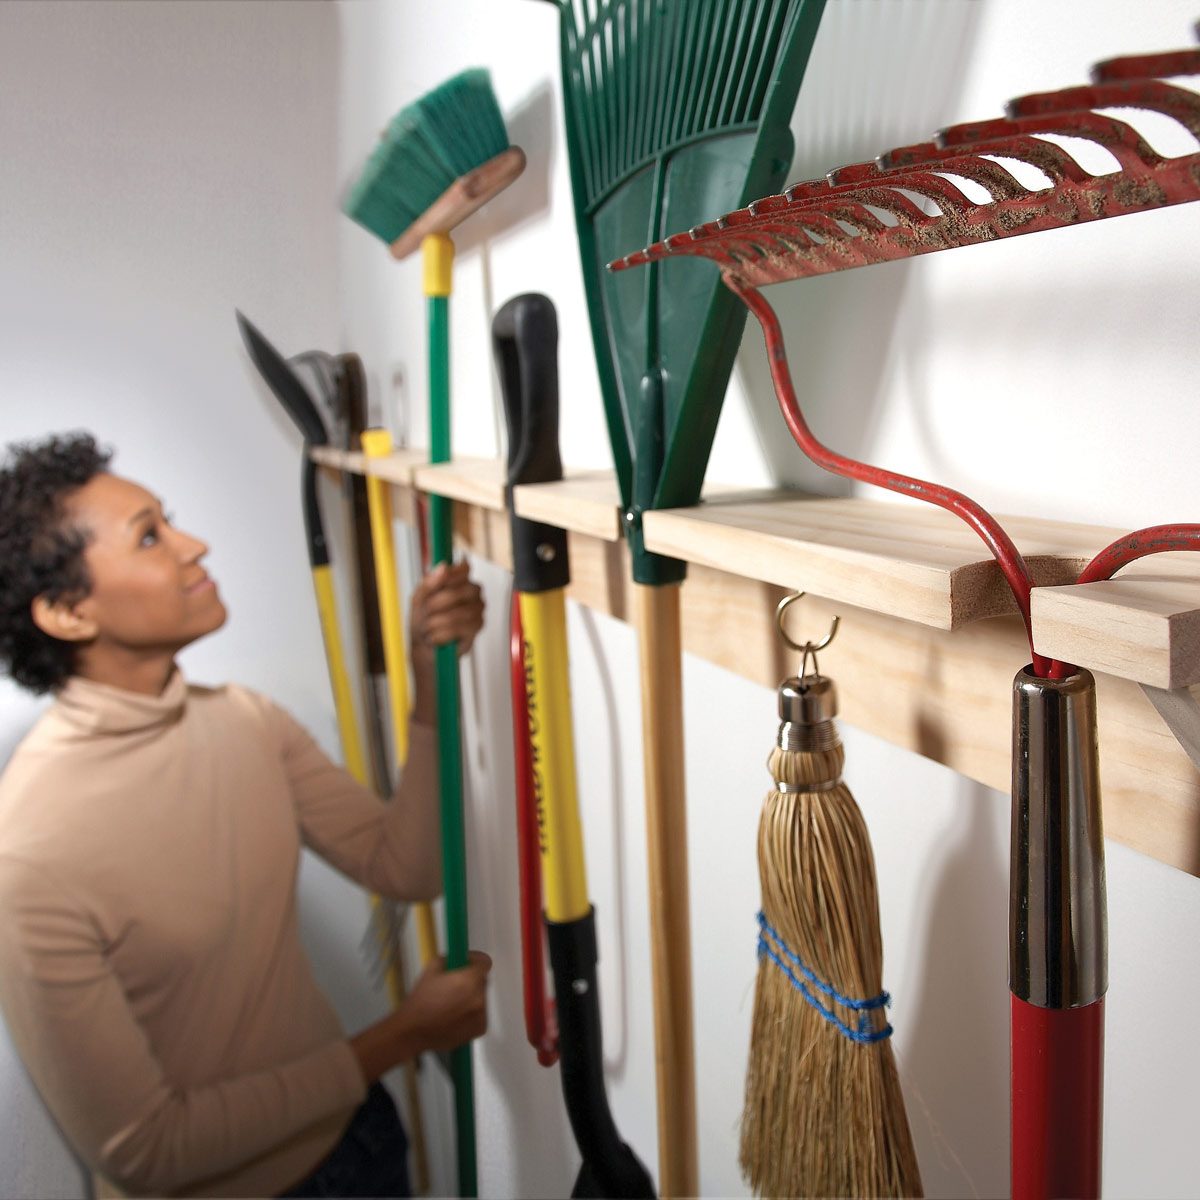
Create a simple long-handled tool hanger out of two 1x4s. On the first one, drill a series of 2-in. holes along the edge of the board. The trick is to center each hole about 1 in. from the edge. That leaves a 1-1/2-in. slot in the front that you can slip the handles through. Space the holes to accommodate whatever it is you're hanging. Screw that board to another 1x4 for the back and add 45-degree brackets to keep it from sagging. If you wish, pound nails into the vertical board to hang even more stuff. No more tripping over yard tools!
48 / 75
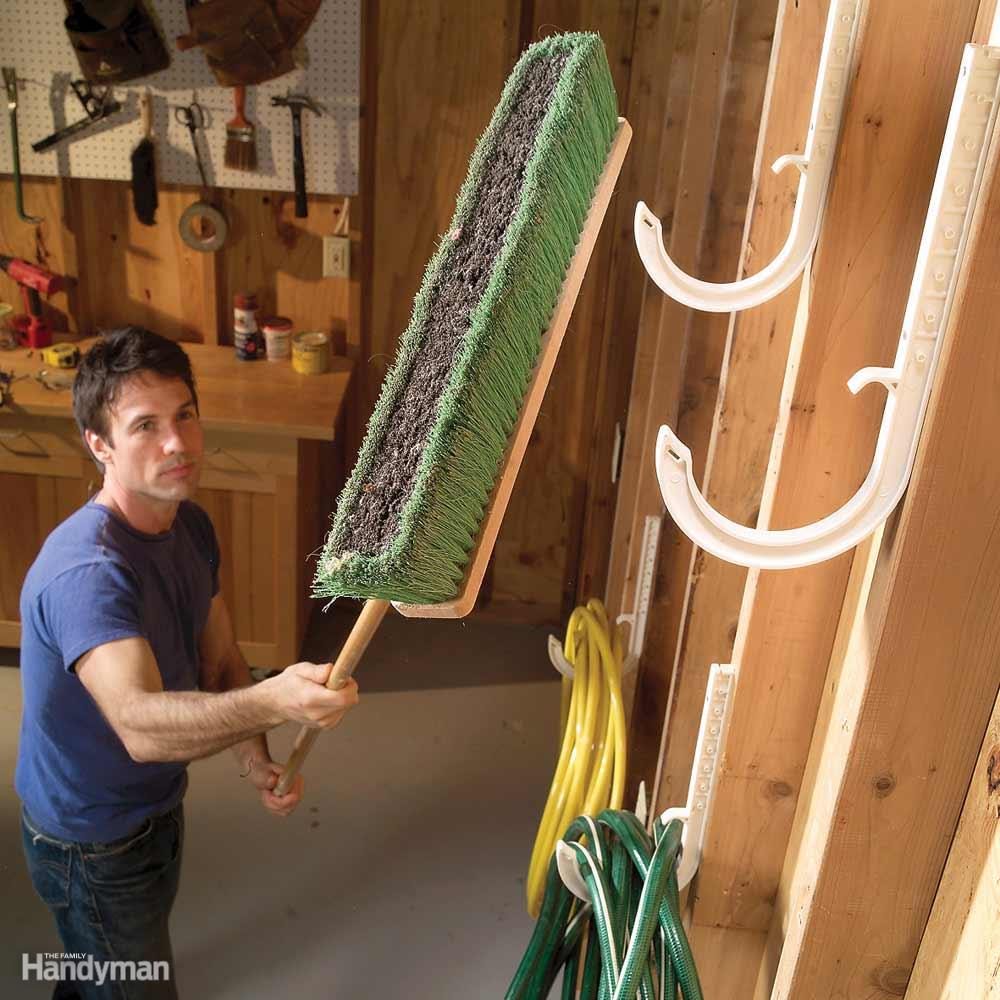
Hang-it-All Hooks

Hang-it-All Hooks

Those plastic hooks that plumbers use to support pipes make convenient hangers for just about anything. They're strong, cheap and come in a range of sizes. Find them in the plumbing aisle at home centers and hardware stores for a cheap storage idea.
49 / 75
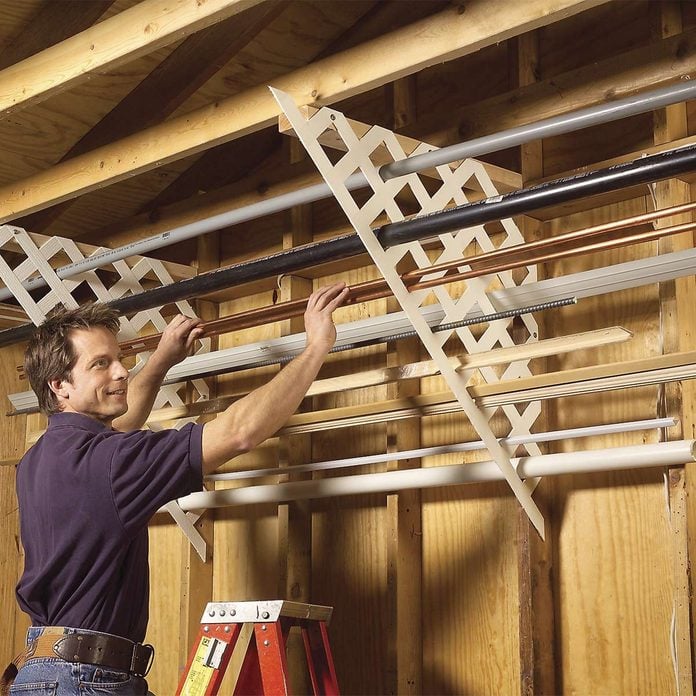
lattice garage rack
Family Handyman

Lattice Rack

Plastic lattice works well for storing long lengths of miscellaneous pipe, trim, flash-ing and conduit. Just cut matching pieces, then screw 2×4 cleats to the ceiling and screw the lattice to the wall studs and cleats. Now you can quickly find those oddball leftovers instead of going to the hardware store and buying yet another piece. Don’t forget the garage floor. Here are a few upgrade options.
50 / 75
Wheelbarrow Rack
Family Handyman

Wheelbarrow Rack

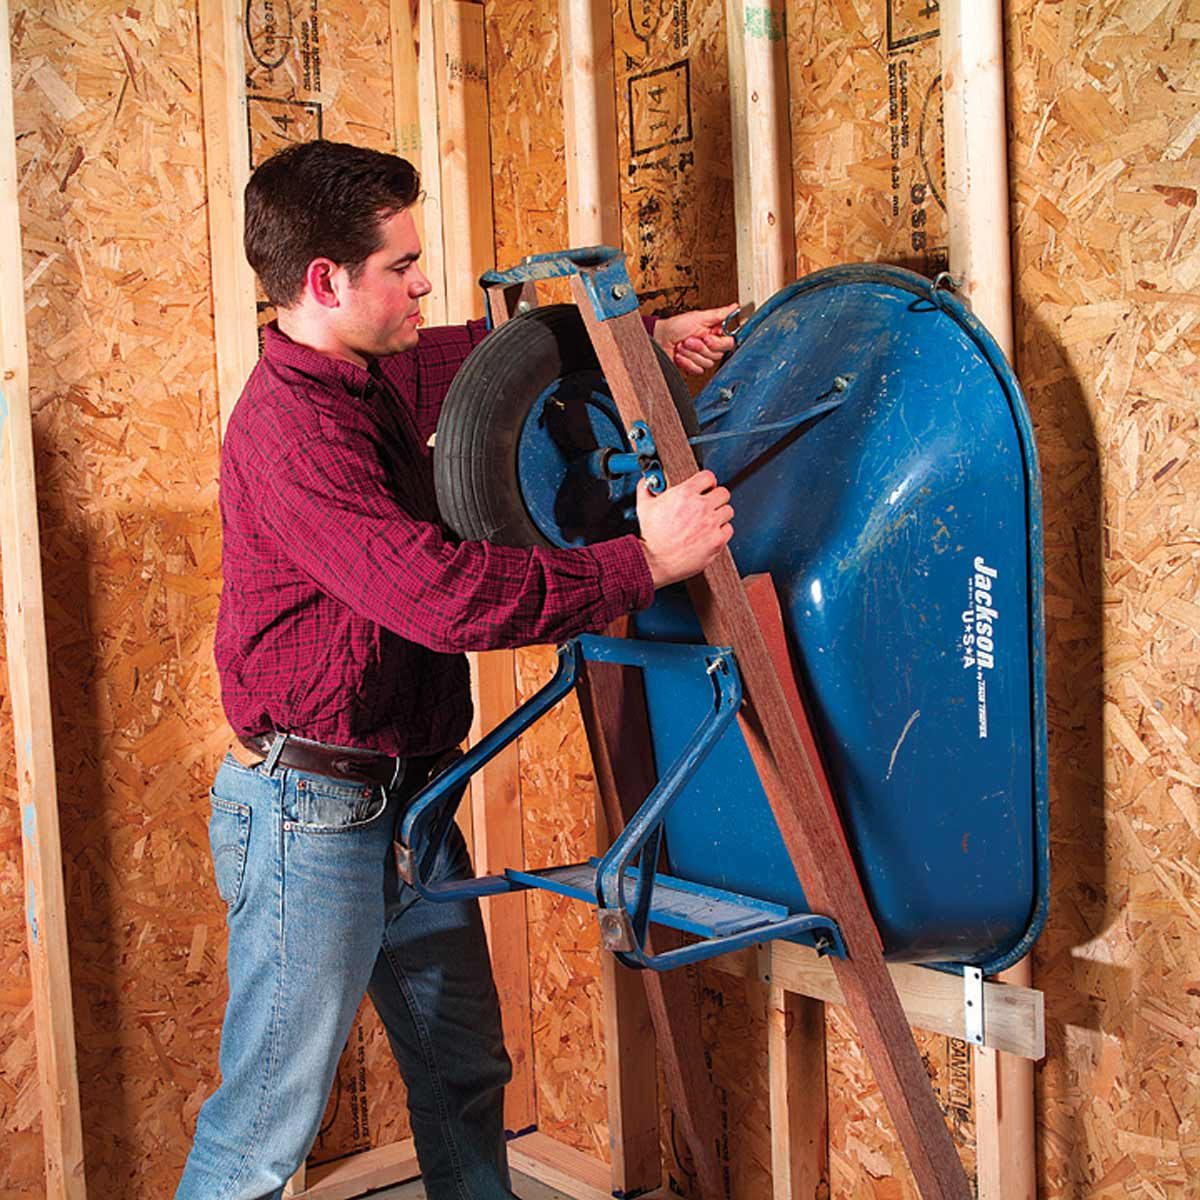
Hang your wheelbarrow on the garage wall to free up floor space. Center a 2-ft. 1x4 across two studs, 2 ft. above the floor. Tack it into place, then drive 3-in. screws through metal mending plates and the 1x4, into the studs. Leave about 3/4 in. of the plate sticking above the 1x4 to catch the rim. Rest the wheelbarrow on the 1x4 as shown, and mark the studs 1 in. above the wheelbarrow bucket. Drill pilot holes and screw ceiling hooks into the studs. Twist the hooks so they catch on the wheelbarrow lip and hold it in place.
51 / 75
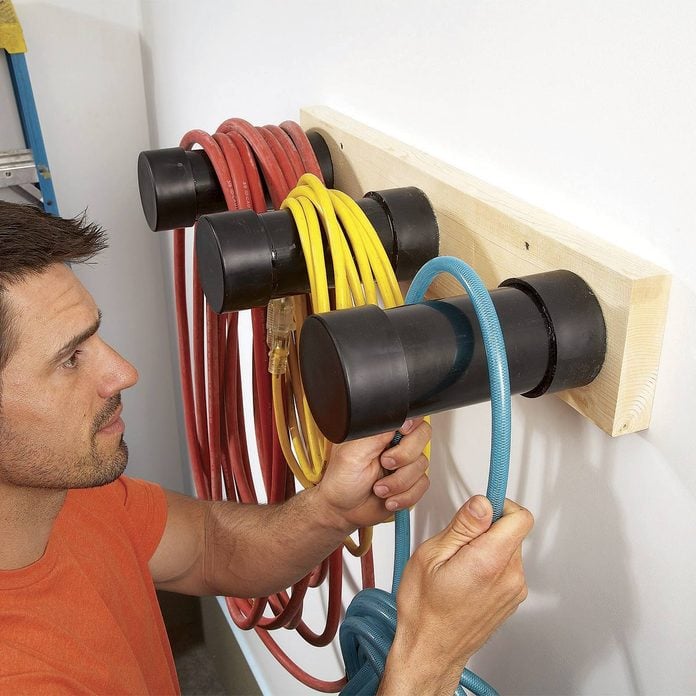
cord and hose hooks
Family Handyman

Cord and Hose Hooks

Hanging electrical cords and hoses on thin hooks or nails can cause kinks and damage the sheathing and wires. Use pieces of 3-in. ABS plastic plumbing pipe to make simple, inexpensive hangers. Screw 3-in. end caps to a 2×6 with two 1-5/8-in. screws. Fender washers under the screw heads keep them from pulling through the plastic. Then cement on 8-in. lengths of end-capped pipe. These “hooks” are very strong! Plus: Make your own hideaway for your garden hose with these plans.
52 / 75
FH09SEP_501_51_078 garage wall of storage
Family Handyman

Shipshape Storage Wall

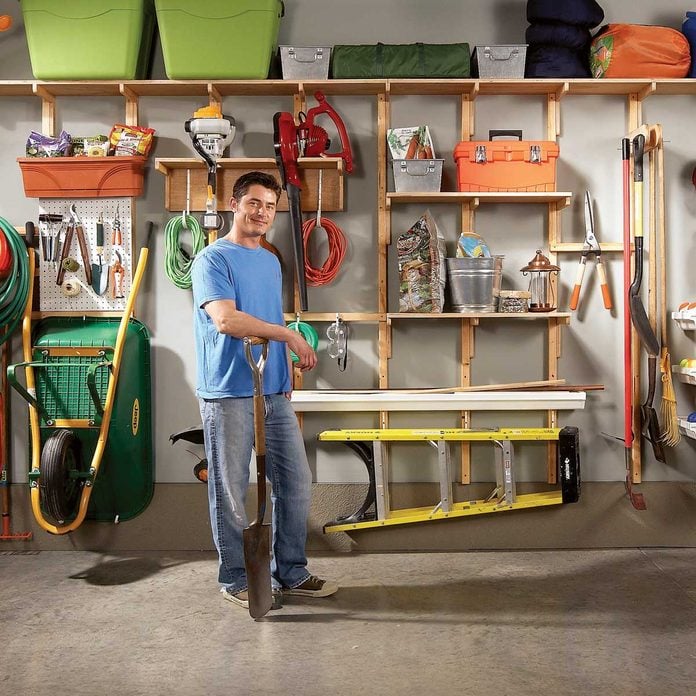
For just a few hundred dollars you can re-create this storage system yourself in one weekend. This project covers about 16 ft. of wall space and offers a multitude of ways to organize your garage.
53 / 75
corner garage storage

Rotating Corner Shelves

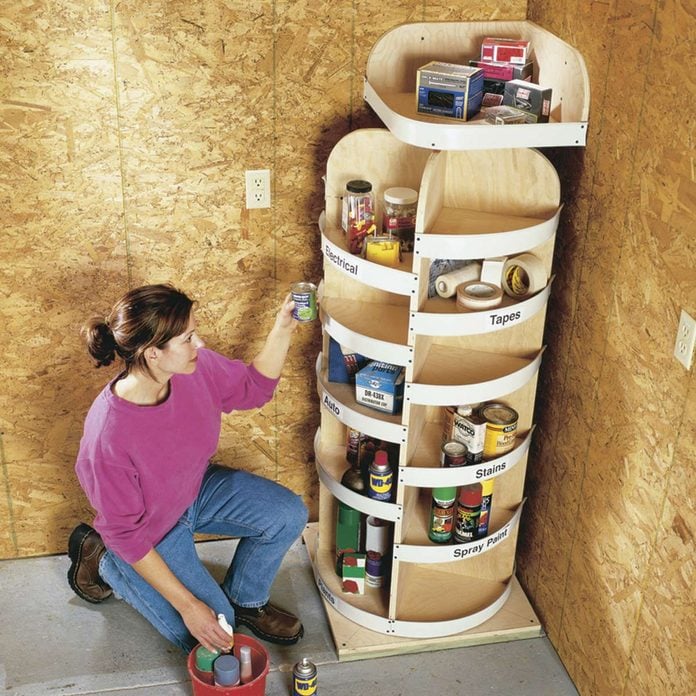
These shelves put a garage corner to maximum storage use. They spin on two lazy Susans, one on the bottom and one at the top (under the top shelf). They can’t tip because the top shelf is screwed to the wall. Get the step-by-step instructions here.
54 / 75
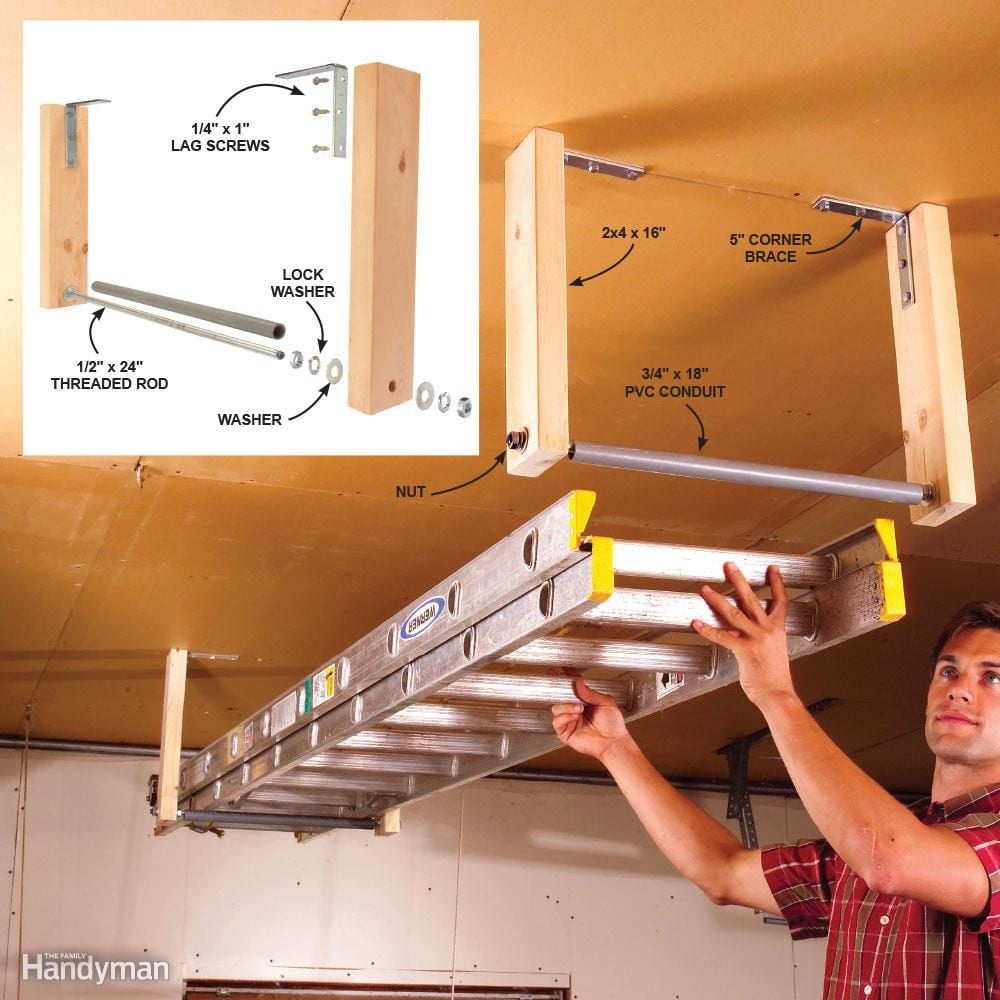
Keep Ladders Out of the Way

Keep Ladders Out of the Way

Hang ladders from the ceiling so they don't hog prime storage space. The rollers on this carriage let you easily slide in one end of the ladder, then the other. The materials are all inexpensive. Fasten the corner braces to ceiling joists with two-inch lag screws. Secure the ladder with an elastic cord so it can't roll out and fall.
55 / 75
56 / 75
garage shelf
Family Handyman

Double-Duty Shelf

Floor space in most garages is hard to come by—so the best place to find storage space for garage shelves is overhead. You can make your own DIY shelves for the garage easily—go double-decker for twice the storage capacity. Here’s the step-by-step to make this shelf yourself. Plus: Check out these 51 other brilliant tips for organizing your garage.
57 / 75
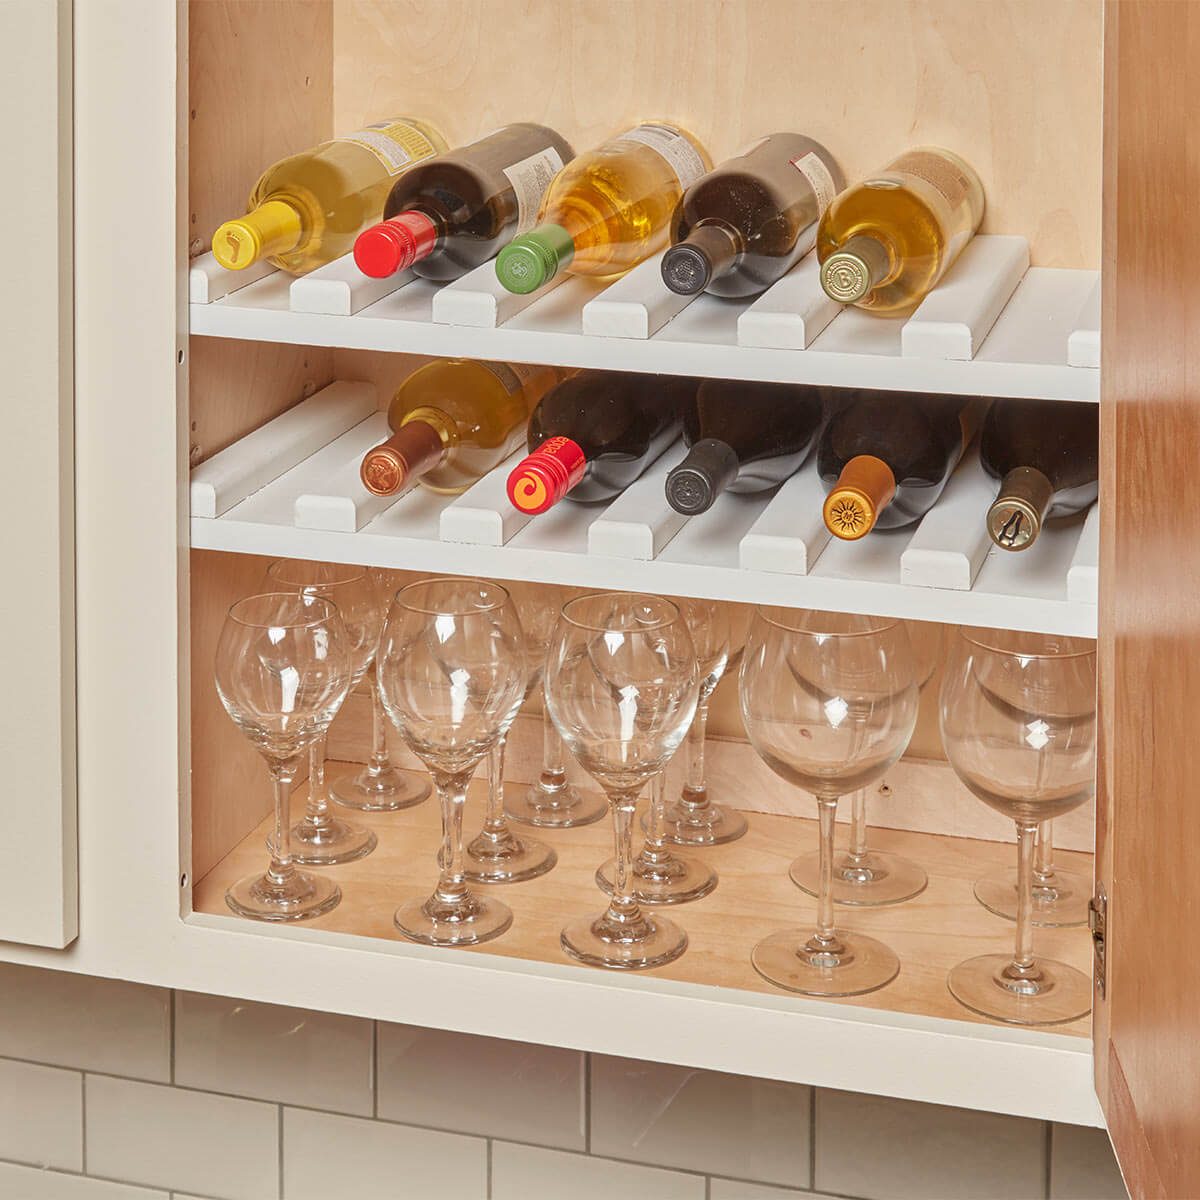
Easy-to-Make Wine Rack Cabinet

Easy-to-Make Wine Rack Cabinet

I never have enough space for wine storage, so I made this wine rack cabinet using pantry shelves and 1x2s. I used a router to round over the top edges of 1x2s, cut them so they're a few inches shorter than the shelf depth; then spaced them about 2 in. apart. Then I screwed them to the shelf. I adjusted the shelf spacing so there’s about 5 in. of clearance for the bottles. – reader Robert Lackey
58 / 75
Easy Drawer Organizer

Easy DIY Drawer Organizer

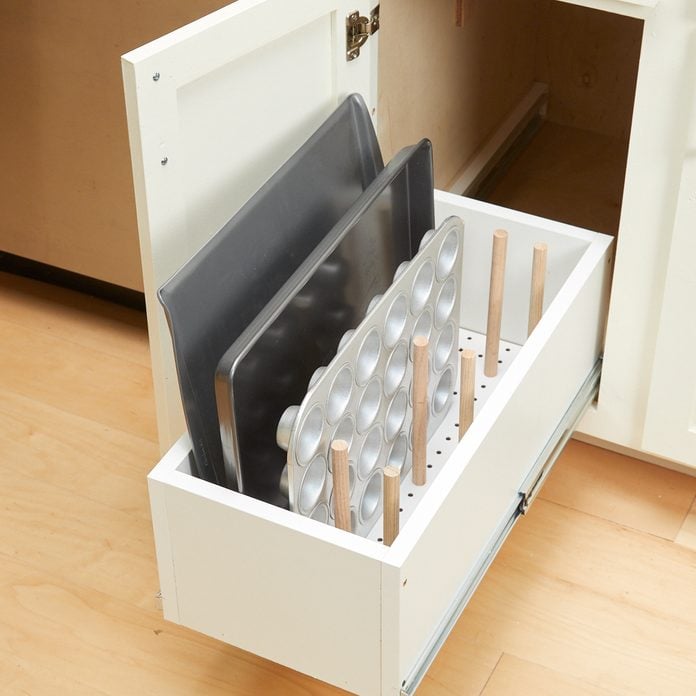
My kitchen drawers used to be an absolute wreck; pans and dishes crammed in however they’d fit. And nearly every time I needed something, it was always at the bottom of the drawer. My solution was to cut a piece of 1/8-in. pegboard to the size of the drawer bottom and attach dowels using screws from underneath. Now my pans are organized and easy to access. The 10 minutes it took to build was easily made up for with how much frustration it has saved me. — reader Tom Smith
59 / 75
60 / 75
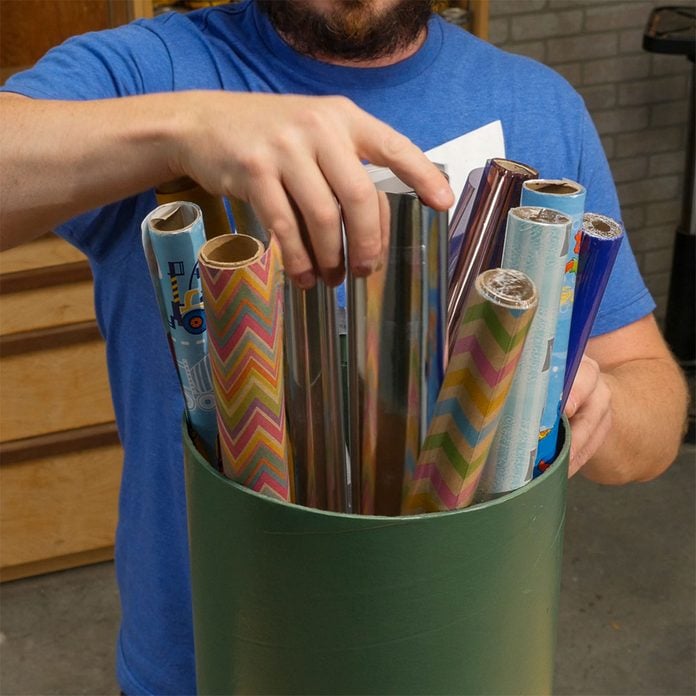
HH sonotube wrapping paper storage container

Concrete Form Wrapping Paper Storage

Using a 6-ft. cardboard cement form cut in half, I created two wrapping paper storage containers. I cut the cylinder in half and cut pieces of heavy cardboard for the base of each, attaching them with duct tape. Then I spray painted them to look presentable. — reader Peter Turner

Check out what another Christmas-related item you can stuff in a concrete form tube.
61 / 75
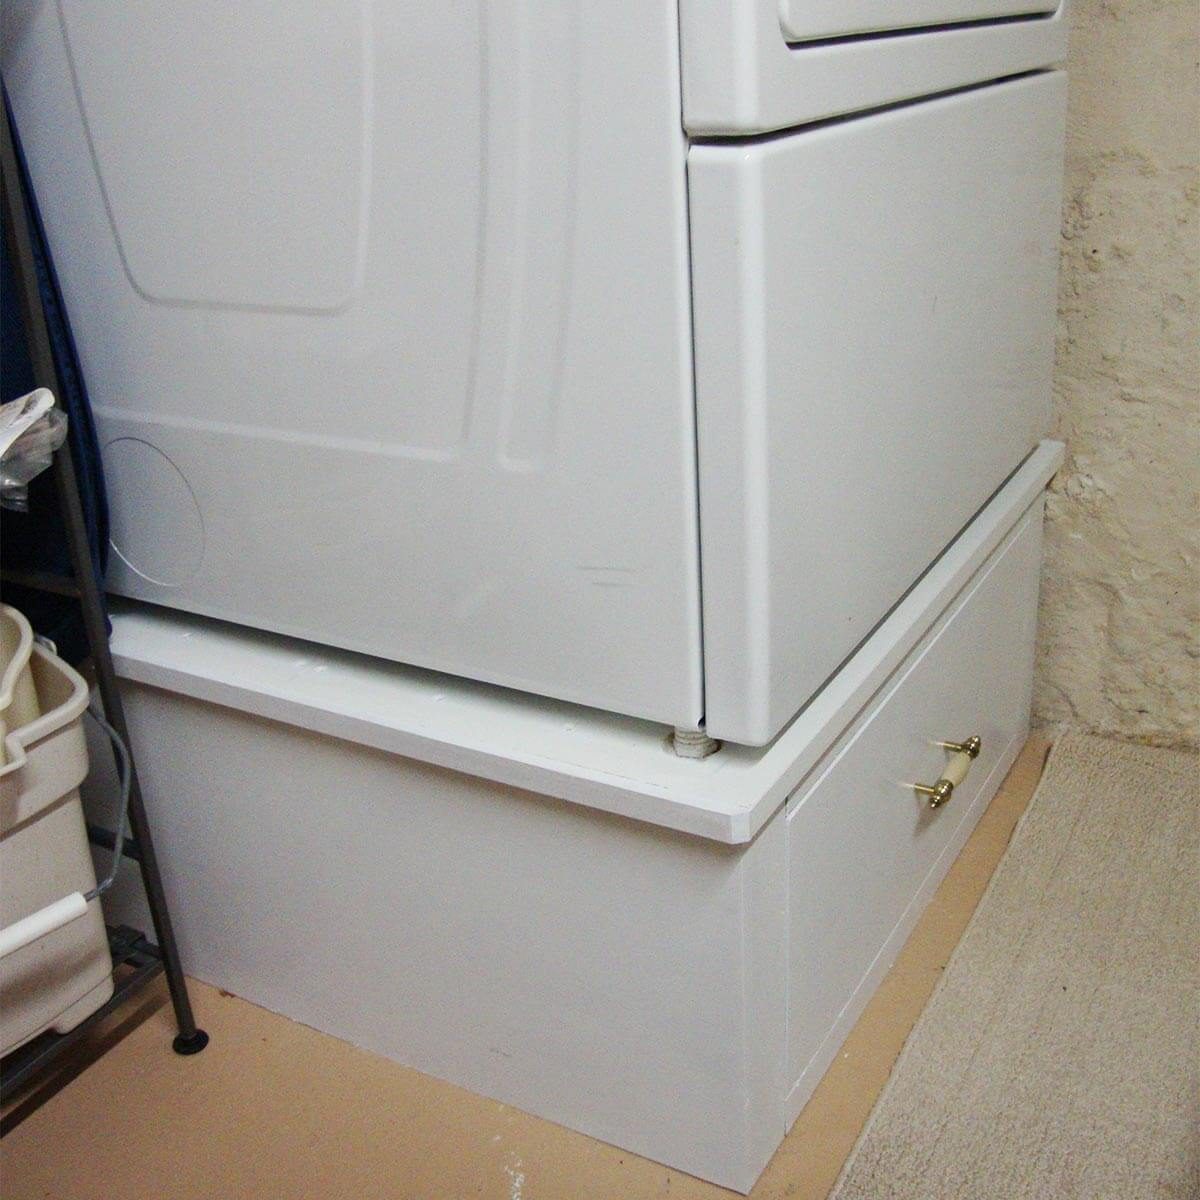
Dryer Pedestal

Dryer Pedestal

Reader Dave Conners’ wife asked for a dryer pedestal and that’s what she got—plus some extra storage space!
62 / 75
Paper Towel Cord Storage

Paper Towel Cord Storage

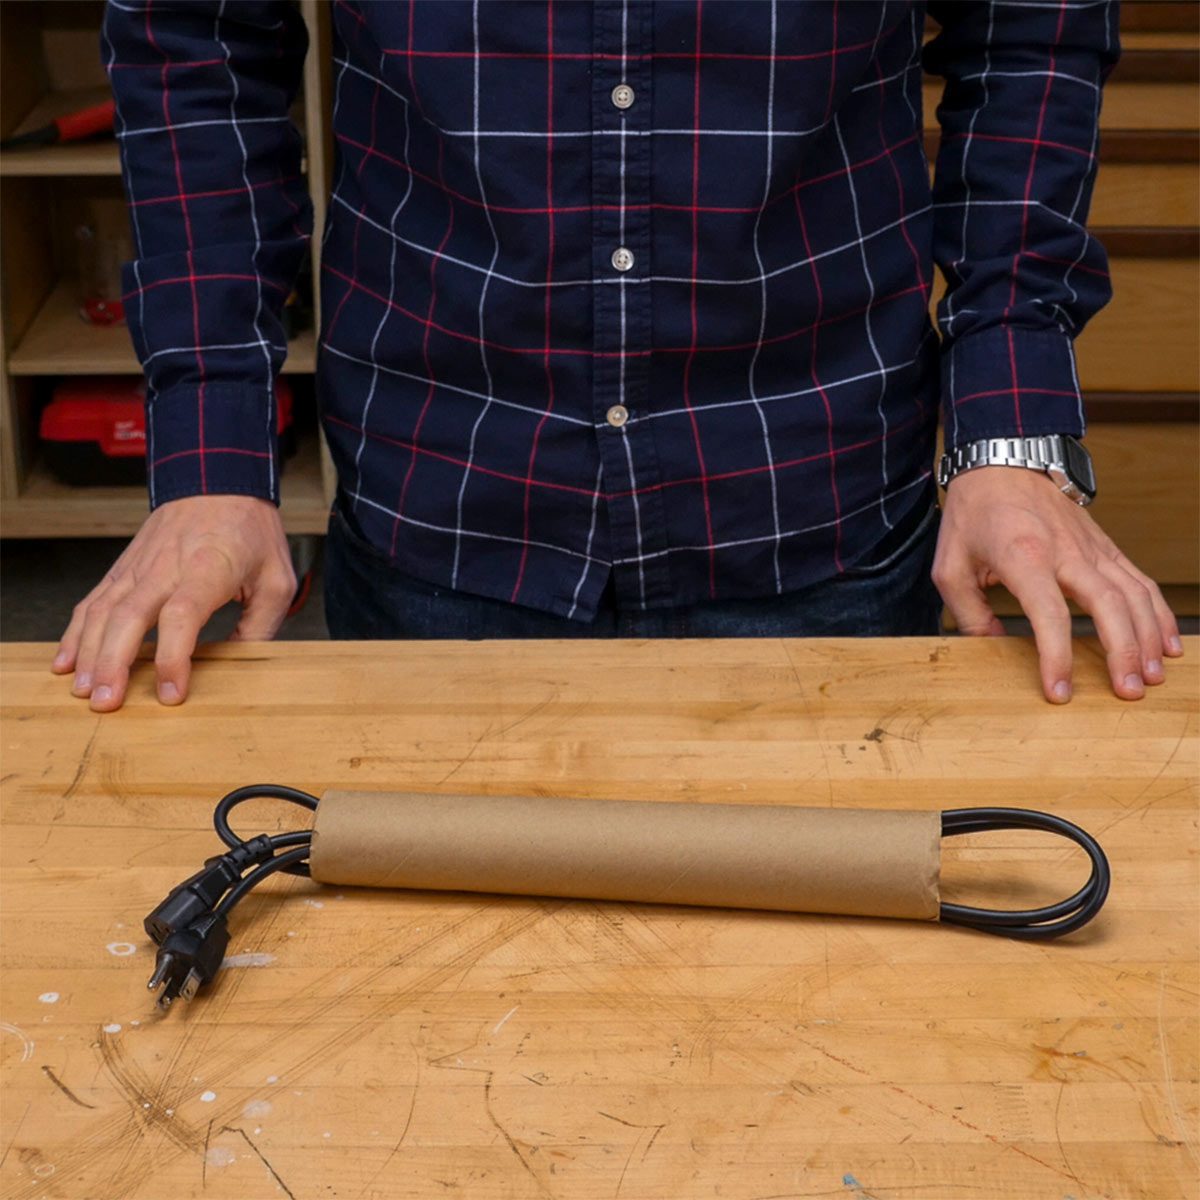
Give empty paper towel rolls new life as cord wranglers. Fold small extension cords neatly before slipping them into their own individual storage sleeve. You can even label the cords by writing on the cardboard. Be safe and learn How to Prevent Electrical Overloads!
63 / 75
Tension Rod Storage Hack

Tension Rod Storage Hack

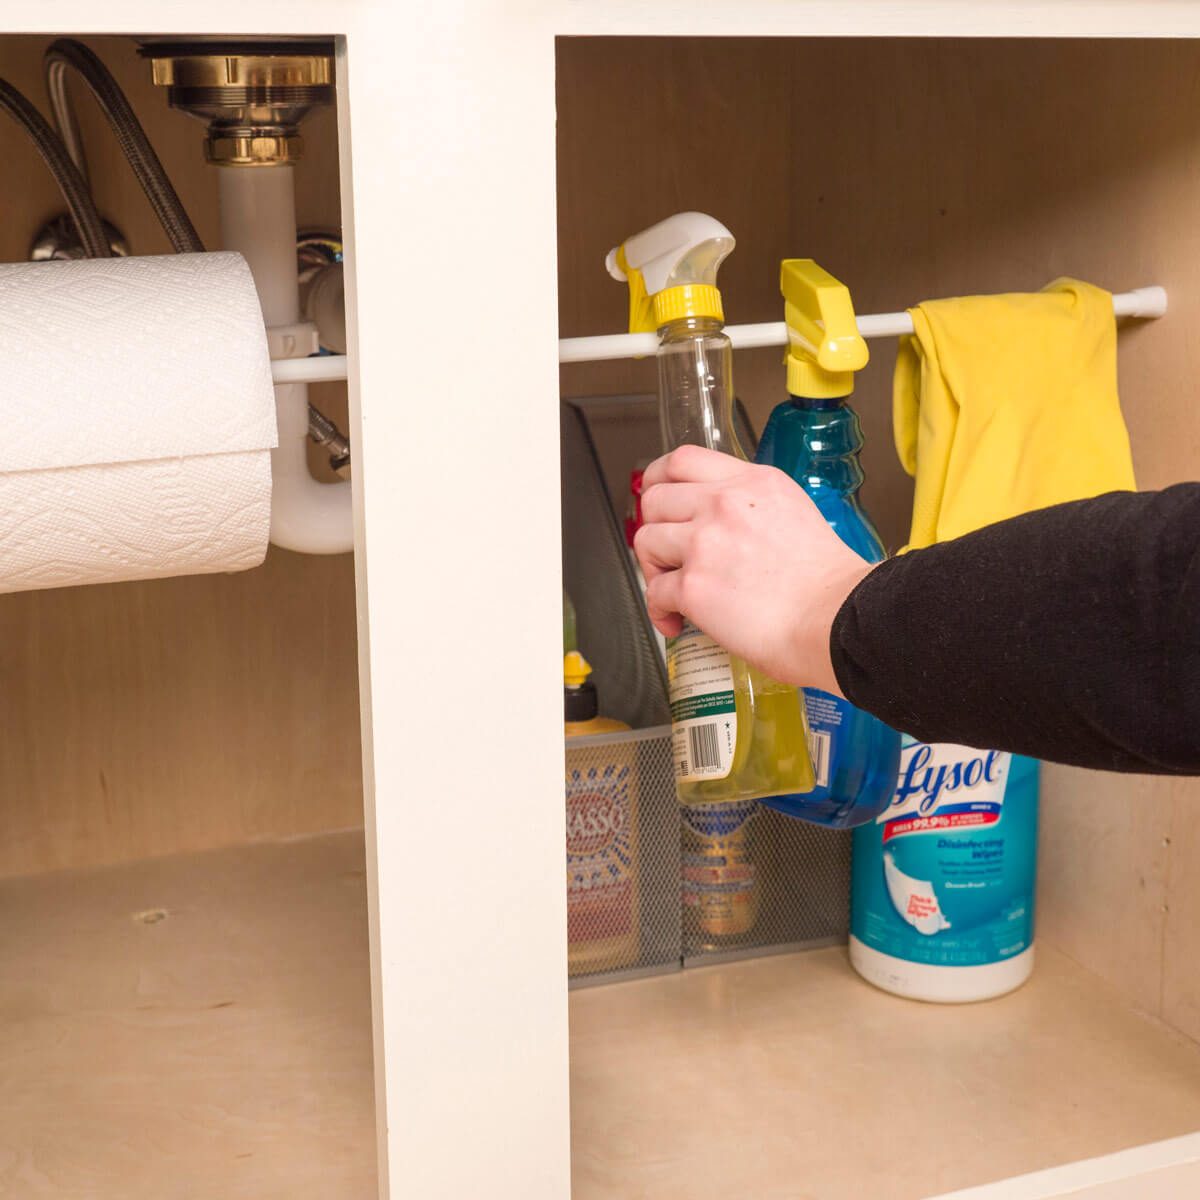
It can be difficult to keep spray bottles and other cleaning supplies from falling over and making a mess under your kitchen sink. Thankfully, we have plenty of cabinet organization tips and tricks. To keep your cleaning supplies upright, hang them from a short tension rod inside your cabinet. Another clever idea is to slide a paper towel roll through the tension rod for easy access. This tension rod organization hack is also a great place to hang dish-drying towels and rubber cleaning gloves.
64 / 75
Wine Box Shoe Storage
Family Handyman

Wine Box Shoe Storage

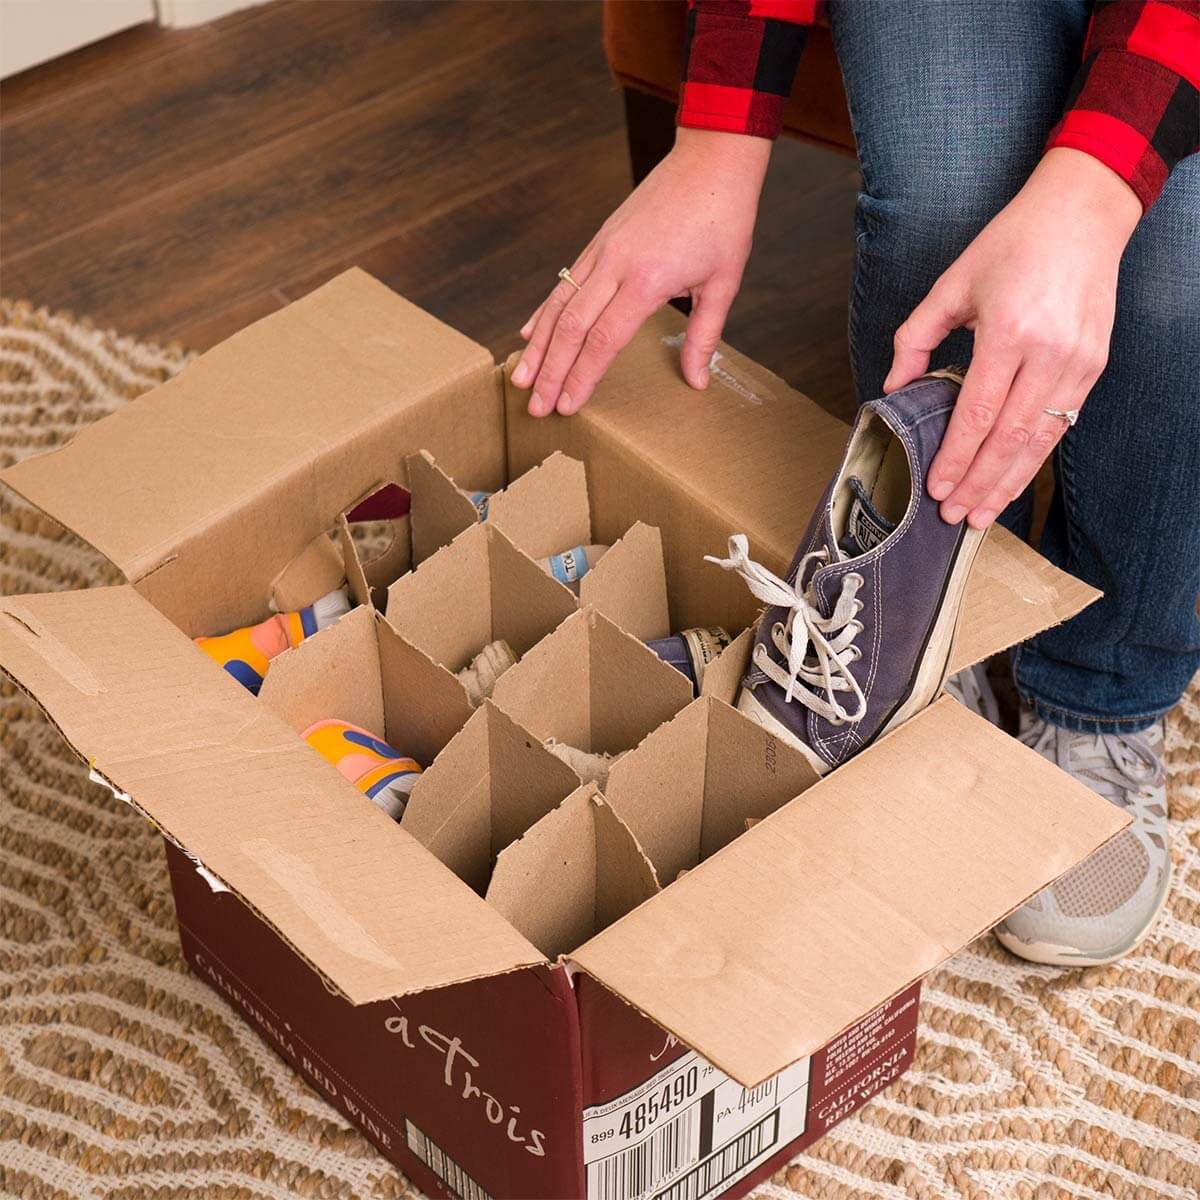
You can easily find a free shoe storage container at almost any store that sells wine. Originally designed to protect glass bottles, a wine box is perfect for organizing shoes as well because it comes with cardboard dividers already in place!
65 / 75
Skinny Workshop Cart

Skinny Workshop Cart

Talk about taking advantage of unused storage space! Reader John White constructed this skinny shop cart for storing his surplus sheet goods. It features an open frame on four small casters, and it fits perfectly in the open space behind the lower cabinets in his workshop. Excellent idea, John!
66 / 75
Bathroom Drawer Insert from the Kitchen
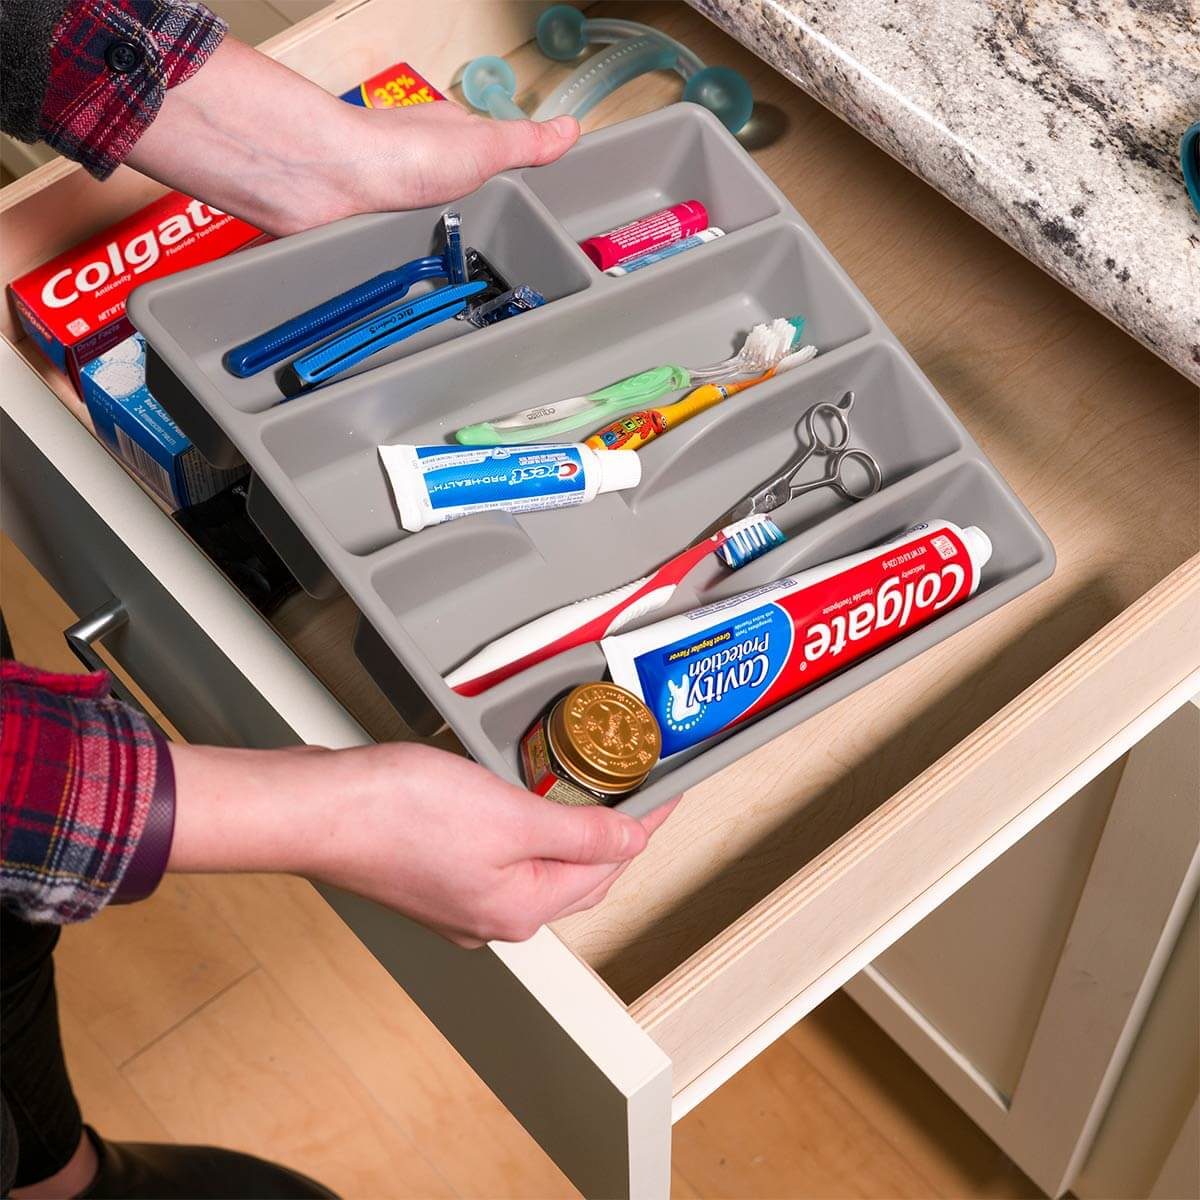
Bathroom Drawer Insert from the Kitchen

A silverware drawer insert works just as well in the bathroom for organizing toothbrushes, tubes of toothpaste, razors, clippers, lip balm and more. The various sizes of compartments keep items looking neat and easy to find. In a small bathroom, every square inch counts. Use these clever tips to wring extra bathroom storage from unexpected places.
67 / 75
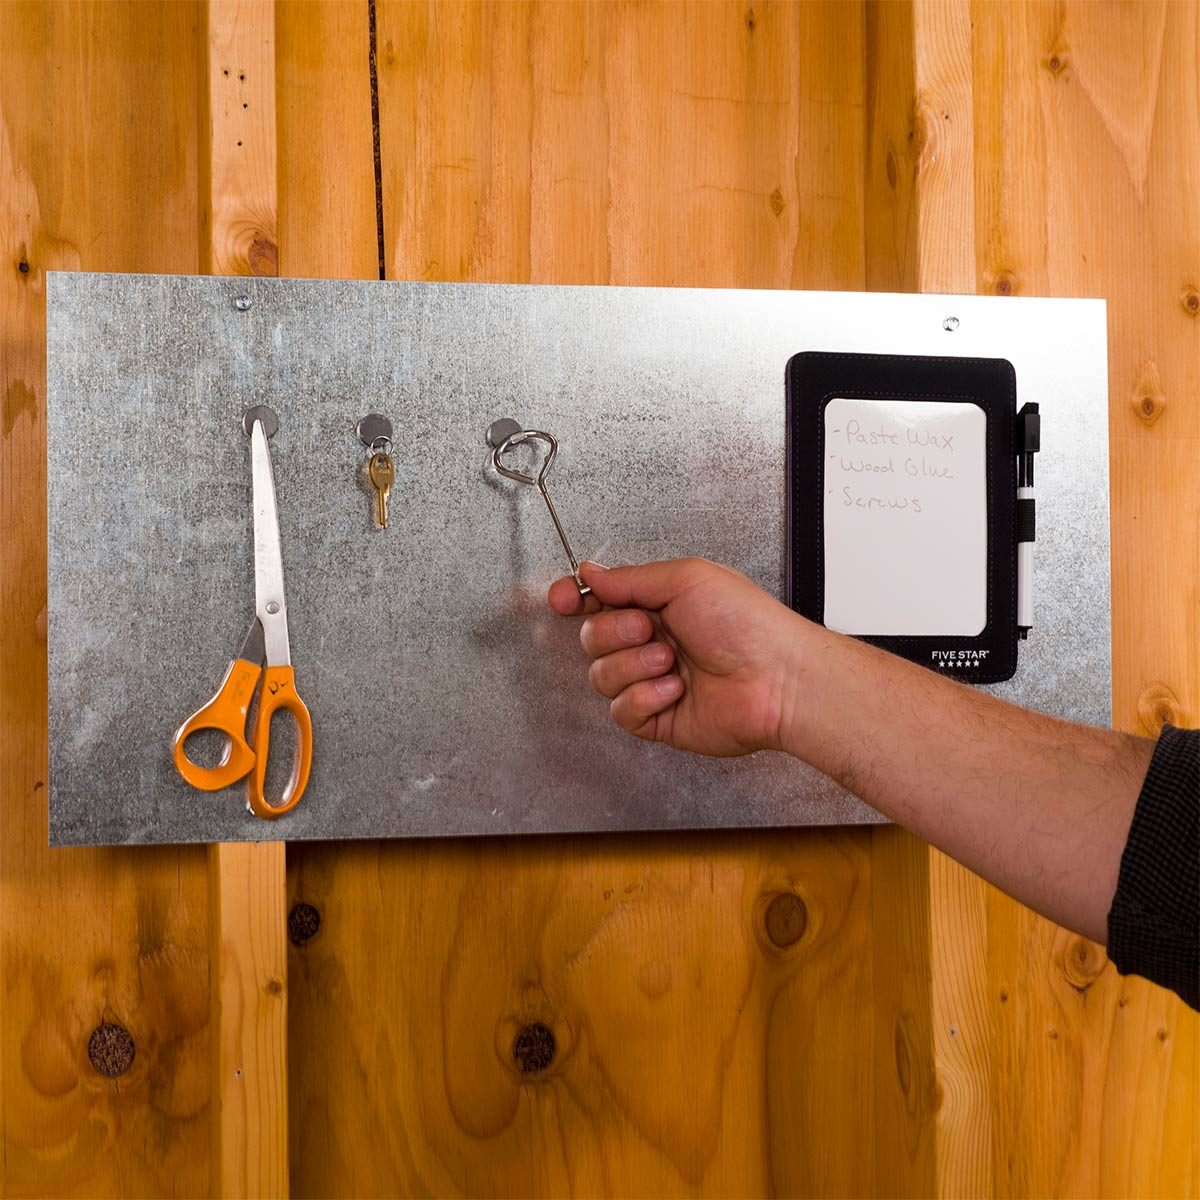
Sheet Metal Magnet Board

Sheet Metal Magnet Board

Reader Bill Jones thought of using a piece of sheet metal as a message board in his workshop—brilliant! He used self-tapping metal screws to secure the piece to studs; then he filled the board with magnets for hanging printed project plans, lists and even small metal tools.
68 / 75
under-cabinet banana hook

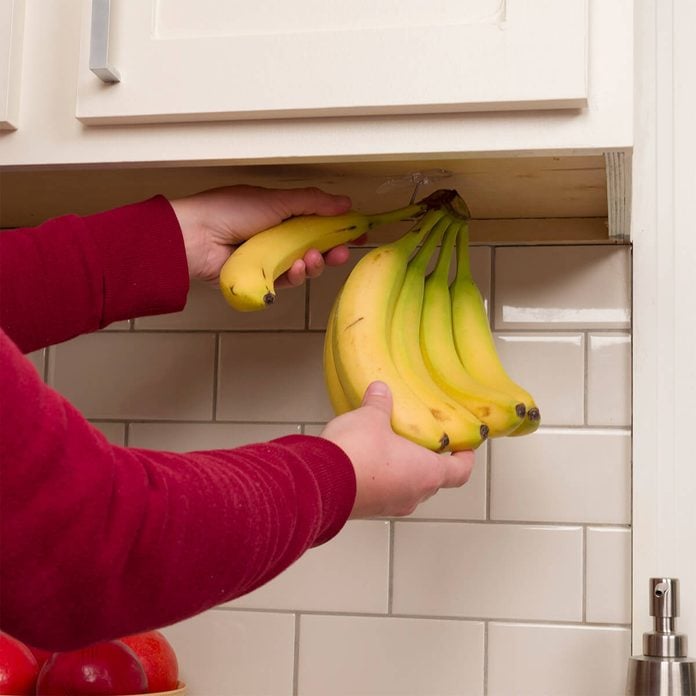
How to Hang Bananas Under Cabinets

My wife and I wanted to get a banana tree to keep our bananas fresh longer and to help them ripen evenly. But counter space is an issue in our kitchen, so we thought of a solution: Instead of adding something else to the countertop, I attached a small adhesive hook under the cabinets to store bananas. When we need it, it holds bananas without taking up any of our limited counter space. When it is not being used, it is hidden from view. It works great, and I didn’t have to drill holes in the cabinet! – reader Michael Blough

Check out these 25 Handy Hints for the Home Cook.
69 / 75
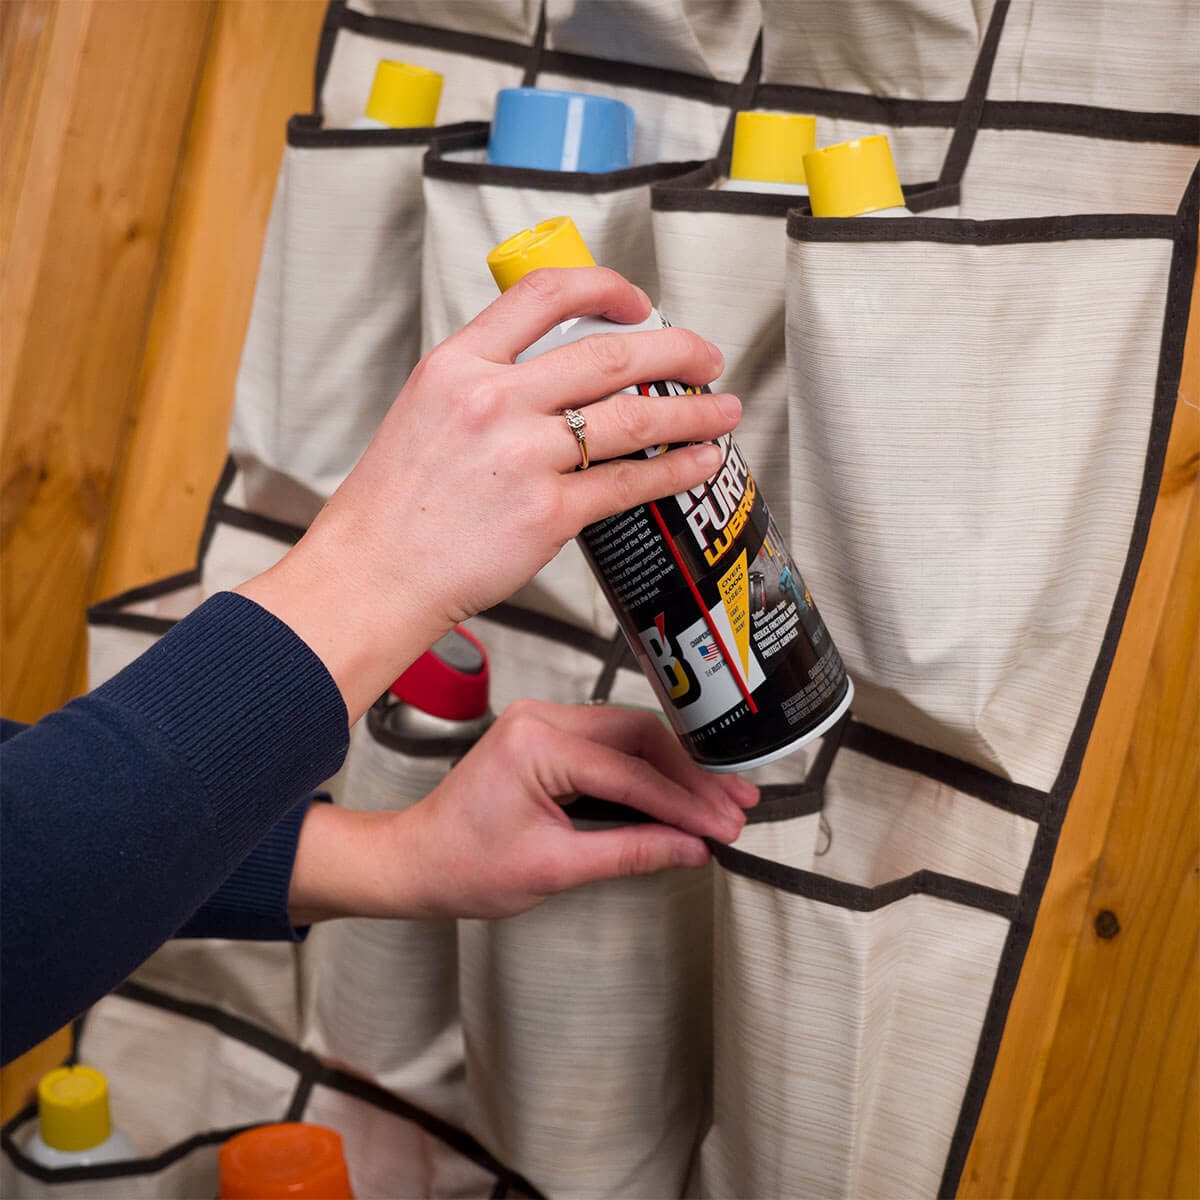
Shoe Holder for Spray Product Storage

Shoe Holder for Spray Product Storage

Keep spray paints, lubricants, etc., organized and out of the way in a hanging shoe holder. The material is easy to clean, mounts quickly to a wall or door in your workshop and has pockets sized perfectly for holding various spray products.
70 / 75
Organize Your Fridge with a Six-Pack

Organize Your Fridge with a Six-Pack

Do all of your small bottles in the refrigerator door like to tip over after opening or closing the door? Fortunately, the answer to tidying those wayward bottles is just a recycling bin away. To keep your kitchen storage and organization under control, use an empty six-pack holder to hold the condiments in your refrigerator door.
71 / 75
Cabinet Storage Organizers: Flip-Down Paper Tray
Family Handyman

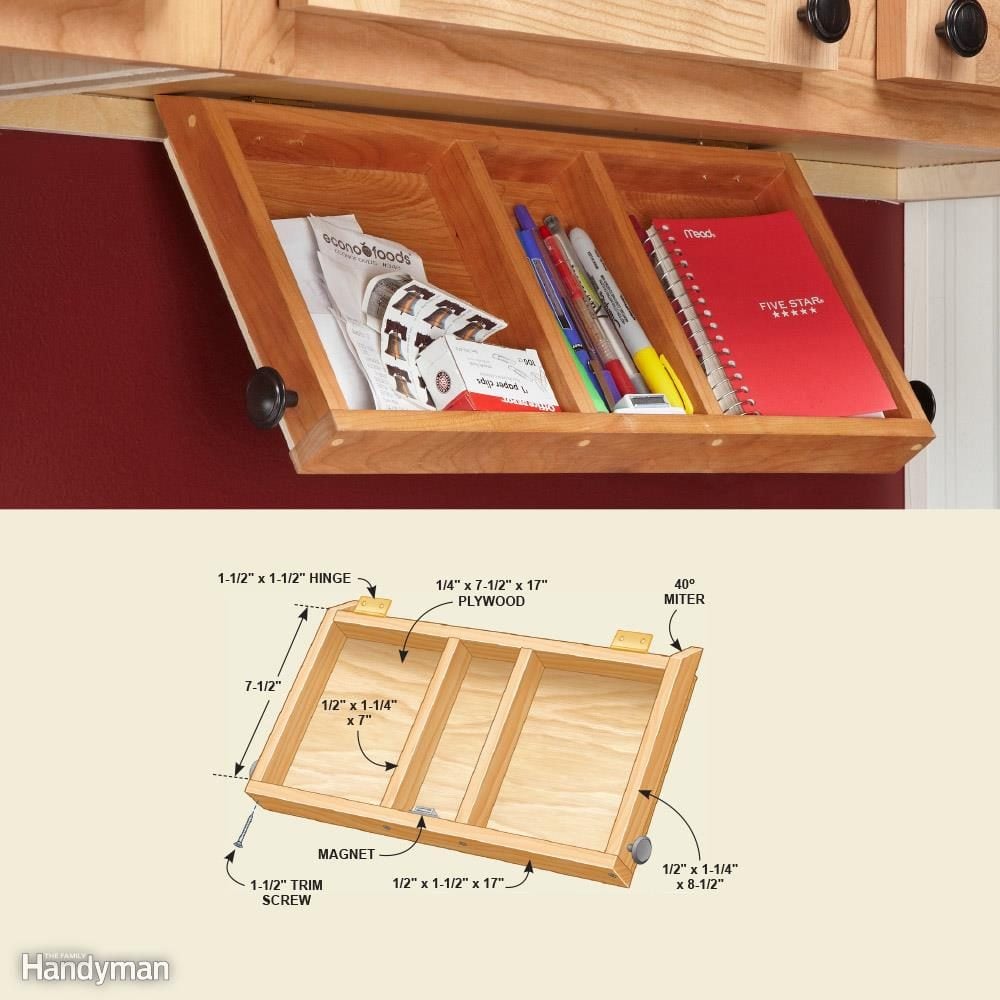
Cabinet Storage Organizers: Flip-Down Paper Tray

This tray is perfect for pens and paper. When closed, it's mostly hidden by the cabinet face frame. Hinges and magnets hold this tray in place under an upper cabinet. To install the tray, screw on the hinges first. Then open the cabinet door above and clamp the tray to the underside of the cabinet while you screw the hinges to the cabinet. Need a more robust command center? Here's how to build a message center in your kitchen instead.
72 / 75
DIY closet shelves

Custom Shelves

Build closet shelves that double your storage space (really!) with these plans. Take your closet real estate to its full potential and store twice as much stuff in a more organized way.

73 / 75
Clothing Storage Solutions: Turn Your Hangers
Family Handyman

Clothing Storage Solutions: Turn Your Hangers

Once you're gone through your closet and weeded out the unused items, turn all hanging clothing with the hanger facing outward. After wearing an item, return it to the hanging rod with the hanger facing the back of the closet. After one year, all articles of clothing still facing outwards were not worn, and you can consider getting rid of them. Find out how to get rid of anything.
74 / 75
DIY Tiered Hangers for More Closet Storage
Family Handyman

DIY Tiered Hangers for More Closet Storage

Short on closet space? Use a lightweight piece of chain to stagger hanging clothing in tall closets to maximize space. Just loop the first link of the chain over the first hanger, and hang subsequent hangers on every other links after. Hang up to six shirts for the rod space of one. If you're up for a bigger project, you can build your own melamine closet storage system.
75 / 75
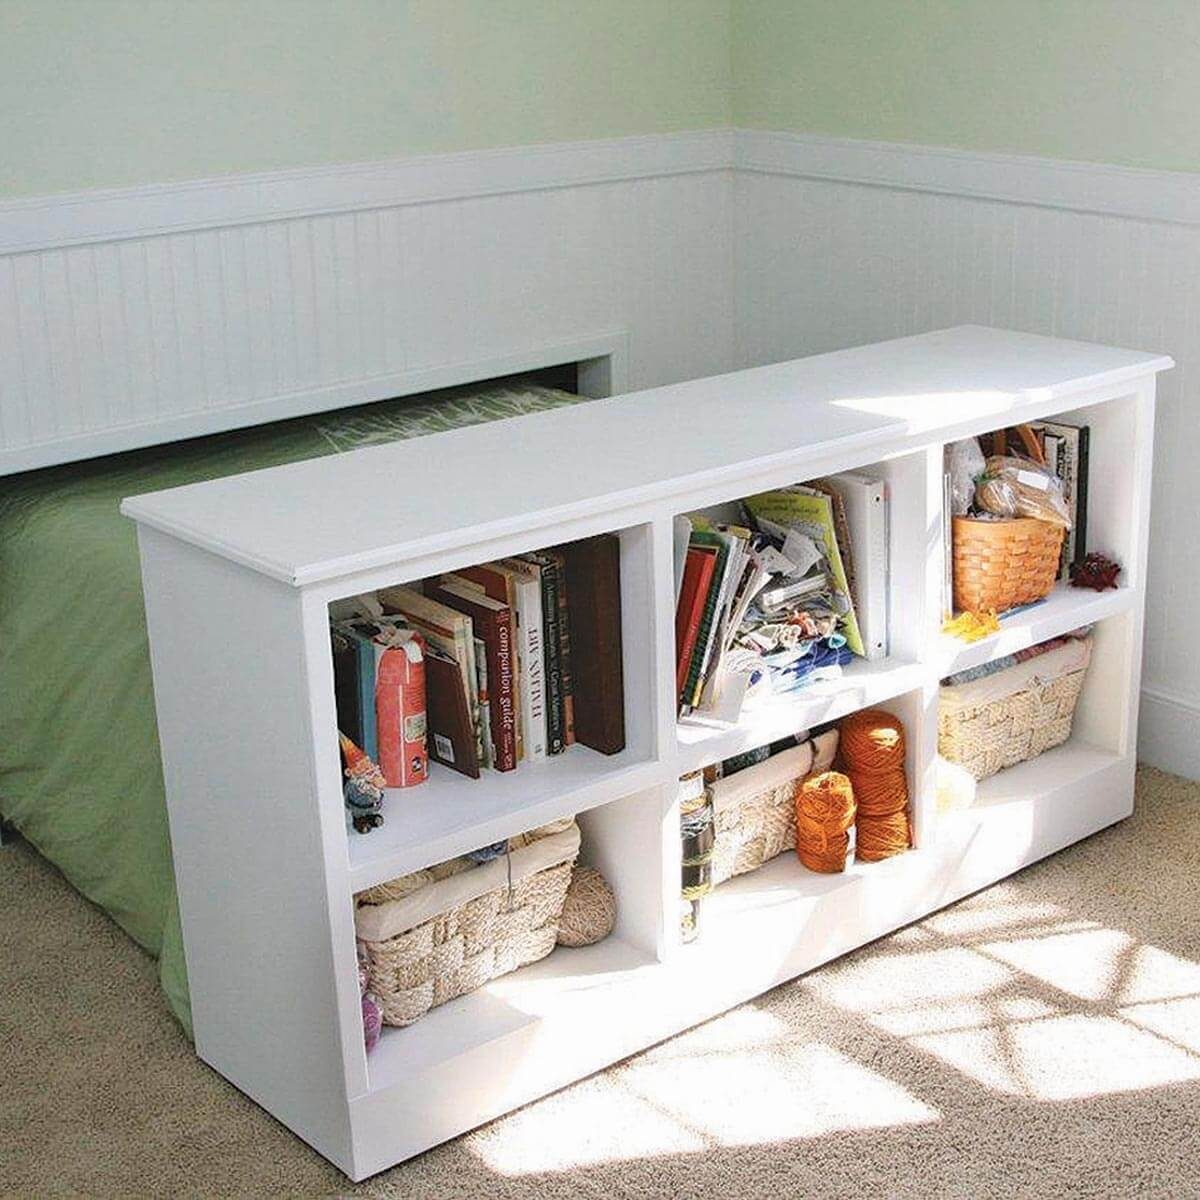
Disappearing Bed
Photo: Courtesy of Brandon Dempster

Disappearing Bed

Reader Brandon Dempster is a magician (or at least a very clever DIYer)! He built this disappearing bed with bookshelf in his guest room. We can’t explain it any better—you just have to see it for yourself!