


A floating shelf is strong, quick to build, with no visible supports and made from only two parts
A full day
Beginner
$200 - $250
Introduction
These shelves are handsome, easy to build and inexpensive. And they're strong even though they have no visible supports. They appear to float on the wall, no clunky hardware or brackets. We made them from only two parts—half of a hollow core door and a 2x4.
You can buy floating shelves in stores or online for $20 to $80 each. But before you do that, consider building your own. For about the same cost, you can get the exact size, thickness and look you want. You can even finish them to match your trim or furniture. And your homemade shelves will be sturdier than most store-bought shelves – ours can support about 50 lbs. each. Plus, you’ll earn serious bragging rights when you’re done.
Cutting list

Figure A
Overall dimensions: 72″ long x 11″ deep (after scribing 1/8″ off the back) x 2-1/2″ thick.

For this project, we used a single 4 x 8-ft. sheet of 1/2-in.-thick red oak plywood covered with wood veneer. It can be tough to find locally, so call around before you shop, or choose different plywood.
A shelf made from a single plank looks great, but long, thick planks can be hard to find, expensive or both. So we cheated and used adhesive-backed veneer made from real wood, which is easy to cut and apply and creates the seamless look of solid timbers. Our shelves are 2-1/2 in. thick and 72 in. long, so finding veneer long enough on store shelves is also a challenge. You can special-order it at some home centers, however.
It took us a couple of hours to build each shelf, including sanding, staining and mounting on the wall. We made ours using a circular saw and cutting guide, but you can make them much faster with a table saw. And you can certainly hand-drive small nails, but it’s much faster and easier to use a pneumatic brad nailer. You’ll need a small compressor to power it. It also helps to have a random orbit sander, especially for sanding the sides flush before applying the veneer. Bonus points if you own a belt sander for scribing!
Tools Required
- Belt sander
- Brad Nailer
- Circular saw
- Drill/driver
- Edge-band trimmer
- Glue
- Hammer
- Level
- Random orbit sander
- Straightedge
- Stud finder
- Tape measure
Materials Required
- 1-5/8” (No. 8) wood screws
- 1-in. 18-gauge brad nails
- 24” x 96” roll of peel-and-stick veneer (enough for seven or eight shelves)
- 2x4
- 4’ x 8’ sheet of 1/2” red oak plywood
- 4″ lag screws
- Clean cotton rags
- Disposable foam paint brushes
- Non-hardening wood putty
- Stainable wood filler
- Tack cloths
- Wood glue
- Wood stain
Project step-by-step (16)
Step 1
Build cutting guides for perfect cuts

It’s hard to get nice, straight cuts without something to help guide your circular saw. That’s where a cutting guide comes in. We used a self-squaring crosscut guide for short cuts and a longer guide for “rip” cuts. The guide shown here is just a narrow piece of 3/4-in. plywood attached on top of a wider piece of 1/4-in. plywood, with a squaring fence on the bottom. The base of the saw rides against the guide’s “fence.”
Step 2
Cut the parts
- Using a 60-tooth blade in your circular saw and a cutting guide, cut all the parts to size. A 4 x 8-ft. sheet of plywood will yield enough parts for two shelves.

Step 3
Glue and nail the frame together
- With all eight parts cut to size, it’s fairly easy to assemble the shelf with glue and nails. Start by laying the front rail on end on top of your worktable (an old hollow-core door or plywood scrap on sawhorses works great), plus a couple of short support blocks cut from a 2×4. These blocks will support the top panel while you glue and nail it onto the front rail. Carefully align the top and front pieces and use an 18-gauge pneumatic brad nailer to drive 1-in. brads.
- Now, stand the side rails on end and glue and nail them to the top panel.
- Flip the whole thing over and install the fillers with glue and brads. The fillers should be evenly spaced, but don’t be too fussy because they’ll be hidden once you install the bottom panel.
- Nail through the front rail into each of the fillers.
- Then, flip the whole thing over again and nail through the top panel into each of the fillers.
- Now, flip the whole works over one more time and nail through the bottom panel into the fillers.
Tip: It helps to draw pencil lines on the top and bottom panels first so you’ll know where to drive the nails for the fillers after you cover them with the top and bottom panels.

Step 4
Sand the front and sides flush
- Using a random orbit sander and 100-grit sandpaper, sand the front and sides of the shelf so that the rails and panels are flush with each other. This will give you a flat, smooth surface on which to apply the veneer.
- If those edges aren’t perfectly smooth and flush with the faces of the front and side rails, the veneer won’t stick properly.

Step 5
Cut the veneer to size
- Lay out the roll, veneer side down, and draw a straight line using a marker and straightedge at 3 in. wide along the entire length of the roll. This will give you 1/4 in. of overhang when you apply the veneer to the front and sides of the shelf.
- Cut along the line with a pair of scissors and then cut the strip of veneer into three pieces for the front and two sides, leaving them long enough so there’s 1/4 in. of overhang on each end.
- Apply the veneer to the sides first, being careful to keep the veneer aligned with the shelf. Don’t peel and stick more than a few inches at a time, and rub a block of wood over the veneer to press it on. Cutting the pieces slightly oversize helps in case you don’t get it on perfectly straight.

Step 6
Stick on the veneer
- Peel off the back and stick on the veneer, leaving a little bit of overhang on all four edges. Press the veneer on firmly with a block of wood.

Step 7
Trim the veneer flush
Using half of a handheld edge-banding trimmer, trim the veneer flush with the edges of the shelf. You can also use a router with a flush-trimming bit.

Step 8
Drill holes for screws
Drill countersink pilot holes in the top of the shelf for some No. 8 wood screws. Drill them 3/4 in. from the “wall” edge and space them about 12 in. apart.

Step 9
Cut the cleat to size
Cut a wall cleat out of a straight 2×4, and make it 1-1/2 in. x 1-3/8 in. x 70-3/4 in. Use your circular saw and the same cutting guide you used to cut the plywood pieces to width (set another 2×4 under the guide to keep it from tipping).
Rip the cleat to width and then crosscut it to length. The narrow part of the cleat should slip into the hollow opening in the shelf with just a bit of wiggle room.

Step 10
Screw the cleat to the wall
- Using an electronic stud finder and painter’s tape, find and mark the stud locations on the wall.
- Transfer the stud locations to the wall cleat and predrill holes in the cleat slightly smaller than the diameter of the shanks of the lag screws.
- Hold the cleat to the wall and drill pilot holes in the wall using the cleat as a drilling guide.
- Drive 4-in. lag screws through the cleat and into the wall. Start by driving a lag screw on one end of the cleat, check for level, then screw down the other end before driving the middle screws.

Step 11
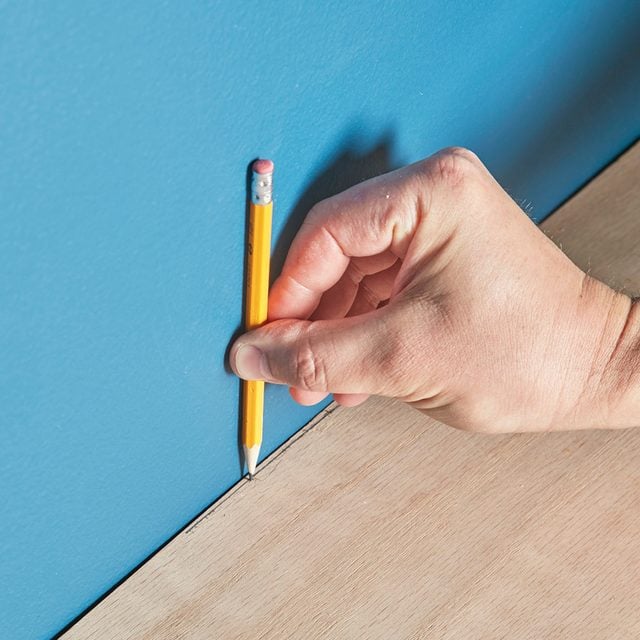
Scribe for a tight fit
- Hold the shelf over the cleat and firmly against the wall and drag a pencil along the wall to trace a scribe line onto the shelf.
- Scribing and sanding allow shelves to fit perfectly against wall contours, but you can skip these steps if you don’t mind a few gaps.
Step 12
Sand to the scribe line
- Using a belt sander clamped to a sacrificial worktable, sand up to the scribe line on the shelf.

Step 13
Fill nail holes
- Push “stainable” wood filler into the nail holes, leaving it slightly proud of the plywood in case of shrinkage.

Step 14
Sand and stain the shelf
- Sand all the sides of the shelf using 100- and 150-grit sandpaper.
- Remove all dust after sanding with the 100-grit to prevent loose granules from scratching the plywood’s surface.

Step 15
Attach the shelf to the cleat
- Hold the shelf against the wall and drive 1-5/8-in. wood screws through the shelf’s pilot holes and into the wall cleat.

Step 16
Hide the screw heads
- Hide the screw heads with wood putty that matches the color of your stain. Use “non-hardening” putty so you can dig it out if you decide to remove the shelf someday.

Originally Published: July 11, 2019