


Here's everything you need to know about how to install a pedestal sink, from start to finish.
Multiple Days
Intermediate
$501-1000
Introduction
Make your cramped bathroom feel more spacious and stylish by tearing out the old vanity and sink and installing a new pedestal sink. This change-out will make your entire bathroom feel fresh and new again.Tools Required
- 2-ft. Level
- 5/16-in. masonry bit
- Adjustable wrenches
- Close-quarters tubing cutter
- Drill and bits
- Hacksaw with fine-tooth blade
- Large slip joint pliers
- Tape measure
- Tubing cutter
Materials Required
- Escutcheon
- Faucet
- P-trap
- Pedestal sink
- Pipe thread sealant
- Plumber's putty
- Shut-off valves (2)
- Supply tubes (2)
- Trap adapter
Replacing your old vanity cabinet with a pedestal sink is one of the quickest and easiest ways to remodel a small bathroom. But we should warn you — pedestal sinks can be tricky to put in, even for pros.
Often the pipes aren’t in the right spot, making it difficult to fit the pedestal in place and connect the pipes so they look nice. You may discover there’s no floor tile underneath the vanity cabinet, so you’ll have to patch or replace the floor. And you may also need to patch missing baseboard.
In the following article, we’ll show you how to handle the most common problems, including how to relocate your drain and water pipes for a neater installation.
You can install a new pedestal bathroom sink and faucet in a day even with no previous experience. If you have to relocate the pipes, plan to spend a few more days to move them, then patch and paint the wall. For this you’ll need basic plumbing skills, like soldering copper and cutting and gluing plastic pipe.
Be sure to contact your building inspections department to see whether a permit is required for this plumbing work.
Besides the items listed above, a few other items that may be useful depending on the type of plumbing materials you are using and the scope of your project. These are:
Soldering tools and supplies: Propane or Mapp gas tank with regulator, lead-free solder Flux, wire brush for 1/2-inch fittings, Emery cloth, heat shield cloth, leather gloves, 10-foot length of 1/2-inch copper pipe, 1/2-inch copper elbows, couplings and caps.
PVC pipe tools and supplies: Fine-tooth saw, PVC glue, PVC primer, 1-1/2-inch PVC pipe, PVC 45- or 90-degree elbows, PVC sanitary tee, transition couplings and an organic vapor respirator.
Other tools: Reciprocating saw with a metal-cutting blade, circular saw, drywall keyhole saw.
Project step-by-step (17)
Step 1
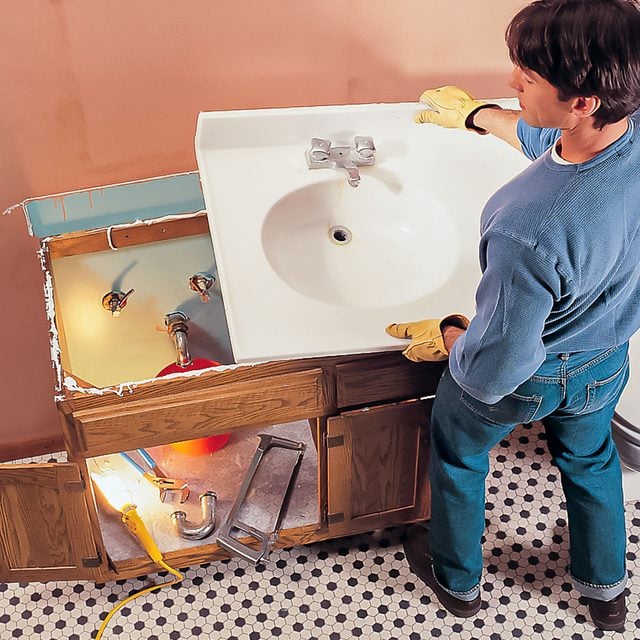
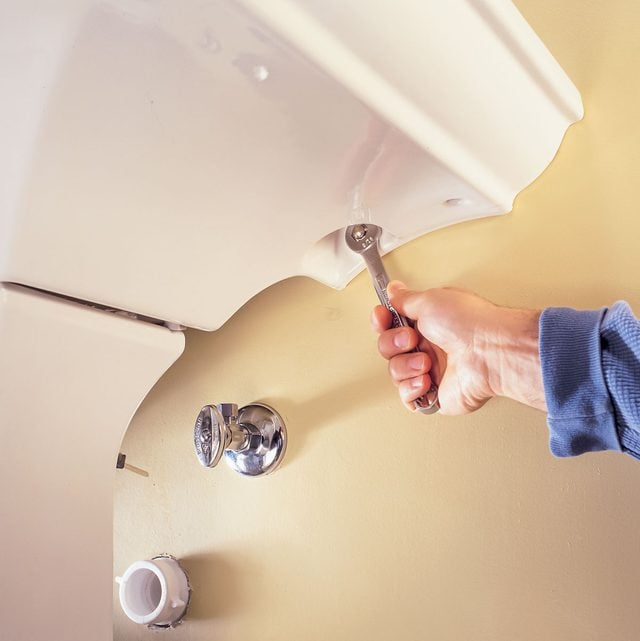
Disconnect the pipes and remove the old sink
Shut off the water at the main shut off valve. Remove the trap by unscrewing the slip nuts and pulling it down. Cut the tubes that supply water to the faucet with a hacksaw or tubing cutter or loosen the nuts and pull them out. Lift off the vanity top and remove the vanity cabinet.
Once the old sink and vanity are removed, check the drain and supply pipe locations. Pedestal sinks look best if the drain and supply pipes are centered and partially hidden by the sink. Your new sink will come with wall measurements showing ideal plumbing locations.
To be absolutely sure, position the pedestal sink and loosely install your new faucet, pop-up drain and P-trap. Now measure from the floor to find the drain height and determine the best location to put the water supply valves mostly out of sight. Our old drain was six inches off center and a few inches too low. The water pipes also were in the wrong spot.
Step 2
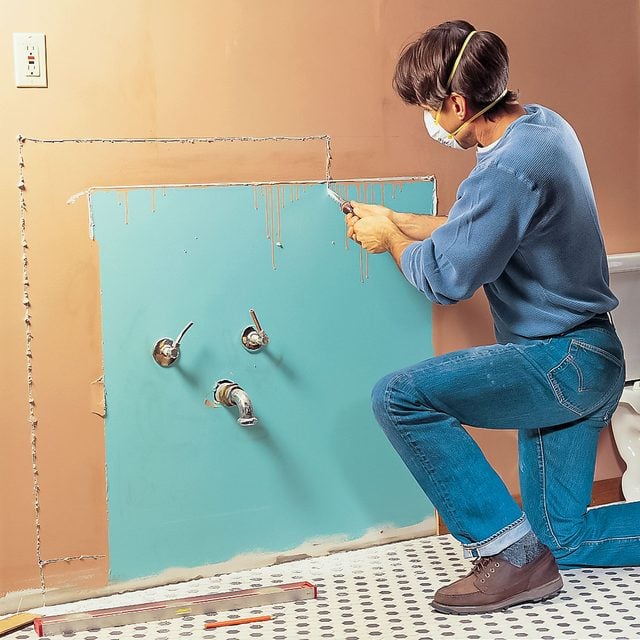
Cut open the wall
If you have to relocate pipes, start by removing a section of wall covering wide enough so you can move the pipes and install wood backing . This means drywall repair and repainting later.
Use a keyhole saw to cut the drywall, expose the plumbing and allow access for installing wood backing. Cut along the edge of the studs, but keep the saw blade shallow to avoid hitting wiring or pipes.
Pro tip: It’s easier to cut along the edge of the studs and add 2×2 drywall nailers alongside the studs later than to try to cut down the middle of the studs.
Step 3
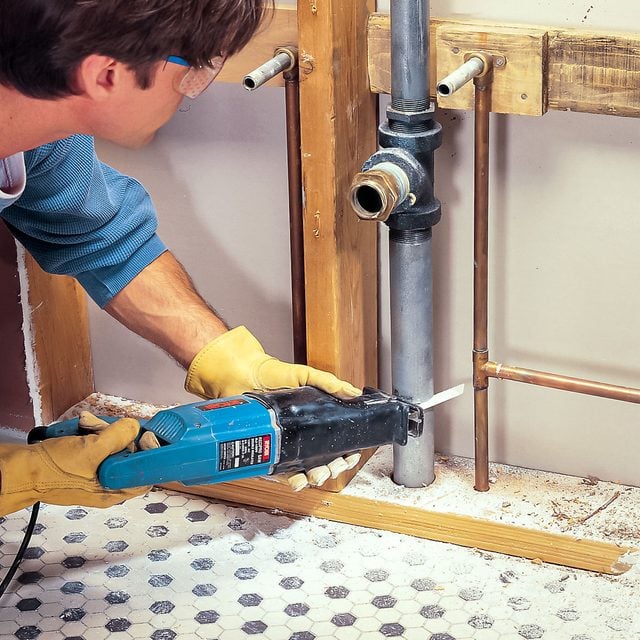
Cut the old drainpipes
Saw off the drainpipe about four inches from the floor. To cut steel pipe, use a metal-cutting blade in a reciprocating saw, or a hacksaw. Use any fine tooth saw to cut plastic pipe. Cut the vent pipe about 40 inches up from the floor.
Cutting steel pipes like ours is a real chore with a hacksaw. Rent or borrow a reciprocating saw to speed up the job. Cut PVC pipes with any fine-tooth saw.
Step 4
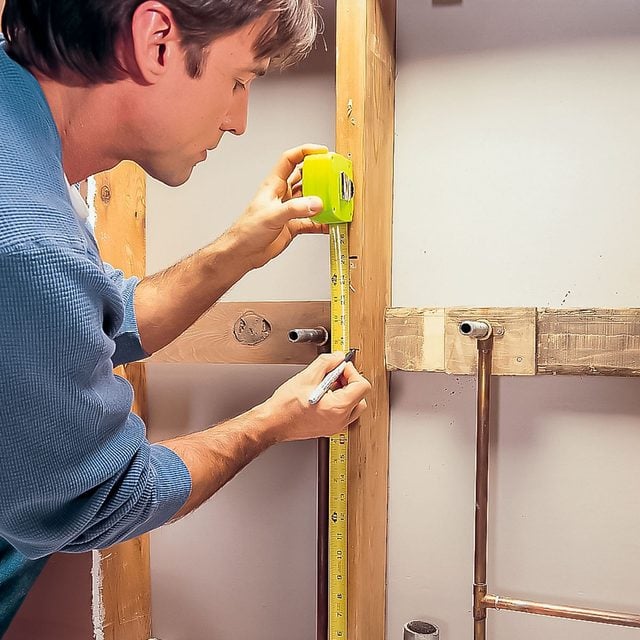
Mark the new pipe locations
Mark the new height of the drain and water supply pipes on a stud. And on the bottom plate, mark the new center of the sink.
Step 5
Connect new to old with transition couplings
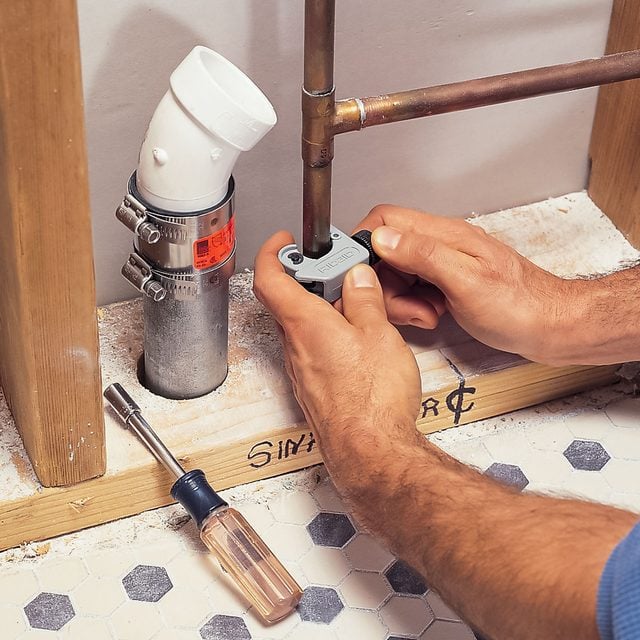
Connect the 1-1/2-inch steel drainpipe to a PVC street elbow with a transition coupling. Tighten the clamps with a 5/16-inch nut driver or socket wrench. Cut the copper water pipes with a close-quarters tubing cutter.
To connect PVC (white) plastic drainpipes to either ABS (black) plastic, copper or steel, use transition couplings. Transition couplings have a rubber gasket surrounded by a steel sleeve with screw clamps at each end. Match the transition coupling to the pipe size.
If your old pipes are PVC, then you’re set to go. Just glue and join the PVC elbow on.
Step 6
Rough in plumbing for pedestal sink
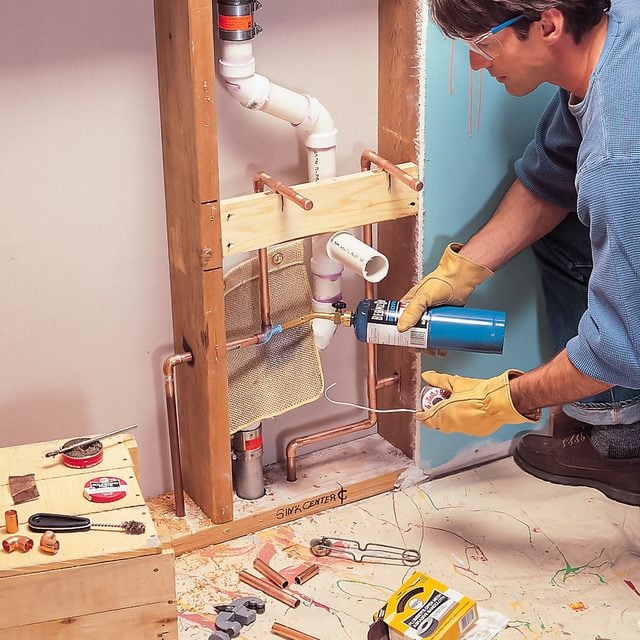
Cut the lengths of PVC pipe so the drain opening in the sanitary tee is centered on the center marks for the drain. Prime the pipe ends and the inside of the fittings. Then spread PVC adhesive on the primed surfaces and quickly assemble each joint, twisting the pipe about a quarter turn as you push it into the fitting. Hold it tightly about 45 seconds.
Plastic pipe makes quick work of relocating your drain. Cut and assemble the drain and vent pipes as shown. Don’t worry if you make a mistake; it’s easy to fix. Just cut the pipe and join a new section with a PVC coupling.
Begin by clamping elbows to the transition couplings on the drain and vent pipes. Then start at the drain and work up toward the sanitary tee, making sure to center the sanitary tee on the new sink location and at the right height. Complete the drain by flexing the PVC drain assembly just enough to glue in the last section of pipe.
We’ve run the drain and vent pipes at a 45-degree angle for optimal performance. If you’re moving the pipes far, you might have to use 90-degree elbows instead. Keep in mind your vent pipe shouldn’t run horizontally unless it’s at least six inches above the “spill line” of the sink, or about 42 inches above the floor.
Leave the drain stub unglued until the drywall is finished. Then cut the stub so the trap adapter fits snug to the drywall and glue them all together.

Step 7
Reroute the supply lines
Sweat the copper pipe supply lines. Cut, clean and solder the copper tubes and fittings. Support the stub-outs with straps and solder a cap on each. Then turn on the water and check for leaks.
To secure the copper pipes and hold them in place as you solder them, level and screw a scrap of wood between the studs and mark the pipe locations on it. Cut the copper pipe and solder the fittings together. Leave about six inches of copper pipe sticking out and solder on a cap so you can turn the water on to test for leaks.
Step 8
Install sink and drywall backers
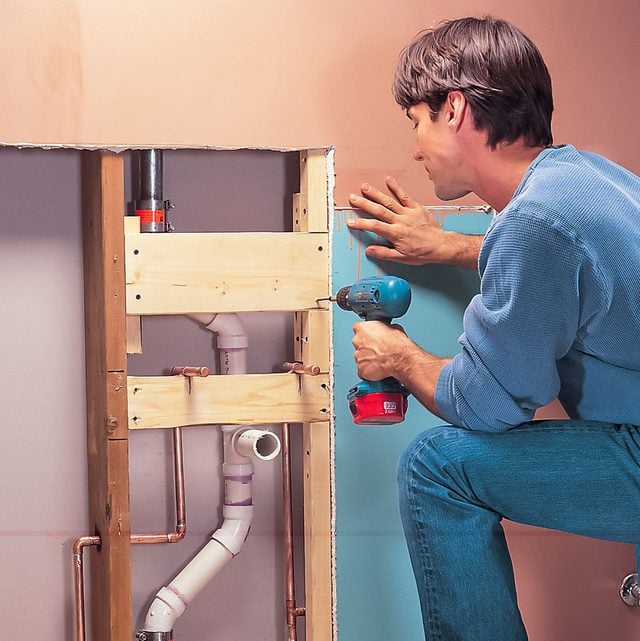
Secure a 2×6 to the studs to provide support for the pedestal sink. Screw additional 2×2 backing to the studs to support the edges of the drywall. Measure the sink for the location of the anchors and screw wood backing between the studs in this area.
If your work requires a permit, call for a plumbing inspection before closing the wall.
Step 9
Close up the wall
Cut drywall and fasten it to the studs with 1-1/4-inch drywall screws. Cover the seams with drywall tape embedded in a layer of joint compound. Trowel on at least two more layers, allowing each to dry before recoating. Use a 10- or 12-inch trowel for the final coat to create a tapered patch.
Sand with 100-grit drywall sanding paper. Prime and paint the wall and nail up the baseboard before installing the sink.

Step 10
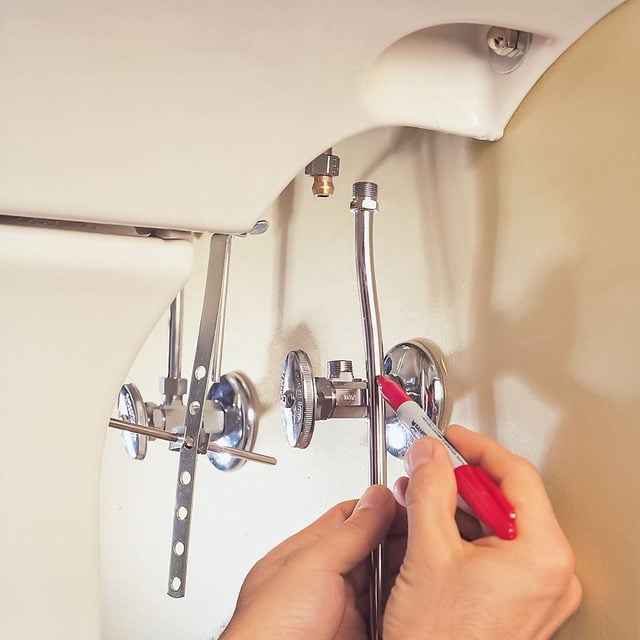
Add shutoffs and adapters
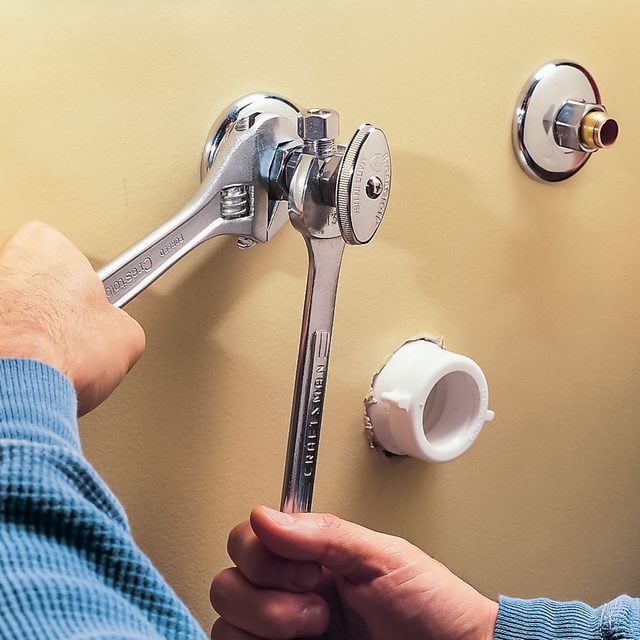
Glue a short length of pipe and a trap adapter to the sanitary tee inside the wall. Then close the main water valve and use a tubing cutter (also known as a wheeled pipe cutter) to cut the copper pipes, leaving two inches exposed.
Slide the decorative escutcheon (for this project you’ll need two 1/2-inch escutcheon), nut and brass ferrule over the pipe stub and attach a compression-type shutoff valve. Hold the valve body with one wrench while you tighten the compression nut with another.
Step 11
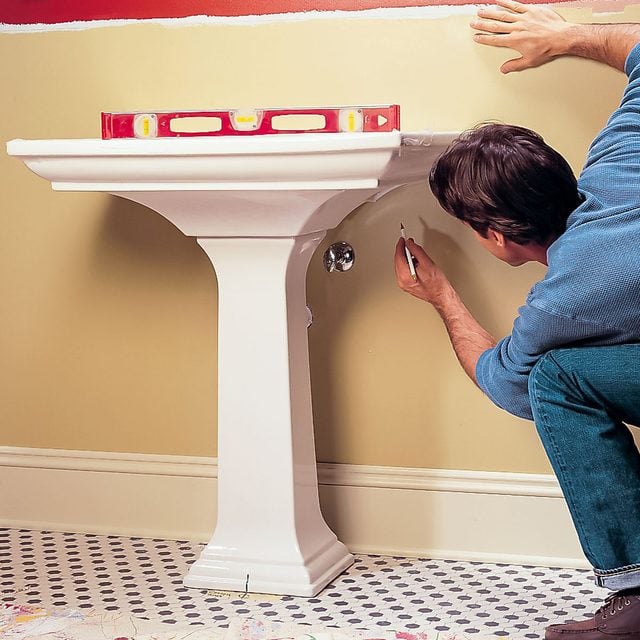
Mark the sink mounting holes
Mark the center of the sink on masking tape stuck to the floor. Align the center of the pedestal with this mark. Set the sink bowl on the pedestal, and lay a two-foot level across it.
When you set the sink on the pedestal to mark the mounting holes, don’t be surprised if it’s a little tippy — they’re not always perfect. Slide plastic shims under the pedestal if necessary to keep it from rocking, and place small self-adhesive foam or rubber cushions between the bowl and pedestal to level the bowl.
Mark the center of the mounting holes on the wall and floor. Remove the bowl and pedestal and set them aside. When the installation is done, fill the gaps at the floor and between the pedestal and bowl with silicone caulk that matches the sink.
Step 12
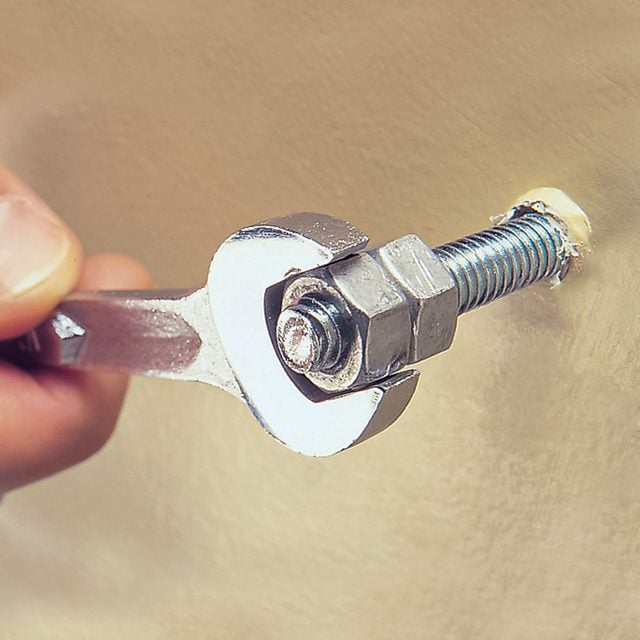
Hanger bolts for pedestal sink
Drill 3/16-inch pilot holes into the wall at the mounting bolt locations. Tighten two 5/16-inch nuts against each other on the hanger bolts to provide a grip for the wrench. Screw the hanger bolts in, leaving just enough bolt exposed to extend through the sink mounting hole plus 3/8-inch.
Use a 5/16-inch masonry bit to drill a clearance hole in the tile floor for the 1/4- by 2-in. pedestal mounting screw. The screw will slip through this hole and screw into the wood subfloor.
Step 13
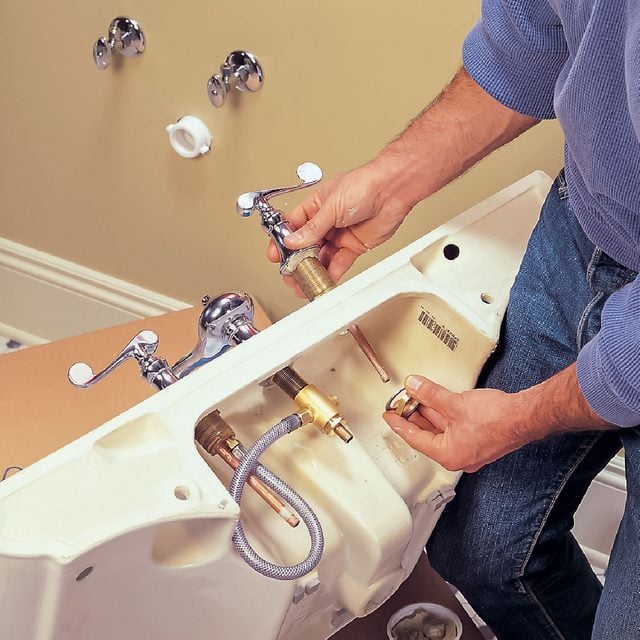
Mount the faucet
Install the bathroom faucet parts to the sink according to the instructions provided. The manufacturer of our faucet specified a bead of plumber’s putty under the valves and spout to seal them to the sink.
Step 14
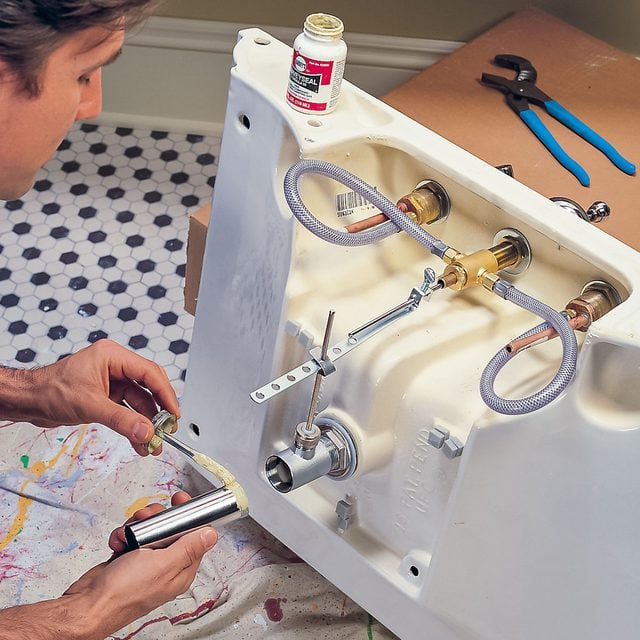
Add the drain assembly
Install the pop-up drain assembly. Press a pencil-width bead of plumber’s putty under the rim of the drain before you press the drain down into the opening in the sink. Screw this piece to the assembly that mounts under the sink.
Assemble the rest of the parts and adjust the opening and closing of the stopper according to the instructions. Coat the fine threads on the tailpiece with thread sealant and screw the tailpiece into the pop-up assembly.
Step 15
Install the sink
Screw the pedestal base to the bathroom floor. Slide the sink over the mounting bolts and install a stainless steel fender washer and acorn nut to secure it. Be careful not to overtighten the nut or you could break the sink.
Step 16
Cut the supply tubes
Mark the supply tubes and cut them with a tubing cutter. Bend them to fit and connect them to the valve and faucet with the nut and brass ferrule provided.
Making the final connection between the faucet and valve can be tricky. If you’re having trouble fitting the supply tube into the valve, loosen the valve (reverse the procedure shown in Step 10) and swivel it to allow clearance to insert the tube. Then re-tighten the connection.
Always use two wrenches to tighten compression fittings, one to hold the valve and the other to tighten the nut.
Step 17
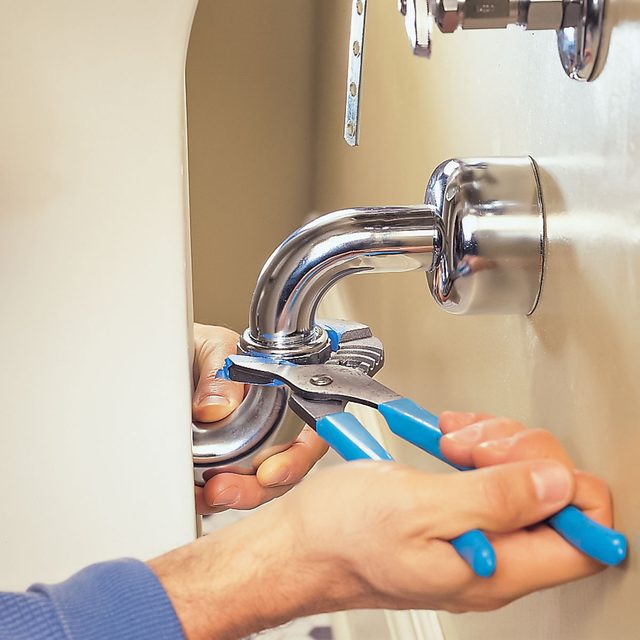
Connect the drain
Complete the installation by connecting the 1-1/4-inch P-trap assembly to the sink tailpiece and PVC trap adapter. Use a fine-tooth hacksaw blade to cut the trap arm to length if necessary. The arm should extend about two inches into the trap adapter.
Hand-tighten the slip joint connectors. Then tighten an additional quarter turn with a large slip joint pliers. Cover the trap adapter with a special deep escutcheon (extra deep, P-trap diameter), available at most home centers and hardware stores.
Double-check all your connections. Fill the bowl with water. Then let it out and watch for leaks. Tighten leaky joints. If this doesn’t work, you’ll have to take apart the leaky joint and make sure the rubber slip joint gaskets are in place and the brass ferrules on the compression fittings are squarely seated.
FAQ
What size mirror for a pedestal sink?
Ideally, the mirror should be approximately the same width as the sink or slightly narrower. This helps create a harmonious visual symmetry. It’s also a good idea to ensure the mirror’s height is proportionate to the wall space above the sink, typically leaving a few inches of clearance between the top of the sink and the bottom of the mirror. However, remember that personal preference and the specific dimensions of your bathroom play a role in this decision. Ultimately, the goal is to strike a balance between functionality and style to enhance your bathroom’s overall appeal.
Are pedestal sink bases interchangeable?
Pedestal sink bases are typically designed to be specific to the sink they are paired with. While the sinks themselves can often be interchangeable, the same may not hold true for the bases. The base needs to provide proper support and stability for the sink, which means the dimensions and shape of the sink and base should match. Attempting to mix and match bases and sinks from different manufacturers or models may result in an unstable installation. If you’re considering replacing one component of your pedestal sink, it’s advisable to consult the manufacturer’s recommendations or a professional to ensure compatibility and a secure fit.
Can a pedestal sink be ADA compliant?
Yes, a pedestal sink can be made ADA (Americans with Disabilities Act) compliant with some modifications. ADA compliance typically involves ensuring that there is enough knee clearance under the sink for a wheelchair user, as well as appropriate faucet controls that are easy to reach and operate. To make a pedestal sink ADA compliant, you might need to choose a sink with a narrower pedestal or modify an existing one to provide more space underneath. Additionally, select a faucet with accessible handles or controls, and ensure that the sink’s height is within the ADA guidelines. This adaptation can make your bathroom more inclusive and user-friendly for people with disabilities while retaining the elegance of a pedestal sink.