
How to Build a Laundry Room Pedestal
Updated: Mar. 08, 2024
Save your back without spending an arm and a leg.

Multiple Days
Intermediate
$101–250
Introduction
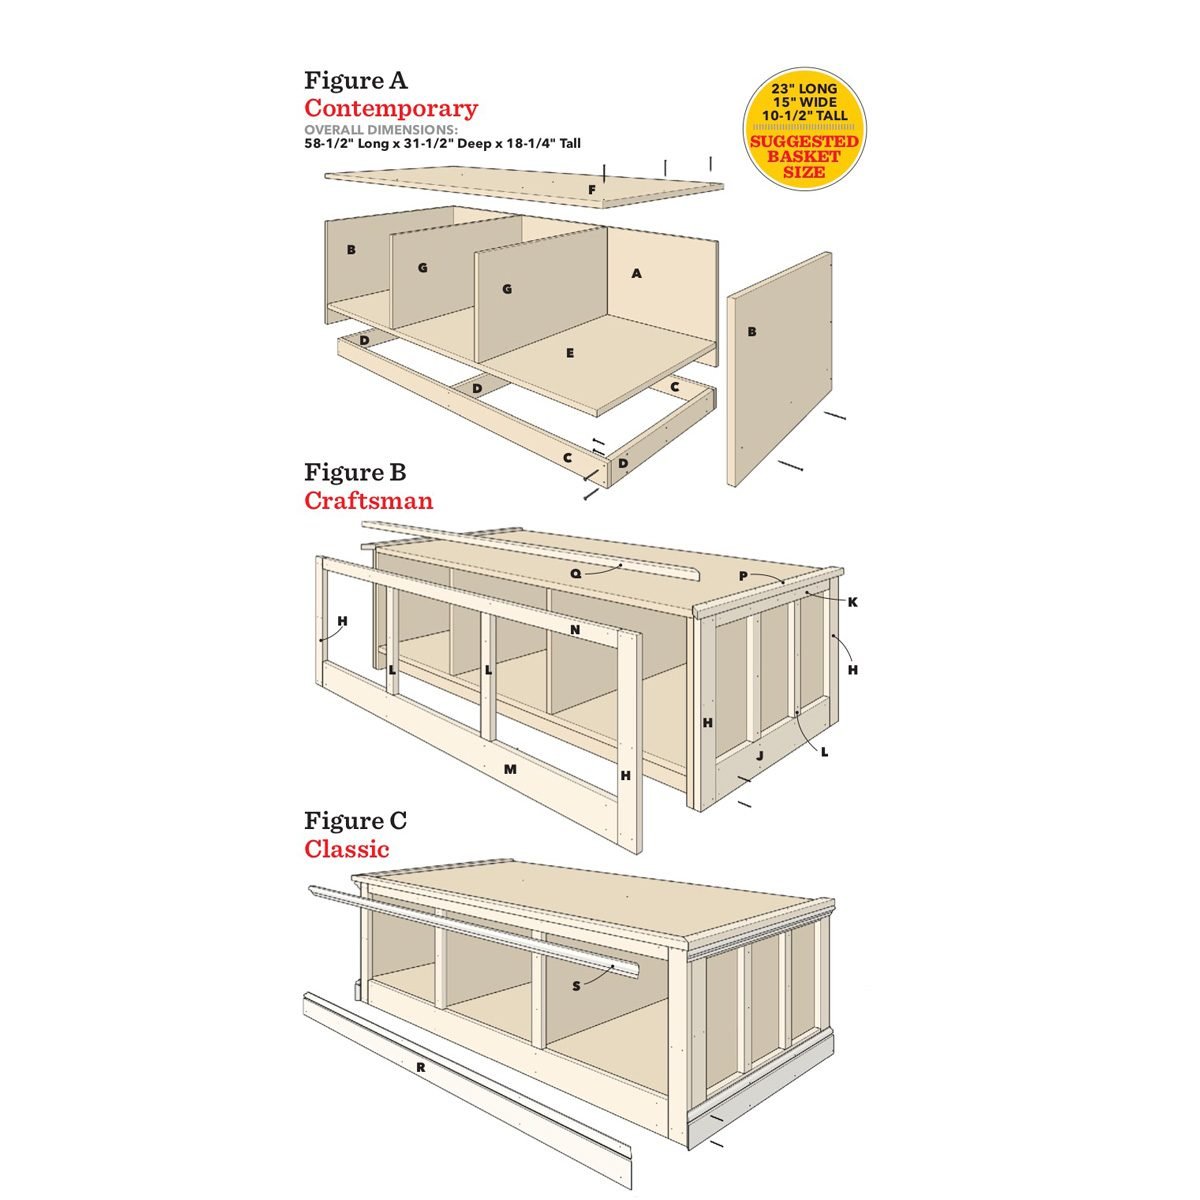
Front-loading appliances have a lot of great features, but being easy on your back isn’t one of them. That’s why manufacturers offer matching pedestals that raise the machines to a comfortable height. But these pedestals cost up to $250 each, and you still won’t have a place to stash laundry baskets. With our plan, you can build your own unit for about half the cost, and get a functional pedestal that will look great in any laundry room. You can choose from the three versions we show here—contemporary, Craftsman and classic. They differ only in the amount of trim and moldings you add to the basic plywood carcass.Tools Required
- Circular saw
- Finish nail gun
- Miter saw
- Table saw

CHOOSE YOUR STYLE!
Build it basic or deck it out with moldings.
Contemporary

Leave off the trim and you have a sleek and functional pedestal. This version doesn’t require any miters, so even a beginner can build it.
Craftsman

Adding trim on the face and sides transforms the pedestal with minimal additional cost and work. Most of the trim cuts are simple right angles, so even this version is easy.
Classic

If you prefer a traditional look, add moldings. You’ll need to cut a few miters to fit the moldings where they meet at the corners, so this version requires slightly more skill.
Skill, time and materials
The skill required goes up a little as the versions get fancier. Including painting, expect to spend a weekend on this project. In addition to standard DIY tools, you’ll need a circular saw and a straightedge guide or table saw to cut the plywood. A miter saw would make cutting the trim for the Craftsman version easier, and is necessary if you want to add the moldings. And a finish nail gun would simplify all the trim work.
The pedestal requires two sheets of plywood, and some trim boards and moldings if you want to add them. You’ll find all these at any home center or lumberyard. Remember, you can always ask to have the plywood cut into smaller pieces to fit in your vehicle.
Dealing with the dryer duct
Raising your dryer also raises the position of the dryer’s exhaust. And that may mean reworking the dryer’s exhaust duct. If the current duct enters the wall at least 20 in. from the floor, there’s no problem. But if the duct is lower than that, you’ll have to raise it. Also, if you want to snug the dryer up to the wall as we did here, you’ll need to recess the vent in a dryer vent box. For help with dryer ducting, go to familyhandyman.com and search for “dryer vent install.” Also take a look at the gas and/or electrical lines serving the dryer to make sure they’ll accommodate a raised dryer.
Project step-by-step (11)
Cut the plywood parts

Get straight cuts with a circular saw and guide. To see how to make a guide, go to familyhandyman.com and search for “saw guide.”
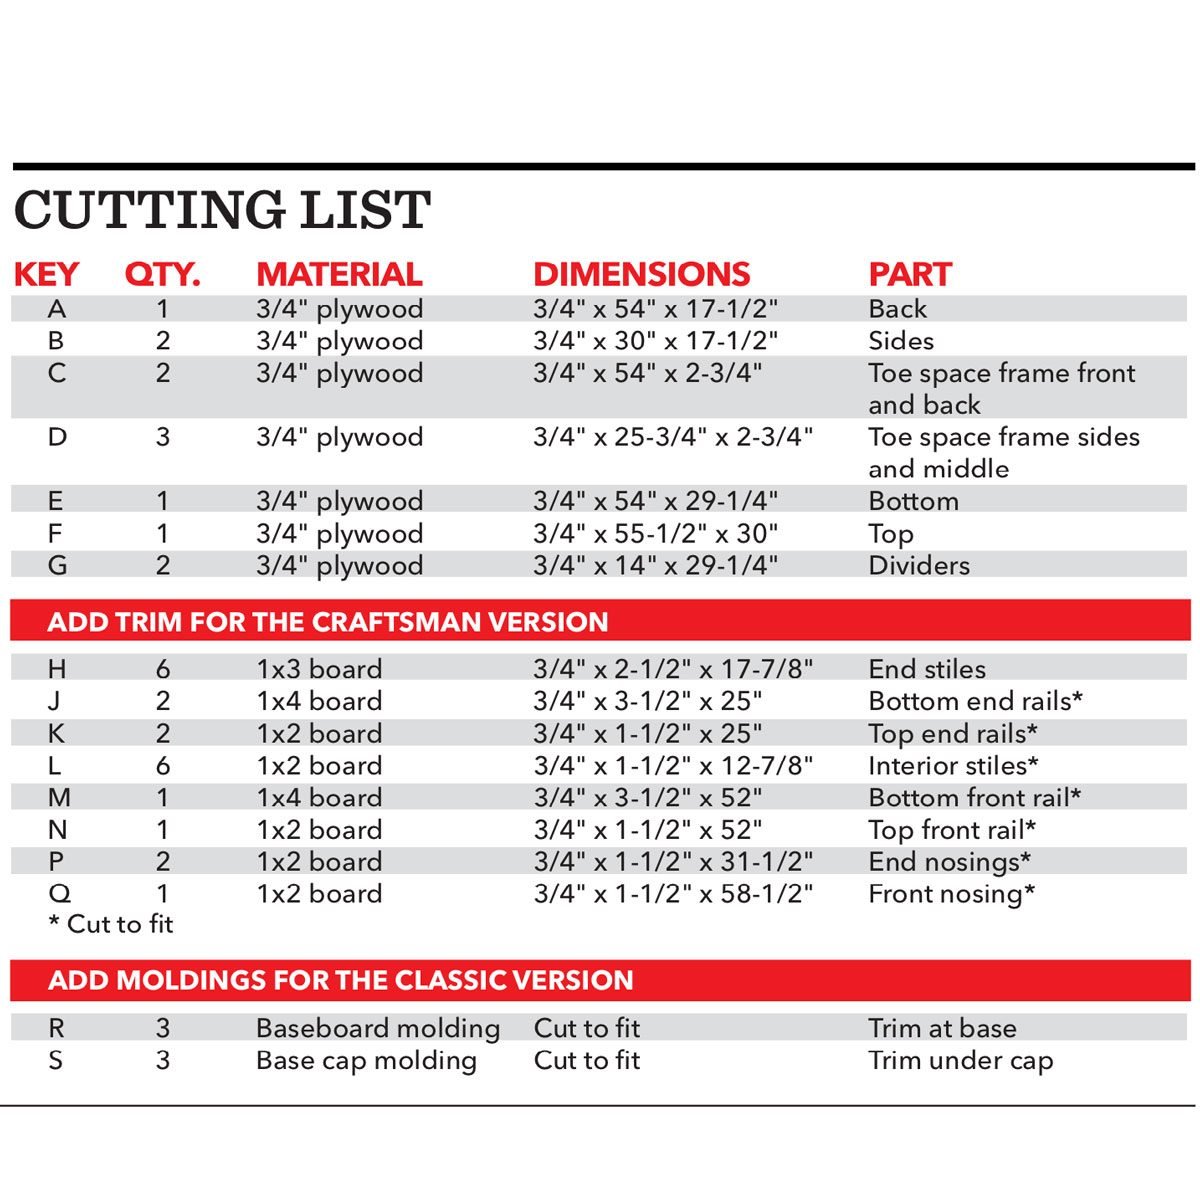
The first step is cutting the plywood parts to the right size. Follow the Cutting List and the Cutting Diagram. You can get great results with nothing more than a circular saw and a straightedge guide. With a guide like this, you just make two marks on the plywood for the size of the part you’re cutting. Then line up the guide with the marks and clamp it. The only trick is to make sure the guide is on the side you want to keep. Then run the saw along the guide’s fence to make the cut.
It’s quicker and simpler to paint or finish the plywood parts before you assemble them. If you’re building the contemporary version, you’ll need to cover or fill the raw plywood edges that are exposed. You could apply veneer edge banding to the edges. But if you’re going to paint the pedestal, it’s easier to simply fill the edge grain with Zinsser Ready Patch or a similar product before painting. Use a small flexible putty knife to trowel the filler onto the edge of the plywood. Let the filler dry. If there are still recessed spots or holes, add a second coat. After the second coat dries, sand the filler smooth. Now you’re ready to brush or roll on two coats of paint.
Screw the sides to the back
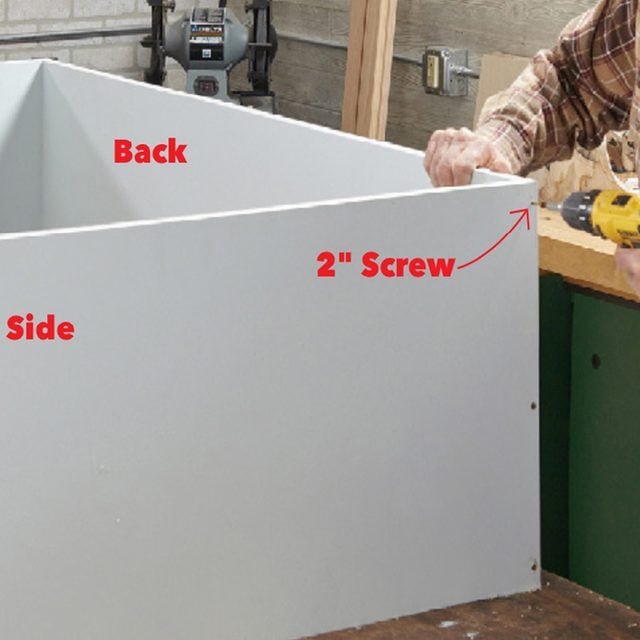
Drill 3/32-in. pilot holes through the sides into the back. Then drive 2-in. screws to connect the sides to the back. After the paint dries, you can assemble the carcass. Start by screwing the sides to the back. Next, build the toe space frame from the four strips of 2-3/4-in.-wide plywood. The frame is sized to allow a 2-in. toe space at the front of the pedestal (contemporary version).
Add the toe space frame

Set the frame between the sides and snug it up to the back. Cut the parts to length from the plywood strips. Drill pilot holes and join the parts with 2-in. screws. Set the frame into place and connect it to the sides and back with 1-1/4-in. screws.
Mark the driver locations

Drive 1-1/4- in. screws from the inside into the back and sides. Before you install the top and bottom, draw faint pencil lines on the inside faces to indicate the positions of the interior dividers. Mark the positions of the two dividers on the top and bottom. Draw light pencil lines to indicate the edges of the panels. Turn the panels over and make a single line to indicate the center of the dividers. Use this line as a guide when you drill the screw holes. You can wash off these lines or paint over them after the pedestal is assembled.
Install Vinyl Flooring in a Laundry Room
Add the bottom
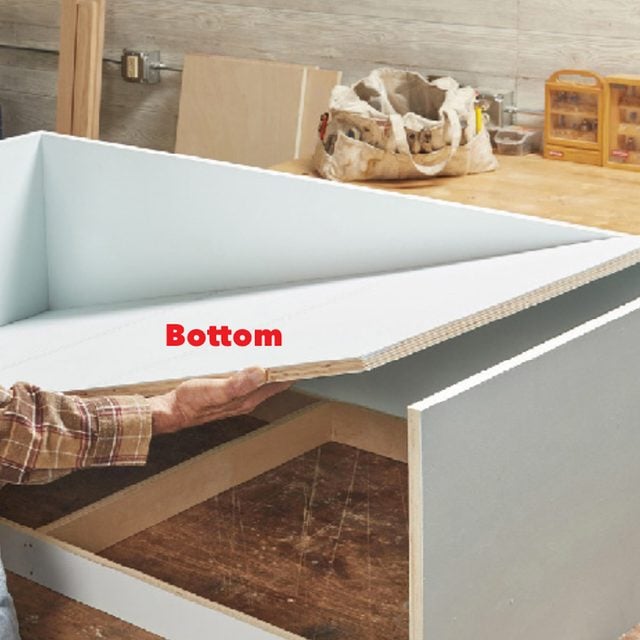
Since the divider locations are slightly different for the contemporary version, make sure to use the correct dimensions (Figure D). On the outside face of the top and bottom, make faint center lines to indicate where screws should be driven. Set the bottom on the toe space frame and attach it with screws. Set the bottom in place and drill pilot holes for the screws. Attach the bottom to the toe space frame with 2-in. screws.
Attach the top
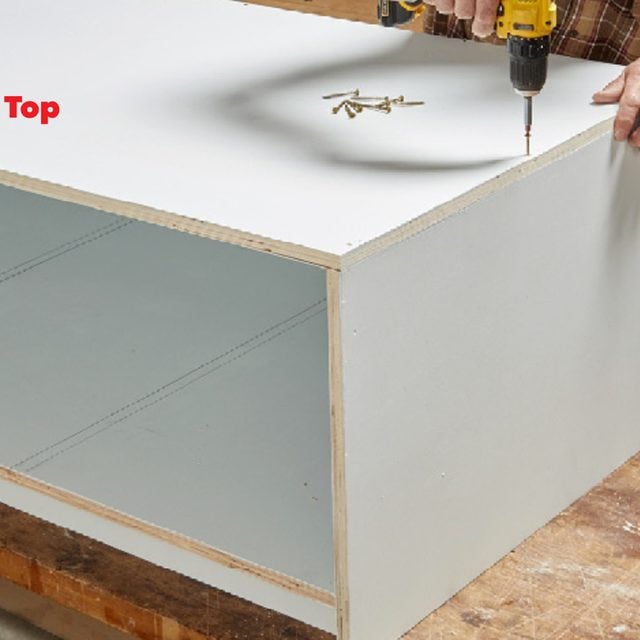
Then align the top and drive screws through the top into the sides and back. Set the top in place. Drill pilot holes and drive screws through the top into the sides and back.
Install the drivers

Finish the carcass by lining up the two dividers with your light pencil lines and securing them with screws. If you’re building the contemporary version, you’re done. Line up the dividers with the pencil lines and secure them by driving screws through the top and bottom into the dividers.
Tip: Tack plywood panels together with finish nails to hold them in place while you drill pilot holes and drive the screws.
Nail on the trim boards

Install the trim on the ends of the carcass, starting with the end stiles. Make sure that all of the trim is 3/8 in. below the top surface of the pedestal. Finish by gluing and nailing the trim to the front. Adding 3/4-in.-thick trim boards to the front and sides is all that’s required to build the Craftsman version. Set all the trim boards 3/8 in. below the top surface to create a 3/8-in. lip when the top nosing is applied. This lip will help ensure that your washer and dryer don’t vibrate off the edge. Use glue and 1-1/4-in. brads to secure the 3/4-in.-thick trim. Start by installing the end stiles (vertical boards) on the sides. Add the rails (horizontal boards) next, and finish the sides with the two interior stiles. Follow the same sequence to install the front trim.
Glue and nail the nosing

Finish this version by gluing and nailing on the 1-1/2-in.-wide nosing. We mitered the ends of the nosing, but you could also use square joints and simply fill and paint the exposed end grain. Cut and fit the 1×2 nosing that runs along the two sides and front of the pedestal. Miter the ends at the corners. Then glue and nail the nosing to the top of the trim.
11 Things That Should Never, Ever End Up in Your Washing Machine
Add moldings

Install the decorative trim that fits under the nosing. Miter the outside corners. Nail the trim to the pedestal. We chose a base cap molding for under the nosing, and matched the existing baseboard molding for the bottom trim. But you can choose any moldings to fit the style of your room. Miter the ends of the moldings and use 1-in. brads to attach them. We wrapped the bottom of the pedestal with standard Princeton-style baseboard to match the baseboard in the room. The next photo shows how you can cope your new molding to create a tight fit with an existing base molding. For more information on how to cope moldings, go to familyhandyman.com and search for “coping.” If your baseboard isn’t compatible or you don’t care about creating a built-in look, then skip the coping step and just cut a square end on the baseboard. When you’re finished installing the trim and moldings, fill the nail holes. Let the filler dry and sand it smooth. Then brush another coat of paint on the trim and moldings to finish the project.
Avoid Using Bleach for White Laundry and Try These DIY Cleaning Tricks Instead
Cope the baseboard

For a built-in look, cope the baseboard to fit against the existing base. To learn how to cope baseboard like a pro, search for “coping” at familyhandyman.com.
10 Laundry Mistakes You Didn’t Know You Were Making