


A bathroom vanity may seem too complicated for your skill set, but it's probably not. Just follow this sleek design with a Carpentry 101 approach.
2 to 3 days
Intermediate
Varies
Introduction
Nearly anyone can build this stylish DIY bathroom vanity in just a few days with these easy-to-follow step-by-step instructions.
Tools Required
- 1/2” straight cut router bit
- 18ga. nail gun
- Clamps
- Measuring tape
- Miter saw or circular saw
- Router
- Speed square
Materials Required
- #8 x 1-1/2" screws
- 1 - 1x3x4'
- 1 - 1x4x4'
- 1-1/2” x 18G brad nails
- 150 and 220 grit sandpaper
- 2 - 1x12x10' Maple boards
- 4” straight metal bracket
- 6 - 3” lag bolts
- 6” metal angle brackets
- Natural wood putty
- Painters cotton rags
- Sealer (polyurethane)
- Stain
- Stain brush
- Stain conditioner
- Wood glue
A bathroom vanity is probably something you never considered making yourself. Allow me to help you change that perspective.
As I approached this project for a DIY bathroom vanity, I purposely designed it with clean lines and simple joints. Ultimately, I wanted a vanity that would fit well in any bathroom and compliment any style. And it’s really not that difficult to build. The hardest part will be reading a tape measure for exacting measurements.
This vanity strategically hides all hardware so the whole thing looks like it’s floating. Follow my step-by-step instructions and insider tips so you can build this DIY bathroom vanity with confidence.
Project Overview

Cutting List
| KEY | QTY. | PART | DIMENSIONS |
| A | 1 | Front face | 3/4″ x 11-1/4″ x 49″ |
| B | 2 | Sides | 3/4″ x 11-1/4″ x 17-1/4″ |
| C | 1 | Back | 3/4″ x 11-1/4″ x 47-1/2″ |
| D | 1 | Shelf | 3/4″ x 11-1/4″ x 47-1/2″ |
| E | 2 | Shelf divider | 3/4″ x 11-1/4″ x 10″ |
| F | 2 | Cleats | 3/4″ x 3-1/2″ x 47-1/2″* |
| G | 1 | Cleat support | 3/4″ x 3-1/2″ x 47-1/2 “ |
| H | 4 | Gussets | 3/4″ x 2-1/2″ x 6″** |
| J | 2 | Divider support | 3/4″ x 3-1/2″ x 10-1/2 “ |
Overall dimensions: 49-in. W by 23-1/4-in. T by 18-in. D.
* – One long edge ripped at a 45-degree angle.
** – Cut both ends at a 45-degree angle.
Project step-by-step (15)
Step 1
Cut wood for top portion of vanity
Using a miter saw or circular, cut wood for the front face (A) and two side panels (B) for the upper part of the vanity. Refer to the Cutting List above.

Step 2
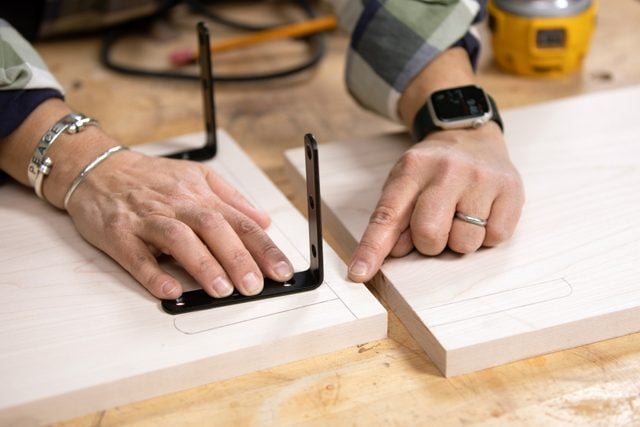
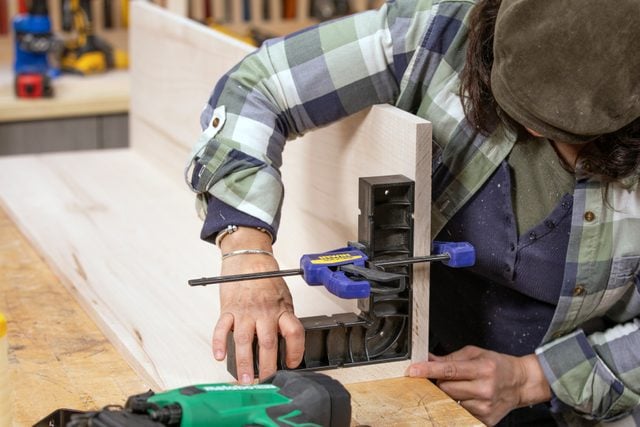
Route “L” bracket channels
Lay the front (A) and side pieces (B) flat and in tandem to where they will connect. An inch up from the bottom of the upper section, mark where you will route a channel to install the “L” brackets. Leave a little wiggle room to easily install the “L” brackets.
Using a router with a 1/2-in. straight cut bit, set your depth to the thickness of your “L” bracket. Be careful not to take out too much depth. Your screws need enough wood to grab and do their job.
Step 3
Build the top section of vanity
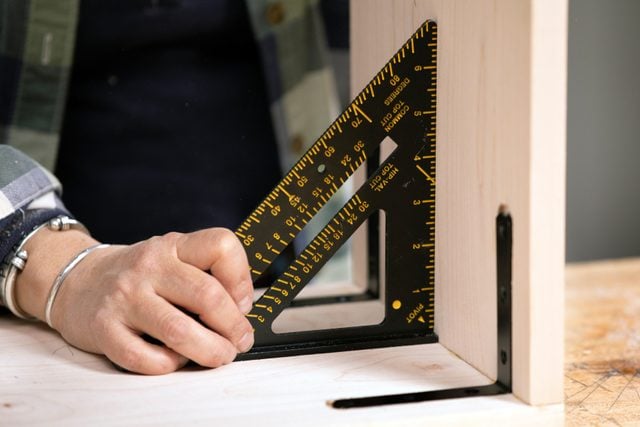
Using a speed square or a corner jig to ensure a solid 90-degree angle corner, glue and nail the front face (A) to the side panels (B). Make sure the sections you routed for the “L” bracket line up from front to side panels. Once you put this together, you can’t go back in with the router.
Pro tip: When gluing unstained wood, keep a wet rag on hand to wipe away any excess glue from the wood surface. When it comes time to stain the whole piece, you’ll be happy you did this. Dried glue will not allow stains to penetrate the surface, leaving you with a less-than-perfect finish.
Step 4
Install the cleat and supports
To complete your square and provide rigidity to the upper section of your vanity, attach one of the two cleats (F) to the back of the vanity and install the cleat support (G) below it.
Install the top cleat (F) using pocket screws with the 45-degree ripped edge facing downward and flush with the back and top edges of the sides (B). Similarly, the cleat support (G) is attached flush to the back and bottom edge of the sides (B). These cleats (F), often referred to as French cleats, will serve as part of your hanging mechanism.
Step 5
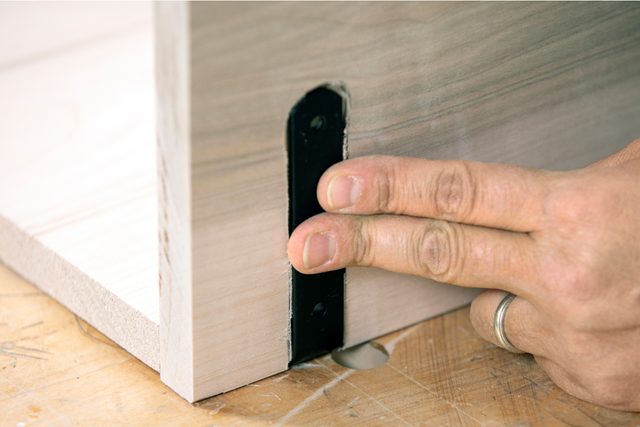
Install “L” brackets
Install “L” brackets with screws attaching the front panel (A) to the side panels (B). Be sure to check the length of the screw so they don’t protrude out the front (A) or side (B). You don’t want to ruin the outermost part of your vanity.
Step 6
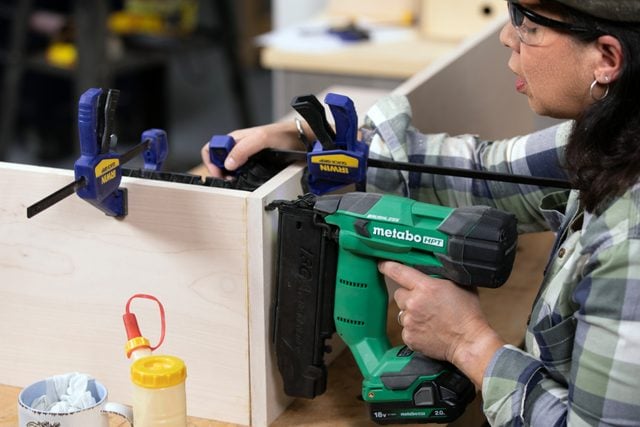
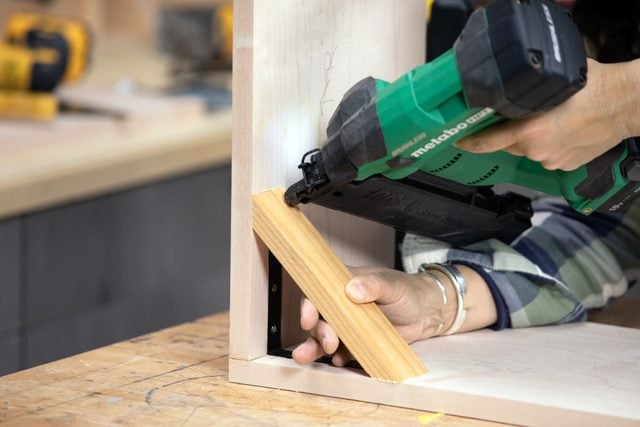
Install the gussets
Cut the 45-degree angles on either end of the gussets (H). In the top back corners of your box, install two gussets (H) between the sides (B) and the cleat (F). Install the remaining two on the bottom, front corners of the box, connecting the sides (B) to the front (A).
Ensure the case is square when installing these. Use wood glue and the appropriate length brad nails to secure them inside and outside the box.
The gussets (H) serve two purposes. They help the corners maintain their 90-degree angle and distribute the weight of the heavy bathroom countertop.
Pro tip: No one will ever see the gussets (H) or the “L” brackets. But they’ll give the vanity longevity and ensure it can handle the weight of leaning and the pressure of pull and push with use.
Step 7
Build the back and shelf
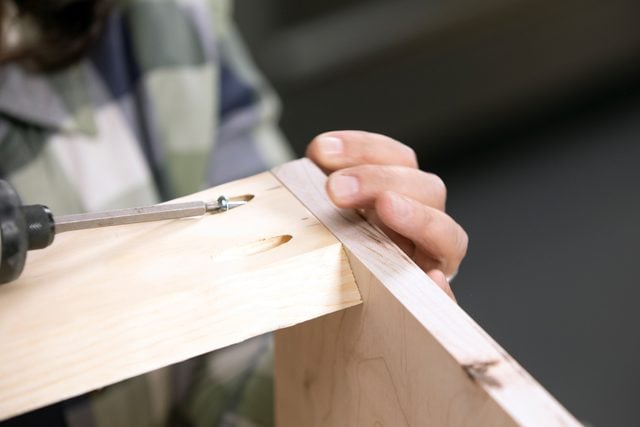
Now you’ve made that upper section, double-check your measurements for the width of the box and trim to back (C) and shelf (D) to that width. Wait until you put together the upper section to cut these pieces; sometimes they may be off by 1/16-in., and that will be noticeable.
Use wood glue, pre-drill, and countersink #8 by 1-1/2-in. screws from the underside of the shelf (D) up into the back (C).
Step 8
Add brackets under lower shelf
To add even more support and strength to the lower shelf (D), I decided to add “L” brackets on the lower back side connecting the back panel (C) to the shelf (D). Again, they’re not visible.
To make them flush, route a channel the same as we did on the upper portion. This will bury the brackets and make them flush so they don’t impede when you install the bathroom vanity.
Step 9
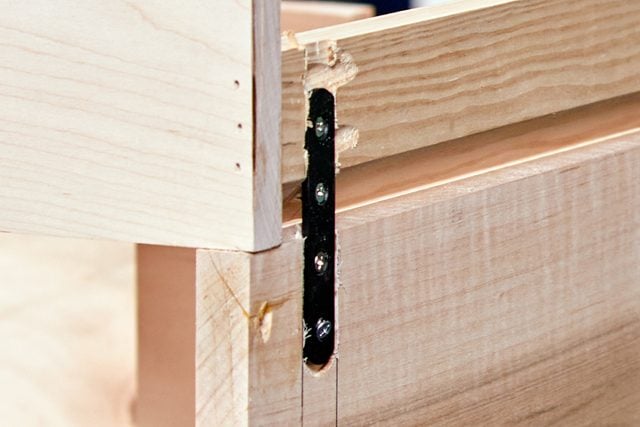
Install support straps
For more insurance with the connection from the upper square to the lower back panel, add metal support straps (G to C). Again, use a wood router to create a channel and ensure it’s flush once installed.
Step 10
Cut and install dividers/support shelves
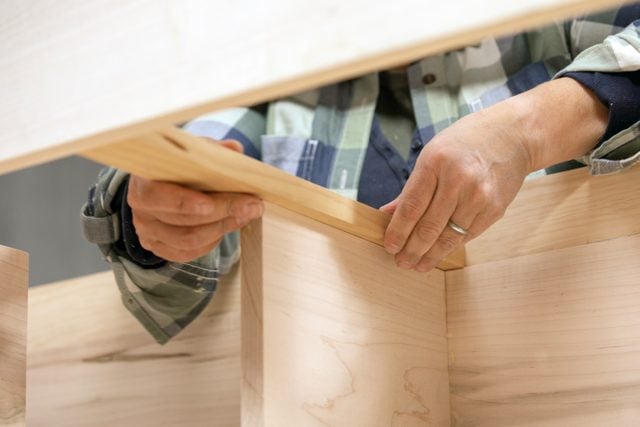
With a vanity of this length, we want to prevent the shelf from sagging over time. Therefore, we will install two dividers (E) that will also serve as support and prevent sagging.
Cut and install two center dividers. While doing this, I also placed a 1- by 4-ft. crossbar (J) from front to back over the divider for more strength and to give me more working space to install screws or nails. Notice how I installed them in a way that ensures they aren’t visible when the whole unit is in place.
Step 11
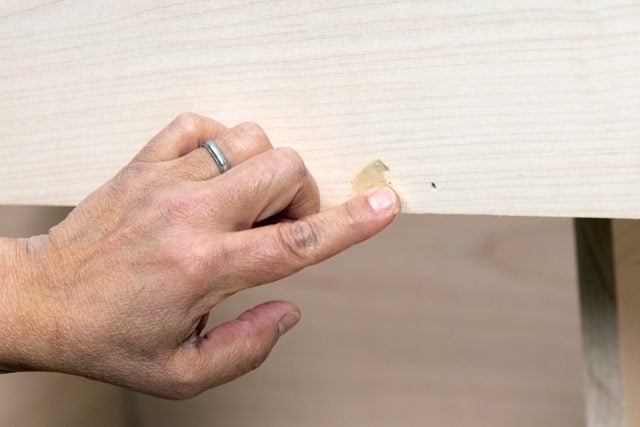
Putty nail holes and apply stain conditioner
Now that the whole unit is put together, do a final prep for stain. Fill small nail holes with wood filler and ensure dried glue is not visible in seams and joints.
Once putty has dried, smooth all sections first with 150-grit, then 220-grit sandpaper. Be sure to sand in the direction of the grain.
Prepare the exterior with a stain conditioner before applying stain. Apply conditioner according to the manufacturer’s instructions. A wood conditioner will ensure the stain seeps into the wood grain evenly, giving you a higher-quality finish.
Be sure to do a test of your stain color on the actual wood you’re going to use, not just a sample piece of the same species. Stains change color with species of wood. Even with different pieces of the same species, stain will take on different feels. Avoid surprises and do a test at least a day before you begin the project.
Step 12
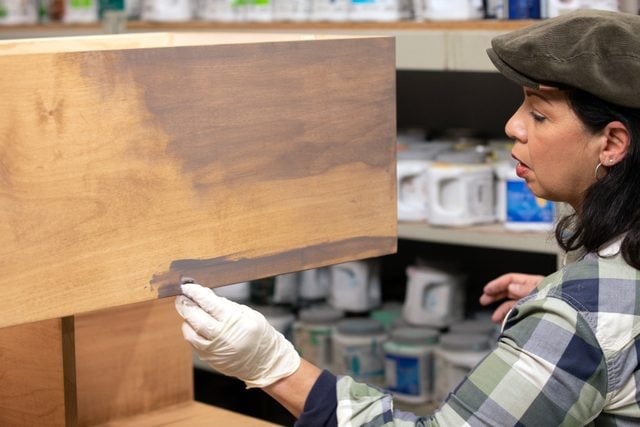
Stain wood
Apply at least two coats of stain. In this case, I used two colors of stain. In general with stain, I prefer to brush on and wipe off with a cotton painter’s rag. Allow the stain to dry completely between coats.
The grain may bloat and rise, leaving a rough feel to the wood you nicely sanded. This is typical; just lightly sand again with 220 grit. You may have to do it again after the second coat and before you apply your sealer.
Step 13
Apply sealer
Apply two or three coats of a sealer like polyurethane or lacquer with a quality paintbrush. If you feel the grain is raised when dry, lightly sand back and apply another coat. Since the vanity is a high moisture area, consider a spar varnish.

Step 14
Installation
The planning that goes into an open-style vanity is one of the more challenging parts of a build like this. This is because the goal is to conceal the plumbing inside the vanity’s upper box. To achieve this, it’s necessary to have an above-counter sink bowl. But it’s equally important to ensure the plumbing rough-in sits at the correct height for the needs of your bathroom.
When it comes time to install the vanity:
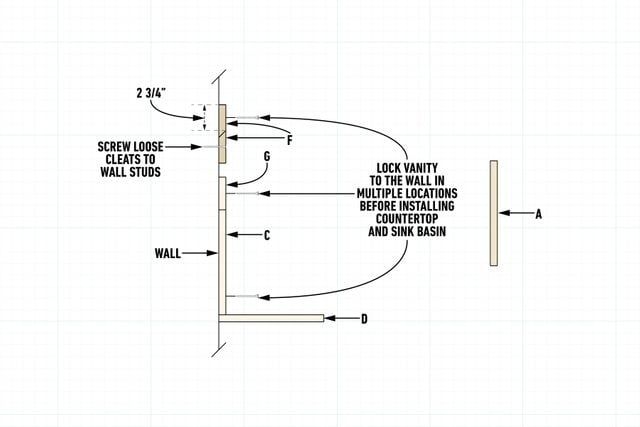
- Trim two or three inches off the loose cleat (F). This will allow you to move your vanity side to side before you secure it.
- Install the trimmed loose cleat (F) level on the wall so that its top point is 2-3/4-inches below where you would like the bathroom vanity height to be. Attach this to at least two studs. If it covers any roughed-in plumbing, cut off that portion before installing it.
- Hang the vanity so the cleat installed on the wall (F) and the cleat at the top of the vanity (F) marry. If the positioning is where you’d like it, mark and trim off any vanity components that interfere with the plumbing rough-in before moving on.
- Lock the vanity to the wall studs in at least two locations before installing your countertop and sink of choice.
Step 15
FAQs
Is it cheaper to build or buy a bathroom vanity?
As you might expect, DIY is cheaper because you’re not paying for labor. Total cost with materials will be less than if you had it custom-built by a cabinet maker or contractor. A commissioned, custom-built vanity can cost you two to three times as much as a prefab vanity purchased from a retailer, because there are more costs involved in making and putting the vanity together.
What are the standard dimensions for a bathroom vanity?
Standard widths are 24-, 30-, 36-, 48-, 60- and 72-inches. Standard depth ranges from 17- to 24-inches. Most standard bathroom vanities are hung 30- to 34-inches high.
When deciding the dimensions of your vanity, take into consideration the height of your sink and fixtures you want to use, as well as the height of the people who will most be using it. A vanity hung at 30-in. will be very uncomfortable for a tall person, just as a vanity hung at 34-in. may be too high for a shorter person. The benefit of a custom build is that you make the final choice.
What is the best wood for a bathroom vanity?
Choose a close-grained solid hardwood or plywood. Plywood is laminated, with the top layer the species called out — birch, cherry poplar, oak, teak or walnut. In any bathroom plywood, seal it well, and be sure all end grains are sealed or trimmed out so moisture doesn’t bloat or damage it. You can also look for a plywood specially treated to be water-resistant, but it’s usually much more expensive.
Originally Published: February 02, 2024