


Extend your growing season with this greenhouse you can build yourself.
Multiple Days
Intermediate
Varies
Introduction
Here in the Upper Midwest, the gardening season is short, typically May through September. By building a greenhouse, we can harness the sun’s rays to let plants thrive as early as March and extend harvest into late fall. A greenhouse is also a great place to store less hardy plants during harsh winters.
Even if you live in a more temperate region, a greenhouse will create a perfect climate for plants, protecting them from temperature swings, storms and pests. We built our greenhouse from cedar, which weathers beautifully, and polycarbonate sheets, which diffuse the sunlight and give even exposure to all the plants.
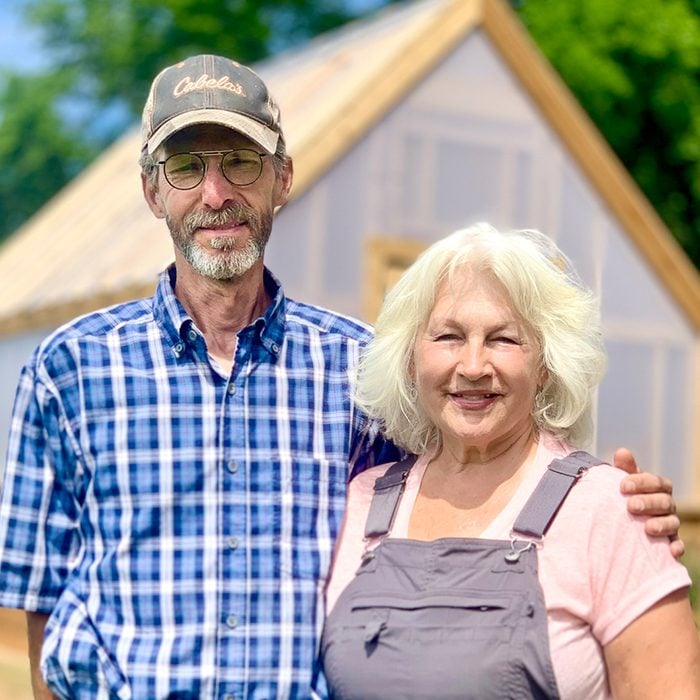
Keith and Renee Johnson live on a picturesque plot of land amid rolling hills in rural Wisconsin. They ran a small hobby farm for about 30 years and always wanted a greenhouse. Family Handyman teamed up with them to build this greenhouse so they could start seedlings for their garden just a few steps away.
Overall dimensions: 10-ft. W x 14-ft. D x 12-ft. H
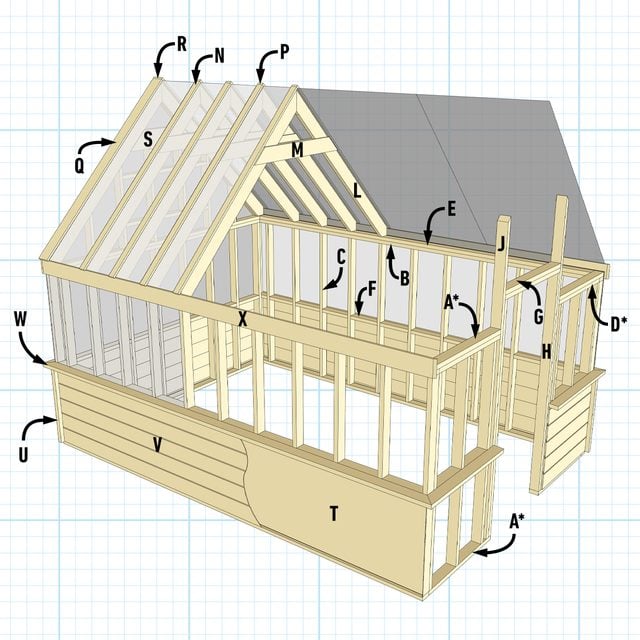
Figure B: Truss
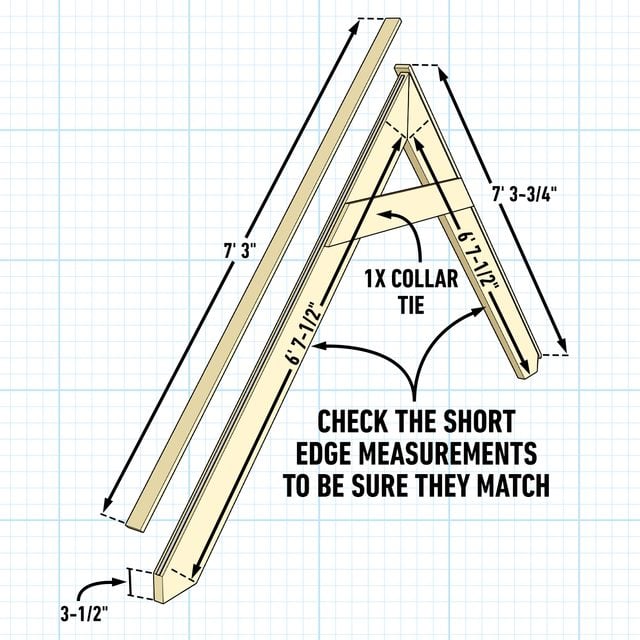
Figure C: Gable End
Cutting List
| KEY | QTY. | DIMENSIONS | PART |
| A | 4 | 1-1/2″ x 3-1/2″ x 9′ 5″* | Front/back wall top/bottom plates |
| B | 4 | 1-1/2″ x 3-1/2″ x 14′ | Side wall top/bottom plates |
| C | 40 | 1-1/2″ x 3-1/2″ x 5′ 9″ | Wall studs |
| D | 2 | 1-1/2″ x 3-1/2″ x 10’* | Front/back wall, second top plate |
| E | 2 | 1-1/2″ x 3-1/2″ x 13′ 5″ | Side wall, second top plate |
| F | 35 | 1-1/2″ x 3-1/2″ x cut to fit | Wall/sill blocking |
| G | 2 | 1-1/2″ x 3-1/2″ x 3′ 3-1/4″ | Door header for 36″ door |
| H | 2 | 1-1/2″ x 3-1/2″ x 6′ 8-3/4″ | Door trimmer stud |
| J | 2 | 1-1/2″ x 3-1/2″ x cut to fit | Door king stud |
| K | 12 | 1-1/2″ x 3-1/2″ x cut to fit | Gable cripples (Figure C) |
| L | 28 | 1-1/2″ x 5-1/2″ x 6′ 7-1/2″ (short edge) | Rafter |
| M | 10 | 3/4″ x 5-1/2″ x 3′ 11-1/2″ (point to point) | Collar tie |
| N | 10 | 3/4″ x 3-1/2″ x 7′ 3″ | Batten, short side |
| P | 10 | 3/4″ x 3-1/2″ x 7′ 3-3/4″ | Batten, overlap |
| Q | 2 | 3/4″ x 5-1/2″ x 7′ 3″ | Gable batten, short side |
| R | 2 | 3/4″ x 5-1/2″ x 7′ 3-3/4″ | Gable batten, overlap |
| S | 4 | 1-1/2″ x 5-1/2″ x 2′ 7″ (point to point) | Gable collar tie |
| T | 7 | 7/16″ x 32″ x cut to fit studs | Sheathing |
| U | 8 | 1-1/2″ x 1-1/2″ x 32″ | 2×4 corner trim |
| V | 30 | 9/16″ x 7-1/4″ x cut to fit | Cedar lap siding |
| W | 4 | 1-1/2″ x 3-1/2″ x cut to fit | 2×4 cedar sill |
| X | 2 | 3/4″ x 5-1/2″ x cut to fit | Cedar fascia |
| Y | 4 | 3/4″ x 5-1/2″ x cut to fit | Cedar frieze board (Figure C) |
| Z | 8 | 3/4″ x 3-1/2″ x cut to fit | Cedar corner trim (Step 18) |
| *The front wall plates will be cut to frame the door opening. | |||
Tools Required
- Basic hand tools
- Circular saw
- Compressor
- Drill/driver
- framing nailer
- Hammer drill
- Impact driver
- Level
- Miter saw
- Reciprocating saw
- Sawhorses
- Table saw
Materials Required
- 10' polycarbonate ridge cap
- 11/16" x 8' x 12' cedar bevel siding
- 11/16" x 8' x 14' cedar bevel siding
- 2" stainless steel ring-shank siding nails
- 2" stainless steel rubber gasket roofing screws
- 2x4 x 12' framing lumber (bracing)
- 3" framing nails
- 5"x5" x 8' ground-contact timbers
- 7/16" x 4' x 8' weather barrier sheathing
- 8mm x 4' x 8' polycarbonate sheets
- Butyl sealant tape
- Cedar 1x4 x 8'
- Cedar 1x6 x 16'
- Cedar 1x6 x 8'
- Cedar 2x4 x 10'
- Cedar 2x4 x 14'
- Cedar 2x4 x 8'
- No. 9 2-1/2" construction screws
- No. 9 3" construction screws
- Pressure-treated 2x4 x 10'
- Pressure-treated 2x4 x 14'
- Wooden screen door
Project step-by-step (22)
Step 1
Build the Foundation
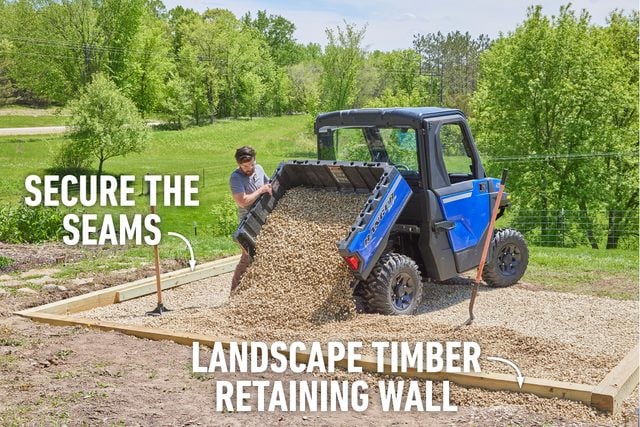
We removed eight inches of topsoil to make room for our base layer of rock. We leveled and compacted the dirt, rolled out heavy-duty landscape fabric, then added at least a two-inch layer of 3/4-in. limestone.
Next, we created a mini retaining wall out of landscaping timbers. We placed, leveled and squared three sides of the retaining wall, leaving the fourth side off until dumping most of the rock.
We secured the timbers at the corners with eight-inch timber screws and fastened a pressure-treated board to keep the timbers together at the seams. When most of the rock was dumped and evenly spread, we built the fourth side. Then we leveled off and compacted the rock with a tamper.
Step 2
Build the Side and Back Walls
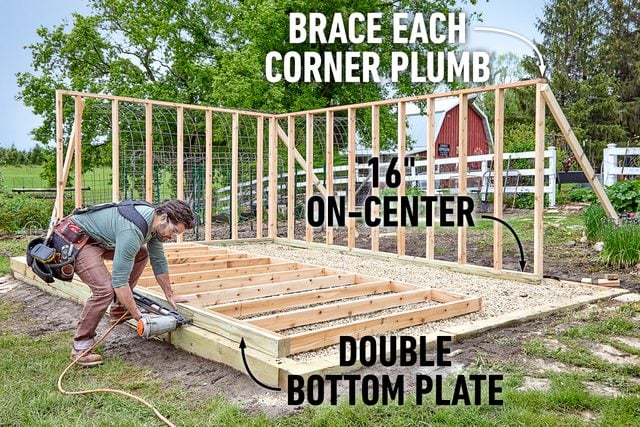
To build the walls, we used pressure-treated 2x4s for bottom plates and cedar 2x4s for top plates. We cut them to the length of each wall and marked the stud layout on them.
Because the studs will be visible inside and outside, we wanted the walls to be symmetrical. So we found the center of the wall and marked the studs every 16 inches on-center from there. We nailed the cedar 2×4 studs through the plates, then fastened a second bottom plate.
After tipping up each wall, we kept it plumb with braces at each corner and nailed the corners together, making sure the top plates were flush on top.
Step 3
Frame the Front Wall
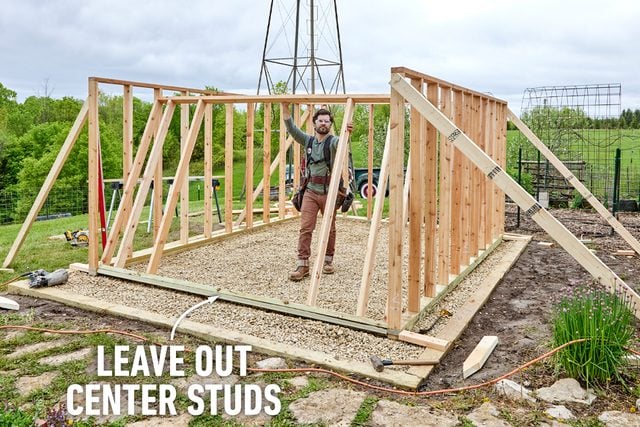
Since the walls are only six feet tall and the door is taller than that, we didn’t frame its rough opening during this step.
We wanted all the walls tied together while we constructed the rest of the structure. So we built the wall all the way across, leaving out the center studs where the door will eventually be framed. We tipped this wall up, braced it plumb and nailed it to the side walls.
Step 4
Anchor the Walls
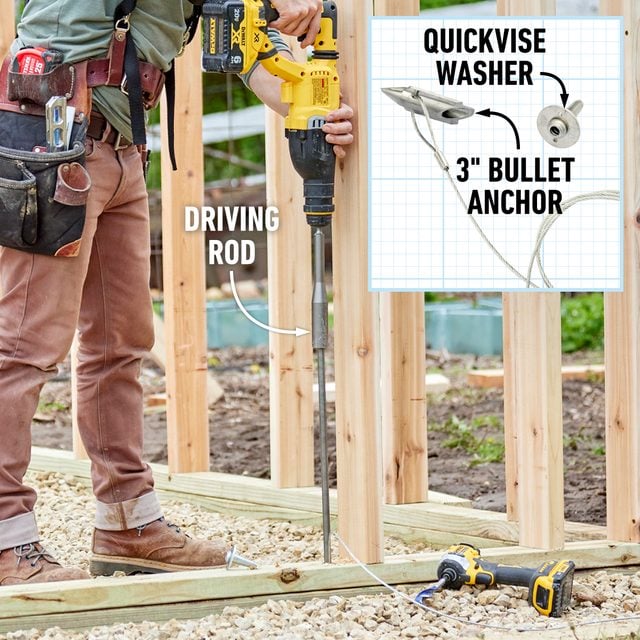
We anchored the structure to the ground with bullet anchors by American Earth Anchor.
After drilling holes in the bottom plates to fit the anchors through, we drove the anchors into the ground with a hammer drill outfitted with a driving rod. Then we pulled the cable through the Quickvise washer to set the anchor in the ground and hold the structure firmly in place.
Step 5
Repeat Parts With a Template
Make a template to accurately cut the rafters and assemble the trusses to ensure they’re all identical. We built a simple 2×4 frame on a pair of sawhorses and fastened a piece of sheathing to the top.
Be sure to build the frame to the exact span of the walls, then draw a line up from the center point to locate the ridge miter. We fastened a block 3-1/2-in. up from the corner on each side of the template at a 45-degree angle. With this setup, we could accurately mark and make all the necessary cuts before assembly.

Step 6
Assemble Gable Walls
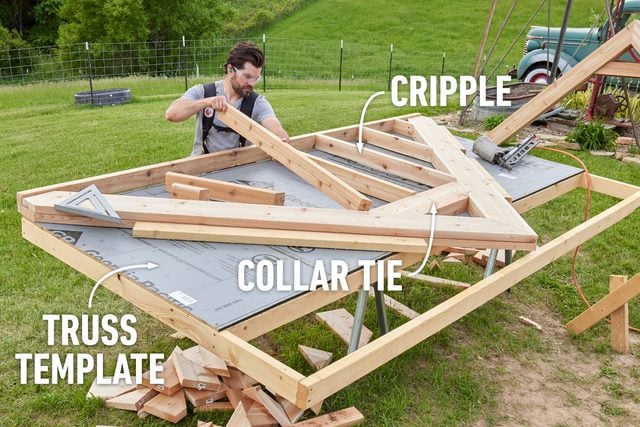
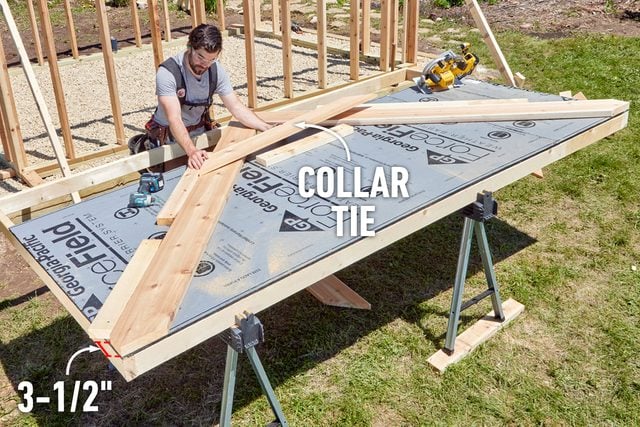
The gable walls on the front and the back of the greenhouse follow the same process as the trusses, with a few exceptions.
First, the gable ends are doubled up. Second, the collar ties are cut from 2-by material and fit between the two rafters. Third, we added cripples to match the layout of the wall they’ll be sitting on.
We used the same template to position the parts, then fastened the second top plate to the bottom of the trusses and cut the collar tie and cripples to fit.
Step 7
Build the Trusses
After making the cuts, place the parts of the truss back on the template, line them up and fasten the peak together with a screw. Then cut and fasten 1×6 cedar collar ties. After determining the location of the collar tie, fasten another block to the template so you can repeat the location on the rest of the trusses.
Step 8
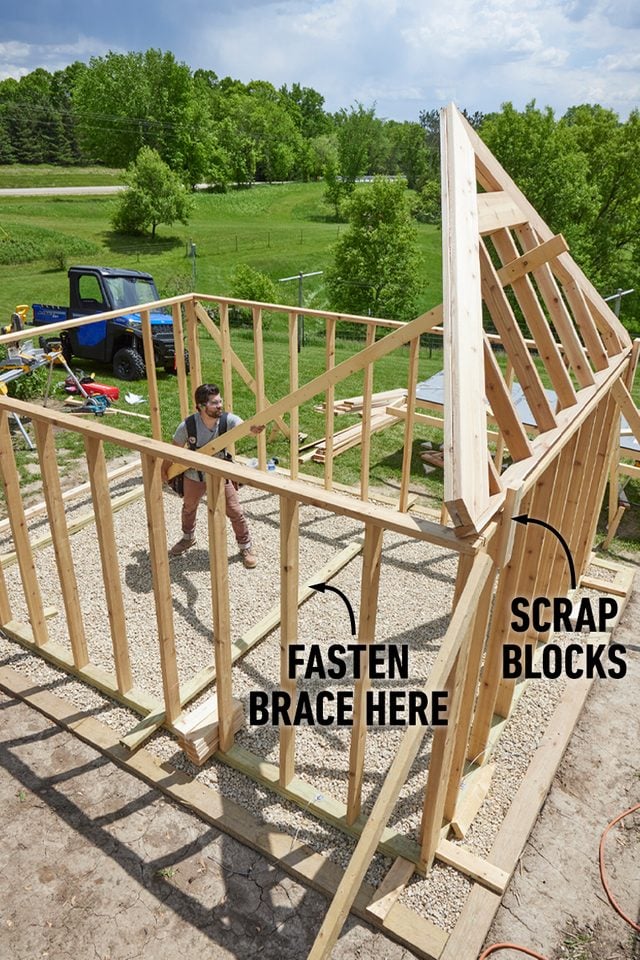
Position and Brace the Gable End
We lifted the gable end onto the walls. Before tipping it upright, we fastened a few scrap 2x4s to the back of the wall to prevent the gable from slipping off.
We fastened a long board to the center cripple toward the top of the gable to use as a brace, pushed the gable upright and then braced it plumb. With it in place, we added a second top plate to the side walls where we’ll rest the trusses.
Step 9
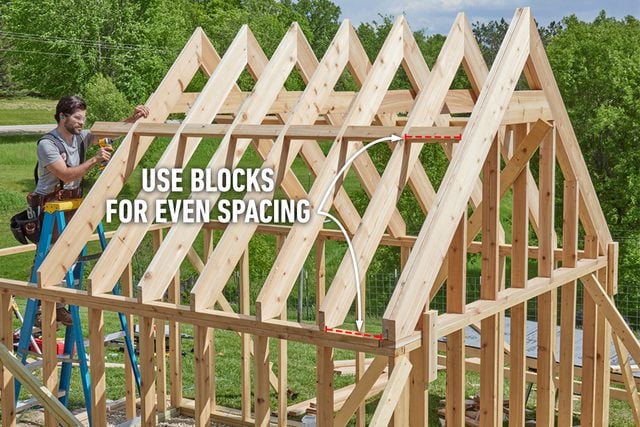
Position the Trusses
When the gable end is plumb, braced and fastened to the wall below, it’s time to set the rest of the trusses.
First, precut cedar 2×4 blocks to match the spacing of each stud bay. Fasten the blocks to the gable 36 inches from the peak, tip up the next truss, fasten it to the blocks and then add the next blocks. Repeat this for each truss until all are attached.
As we tipped up trusses, we checked that their tails lined up with the studs in the walls and toe-screwed them to the top plates.
Step 10
Cut Out the Door Opening
Once you’ve fixed the trusses to the walls, cut away the top plates and a bottom plate to frame the door. We marked out a 42-1/2-in. opening in the center of the front wall and cut it out to fit the 36-in. door and its framing. This left room for the framing and space for the door to swing open.
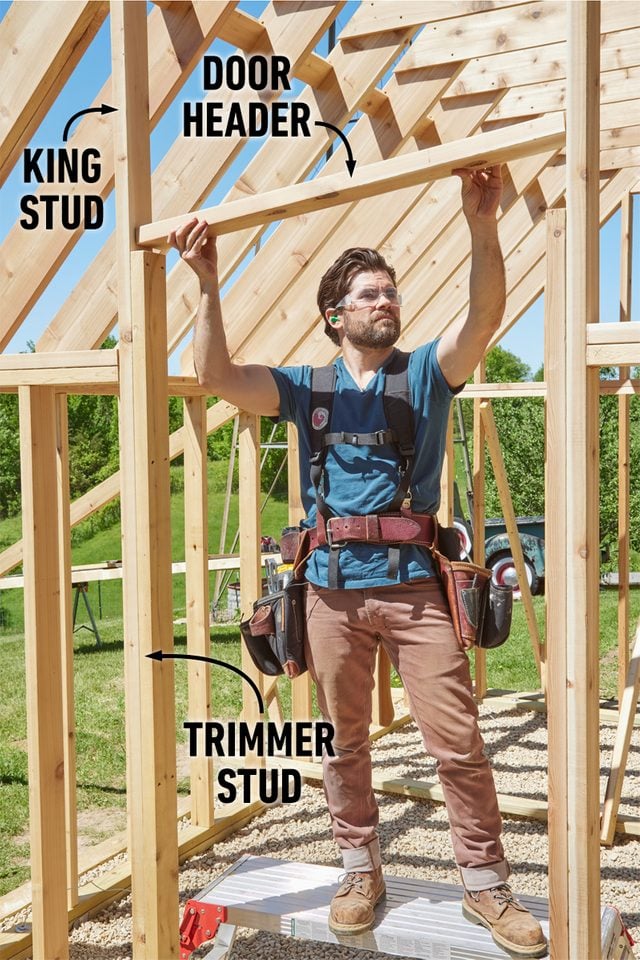
Step 11
Frame the Door
Cut king studs to fit from the bottom plate to the gable truss, plumb and fasten them in place. To finish the framing, add trimmer studs cut to fit the height of the door and a header across the top.
Because there is no doorjamb, these components must be perfectly plumb and level. Keep about 3/16-in. space at the sides and top, and about 3/8-in. at the bottom when the door is in place. Install the door temporarily to make sure it fits.
Step 12
Sheathe the Bottom
To install siding on the bottom half of the greenhouse, we added sheathing to the studs. The sheathing also adds rigidity to the entire structure.
We ripped the sheets and nailed them to the studs with ring-shank framing nails, making sure all the seams landed on a stud. We kept the factory edge of the sheets up for easier leveling.
Step 13
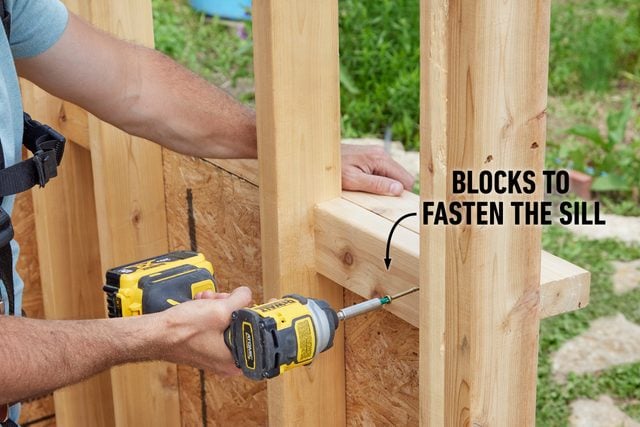
Add the Siding Sill
Before adding the siding, we needed to cut and install a siding sill to keep water from getting behind it.
We started by cutting a five-degree angle on the edge of a 2×4 with the table saw, then cut a miter at both ends to turn the sill around the corner. To get these miters to snug up at the corner, we matched the bevel cut with the miter saw.
We marked the miters and set the back of the board on a shim to keep the beveled edge flat against the fence. This trick makes it easy to make more precise compound cuts.
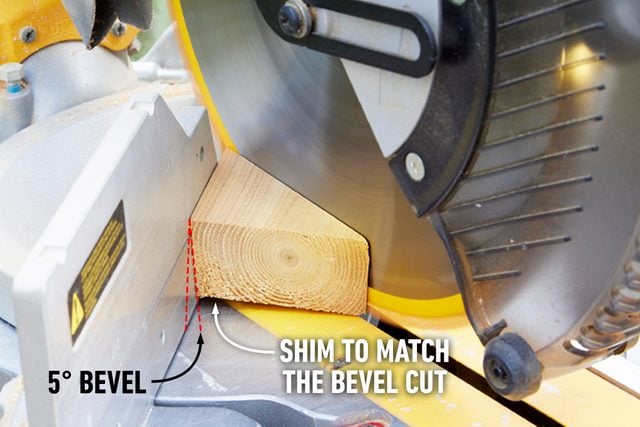
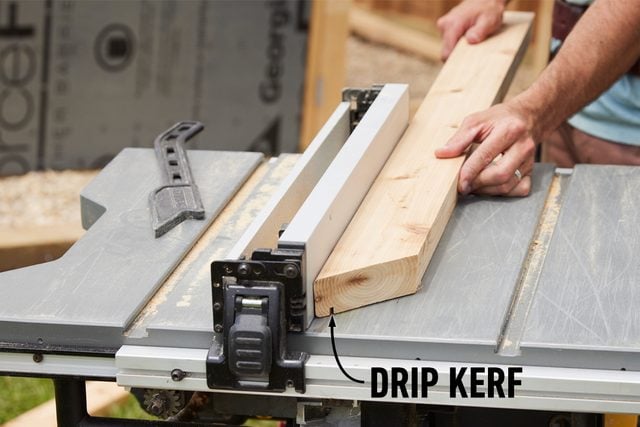
Once cutting the miters, we cut a 1/4-in.-deep kerf in the bottom of the sill about 1/2-in. from the outer face of the sill. This kerf will keep water from wicking backward and getting behind the siding.
We fastened 2×4 blocks between the studs to attach the sill. We set the sill on top of the plywood sheathing, flushing up the top of the blocks with the top of the sill. Then we fastened the blocks through the studs and the sill through the blocks.
Step 14
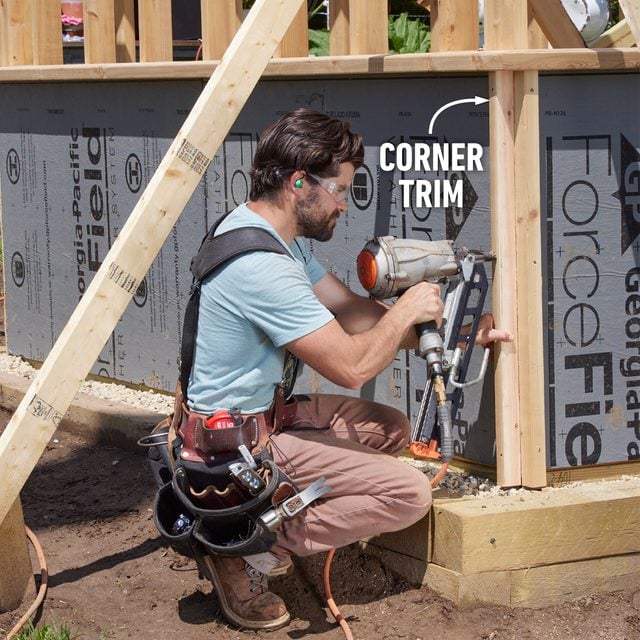
Install Corner Trim
There are several ways to handle the corner detail of the siding. We chose an inverted corner trim that the siding butts into.
We used leftover 2x4s ripped in half and nailed them to the corners. This makes cutting the siding right up to the trim a breeze and adds a unique look. We also didn’t have to order thicker trim boards, spend time cutting angles into each piece of siding or install individual corner hardware for each course.
Step 15
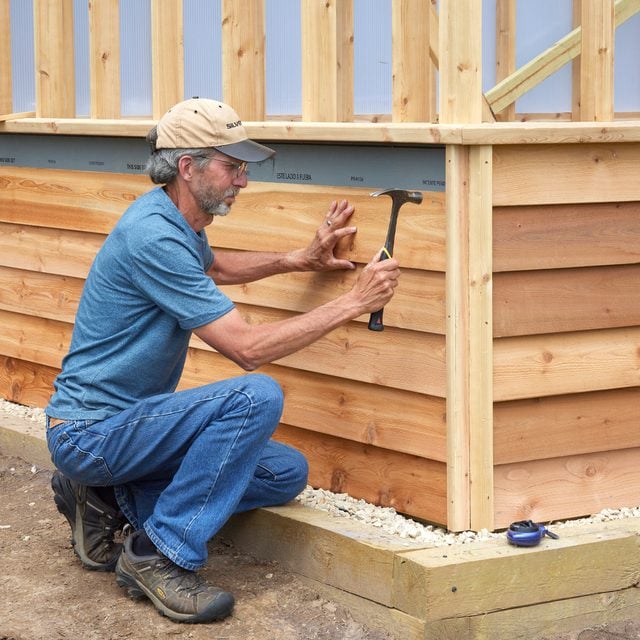
Install Siding
The corner trim makes the siding installation fast and easy. We recommend buying lap siding that’s long enough to span an entire side, if available.
Cut the siding to length and nail it to the studs using ring-shank nails compatible with cedar. (Some galvanized siding nails will leave a blue streak on the cedar when water passes over it.) Each course of siding overlaps the next, leaving six inches of each course exposed.
Step 16
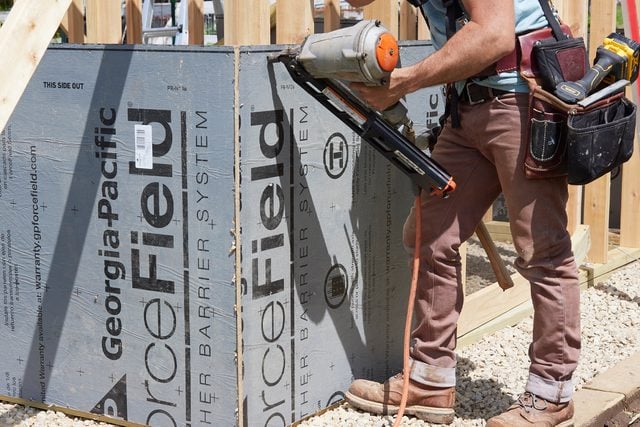
Finish Sheathing the Walls
With the sill and siding finished, we started sheathing the rest of the greenhouse walls with polycarbonate sheets. We cut the sheets to length, making sure each seam landed on a stud, then used two-inch stainless steel roofing screws to fasten the sheets.

Step 17
Fasten the Fascia
Cut a piece of 1×6 cedar to fit beneath the edge of the roof. Fasten the fascia so that a straightedge placed on the rafter contacts the top outer edge of the fascia. Drive nails into each truss and top plate.
Step 18
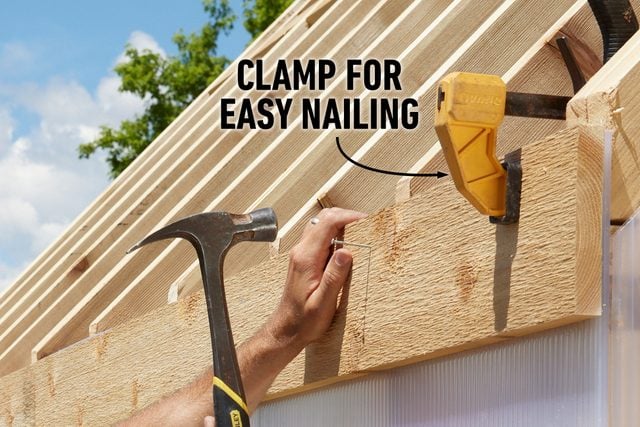
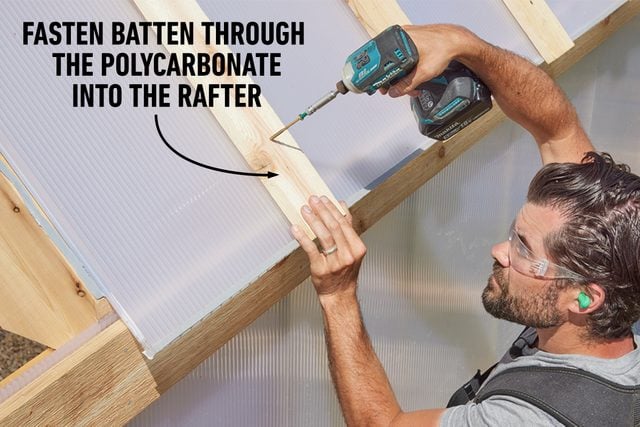
Make a Polycarbonate Sandwich
Apply a strip of butyl tape down the center of each truss. This tape is sticky, especially in hot weather! Cut the pieces of polycarbonate to overhang the fascia by about 1-1/2-in. Double-check the truss layout to verify that the edge of each sheet will land on a truss, then set the sheets in place.
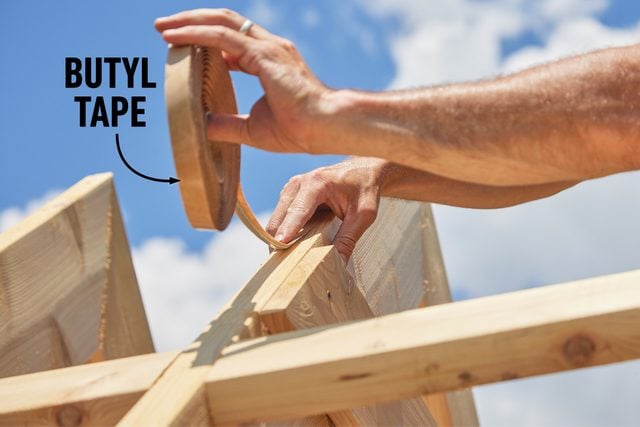
The butyl tape sticks to the polycarbonate instantly, so be precise when laying each sheet down. As you position the sheets, fasten a piece of cedar 1×4 over each truss with a three-inch exterior construction screw. Drive the screw through the butyl tape to seal the penetrations and secure the polycarbonate sheets.
To be on the safe side, we added a second strip of butyl tape where two sheets met on one truss to make sure all the screw holes would be sealed.
Step 19
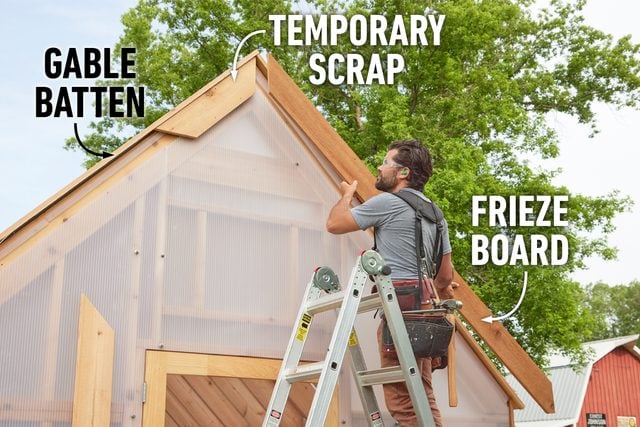
Trim the Roof
We trimmed the gable edges of the roof with 1×6 cedar. This batten needed to overhang the frieze board, so we positioned it one inch proud of the sheathing on the gable end. Then we installed cedar frieze boards to trim the peak.
We cut two scraps of 1×6 at a 45-degree angle to check the fit at the peak and fastened one of them temporarily. We positioned the frieze board on one side, then removed the scrap to install the other side.
Step 20
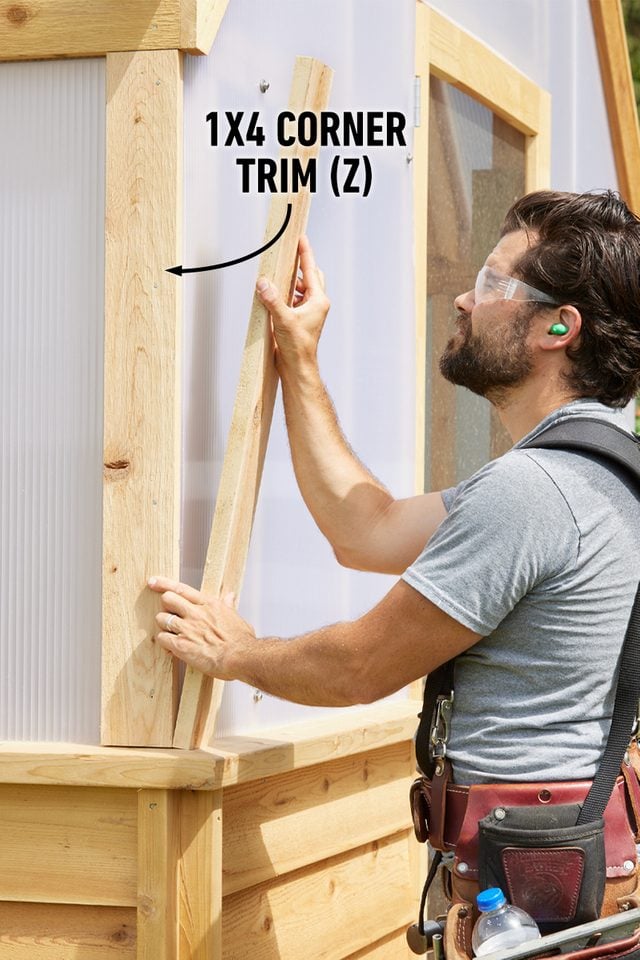
Add Corner Trim
Cut 1×4 cedar boards to fit the sill and the fascia. Fasten them to fit around the corners with siding nails.
Step 21
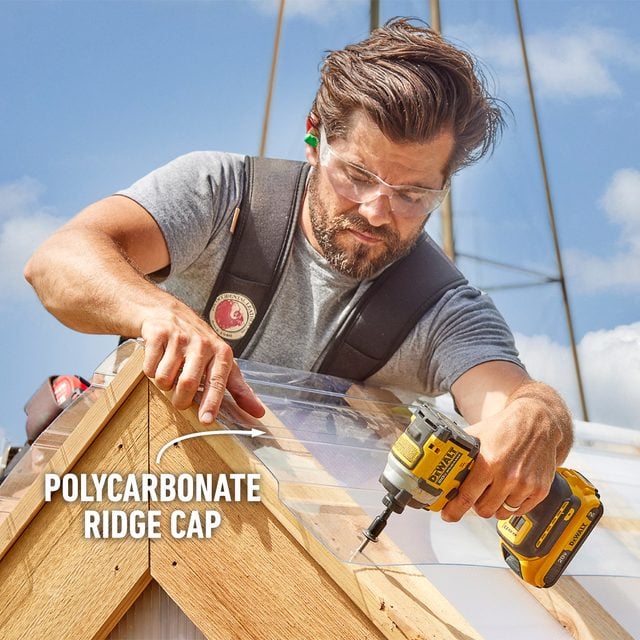
Fasten the Ridge Cap
To finish the outside of the greenhouse, we covered the peak with a polycarbonate ridge cap. We lined up the ridge of the cap with the peak of the roof all the way down and fastened it through each batten into the trusses with two-inch stainless steel roofing screws.
Step 22
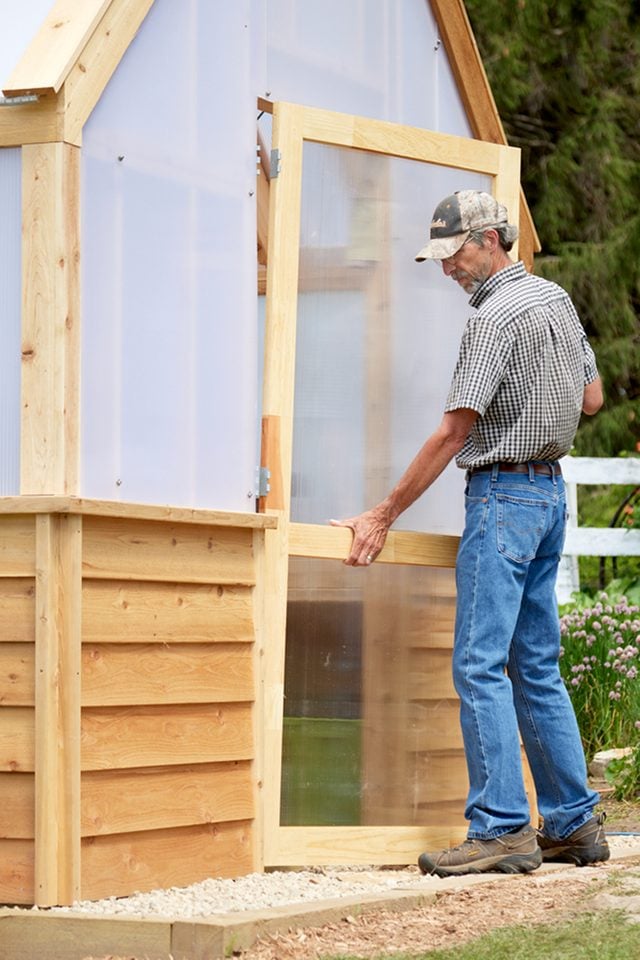
Install the Screen Door
We purchased a screen door from a home center to fit our door opening. We removed the screen and replaced it with a clear version of the polycarbonate we used on the rest of the greenhouse. Then we hung the door using three-inch galvanized utility hinges. Finally, we installed a screen door closer and fence gate latch to keep it from blowing open in the wind.
Originally Published: July 25, 2022