


How to Build a DIY Fire Pit Grill

Updated: Apr. 09, 2024
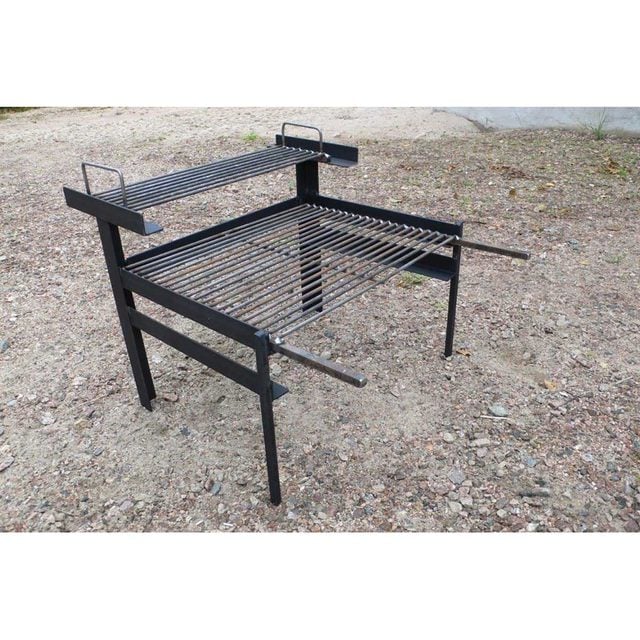
Want to cook great food over an open fire? This weld-it-yourself fire pit grill stand makes outdoor cooking better and easier.

Introduction
This project looks impressive, but it's surprisingly simple to build. Work through these instructions and you'll be cooking over an open fire in no time.
Tools Required
- 1/8-in.-thick piece wood or metal spacer
- 6-in. level
- Electric welder and safety equipment
- Framing square
- Miter saw
- Shims
- Tape measure
Materials Required
- 1-1/2-in. x 1-1/2-in. x 15-ft. mild steel angle iron (3/16-in. thick)
- 1/2-in. x 1/2-in. x 13-ft. mild steel square stock
- 1/4-in.-dia. x 65-ft. mild steel rod
- Boiled linseed oil

Project step-by-step (5)
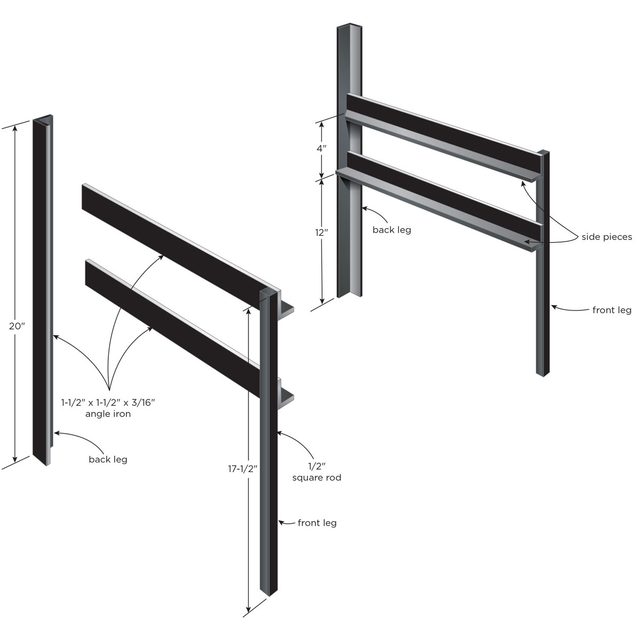
Cut Parts and Assemble Side Frames
- Cut two front legs (use square mild steel; 17-1/2-in. long each), two back legs (use angle iron; 20-in. long each) and four side pieces (use angle iron; 24-in. long each).
- Cut a 45-degree angle on the back ends of two side pieces.
- These ends will match a similar angled end you’ll cut on both ends of the back piece.
- Weld one front leg, one back leg and two angle-iron side pieces, taking care to orient the angled ends of the top-most side pieces towards the back. This makes one side frame.
- Use a carpenter’s square to ensure the front legs, back legs and lower side pieces turn out square in relation to each other.
- Use this first frame as a guide for creating an identical second side frame.
- Pro Tip: While it’s not absolutely vital that the heights of various side-frame parts match the plans exactly, it’s vital that both frames match each other.
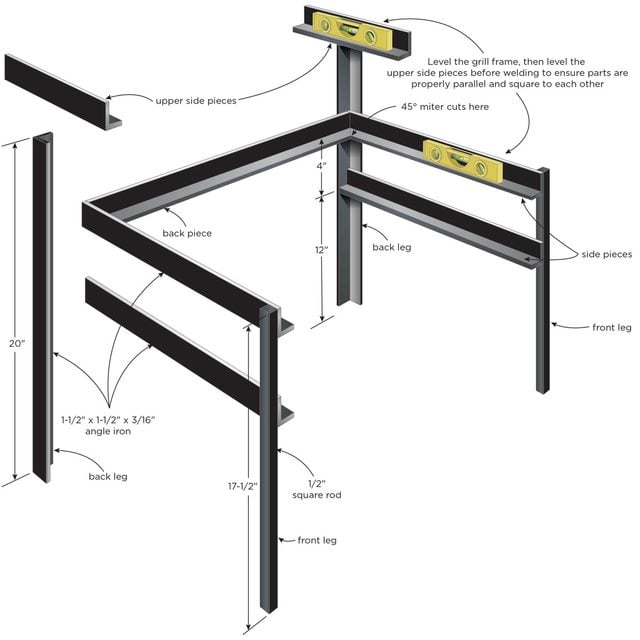
Assemble the Main Frame
- Using angle iron, cut a 24-in. back piece. Cut both ends of the back piece to a 45-degree angle to match the angled cut on the ends of the top-most side pieces you cut earlier.
- Weld the back piece to the side frames, joining them. Level up the growing frame by shimming the assembly as it sits on the ground, then use a six-inch level on the upper side pieces to orient them so they’re horizontal.
- Using angle iron, cut two upper side pieces, each nine inches long, and weld onto the back legs.
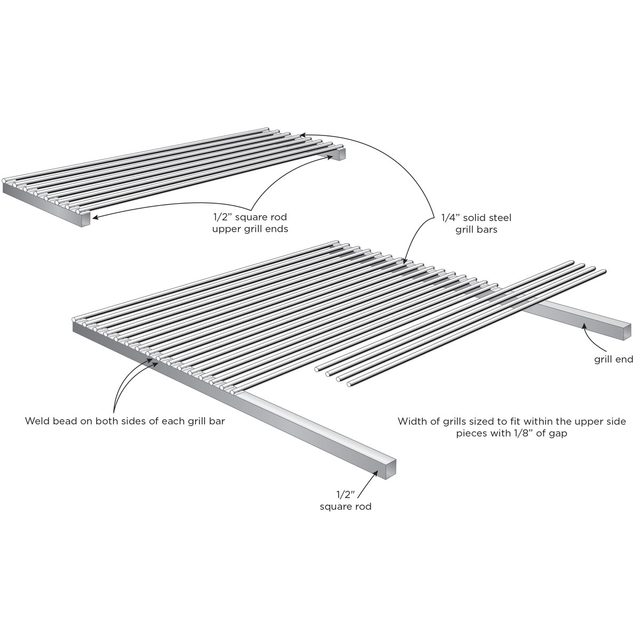
Build the Grills
- Using the square mild steel, cut two upper grill ends (both 24-in. long) and two lower grill ends (both 30-in. long).
- Using the mild steel rod, cut 29 grill bars, 24-in. long each.
- Place these grill end pieces in the angle iron they’ll rest in when complete, then weld the grill bars to them.
- Note that the ability to easily remove and replace the grill assemblies depends on a certain amount of clearance between the grill ends and the angle-iron side pieces.
- Pro Tip: Use a 1/8-in.-thick piece of wood or metal as a spacer to preserve clearance along the sides of the grill while you’re welding the grill bars to the grill ends.
- Note that the ability to easily remove and replace the grill assemblies depends on a certain amount of clearance between the grill ends and the angle-iron side pieces.
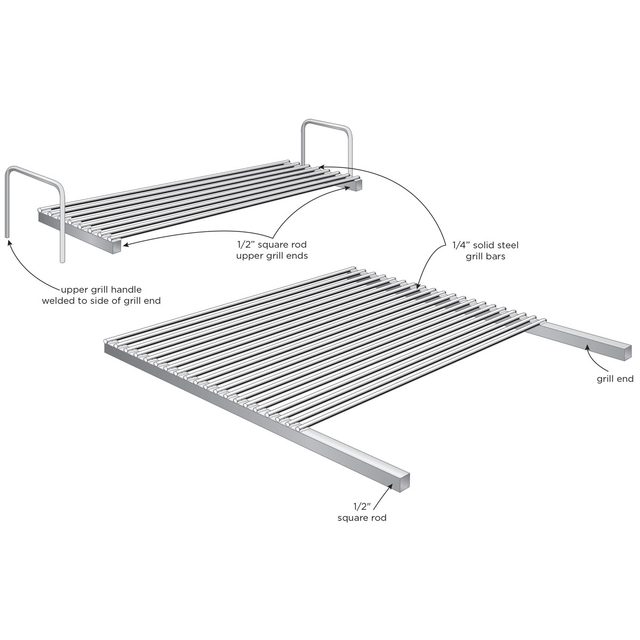
Add the Grill Handles
- Cut two 13-in. pieces of mild steel rod.
- Bend each handle in a vise, using your hands and a hammer, to form the upper grill handles.
- Make the two handles as close to identical as you can.
- Weld handles to the ends of the upper grill assembly.
Finishing Up
- Apply boiled linseed oil to all parts of the project except the grills. Allow three days for the oil to harden in the air. The resulting film will burn away where the legs get close to the fire, but some will remain to protect the metal elsewhere.
- Don’t paint this project because you want bare steel for supporting the food you’re cooking. Painting the leg assembly wouldn’t make sense either because the paint will flake off in the heat.
If you’re interested in learning about welding, Family Handyman’s DIY U has a class for you! Steve Maxwell teaches MIG Welding for Beginners where you’ll learn welding and metal fabrication with five MIG welding projects, including this fire pit grill. You’ll also learn how to choose a MIG welder and the welding supplies you’ll need. Check out this class and the entire catalog of classes and workshops for DIYers just like you.
Originally Published: August 25, 2020