


We know what you're thinking: "I'd love to build a canoe, but this is just too big and too difficult for me." Well, we think you're in for a pleasant surprise. True, this is a large project, and it is time-consuming. But it's like painting your house—lots of time and lots of work, but not all that difficult.
Introduction
Unlike most forms of boat building, a cedar-strip canoe is very forgiving in its construction. A first-time canoe builder with modest tool skills can build an excellent craft.
What is a cedar-strip canoe, anyway?
The basic idea behind a cedar-strip canoe is to make a hull of narrow wood strips, each one glued to the next with ordinary carpenter’s glue, and then cover the hull with fiber-glass, inside and out. The wooden hull by itself is weak, but the two layers of fiberglass make the canoe extremely strong, lightweight and waterproof. No ribs are needed, no canvas covering, and no caulking.
This “sandwich” construction, with the fiberglass as bread and wood as the filling, is also why this type of canoe is very forgiving to a novice builder—the wooden trips don’t have to be fitted exactly, because the fiberglass covers all the gaps.
What it takes to build
You don’t need the skills (or the fussiness) of an expert woodworker to make a cedar-strip canoe. If you can operate a table saw or radial arm saw, you can do it. You do need patience and persistence, however. There are a lot of wooden strips to put on, and there’s plenty of surface area to sand. You should count on it taking about 150-175 hours to finish the canoe.
A garage is the best place for building, because you need 12-16 ft. of clearance in front of and behind your saw for cutting the long strips. Furthermore, sanding the glued-up hull produces clouds of sawdust, and applying the fiberglass produces noxious fumes. You could work in a basement shop, but be sure you can get the finished canoe out, and install a powerful fan to exhaust dust and fumes. If you’re ready, take a deep breath, and let’s get started. The following will walk you through each step of building a cedar-strip canoe. Find a full, printable version of the article at the end of this project,
Tools Required
- 10 2-in spring clamps
- 2 7-in or 9-in paint rollers
- 2 paint scrapers
- 2 staple guns
- 20 clothespins
- 3 paint trays
- 4 6-in clamps
- Belt sander
- cartridge-type respirator
- Chalk line
- Church-key can opener
- Combination square
- Coping saw
- dust masks
- electric drill
- hand plane
- Jigsaw
- Orbital sander
- Router
- Rubber gloves
- safety goggles
- small tack puller
- surfers file
- Table saw
- Wrenches
Materials Required
- 2 1"x6"x8' pine
- 2 1/2"x4'x8' exterior fir plywood
- 2 1/4"x2" hex head bolts with nuts and washers
- 2 1/4"x5" hex head bolts with nuts and washers
- 20 1/4"x3" lag bolts
- 26 1/4"x2-1/2" hex head bolts with nuts and washers
- 3 1"x10"x16' cedar
- 3 22"x28" poster board
- 46 #6x1-1/2" drywall screws
- 5 19"x24" tracing paper
- 50 #6x2-1/2" drywall screws
- 50 1" brads
- 7 2"x4"12' pine
- 8 1/4"x3" hex head bolts with nuts and washers
Project step-by-step (44)
Step 1
Transfer Mold Shapes
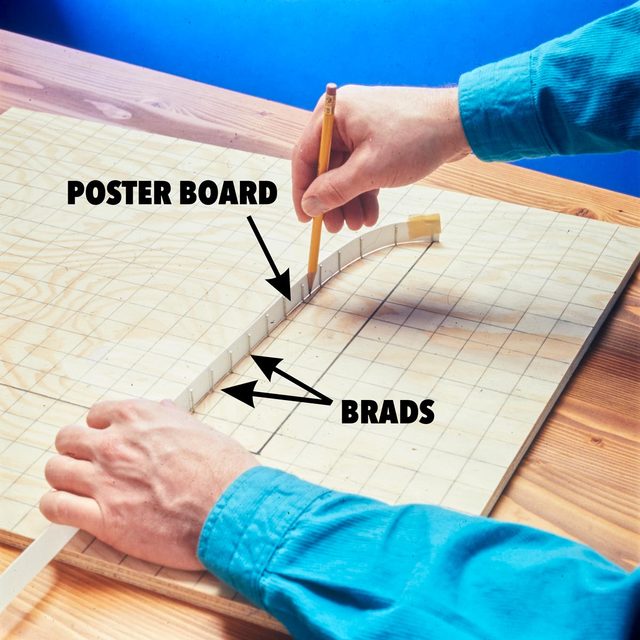
Transfer the mold shapes from our drawing to a piece of plywood using brads and a thin piece of poster board.
Step 2
Trace
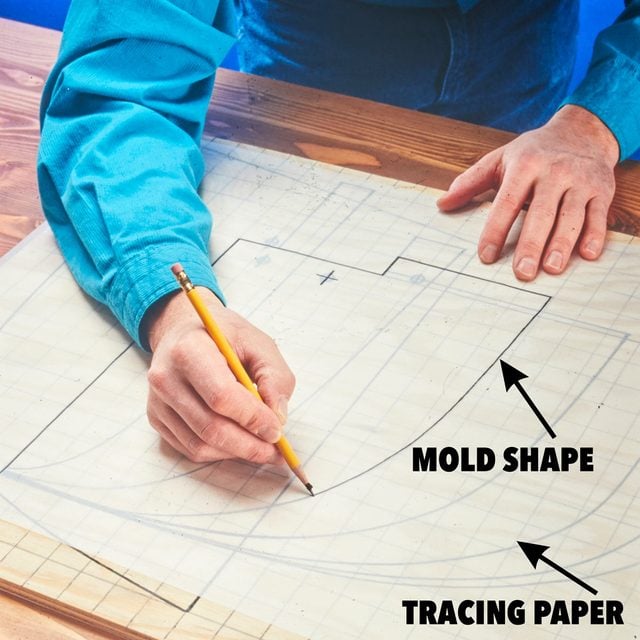
Trace the shape of each mold to a separate sheet of tracing paper, taping it securely to the plywood layout board for accuracy.
Step 3
Cut Poster Board Templates

Cut out templates from each tracing paper pattern, again taping the tracing paper down for accuracy.
Step 4
Align
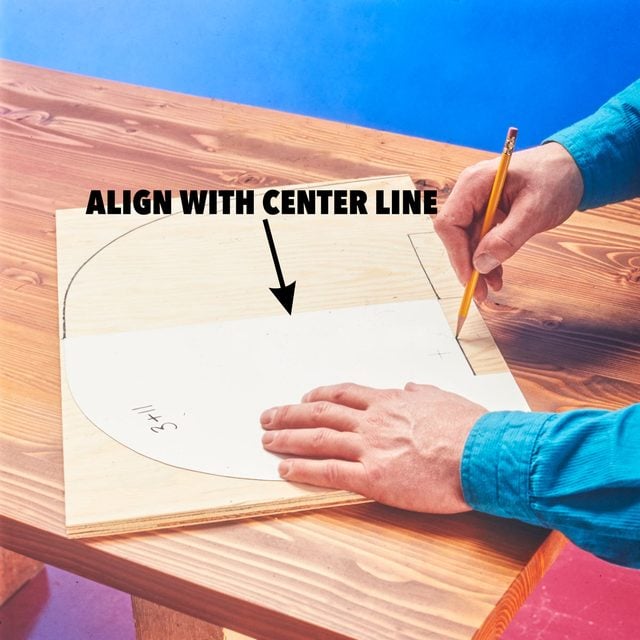
Align the poster board templates to the center lines on the plywood mold pieces. Mark the mold shapes on the plywood.
Step 5
Cut the Molds

Cut the molds out with a saber saw, staying outside the lines. Since the canoe is symmetrical, you can cut two molds at once.
Step 6
Assemble the Strong Back
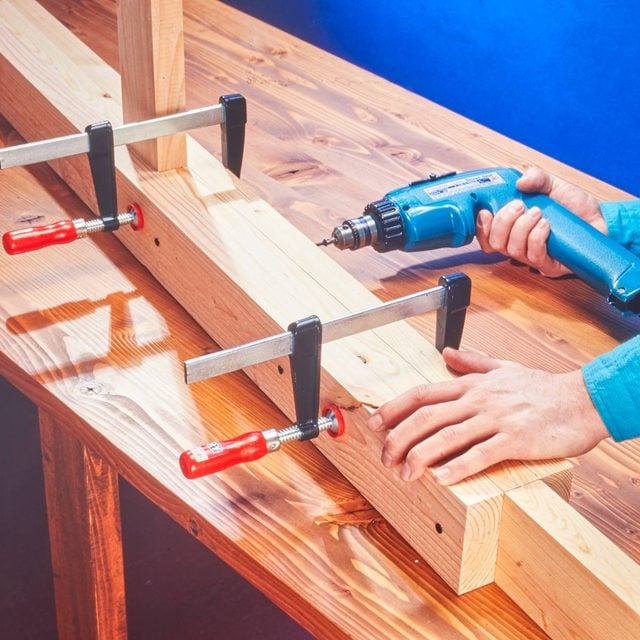
Assemble the strong back, aligning the pieces carefully. Work on a long, flat surface to keep the strong back straight.
Step 7
Snap a Chalk Line
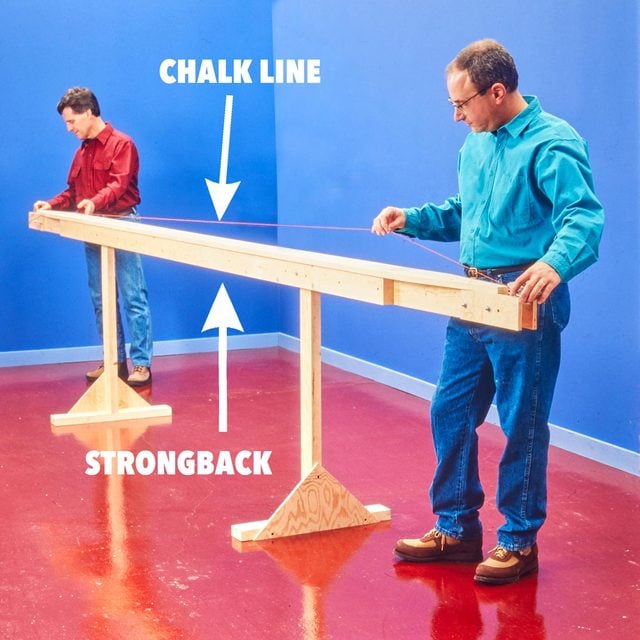
Snap a chalk line down the center of the strong back. This line will be used to align the mold supports and molds.
Step 8
Bolt the Mold Supports
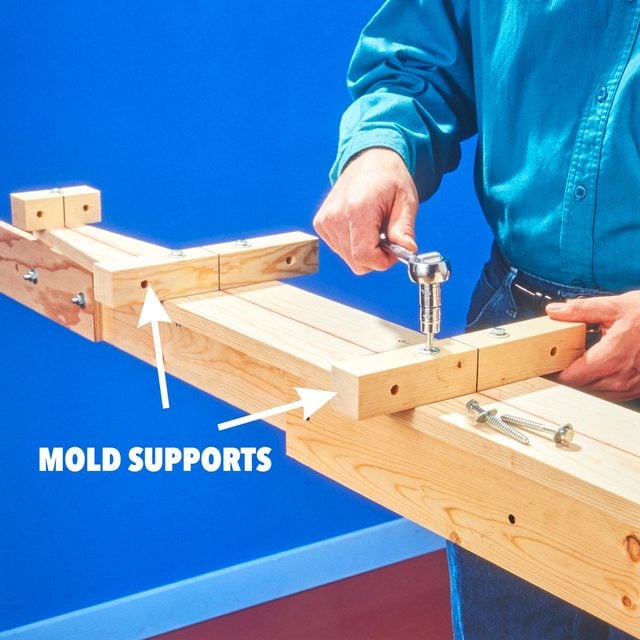
Bolt the mold supports to the strong back so the center lines match. The oversize holes leave you plenty of room for adjustment.
Step 9
Bolt End Mold Supports
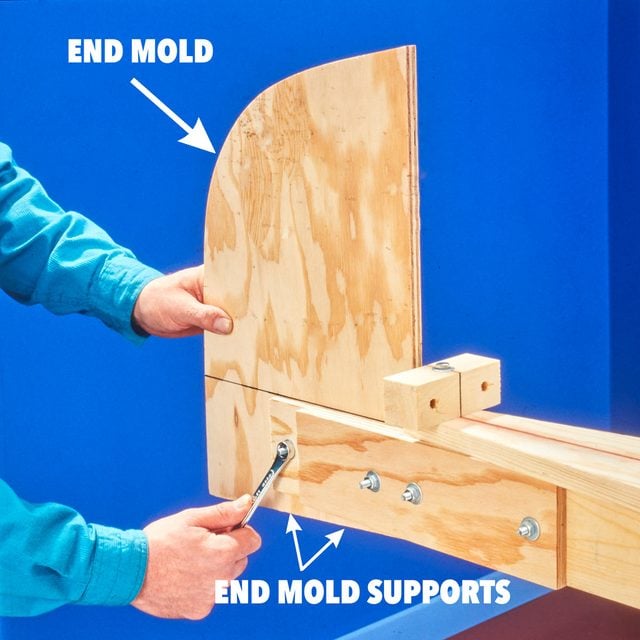
Bolt the end mold supports to the end molds through the front hole, then slide the end molds into the strong back and bolt them down.
Step 10
Align the End Molds
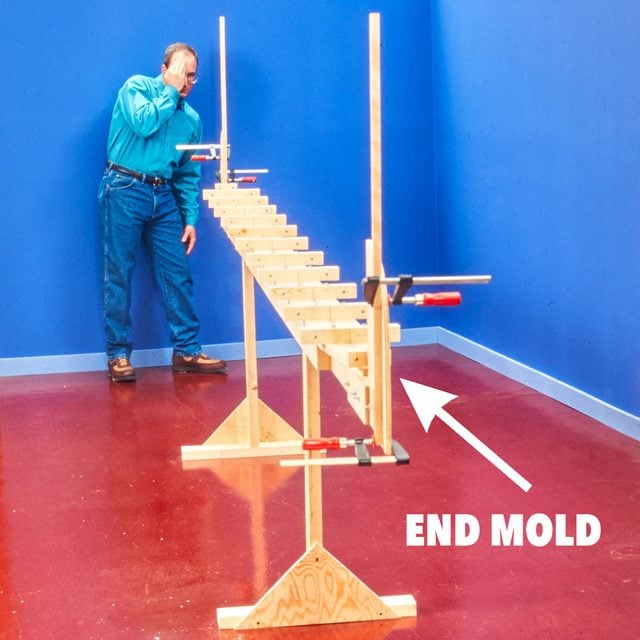
Long, straight pieces of wood clamped to the end molds will allow you to do it accurately by eye.
Step 11
Place the Molds
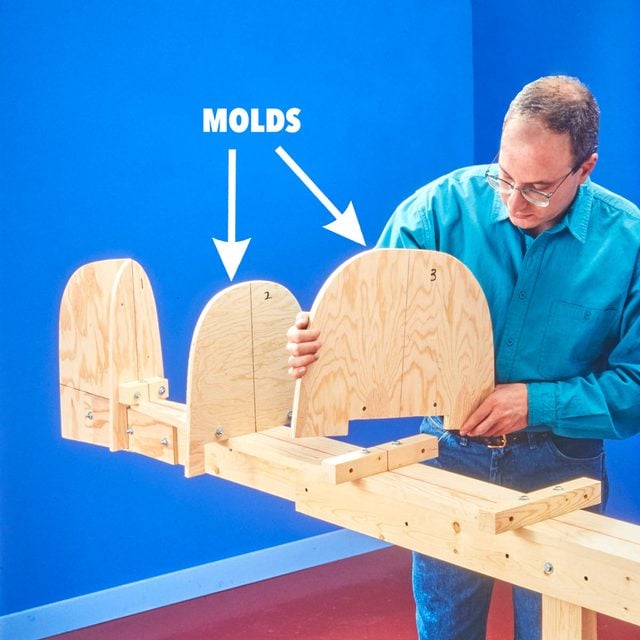
Place the molds on the strong back with the center lines of the molds and mold supports aligned, then bolt them in place.
Step 12
Align the Molds
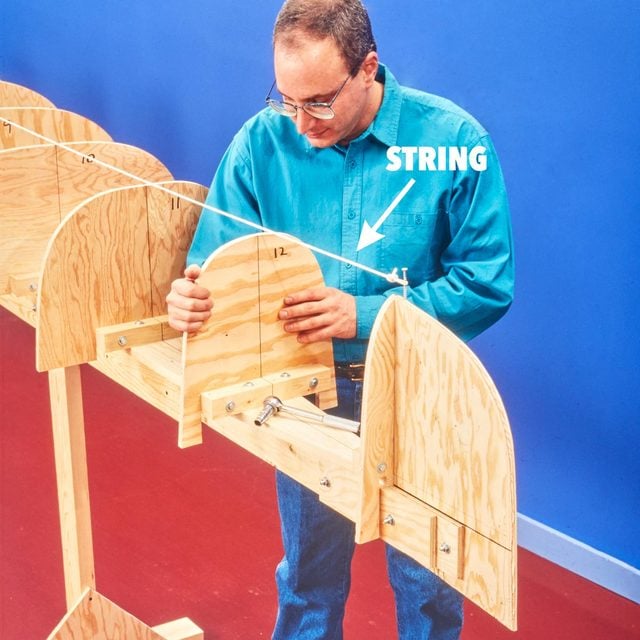
Align the molds using a string pulled taut from end mold to end mold, then tighten the bolts holding the molds to the supports.
Step 13
Cut the Cedar Strips
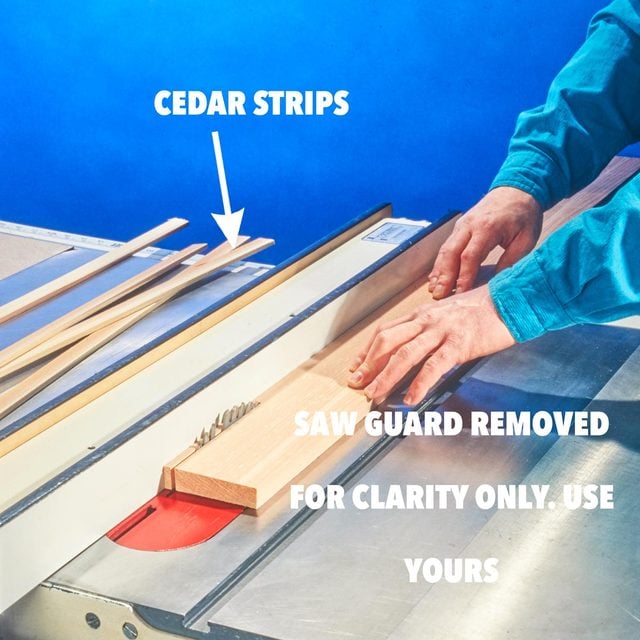
Cut the cedar strips that will form the hull of the canoe out of ordinary cedar lumber. A thin-kerf saw blade will reduce waste.
Step 14
Check the Molds
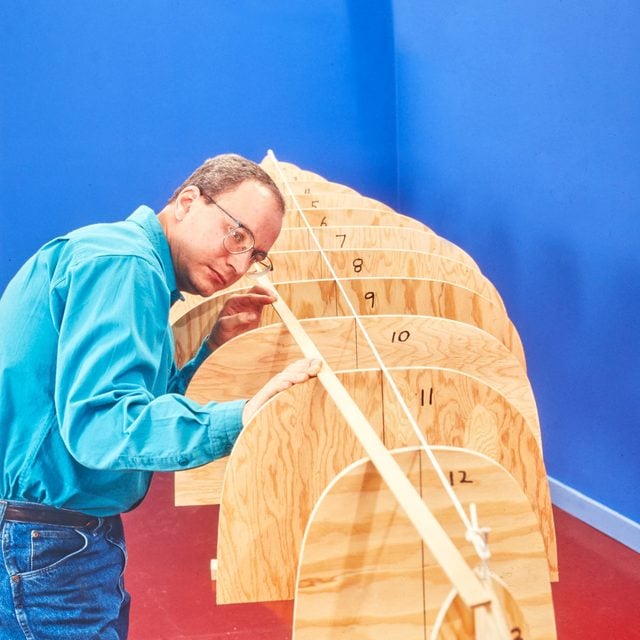
Check the molds with a cedar strip, and shift them if needed, to be sure that all the strips will lie flat against each mold.
Step 15
Staple the First Cedar Strip
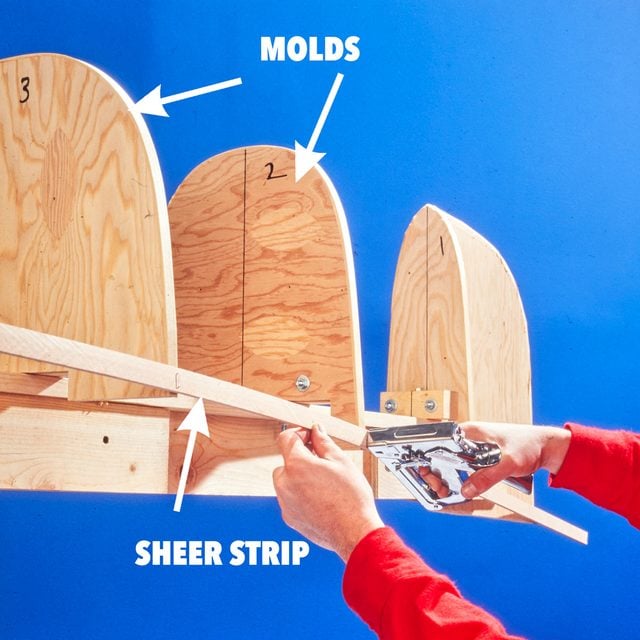
Staple the first cedar strip to the bottom corner of the molds, bending it smoothly to the ends. This is the “sheer strip.”
Step 16
Staple the Second Strip
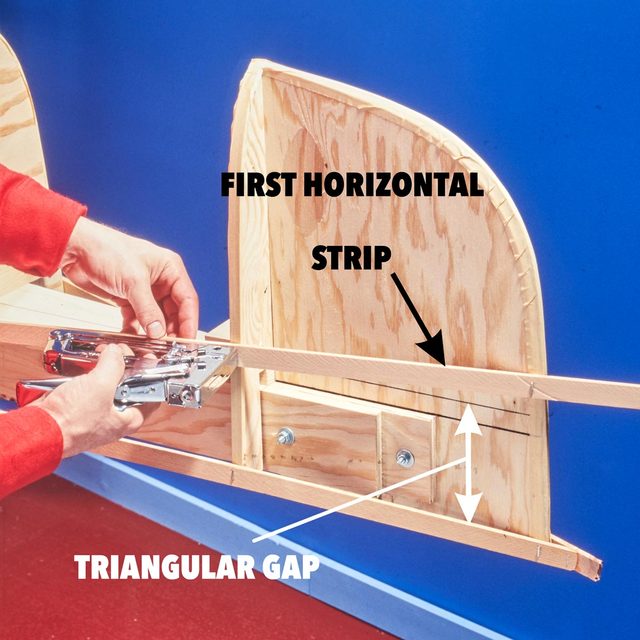
Staple the second strip horizontally, just above the sheer strip. Strips are edge-glued with regular carpenter’s glue and stapled to the molds to hold them in place. Short strips are cut later to fill the triangular gaps.
Step 17
Join Cedar Strips
Join cedar strips end-to-end, always putting the joint over a mold and keeping the joints spread randomly over the surface of the canoe.
Step 18
Use a Coping Saw
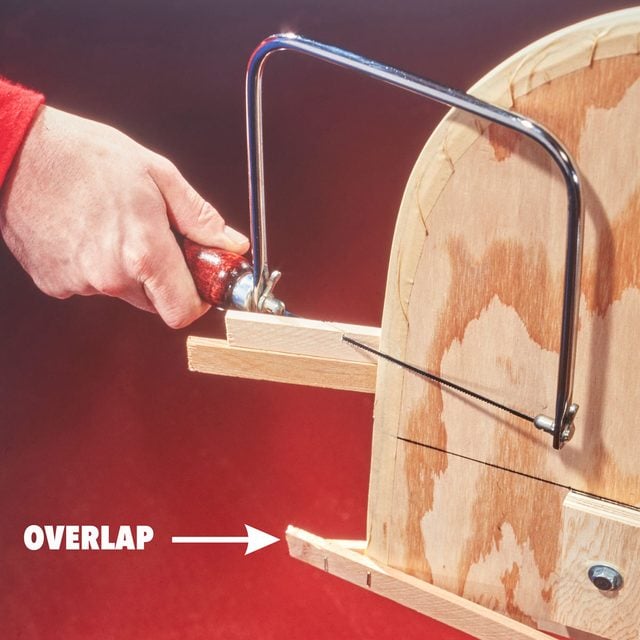
Use a coping saw to trim the ends of the strips. Note how the ends of strips on opposite sides of the canoe overlap. Temporarily laying a strip on the other side will allow you to mark the strips for cutting.
Step 19
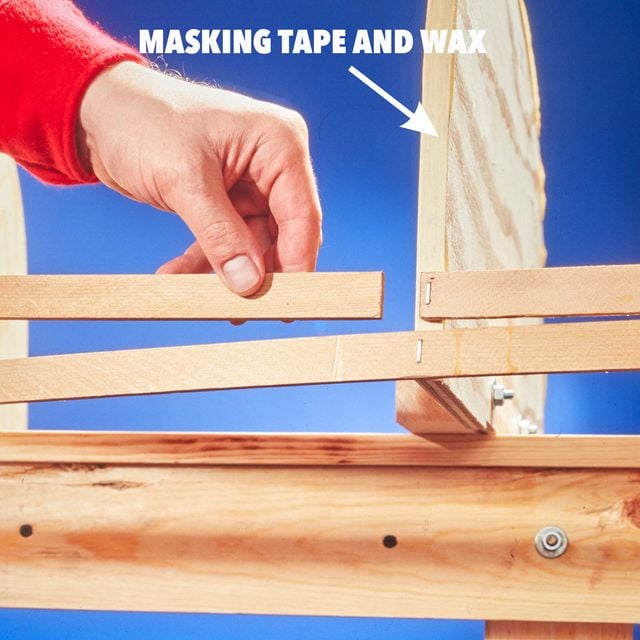
Spring Clamps
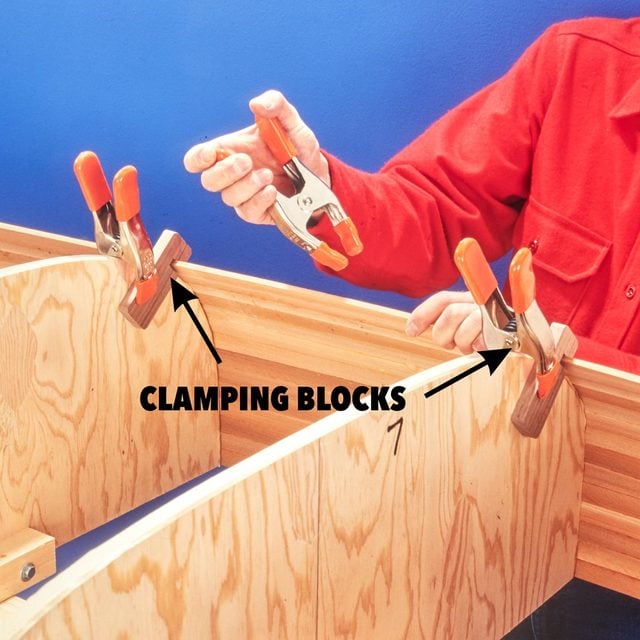
Spring clamps and slotted blocks help hold the strips in place where the molds are more curved. Between molds, short staples hold strips to each other.
Step 20
Cut the Keel Strip
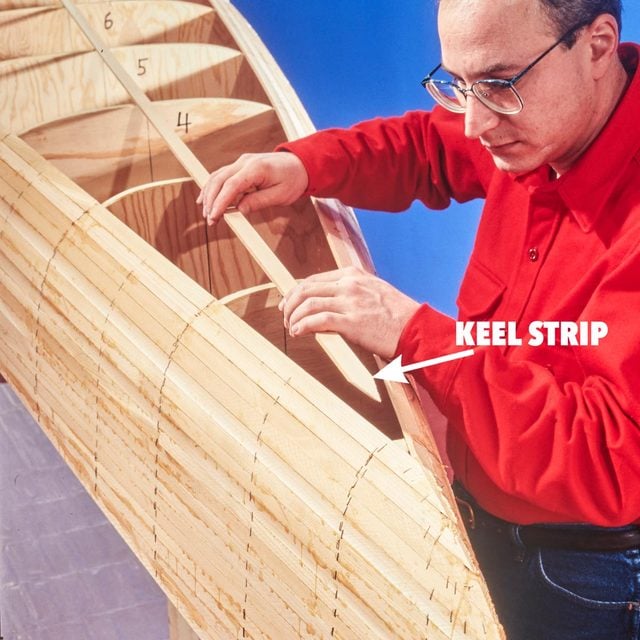
Cut the keep strip to fit after all the horizontal strips are glued together. Staple the keel strip to the molds so it’s exactly centered.
Step 21
Fill in the Bottom
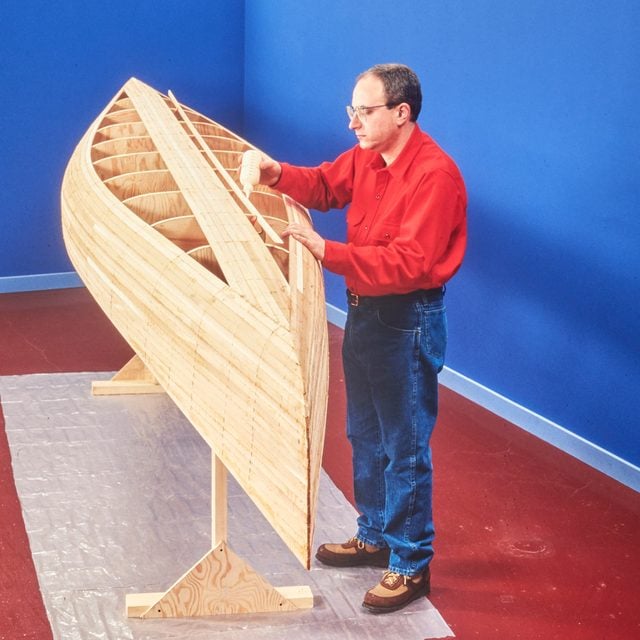
Fill in the bottom of the canoe, working from the keel strip outward. A hand plane quickly cuts the tapered ends of the strips.

Step 22
Pull the Staples
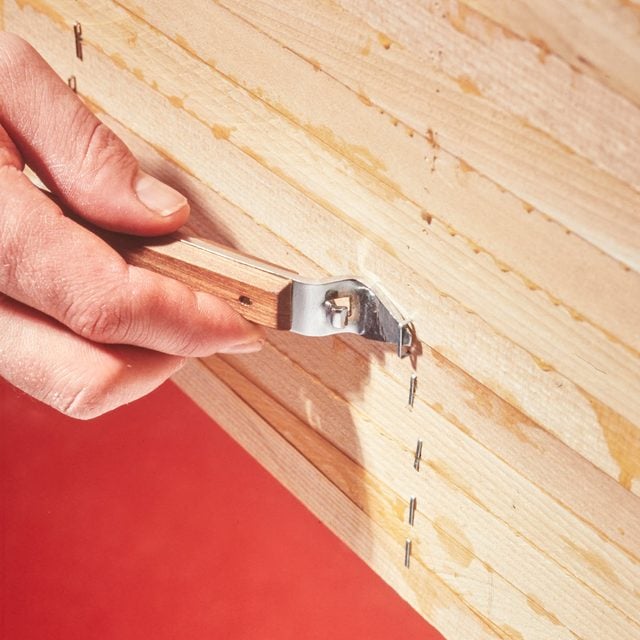
Pull the staples out when all the strips are in place and glue is dry. A bottle opener with the tip ground or filed flat is the perfect cool.
Step 23
Scrape off the Dry Glue
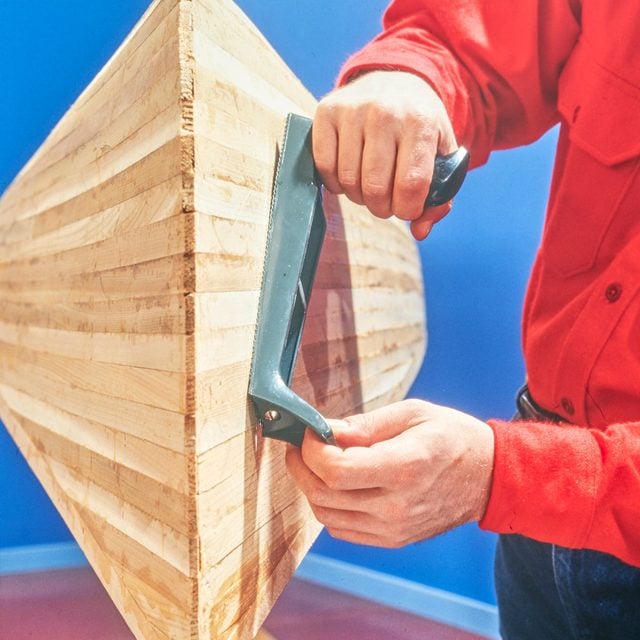
Scrap off the dry glue with a Surform file and paint scraper, then sand the hull smooth with a power sander and coarse sandpaper.
Step 24
Shape the Ends
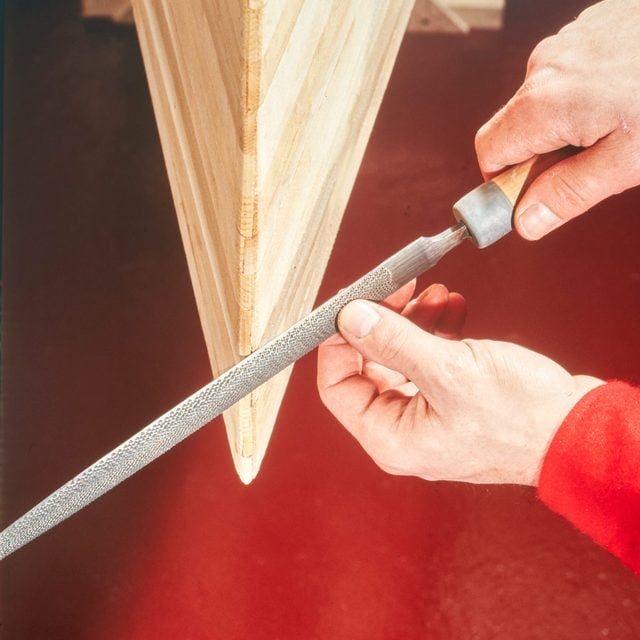
Shape the ends of the canoe with a rasp so the edge is about the diameter of a pencil. Sand the entire hull smooth, then coat it with a polyurethane sanding sealer.
Easy (and Very Important!) Boat Trailer Guides
Step 25
Lay Fiberglass

Lay fiberglass cloth over the hull so the weave is at an angle to the keel, then trim off the overhanging pieces. Trim the cloth an inch or so short of the ends of the canoe.
Step 26
Cut Strips
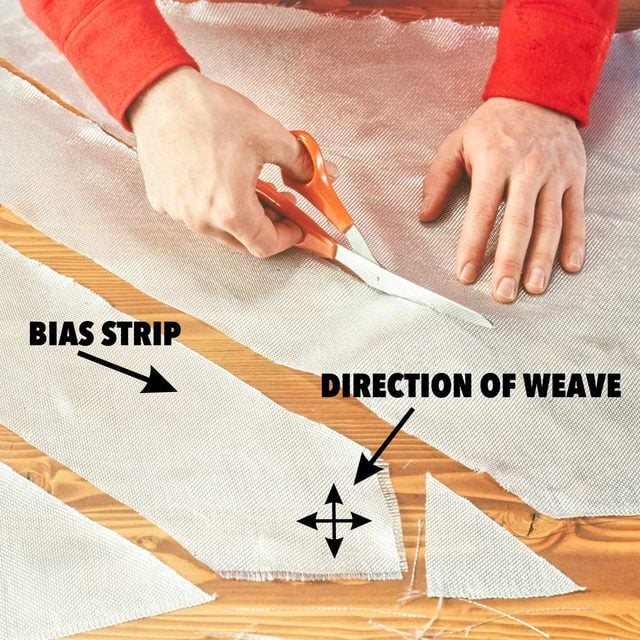
Cut strips from the scraps to cover the ends of the canoe. Cut them at 45 degrees to the weave (on the bias) and make the ends pointed.
Step 27
Safety First!

The resin that goes on the fiberglass cloth and its catalyst are both dangerous. Wear a carbon-filter respirator, goggles and rubber gloves.
Step 28
Start with the End Strips
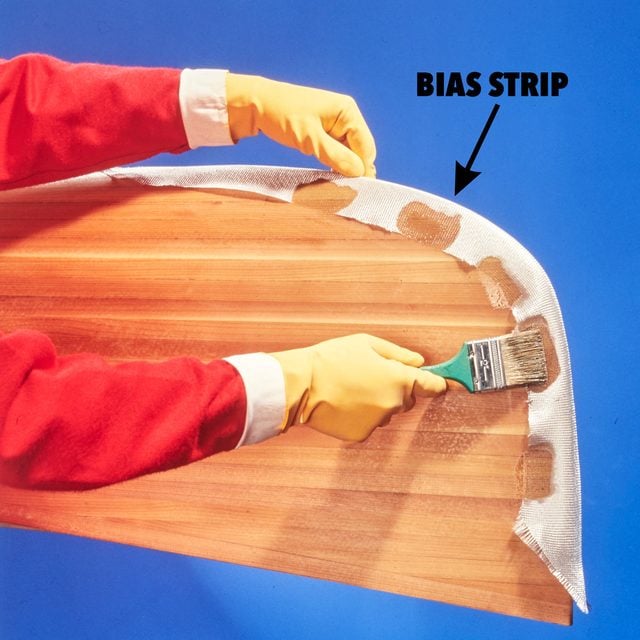
Start with the end strips, laying down the dry cloth, then applying resin with a disposable brush. These strips (two under and one over the main cloth layer) provide extra strength in this critical area.
Step 29
Apply Cloth and Resin
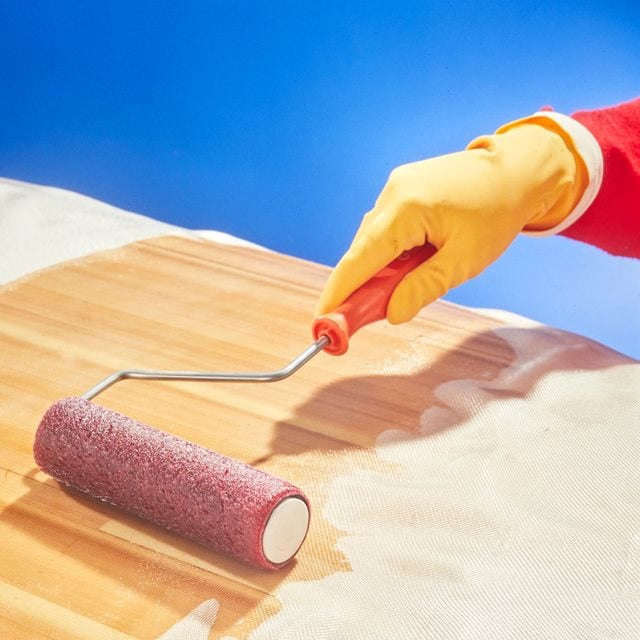
Apply cloth and resin to the entire hull. Lay the dry cloth on the hull, and apply the resin with a paint roller. Work out from the center in 2-ft. sections. Let it cure, sand and it’s done.
Step 30
Remove the Canoe
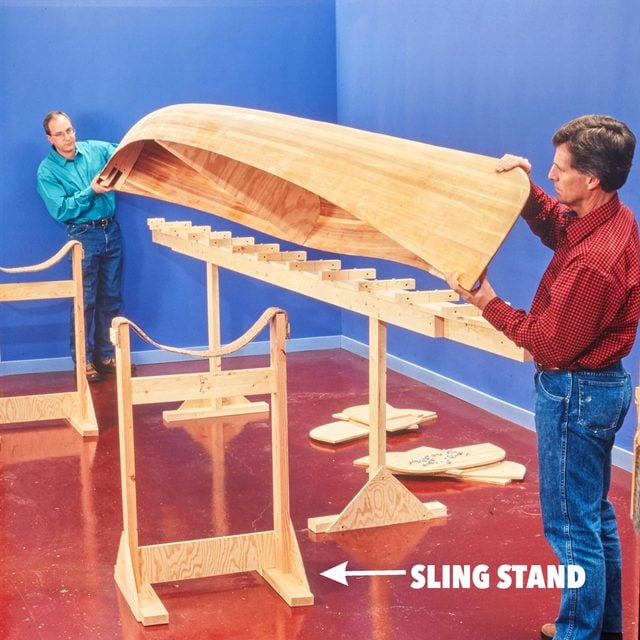
Remove the canoe from the strong back and place it on sling stands, which support it while you work on the inside of the hull and the trim.
Step 31
Wood Braces
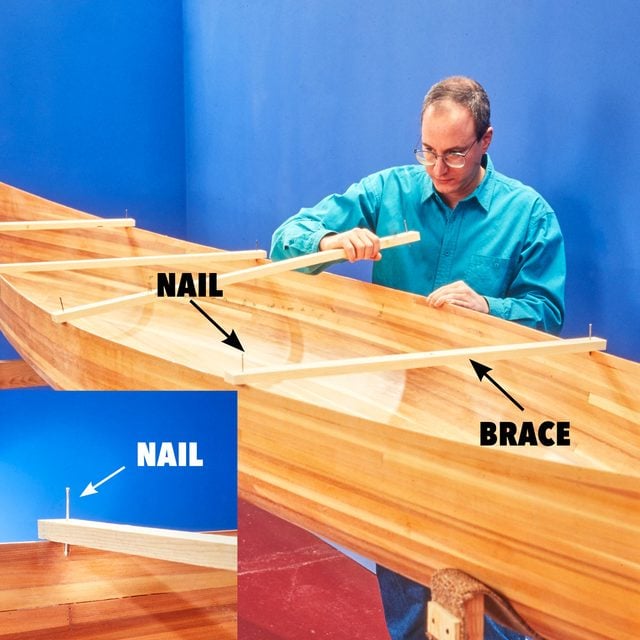
Wood braces with nails at the ends keep the hull from bowing in when you’re not working on it. Use the molds to determine the nail spacing.
Step 32
Sand the Inside
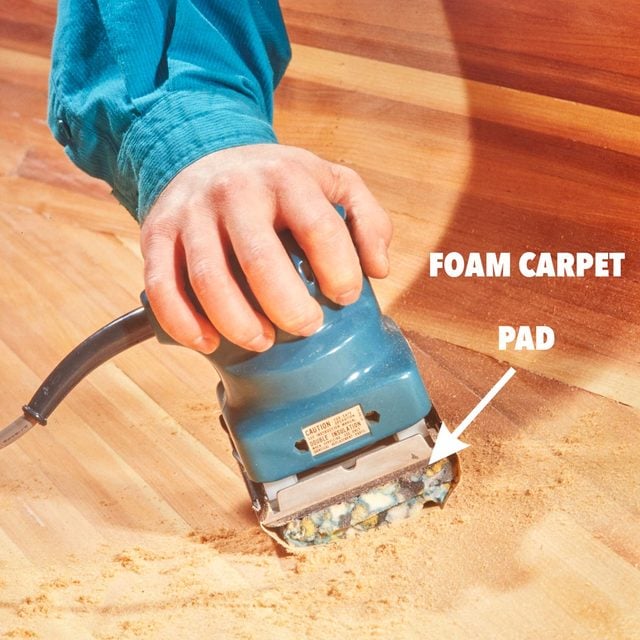
Sand the inside using an orbital sander. Place carpet pad between the sander’s pad and the sandpaper so it conforms to the canoe’s shape.
Step 33
Fiberglass the Inside
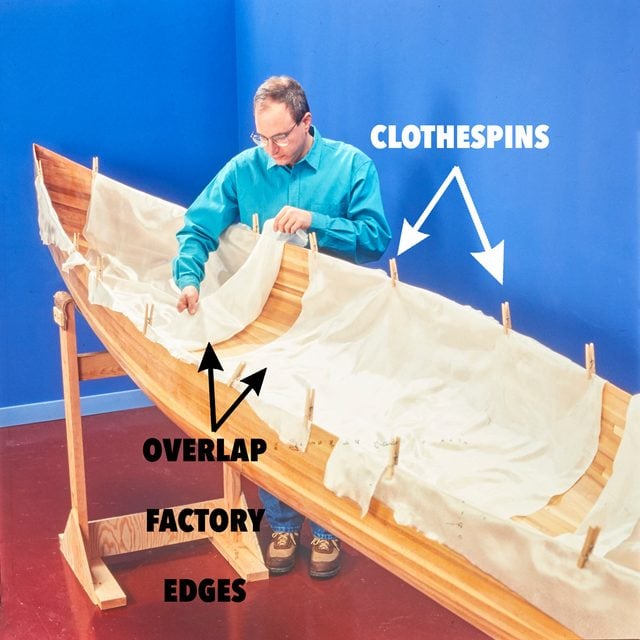
Fiberglass the inside with overlapping pieces, starting at the center and working out. Clothespins hold the fabric in place as you apply the resin.
Step 34
Fill the Ends
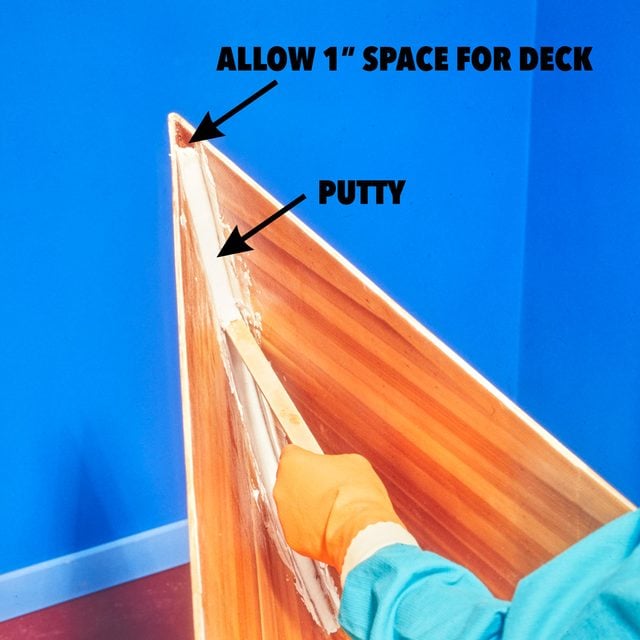
Fill the ends with polyester resin putty, using a rounded end stick to smooth it. Putty strengthens the ends and makes them easier to clean.
Step 35
Attach the Ash Decks

Attache the ash decks to the hull with stainless steel screws. Offset the two screws nearest the ends so they don’t interfere with each other.
Step 36
Join Strips
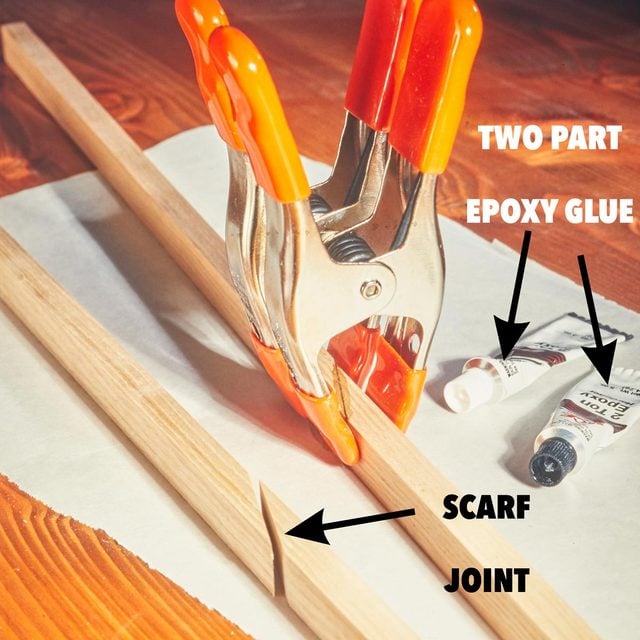
Join strips of ash for the inwales and outwales with a “scarf joint,” a low-angled lap joint. Glue the joint with epoxy.
Step 37
Clamp the Ash Inwale
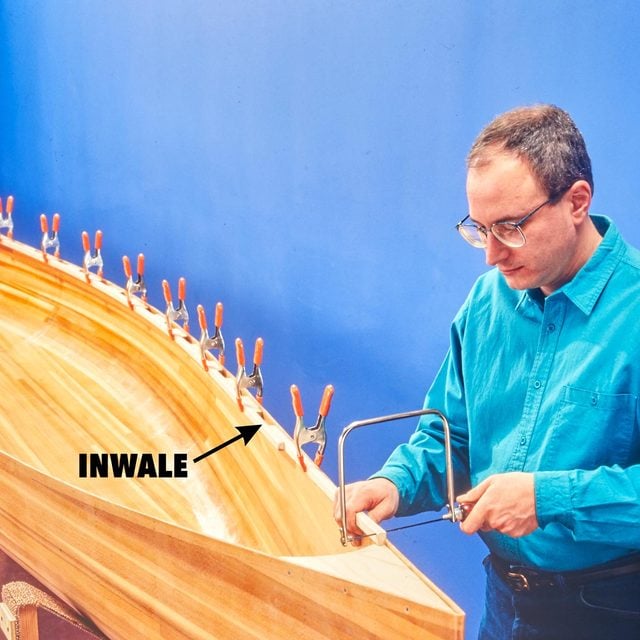
Clamp the ash inwale to the hull 1/4 in. below the edge, and trim one end to fit. Screw the inhale to the hull, then trim the other end.
Wood Finishing Tips: How to Renew a Finish
Step 38
Mark the Location

Mark the location of the screws that hold the inwales and decks to the hull so you can screw the outwales on without screws hitting each other.
Step 39
Clamp on the Outwale
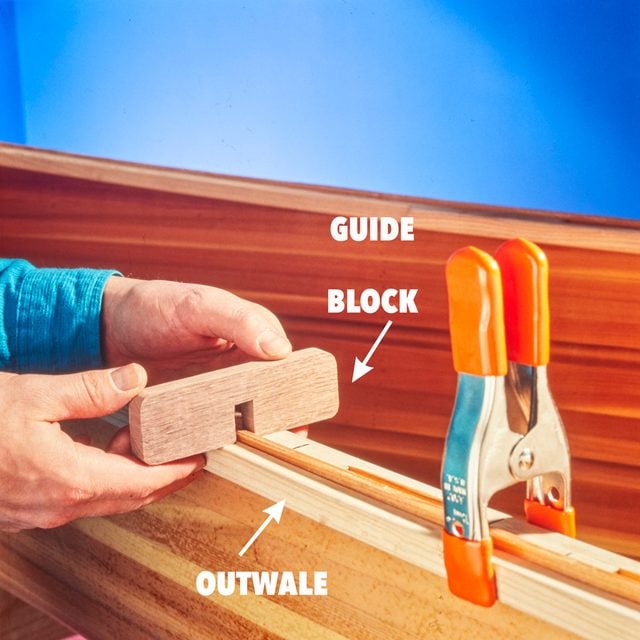
Clamp the outwale and get it aligned, then screw it on. A notched block on wood helps get the out wale and inhale lined up evenly.
Step 40
Sand the Gunwales Flush
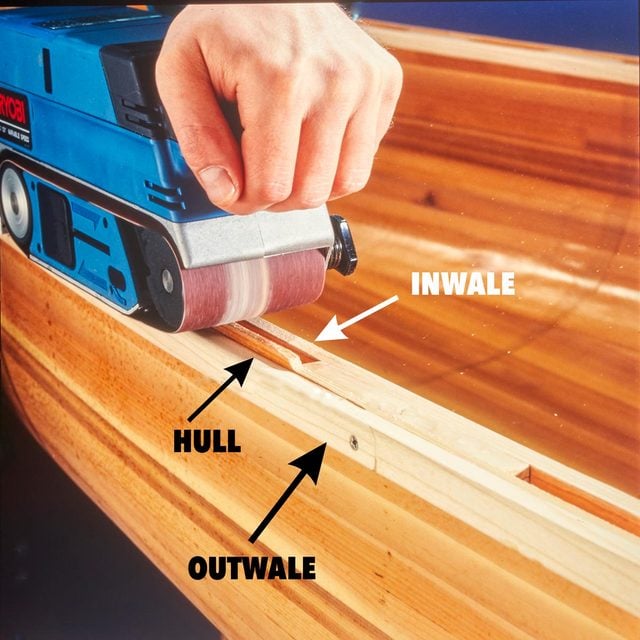
Sand the gunwales flush with a belt sander, removing the 1/4 in. of hull that protrudes. Hold the sander as flat as possible while you sand.
How to Stain Wood Evenly Without Getting Blotches and Dark Spots
Step 41
Mark the Thwarts
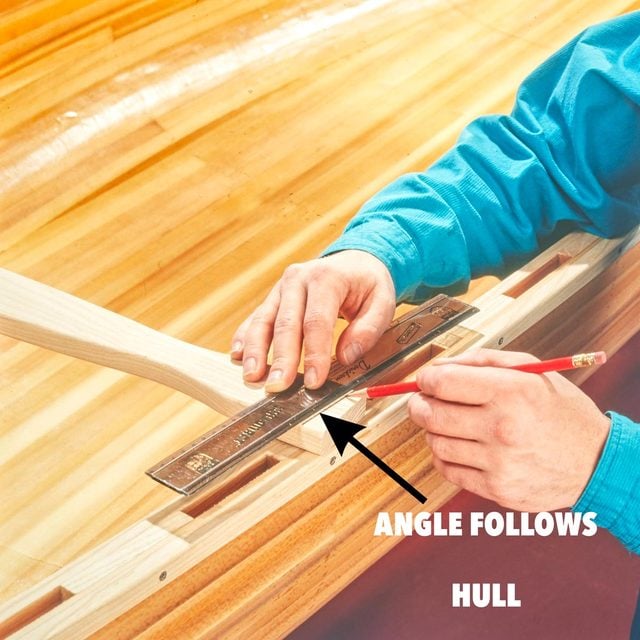
Mark the thwarts so they fit the angle of the hull, cut them, then bolt them on underneath the inhales with stainless steel bolts.
Step 42
Build the Seats
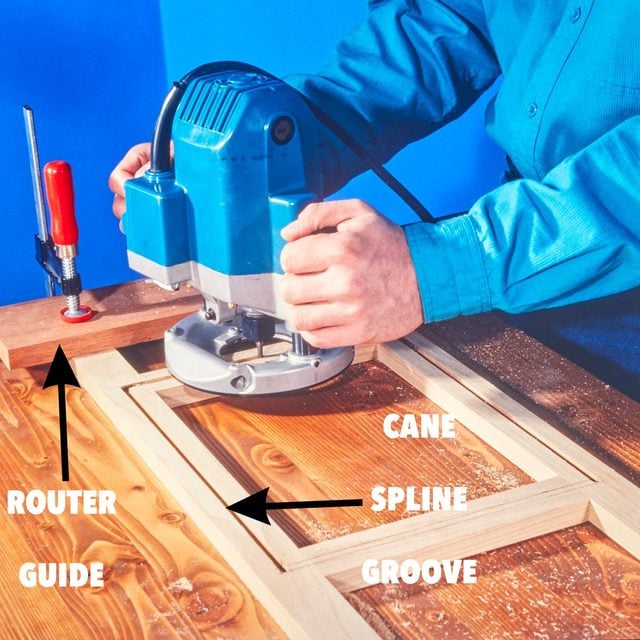
Build the seats from ash frames with grooves routed in them to hold the prewoven cane. A wood strip, called a “spline,” is jammed in the groove to hold the cane tightly.
Step 43
Hang the Seats
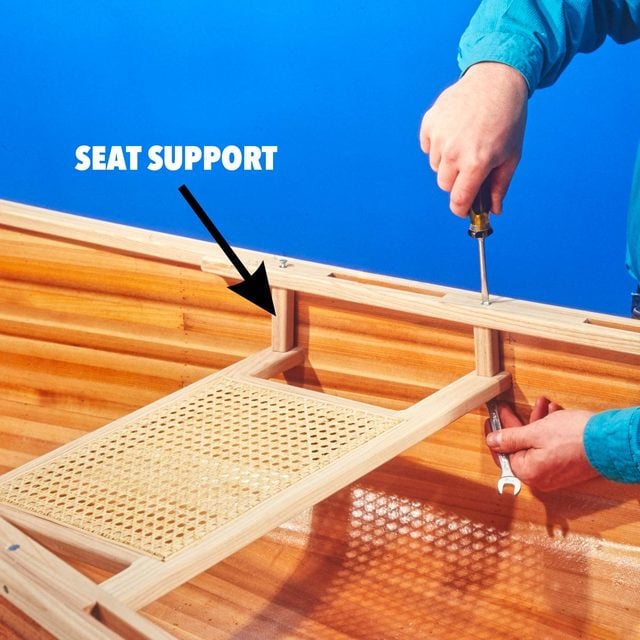
Handy the seats from the gunwales with long bolts and seat support blocks. The front edge of each seat is hung lower for paddling comfort.
Step 44
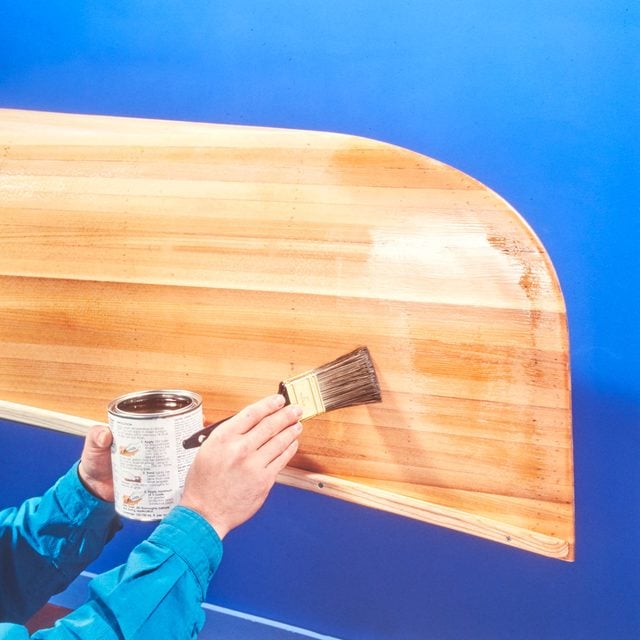
Apply Two Coats
Apply two coats of clear exterior polyurethane to the hull and to all the ash trim. Then break out the paddles-you’re finished! Next, learn secrets of Amish furniture makers.