


This innovative A-frame playhouse offers a new perspective on the traditional design.
3 to 4 days
Beginner
$850
Introduction
Thrill the kids or grandkids with this two-weekend project. This DIY playhouse is a gorgeous addition to any backyard.
I was so excited to build a playhouse for my kiddos. I made it an open A-frame because I wanted it to be versatile and grow with my kids. Today, it’s a place to watch an outdoor movie or craft. Tomorrow, it could be a relaxing backyard space to read.
Two beginning DIYers who know their way around circular and miter saws could put this together in a couple of weekends, including the painting.
I made this a little larger because my kids are a little older and I wanted them to use it for as long as possible. If 8 by 10 feet is too much, you can make it 8 by 8 feet or 8 by 6 feet. I chose 8 by 10 feet to include a small patio. I also didn’t want to deal with a lot of cuts, so I went with common sizes found at the hardware store.
Safety tips
Always wear eye protection and a dust mask when screwing into or cutting pressure-treated wood, and dispose of sawdust right away. You should also wear hearing protection when using the saw, and work gloves to protect your hands.
Cutting List
| KEY | QTY. | PART | DIMENSIONS |
| A | 2 | Short rim joist | 2×6 x 96″ |
| B | 2 | Long rim joist | 2×6 x 117″ |
| C | 7 | Interior joist | 2×6 x 93″ |
| D | 10 | Wall stud | 2×4 x 96″ |
| E | 24 | Wall brace | 2×4 x 22-1/8″ |
| F | 2 | Wall base plate | 2×4 x 96″ |
| G | 1 | Back wall base plate | 2×4 x 88″* |
| H | 1 | Center mullion | 2×4 x 29″ |
| J | 1 | Under-window support | 2×4 x 52-3/4″* |
| K | 2 | Window upright | 2×4 x 18″ |
| L | 1 | Over-window support | 2×4 x 28″* |
* – Cut to fit
Tools Required
- Assorted drill bits
- Circular saw
- Drill/driver
- Level
- Miter saw
- Painting supplies
- Sanding block
- Speed or framing square
- Stepladder
Materials Required
- #10 x 2" Galvanized roofing screws with washers
- 1-1/4" deck screws
- 18 - 2x4x8'
- 2 - 2x6x10'
- 2 - 3/8"x4'x8' Beaded plywood panel siding
- 2 - Polycarbonate roof panel ridge caps
- 2" Deck screws
- 3 - 3/4"x4'x8' exterior / marine plywood
- 3-1/2" deck screws
- 3" deck screws
- 8 - 2'x8' corrugated polycarbonate roof panels
- 9 - 2x6x8'
- Exterior paint
Watch How to Build a Playhouse
Project step-by-step (11)
Step 1
Playhouse base
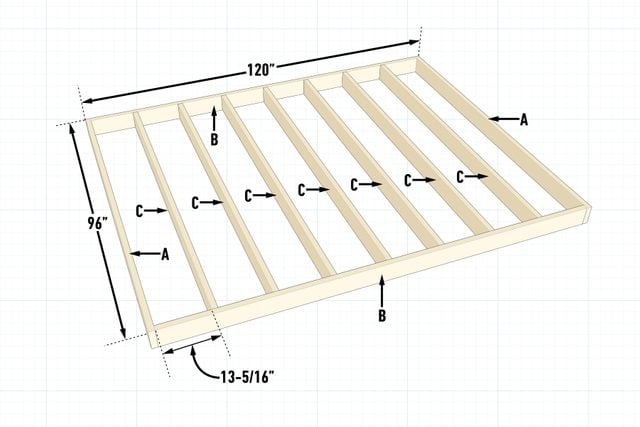
Because this is using lumber for the foundation, it’s important that you don’t have it sitting in wet soil. To do that, you can elevate it on cinder blocks or posts, which is what I did here. You can also dig out a pad underneath and fill it with gravel for drainage. The platform must be level so the A-frame sits plum and square as you’re assembling the playhouse.
Start by fastening the two short rim joists (A) to the long rim joists (B) with 3-1/2-in. deck screws. You could also use carriage bolts or lag screws if the platform is larger.
Evenly space the seven interior joists (C) inside of the rim joists, about 13-5/16 inches. Affix them with deck screws flush with rim joist’s top edges.
Step 2
Add the plywood decking
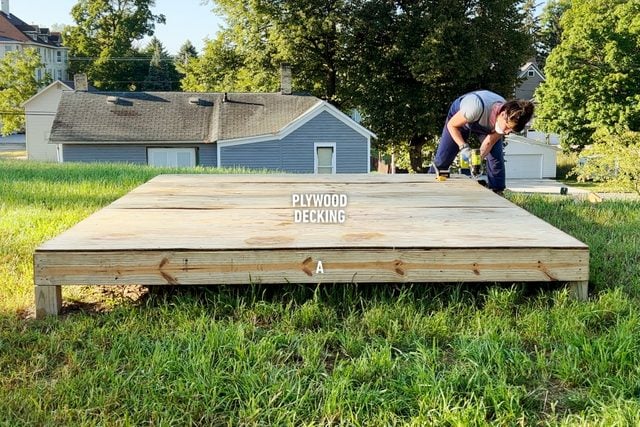
Attach two 4-by-8-ft. full sheets of exterior grade or marine plywood to the top of the joists with two-inch deck screws. Use the square sides of the plywood to keep the joists square as you attach them. Take a circular saw and rip the final sheet to cover the remaining exposed platform framing and secure it.
Ensure the finished platform is square and level before proceeding. Finish the platform with an exterior deck finish and let it dry.
Step 3
Cut your framing
Grab your circular saw or miter saw, don your safety glasses and dive into the Cutting List above. Note the A-frame wall studs (D), over-window support (L) and under-window support (J) will need the following angles cut into them.

Step 4
Paint your A-frame studs
Trying to paint the A-frame once everything is together can be tricky. Better to paint the wall studs (D), bracing pieces (E) and anywhere else you’d like some color ahead of time.
I wanted the wall studs to be noticeable from the polycarbonate, so I painted all the beams a Wes Anderson-style blue. The A-frame could also be finished with a deck stain to protect it from weather.
Step 5
Assemble the A-frame walls
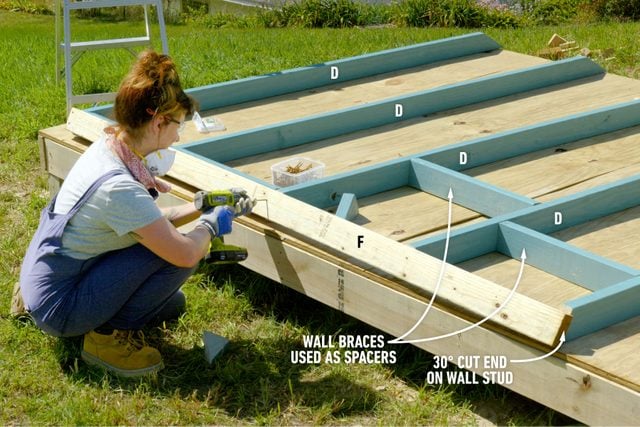
Attach the 30-degree cut ends of the wall studs (D) to the wall base plate (F) using three-inch screws. Install one flush with the outside edge of each end of the base plate. Use wall braces (E) to space the middle three framing members evenly.
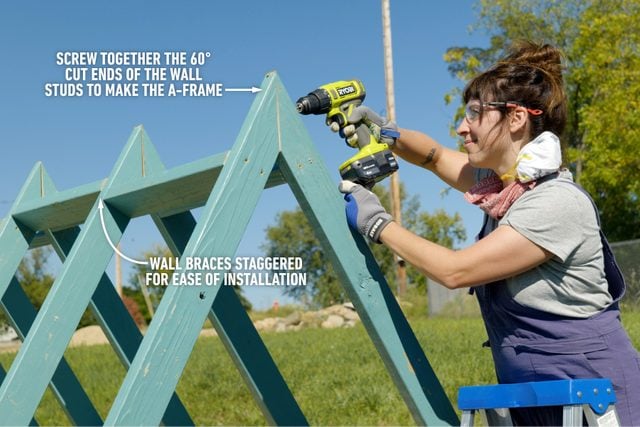
Next, secure the wall braces (E) between the wall studs (D). There should be three wall bracing pieces per section — one just below the 60-degree angled top, and the others evenly spaced in the cavity. Stagger them cavity to cavity to allow you to screw each wall brace to the stud without interference.
Step 6
Secure the framing to the platform
Using three-inch screws, attach the base plates of the wall frames (F) to the outside edge of the platform, flush to one end.
At first, only secure it with a few screws in case the walls need to be shifted to align the 60-degree peaks of the A-frame wall studs (D). Once they have, screw the wall base plates (F) to the platform and the peaks of the A-frame wall studs (D) together.
If you’re working alone, cut the wall base plates (F) into sections so you can lift the wall pieces individually and assemble them piece by piece. I had two helpers erect the walls, so we constructed both walls and lifted them into place.
Step 7
Enclose the back wall
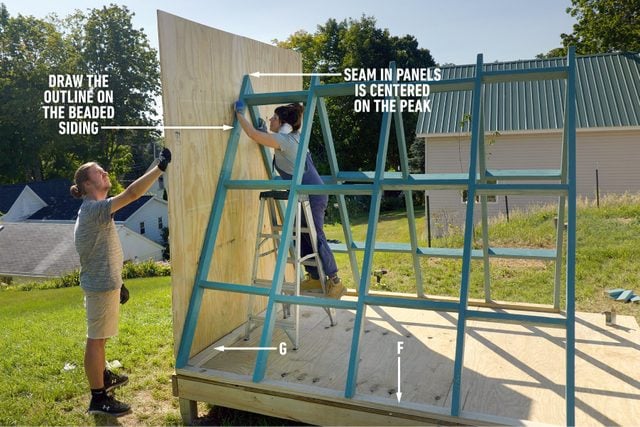
With your A-frame framing standing and secure, it’s time to enclose the back wall.
- Screw the back wall base plate (G) along the back edge of the platform so it nests between the base plates of the walls (F).
- Hold or clamp the two 4-by-8-ft. sheets of exterior plywood siding against the back framing of the A-frame so the seam in the panels is centered on its peak. Trace the outside of the A-frame shape onto it.
- Using a circular saw, cut the outline you just traced of the A-frame on the plywood siding pieces.
- Screw the cut plywood siding panels to the end of the A-frame using 1-1/4-in. deck screws every 16 inches along the outside wall studs (D) and the back wall base plate (G).
Step 8
Add back wall framing and window
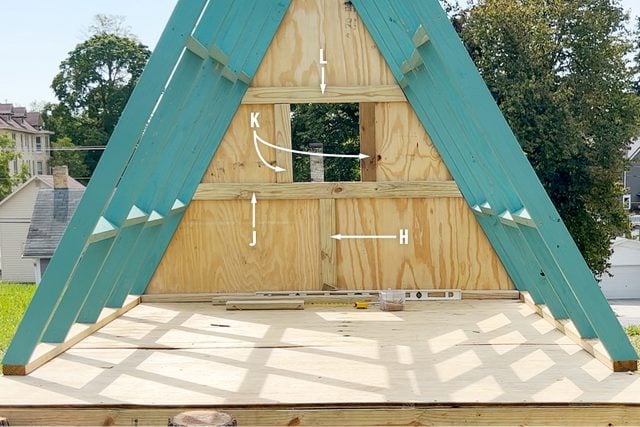
To stiffen up the back wall and provide support around the window, add the back wall framing. Start with the center mullion (H) and work up. As noted in the Cutting List, I recommend cutting some of these boards to fit, since not all A-frame roof pitches are identical.
- Attach the center mullion (H) to the plywood siding so it’s centered on the gap between the plywood siding pieces and sitting on top of the back wall base plate (G). Use a level to make sure it’s plum and attach it from the outside using 1-1/4-in. exterior rated screws.
- Secure the under-window support (J) with its 30-degree end cuts so it sits on top of the center mullion (H) and is level side to side. Attach it to the plywood siding in the same manner as the center mullion. Toe screw it to the outside wall studs (D) using 2-in. screws.
- On top of the under-window support (J), attach the two window uprights (K). Make sure they’re plumb and centered on the wall before securing them. Space them as far apart as you want your window to be wide; we chose a square 18-in. window.
- Secure the over-window support (L) so it rests on top of the two window uprights (K). As with the under window support (J), attach it to the front with 1-1/4-in. screws. Use 2-in. screws to toenail the 30-degree cut ends into the outer wall studs (D).
- Cut the window opening out of the plywood siding with a circular saw, jigsaw, or router with a flush trim bit. Sand any sharp or jagged edges around the opening before allowing children to play there.
Step 9
Playhouse roof
Attach the first polycarbonate panel so it overlaps the edge of the plywood siding by 1-1/2 inches. Secure it using 2-in. roofing screws with washers to the wall bracing pieces (E) and the bottom of the wall studs (D). Washers on the screws provide a watertight seal.
Overlap the polycarbonate panels as you go.
Install the ridge cap using the same 2-in. roofing screws. Screw it into the upper most wall braces (E) and near the top of the wall studs (D). Again, be sure that it overlaps the edge of the beaded plywood siding to protect it from moisture.

Step 10
Last minute details
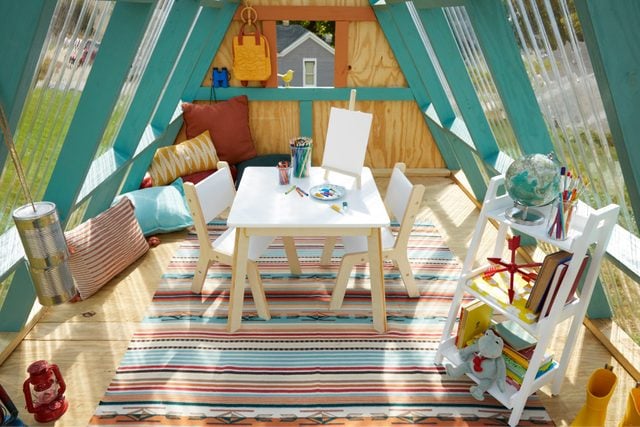
Sand smooth any exposed sharp edges and add more color or paint details to the interior if you like. That’s it! Now your kids will have a fun and interesting playhouse that will be the talk of the neighborhood.
Decorate the A-frame with tables, chairs, patio pillows and other decor items. Add a watertight box to protect things like art supplies and books that your kids can take out and use while they relax and create in their outdoor space.
Step 11
FAQs
How much does it cost to build a DIY playhouse?
It can range from $300 to $5,000, depending on features. I’ve seen playhouses with materials similar to actual homes, including hardwood flooring, electricity, double-hung windows and metal roofs.
What kind of wood do you use to make a playhouse?
Playhouses are typically constructed from cedar or treated deck lumber, but virtually any type of wood suitable for outdoor use will work.
Can I put a wooden playhouse on grass?
Yes. But for longevity, place it in an area where precipitation drains well, and seal any wood products in direct contact with the ground.
Originally Published: August 26, 2019