


A customizable clutter-buster that turns your garage into a mudroom.
Multiple Days
Beginner
$251-500
Introduction
Garage or mudroom organizers all have a similar design: tall, narrow cubbies, hooks on the wall, maybe a built-in bench. In my home, this arrangement ends up looking like a pile of jackets and bags hung on top of one another. Another problem is that people’s storage needs change over time. But most organizers don’t.
I wanted to break the mold and create a more versatile and less cluttered solution. What I came up with was inspired by the versatility of pegboard. The one-inch pegs support a ton of weight, and making a new shelf or moving a crowded peg is simple. You don’t need to know how to build cabinets to build this stunning storage wall. But you will have to drill lots of holes — 288 per sheet! Luckily I figured out a trick to make positioning all those holes fast and accurate.
Tools Required
- 1" forstner bit
- Circular saw
- Clamps
- Cordless drill
- Drill press
- Framing square
- Level
Materials Required
- 1-1/4" washers
- 1" dowel rod
- 1" wood screws
- 1/4" x 2' x 4' birch plywood
- 15-ga. finish nails
- 1x2 furring strips
- 1x6 Board
- 2X2 lumber
- 2x4 lumber
- 3" Construction screws
- 3" trim head screws
- 3/4" x 4' x 8' birch plywood
- composite shims
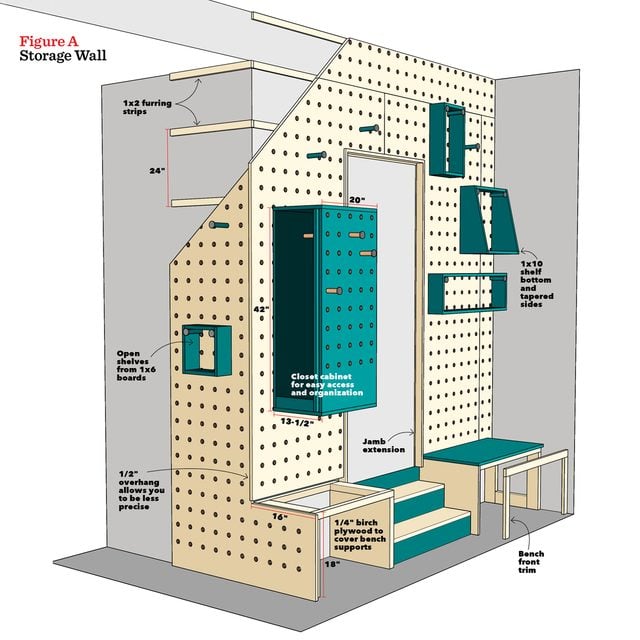
Rearrange It In Minutes
This system is easy to reconfigure as your needs change — so easy you could rearrange every season. All you have to do is pull out pegs and insert them elsewhere. You can move a shelf in seconds, make a new one in minutes or create an entirely new arrangement in less than an hour.
Build Boxes to Suit Your Stuff
Boxes hanging on pegs are the key to this flexible system. In an hour or two, you can build boxes of any size and shape, just right for the items you want to store.

Project step-by-step (14)
Step 1
Make a Drilling Jig
Save yourself hours of measuring with this drilling guide:
- Cut an eight-foot length of plywood to six inches wide.
- Then make a pair of marks two inches from the long edge, one at two inches from the end and the other six inches from the end.
- Clamp a backer (I used MDF) to the plywood and bore a hole at the first mark with a drill press and a one-inch Forstner bit through the jig and the backer.

Step 2
Bore Consistent Holes
- Place a one-inch-diameter dowel in the hole to keep the jig and backer together.
- Line up the bit with the second mark, clamp the backer to the table and then bore a second hole.
- Without moving the parts, keep the backer clamped to the table and fasten a fence along the edge of the jig.
- Slide the jig down and place the dowel through the new hole.
- Bore the rest of the holes this way.

Step 3
Bore the Holes in First Column
- Lay a sheet of plywood on 2x4s and flush the edges of the jig and the plywood.
- Clamp it in place, then use the jig to bore the first column of holes.

Step 4
Trace Corner Holes
- Position the jig sideways along the top of the plywood and hold it in place with a dowel in the top hole.
- Square the jig with the edge of the plywood and trace a hole at the opposite edge of the plywood.
- Do the same at the bottom to locate the hole in the opposite corner.

Step 5
Bore Holes in Far Column
- Line up the jig with the traced holes, clamp the jig into place and bore each hole.
- Place a dowel in the first hole to keep the jig secure, then place one every few holes as you go to help hold the jig in place.

Step 6
Drill the Rows
- Rotate the jig horizontally and hold it in place with dowels in each column.
- Bore the holes in the row, then move the jig down to the next row.
- Repeat the process until all 288 holes are drilled.

Step 7
Use First Sheet as a Template
- Now that you have a complete sheet drilled, you have a perfect template for making more.
- Place the template on top of a new sheet, line up all the edges, and bore more holes.

Step 8
Build the Benches
- Assemble the bench from 2x4s and 2x2s.
- Position the bench, then screw it to studs in the wall and shim the legs to level the top.

Step 9
Attach the Furring Strips
- Fasten a furring strip along the length of the wall just above the bench.
- Then level and fasten furring strips every two feet until you reach the ceiling.
- Screw the strips into the wall studs.
- To avoid blocking entire rows of holes with the strips, use the jig as a guide.

Step 10
Fasten the Plywood
- Cut the plywood to fit around doors and corners.
- Tip up each sheet and attach them with trim-head screws into each row of furring strips every 16 inches.

Step 11
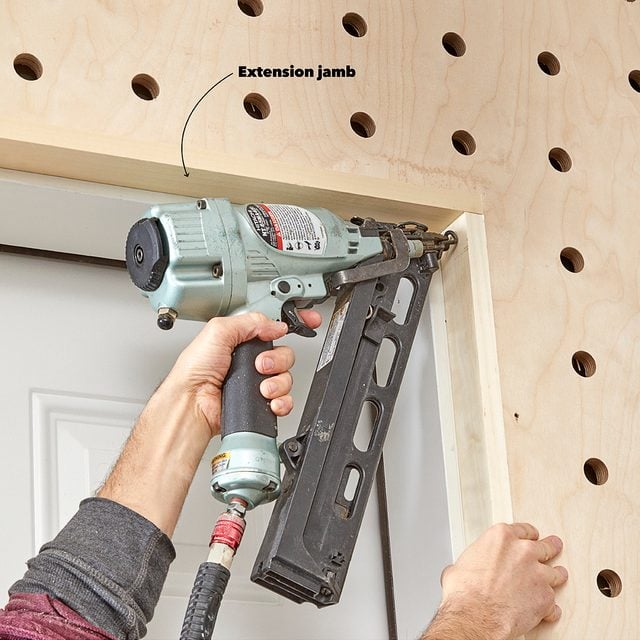
Pro Tip: Dealing with Doors and Windows
I had to work around a door that was smack dab in the middle of the wall. Because the wall was being built out, I needed to extend the jamb of the door. I extended the jamb beyond the plywood by 1/2-in. to create a simple, modern look.
Step 12
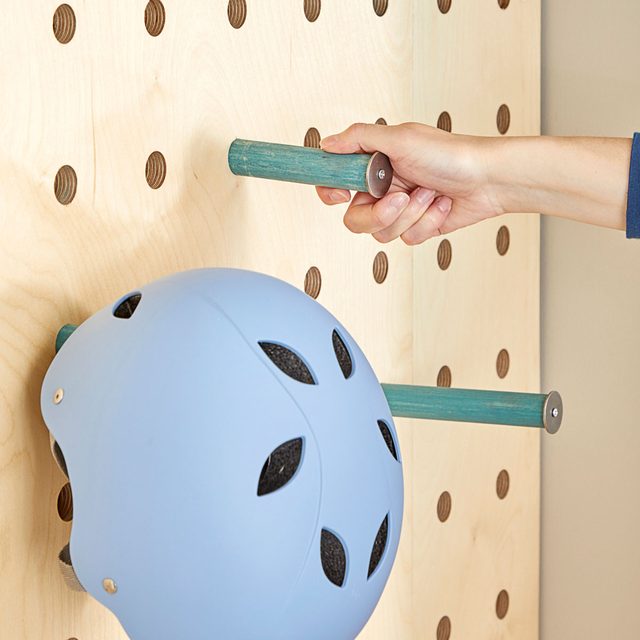
Make the Pegs
- Cut one-inch-diameter dowels to seven-inch lengths to make pegs to hold the 1×6 shelves.
- Drill a pilot hole centered on the end of the peg and attach a washer with a one-inch wood screw.

Step 13
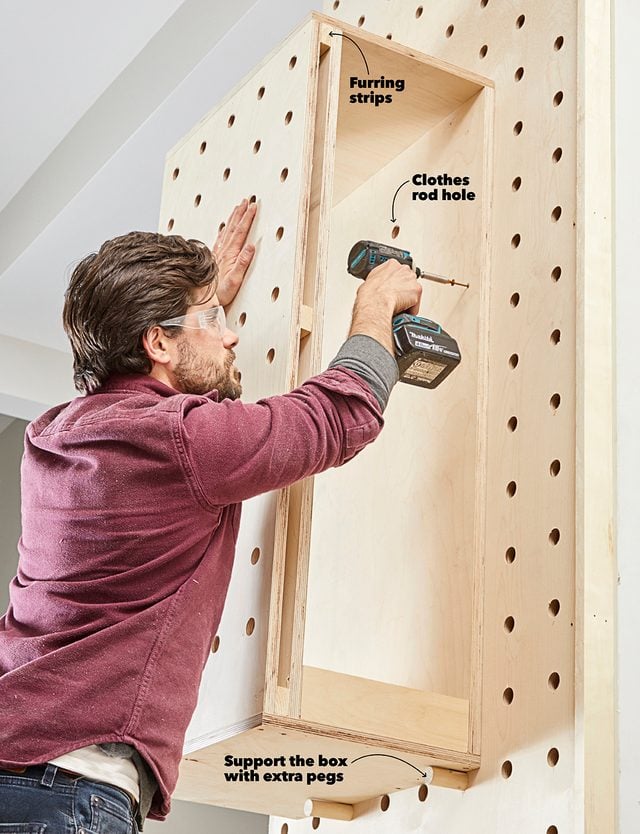
Build a Closet Cabinet
- Stack the wall closet panels and line up their edges.
- The panel with peg holes will be on top.
- Use one of the center holes toward the top as a guide to bore through the other two panels to fit a clothes hanger rod.
- Then nail furring strips between the two front panels, avoiding the rows of peg holes.

Step 14
Mount the Cabinet
- Screw the top and bottom of the closet box to the panels and attach the sides.
- To help position it on the wall, place a pair of pegs under the closet cabinet.
- They can help hold it up while you fasten it to the wall.
Originally Published: August 07, 2020