


Organize your garage with a handsome, easy-to-build storage system that'll hold all of your garage clutter
Multiple Days
Beginner
$101–250
Introduction
This garage wall hanging storage system makes every inch count. You can easily store all kinds of tools, bikes, garden equipment and even add shelves and bins for smaller stuff. It's easy to build with a circular saw, router and drill and is easy to adapt to any garage.
Project Overview and Design
The wall space in your garage is way too valuable just to hang rakes, bikes and garden hoses at random on nails, hooks or shelves. To make every square inch of that wall space work for you, we designed this wall storage system. (Explore these affordable DIY garage storage projects.)
Our system is made entirely from plywood and standard hardware. It’s easy to build and easy to customize to suit your needs. You can install it to fill any size wall or cover only part of a wall. You can hang shelves, bins or hooks and arrange them to make efficient use of wall space. With special store-bought hangers, you can hang hard-to-hold items like bikes or wheelbarrows. Best of all, everything hangs from sturdy rails, so you can rearrange the wall in minutes without any tools. Some store-bought systems provide the same versatility, but they can cost two or even three times as much as this homemade system.
The only power tools you’ll need are a circular saw and a drill. Other tools—a table saw, router, miter saw and brad nailer—will save you time, but they aren’t necessary. All the materials you’ll need are available at home centers. If you don’t expect to hang anything from the lower half of the wall, you can cut time and expenses by covering only the upper half. If you completely cover a large wall as we did, expect to spend a weekend building the system and another finishing it and assembling shelves and hooks.
Tools Required
- Caulk gun
- Chamfer router bit
- Circular saw
- Circular saw guide
- Drill bit set
- Drill/driver - cordless
- Hammer
- Leather gloves
- Metal cutting blade
- Router
- Safety glasses
Materials Required
- 1/2-in. plywood
- 3/4-in. plywood
- Aluminum angle
- Aluminum flat stock
- Construction adhesive
- Wood glue
Project step-by-step (17)
Step 1
Figure A: Wall Panel System Parts
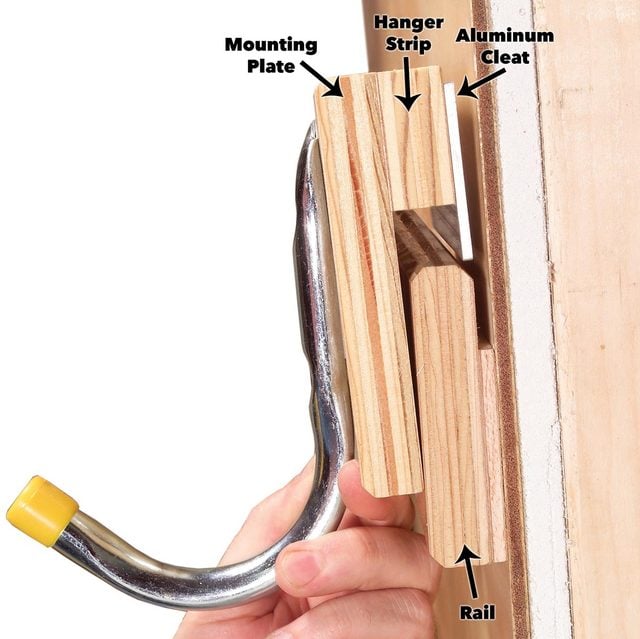
The design includes 1/4-in. plywood backer and a plywood rail mounted to the wall. Various hanger assemblies then hook over the rail.
Note: You can download Figure A and enlarge it in the Addendum below.
Step 2
Cover the Wall with Plywood
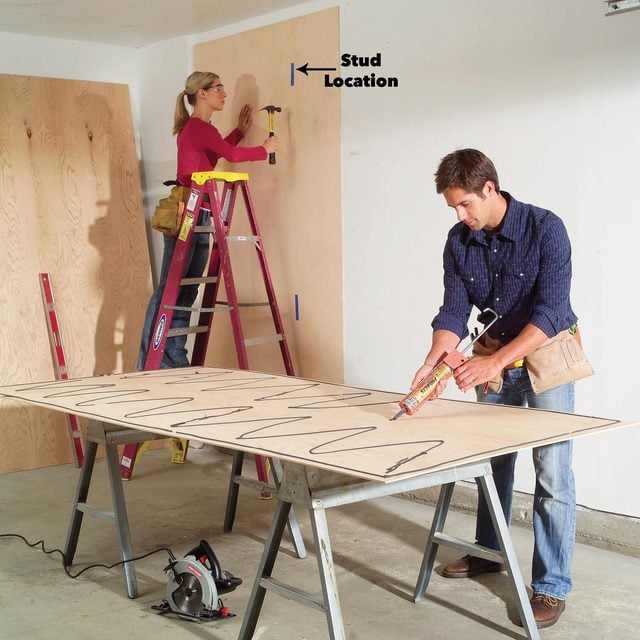
You could nail and glue the rails directly to bare studs or drywall, but we chose to cover our wall with 1/4-in. plywood, for three reasons: First, the birch plywood matches the rails and gives the whole system a rich, finished appearance. Second, plywood won’t scratch, gouge or dent as easily as drywall, and third, you can quickly clean it with a damp cloth.
The sheets of plywood should meet at studs, so start by locating studs with a stud finder. Mark stud locations with masking tape. Chances are, you’ll have to cut the first sheet lengthwise so the edge aligns with a stud’s center. Then you can use full sheets until you reach the end of the wall and cut the final sheet to fit. Your cuts don’t have to be perfect and the sheets don’t have to fit tightly into corners because you’ll cover the edges with trim later.
If you’re installing the plywood over drywall as we did, run a bead of construction adhesive around the edges of each sheet and cover the middle with a zigzag pattern. Use at least half a tube of adhesive per sheet. If you’re fastening plywood to bare studs, apply a heavy bead of adhesive to each stud. Nail the sheet to studs with 1-5/8-in. paneling nails to secure the plywood until the adhesive dries.
Step 3
Frame the Wall Perimeter
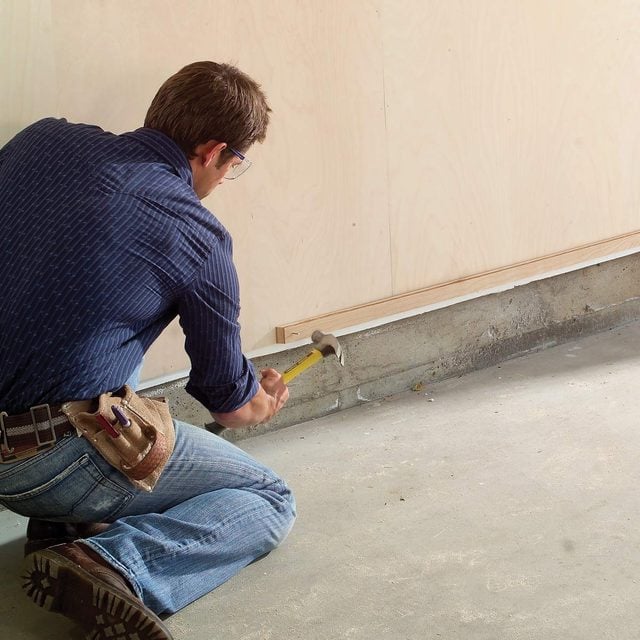
Frame the wall with 1-1/2-in.-wide strips of 3/4-in. plywood. At corners, nail the vertical strips flat against adjoining walls. Then run strips across the top and bottom.
Make the strips using the same techniques used to make the rails. Rip 3/4-in. plywood into 1-1/2-in.-wide strips, chamfer one edge with a router and nail them into place with 16d finish nails.
Step 4
Combine Thick and Thin Plywood to Make Rails
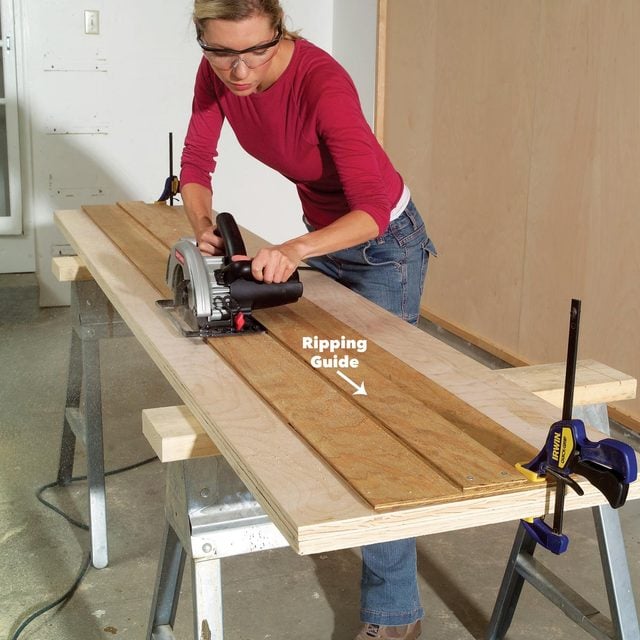
Begin rail construction by cutting strips of 1/4-in. and 3/4-in. plywood. If you don’t have a table saw, make a simple ripping guide to ensure straight cuts. Cut a 3-5/8 in. spacer block to position the ripping guide. Position your ripping guide using a spacer block and clamp it into place. Then cut the 3-1/2-in.-wide plywood rails. Cut two sheets at once to speed up the job.
Tip: If you make the guide from 1/2-in.plywood, you can rip two sheets of 3/4-in.plywood at once. Cut a 2-5/8 in. block to position the guide when cutting the 1/4-in.plywood strips. You’ll get 13 rails from a sheet of 3/4-in. plywood; 18 strips from a sheet of 1/4-in. plywood. We made twenty-three 8-ft. long rails for our 8 x 20-ft.wall.
Step 5
Chamfer 3 Edges
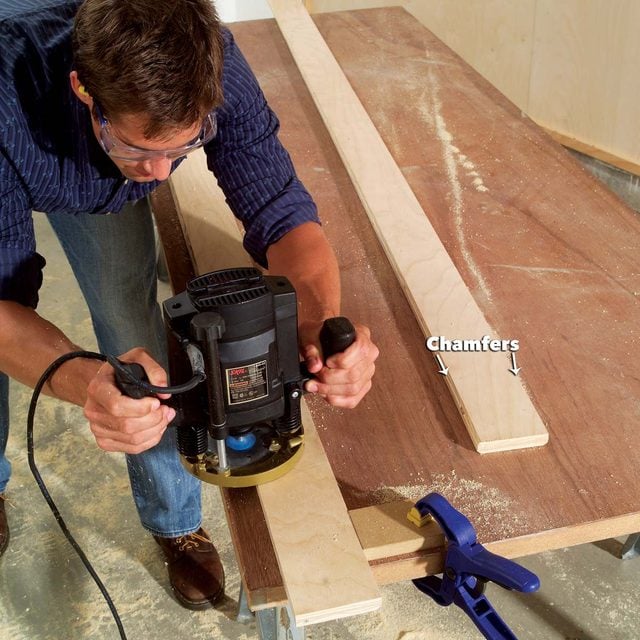
The chamfers on the rails are optional. The two on the face of the rail are purely decorative. The one on the back lets the aluminum cleats slip over the rail more easily. Instead of chamfering the edge, you can simply round it slightly with sandpaper. For appearance, we also chamfered our shelves and hook mounting plates. To begin, cut three 45-degree chamfers 1/8 in. deep on each rail using a router and chamfer bit.
Step 6
Add the Plywood Spacer To Create Slatwall
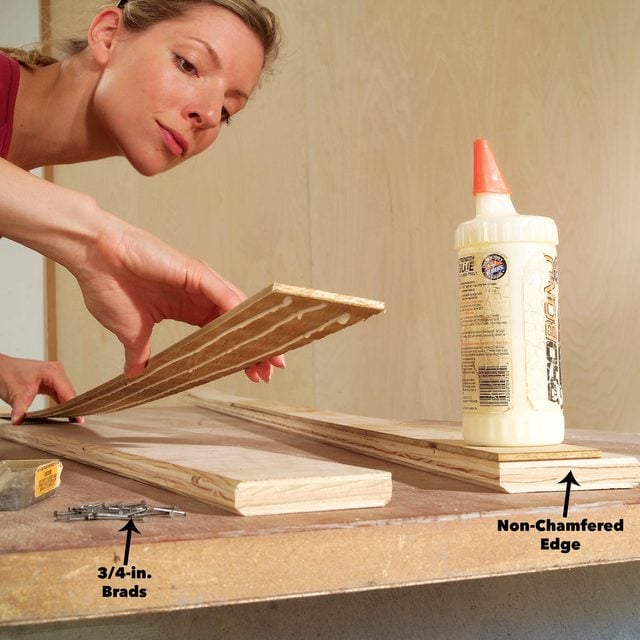
Glue 2-1/2-in.-wide strips of 1/4- in. plywood to the back of each rail, even with the non-chamfered edge. Tack the strip into place with a pair of 3/4-in. brads every 12 in. To save time, finish the rails before you install them. We used a water-based polyurethane. But don’t coat the back side; construction adhesive will grip bare wood better than sealed wood.
Step 7
Figure B: Plywood Rail Details
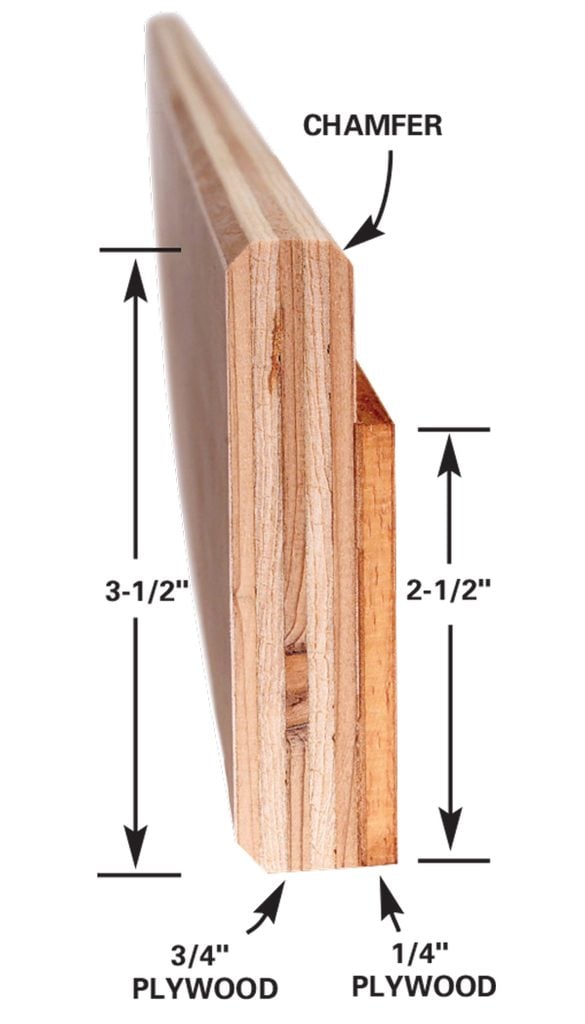
Assemble the rails from 3/4-in. and 1/4-in. strips of plywood.
Note: You can download Figure B and print it, see the Additional Information section below.
Step 8
Space and Nail the Rails to the Wall
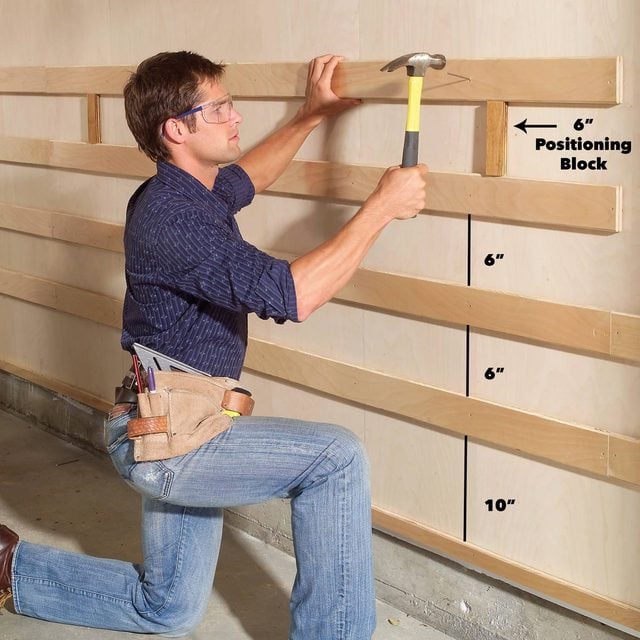
Attach rails with two beads of construction adhesive and a 16d finish nail driven at each stud. Start at the bottom and work up. Cut rails so that the ends meet at stud centers. For better appearance and strength, avoid putting rail joints at plywood seams.
Use a level to make sure the lowest course of rails is straight and level. Then use a pair of spacer blocks to position the rest of the rails. You can space the rails however you like. The closer you position them, the more flexibility you’ll have when hanging shelves or hooks. We began with a 10-in. space between the bottom strip of trim and the lowest rail then spaced the rest of the rails 6 in. apart. When all the rails are in place, finish the entire wall with a coat of polyurethane.
Step 9
Mass-produce Hanger Cleats From Aluminum Stock
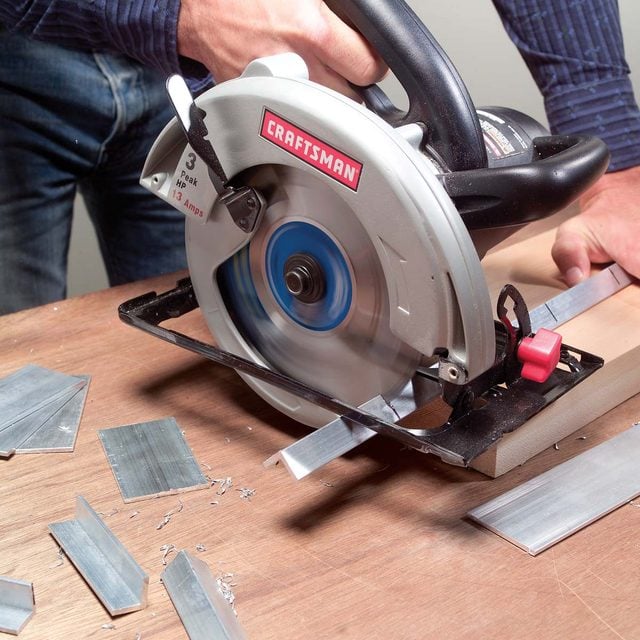
The cleats that hook onto the rails are made from 1/8-in. thick aluminum stock that’s available in 2- to 8-ft. lengths. Use 3/4- in. x 3/4-in. angle for shelves and 2-in.-wide aluminum flat stock for mounting plates. Cutting and drilling aluminum is fast and easy. Cut the aluminum with a metal-cutting blade. We cut all our cleats 4 in. long, but you can vary the length to suit your needs.
Wear eye protection when cutting and drilling aluminum. Round off the razor-sharp edges of each cut with a file or sandpaper.
Step 10
Drill Screw Holes
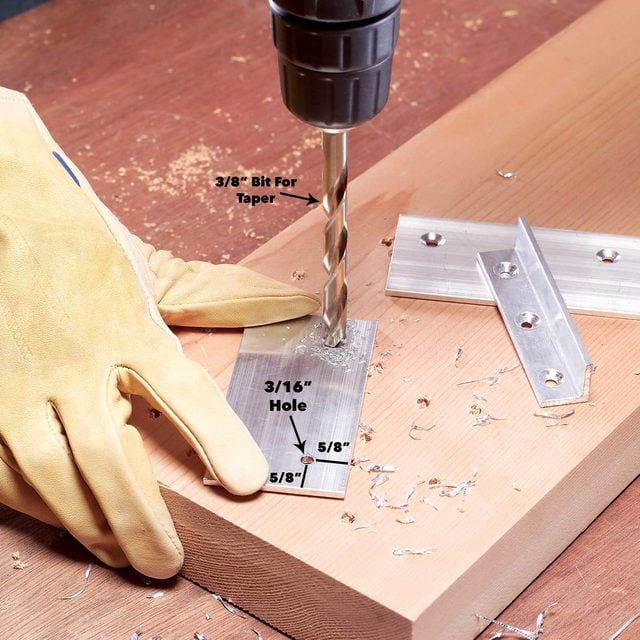
Drill three 3/16-in. screw holes in angled cleats and two in flat cleats. Then drill a shallow screwhead recess with a 3/8-in. bit.
Step 11
Make a Dozen Sturdy Shelves in an Hour
The shelves are made from aluminum angle cleats, 3/4-in. plywood and brackets that are available in a range of sizes. We made shelves 6, 12 and 15 in. deep and 24 in. long. You could make yours longer than that, but remember that long shelves are less versatile than short ones. We chamfered three sides of each shelf with a router and coated them with water-based polyurethane before adding cleats and brackets
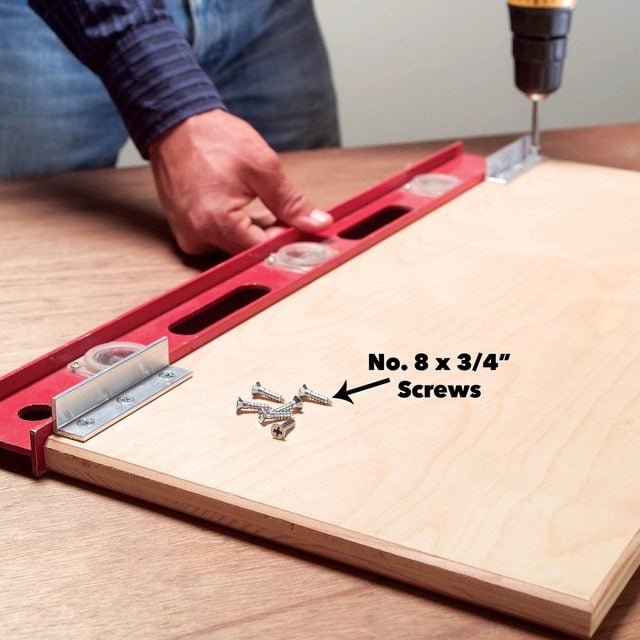
Screw cleats to the shelf about 1/4 in. from the ends. Use a straightedge to position the cleats flush and parallel with the back edge of the shelf.
Step 12
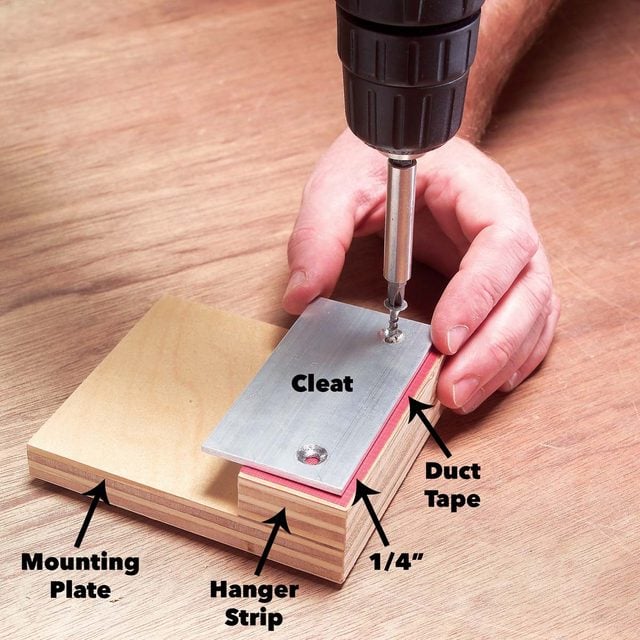
Position Shelf Brackets
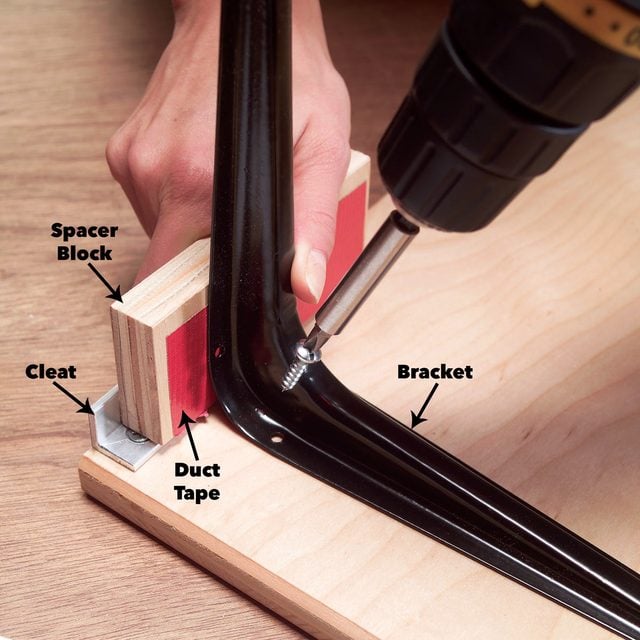
Position shelf brackets with a 3/4-in. plywood spacer block. Add a strip of duct tape to slightly widen the space so the cleat slips easily onto rails. To keep shelves from sagging, place brackets no more than 30 in. apart.
Step 13
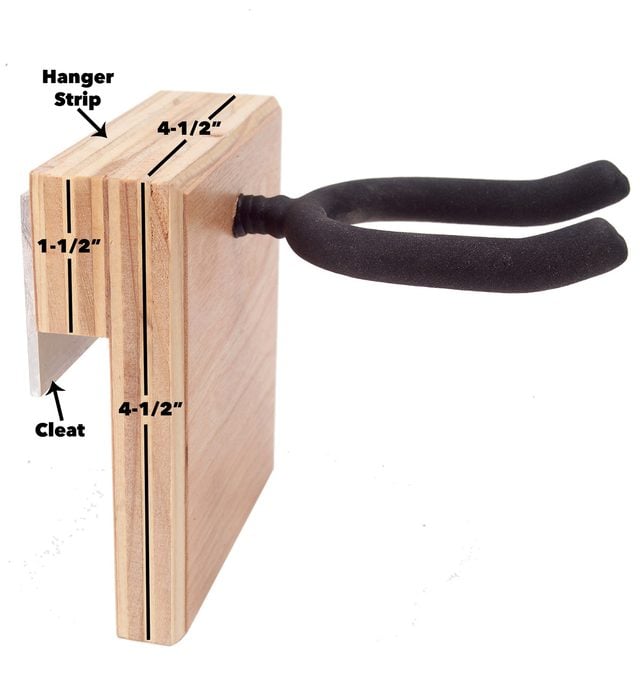
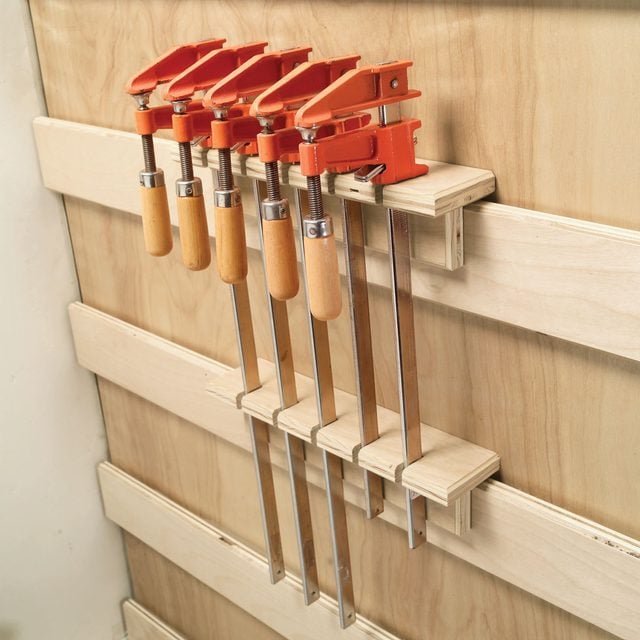
Plywood Mounting Plates Let You Hang Just About Anything
Mounting plates are just pieces of plywood that hold hooks, bins, drawers or anything else that you’d want to mount on a wall. Cut 4-1/2 x 4-1/2-in.plates for small hooks. Glue and nail a 1-1/2-in.-wide plywood hanger strip across the back of each plate. Then add a strip of duct tape and screw on the cleat 1/4 in. from the top edge. Coat the plates with polyurethane. When the finish is dry, position the aluminum cleats about 1/4 in. from the upper edge of the hanger strip and fasten it with 1-1/4-in. drywall screws.
Step 14
Add Screw Hooks For Additional Hanging Options
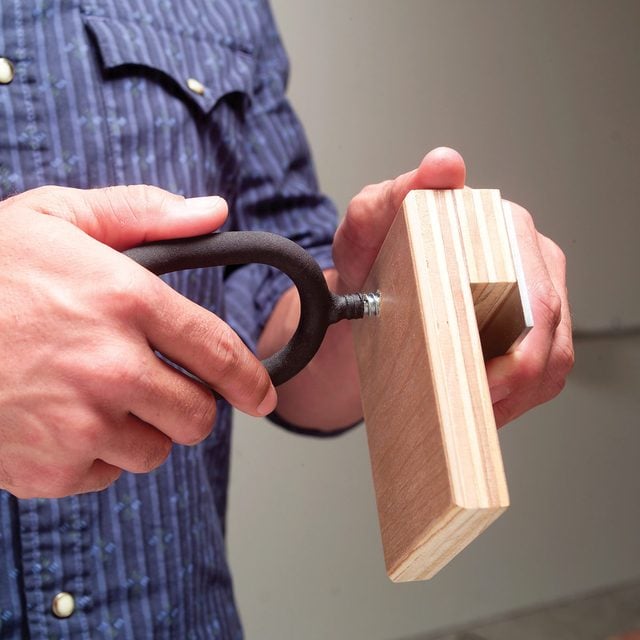
Predrill and screw hooks near the top of the plate where they can penetrate two layers of plywood. Finally, screw hooks to the plates. We also made larger mounting plates for bins, drawer units and a bicycle holder.
Step 15
Finished Slatwall Plate Unit
Use small mounting plates to hold various types of hooks. Use large mounting plates to support drawers and bins.
Step 16
Hang the Plates and Shelves
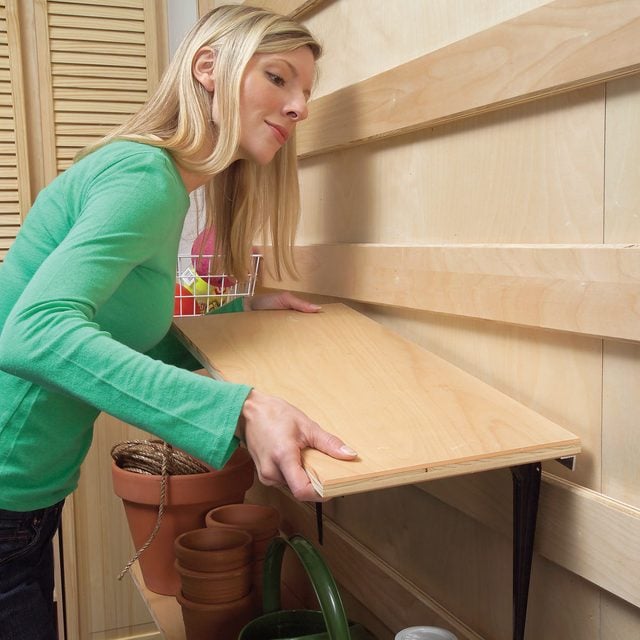
Don’t hang plates or shelves on the rails until the polyurethane has dried for at least 24 hours. Otherwise, the fresh polyurethane can “glue” parts together. Slip the cleats over the rails and push down to anchor the shelves and mounting plates.
We put our deepest shelves near the ceiling where they would be out of the way. That out-of-reach space is the best place for stuff you don’t use often and a good spot for child hazards like lawn chemicals.
Step 17
Custom Racks, Too Few Hooks and a Missed Opportunity
Editor’s note: One of the things I like most about this storage system is its adaptability. With a little ingenuity, you can make special holders for all those oddball items that don’t fit conveniently on shelves or store-bought hooks. But before you make a custom holder, visit a home center. I spent a couple of hours building a bike rack only to find a better one at a hardware store for $7.
I also wasted time on the storage system project because I made too few mounting plates for hooks. Assembling five or six extras would have taken just a few minutes. Instead, I had to drag out my tools and run through the whole process a second time.
But here’s my biggest mistake: Like most garages, this one has too few electrical outlets. I could have hacked holes in the drywall to easily run new electrical lines. No need to patch up the wall, since it was about to be covered with plywood anyway. Unfortunately, this occurred to me just as I nailed the last rail into place. I’ll know better next time.
Additional Wall Storage System Information: