


These space-saving, clutter-busting home storage projects will inspire you to organize every space in your home. Trust us, you'll thank us later.
17 Home Storage Solutions You’ll Thank Us For Later
1
/
17
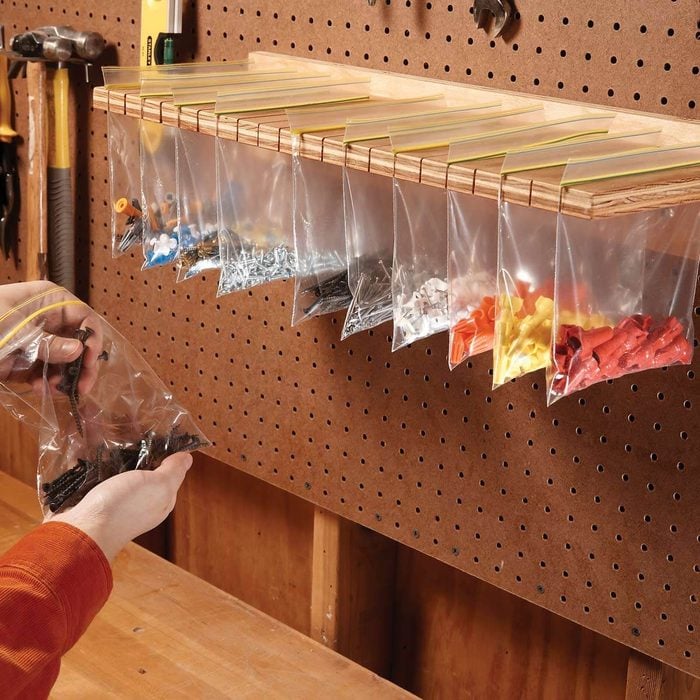
Assemble a Sandwich Bag Parts Organizer
Keep your workshop screws, connectors, nails and other small parts in sight and handy with this resealable bag holder. You can build it out of a 3/4 in. thick scrap of plywood. Start by cutting two pieces of plywood as shown. Draw lines one inch apart across the shorter piece with a square, stopping one inch from the edge. Now cut along the lines with a jigsaw. Screw the two pieces of plywood together and screw the unit to the wall. Fill resealable bags and slip them into the slots.
2
/
17
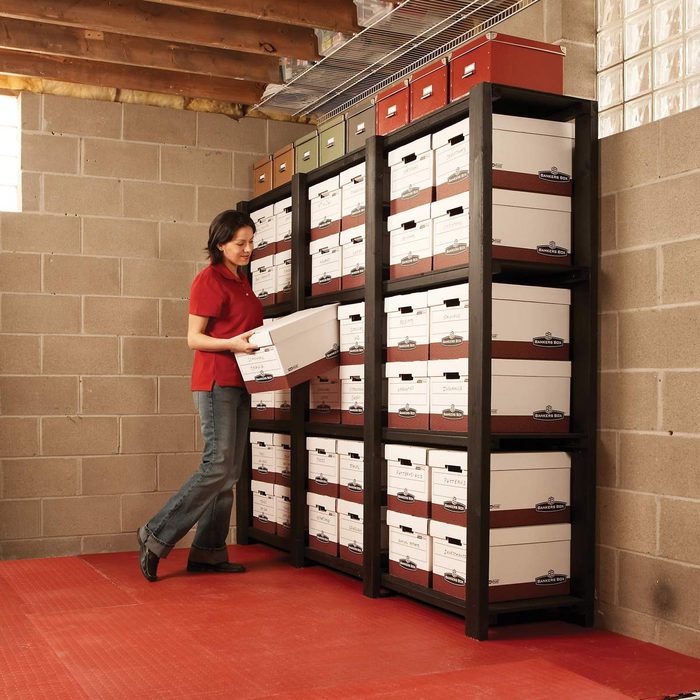
Build Heavy-Duty Storage Shelves
Store-bought shelving units are either hard to assemble and flimsy, or awfully expensive. Here’s a better solution. These shelves are strong and easy to build and cost about $70. And this sturdy shelf unit is sized to hold standard records boxes ($4 each). If you want deeper storage, build the shelves 24 in. deep and buy 24 in. deep boxes. And if you prefer to use plastic storage bins, measure the size of the containers and modify the shelf and upright spacing to fit. Get the project dimensions here. For more storage shelf projects click here.
You can also explore these Barbie storage ideas if you’re having a hard time organizing the dolls!
3
/
17
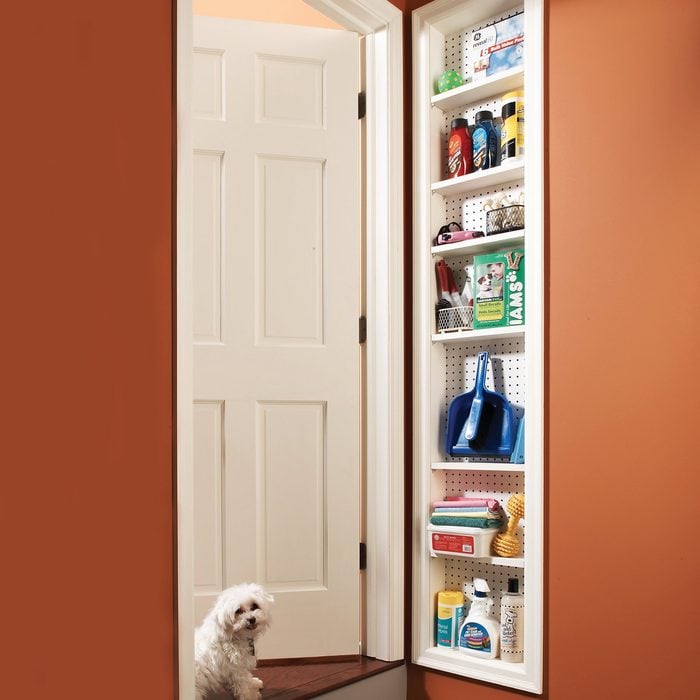
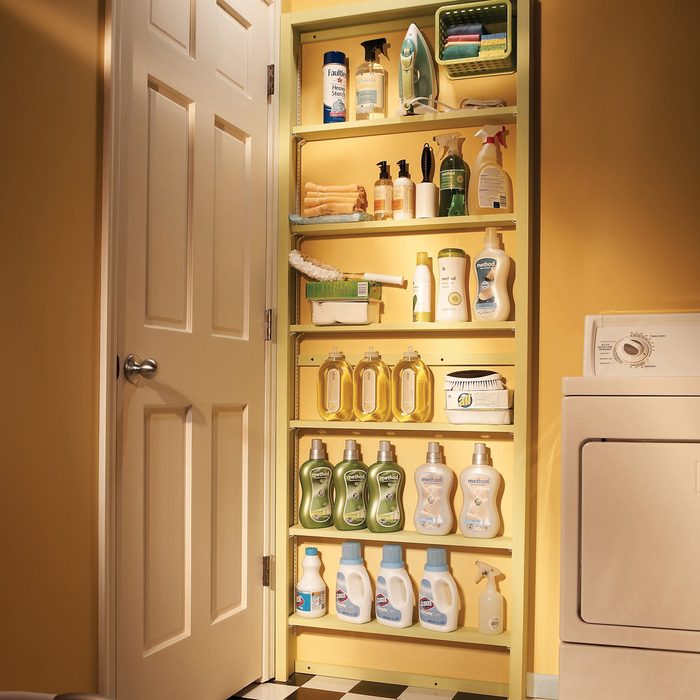
Make a Stud-Space Cabinet
When you can’t find a convenient nook for a set of shelves, you can often create one by recessing the shelves into the wall itself. So choose the location before you build the project to make sure it will fit. Start by looking for a space with no obvious obstructions. Then locate the studs with a stud finder. Some stud finders can also locate electrical wires and plumbing pipes inside walls. When you’ve found a promising spot, cut a 6 in. square inspection hole between the studs. Use a flashlight and a small mirror to inspect the stud cavity for obstructions. You often can modify the size of the cabinet to avoid obstructions. Get the project’s construction drawings here. Don’t want to open your walls? Check out these other easy shelving ideas.
4
/
17
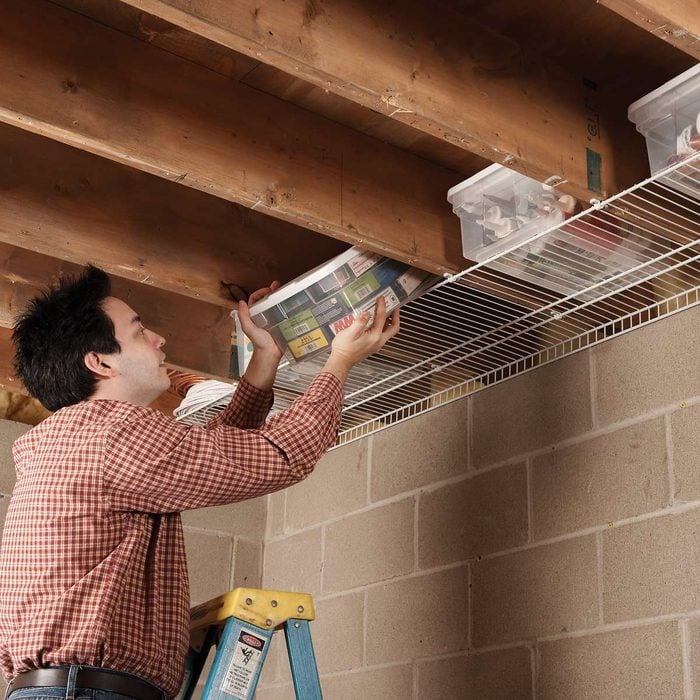
Create This Joist-Space Storage Space Saver
Don’t waste all that space between joists in a basement or garage. Screw wire shelving to the underside of the joists. An 8 ft. x 16 in. length of wire shelving and a pack of plastic clips (sold separately) costs about 20 bucks. Don’t forget that wire shelving also looks great on walls. Learn the best practices for installing wire shelving here. This storage solution won’t collect dust!
5
/
17

Build Cabinet Rollouts
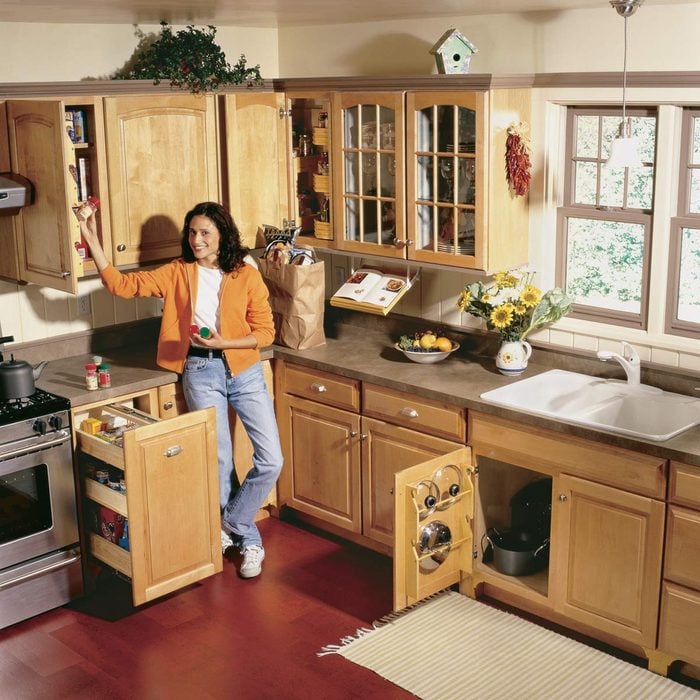
Base cabinets have the least convenient storage space in the entire kitchen. To access it, you have to stoop way over or even get down on your knees and then sort through all the stuff in front to find that particular omelet pan or storage container. What a pain. Rollouts solve that problem. They make organizing and accessing your cabinet contents back-friendly and frustration free. If you’re stuck with cabinets without rollouts, don’t despair. In these step-by-step project instructions, we’ll show you how to retrofit nearly any base cabinet with rollouts that will work as well as or better than any factory-built units.
6
/
17
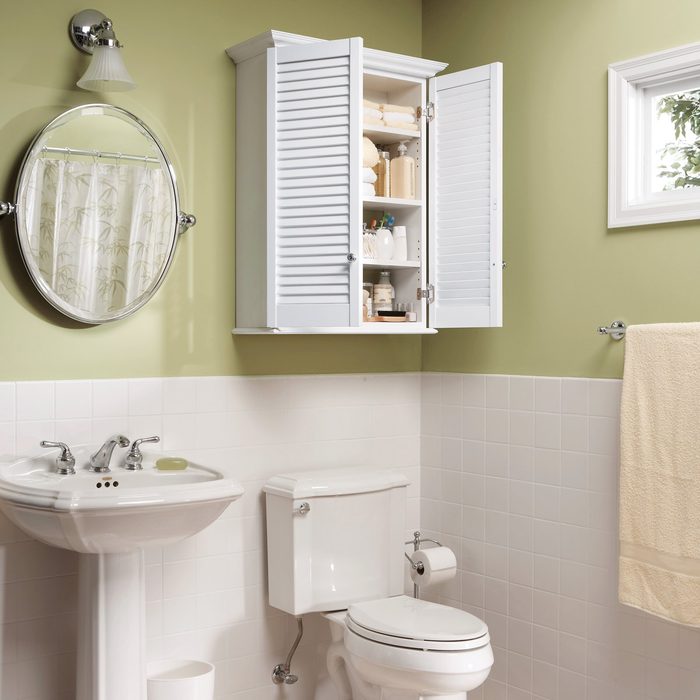
Create This Super-Simple Bath Cabinet
In many bathrooms, a picture or a small shelf hangs above the toilet. But you can make better use of that space by building an attractive cabinet that offers about three times as much storage as a typical medicine cabinet. Learn how to build these cheap bathroom cabinets here. The simple joinery and store-bought doors make this a great project for the woodworking novice.
7
/
17
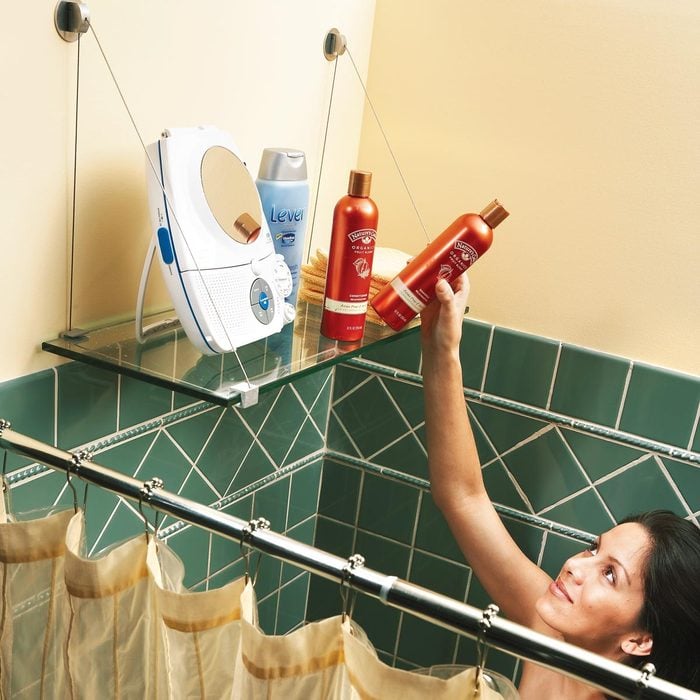
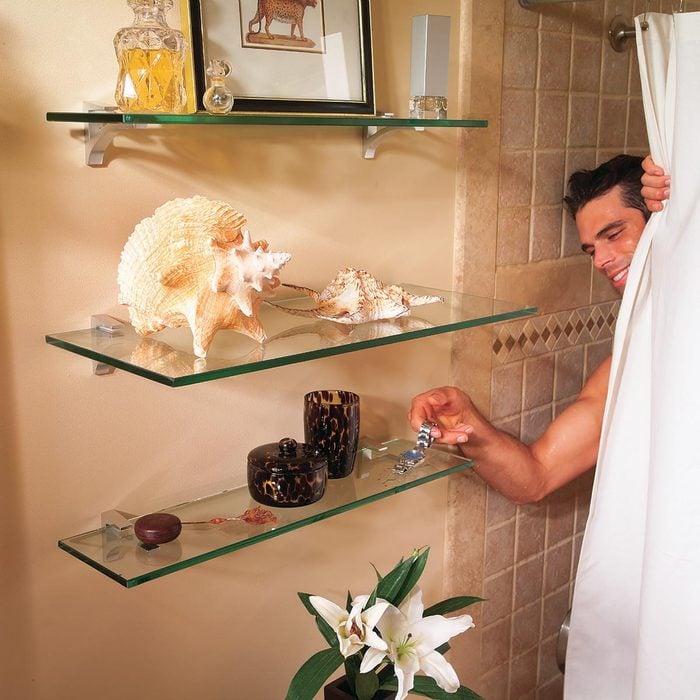
Hang a Glass Shower Shelf
Tired of the clutter of shampoo and conditioner bottles along the rim of your tub? This tempered safety glass shelf on a cable shelf bracket is an easy solution. And the cable shelf bracket requires only two screws for support. If studs aren’t located in the right positions, use toggle bolts to anchor the shelf brackets. And the glass hangs on the cables. The cable shelf brackets (No. CSB5B) are available online from expodesigninc.com. Also, order a tempered glass shelf from a local glass company. We installed a 3/8 in. thick, 12 in. deep shelf. Want to add some more flair to your bathroom? Learn how to frame your mirror with glass tile here.
8
/
17
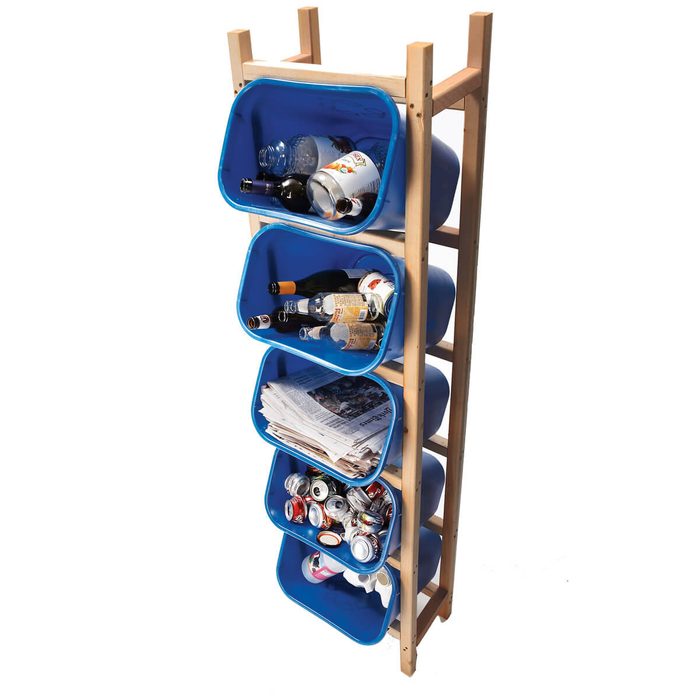
Clear Clutter With This Space-Saving Stacked Recycling Tower
Five plastic containers, six 2x2s and screws, and one hour’s work are all it takes to put together this space-saving recycling storage rack. The frame fits containers that have a top that measures 14-1/2 in. x 10 in. and are 15 in. tall. Learn how to build this stacked recycling tower here.
9
/
17

Assemble This Catch-All Cabinet
CDs, kids’ books, craft supplies, household tools — everyone’s got a collection of something they need to store. And we’ve got just the cabinet for the job. We designed it with simple joints and details so you can assemble it in one morning, even if you don’t have cabinet-building experience. The only tools you’ll need are a table saw and a drill. Learn how to build it here.
10
/
17
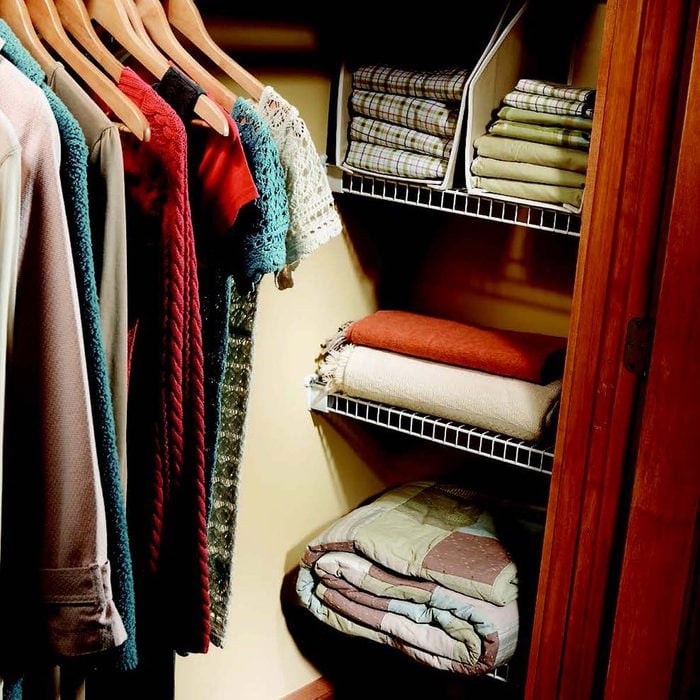
Maximize Your Closet With These Nook Shelves
Don’t let the recessed space at the ends of a closet go to waste. One of our favorite ways to maximize existing closet space is to install wire shelving to hold blankets, towels or bedding. Wire shelves are available in a variety of widths. Measure the width and depth of the space. Then choose the correct shelving and ask the salesperson to cut the shelves to length for you. Subtract 3/8 in. from the actual width to determine the shelf length. Buy a pair of end mounting brackets and a pair of plastic clips for each shelf.
11
/
17

Maximize Hand Tool Storage With a On-a-Roll Pegboard Doors
Maximize hand tool storage in a tool cabinet with this slick DIY project. The key to this project is a four foot long by-pass sliding door hardware set (about $15 at a home center). Mount 1/4 in. pegboard onto it, making sure to provide enough room (two inches) to hang tools on the pegboard and still allow it to slide by the door in front. The trick is to insert 1/2 in. plywood spacers in the roller hardware as shown. You can use the floor bracket that comes with the slider hardware to maintain the same two-inch clearance at the bottom of the cabinet. For door handles, simply drill a couple of 1-1/4 in. holes in the pegboard with a spade bit. Now pop in the pegs and hang up your tools. Next, learn how to build a hardware organizer.
12
/
17
Build These Behind-the-Door Shelves
The space behind a door is a storage spot that’s often overlooked. Build a set of shallow shelves and mount it to the wall. The materials cost about $40. Get the project drawings here. Locate the studs. Drill clearance holes and screw the shelves to the studs with 2-1/2 in. wood screws. Put a rubber bumper on the frame to protect the door. Don’t have an electronic stud finder handy? Learn how to locate studs without a stud finder here.
13
/
17
Hang Glass Shelves for Bathroom Storage
Most bathrooms have one space you can count on for additional storage, and that’s over the toilet. Open glass shelves are a great place to display decorative bathroom bottles or knickknacks. And there are zillions of glass shelving systems on the market. Follow the directions that come with the system for the installation details, but learn how to anchor them to the wall here because you probably won’t have studs exactly where you need them. In this project, use masking tape to avoid marking the walls.
14
/
17
Add More Kitchen Storage
You can unlock hidden storage space in your kitchen by opening up the hard-to-get-at corners, nooks and crannies of your cabinets. Squeeze more space from deep base cabinets and corner cabinets and add versatile new features to old cabinets. Here you’ll find five projects that create more storage space and make existing cabinet space more accessible.
15
/
17
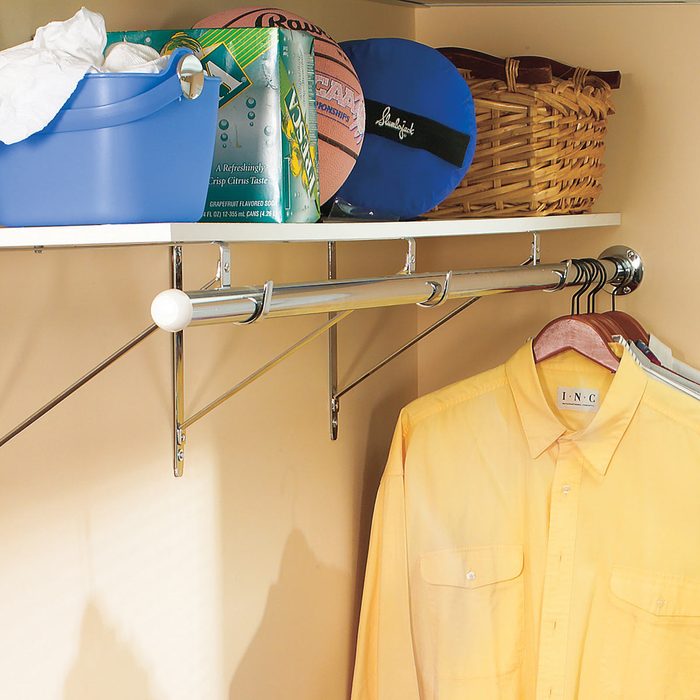
Add a Closet Rod and Shelf
This project will save you hours of ironing and organizing. Now you can hang up your shirts and jackets as soon as they’re out of the dryer — no more wrinkled shirts at the bottom of the basket. You’ll also gain an out-of-the-way upper shelf to store all sorts of odds and ends.
16
/
17
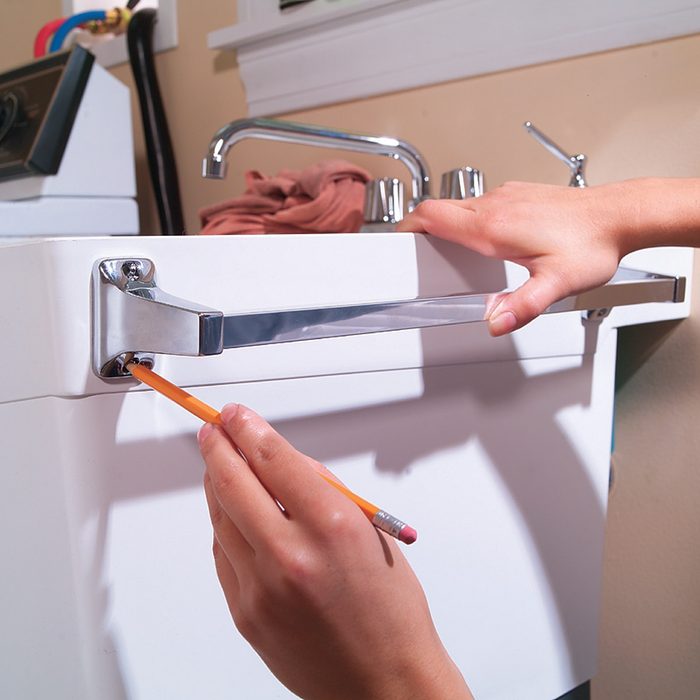
Attach a Towel Bar to the Laundry Sink
Get those messy rags out of the sink and onto a towel bar so they can actually dry. Shop for an easy mounting towel bar that you can shorten if you like. We picked one up at the hardware store that had easy mounting holes right on the face of the mounting plate and a removable bar. We cut the bar with a hacksaw so it would fit nicely on the side of the sink. While you’re at the hardware store, buy stainless steel mounting bolts, washers and acorn nuts to mount the bar. We used 7/8 in. No. 8-24 bolts.
17
/
17
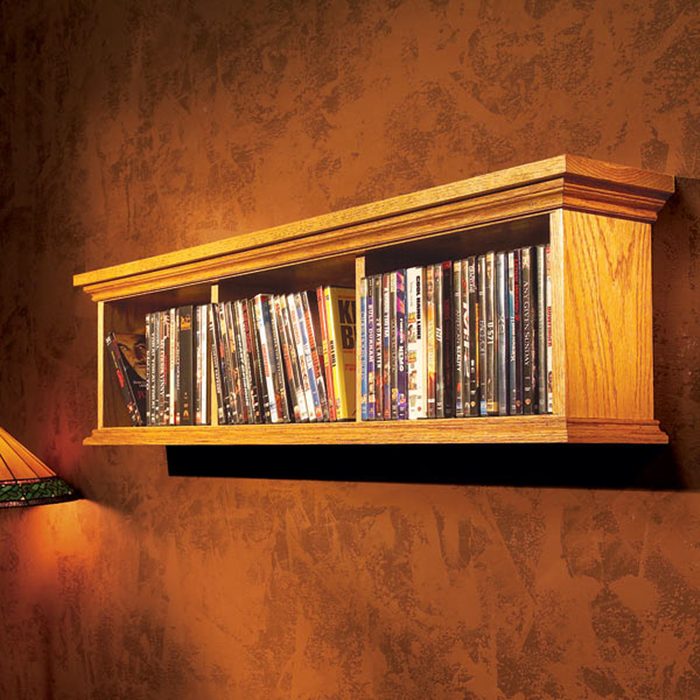
Build This DVD Wall Cabinet
Do you have DVDs scattered all over the room? We offer this handsome cabinet as one solution to the clutter. As shown, the cabinet is 42 in. wide and holds about 60 DVD cases. Go ahead and expand or shrink the width to better hold your collection or to fit a particular spot on the wall. The construction techniques will be the same no matter the width. Pull out your table saw and we’ll show you how to build a simple, sturdy wall-mount cabinet for your CDs and DVDs. Learn how to build a DVD Wall Cabinet.