
How to Make an Adirondack Chair and Love Seat
Updated: Feb. 27, 2024

Multiple Days
Intermediate
$51–100
Introduction
This Adirondack chair and matching love seat are designed for outdoor comfort. They're designed for easy assembly, so that a novice can build them. And you can build them from inexpensive, durable wood that, once stained, looks beautiful.Tools Required
- Caulk gun
- Circular saw
- Combination square
- Countersink drill bit
- Drill bit set
- Drill/driver - cordless
- File
- Framing square
- Glue
- Handsaw
- Jigsaw
- One-handed bar clamps
- Rasp
- Tape measure
- Wood chisel
Materials Required
- Construction adhesive
- Deck screws
- Exterior stain
- Lumber (see Cutting Lists)
- Sandpaper
Overview, tools and materials
Matching love seat
Assemble the love seat exactly like the chair, using the cutting list for the parts.
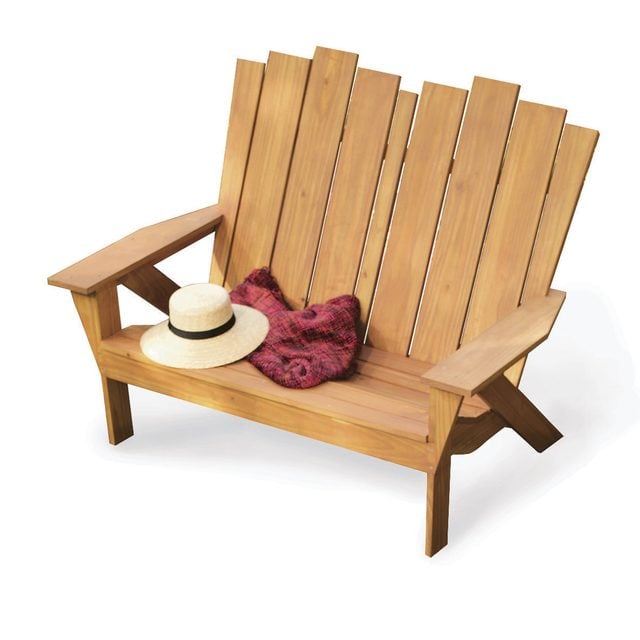
This chair and love seat combo is just perfect for outdoor lounging. The seat has a nice curved recess to conform to your body, and wide arms to hold your favorite snack and drink. And because the seat doesn’t slope steeply downward like on a traditional Adirondack chair, even your grandfather will be able to help himself out without a boost.
You won’t need an arsenal of power tools to build this furniture. In fact, you’ll only need a circular saw, a drill and simple hand tools. I’ve designed this project for simplicity as well: With a bit of patience, even a novice can do a great job.
The wood is pressure-treated pine, chosen for its low cost, high strength and longevity. And don’t worry about the drab green look of treated wood. You can brush on an exterior oil or latex stain and give it a beautiful warm glow that makes it look more like mahogany or teak than treated pine.
Select straight, knot-free, pressure-treated pine
Most outdoor wood furniture is made from cedar or expensive teak, but regular treated boards from your home center or lumberyard are perfect for this project. The trick is to select boards that are as straight and free of knots as you can find. A few tight knots are OK, and if you spot a board that looks great except for a huge loose knot, just cut it out and use the knot-free sections. It’s a good idea to buy a couple of extra boards, just in case you end up cutting out more sections than you’d planned. Also avoid boards that are still wet from the treatment process (they’ll feel cool and damp) because they might warp or crack as they dry.
Don’t assume that the treated boards are dimensionally consistent. When I got my lumber home, the boards varied by as much as 3/16 in. in width. These variations can screw up the assembly process, especially for the back slats, which require spacers to get an exact back width. Once you get the boards home and begin to cut the pieces, use the rip guide on your circular saw (or borrow a neighbor’s table saw) to trim them to the exact widths in the Cutting List.
Project step-by-step (14)
Assemble the main frame: Cut the leg notches

Clamp the two front legs together, measure for the 3/4-in. deep notch and make repeated cuts with your circular saw set to 3/4-in. depth of cut. Chisel the pieces between the cuts and then file smooth.
Screw the stretcher to the legs
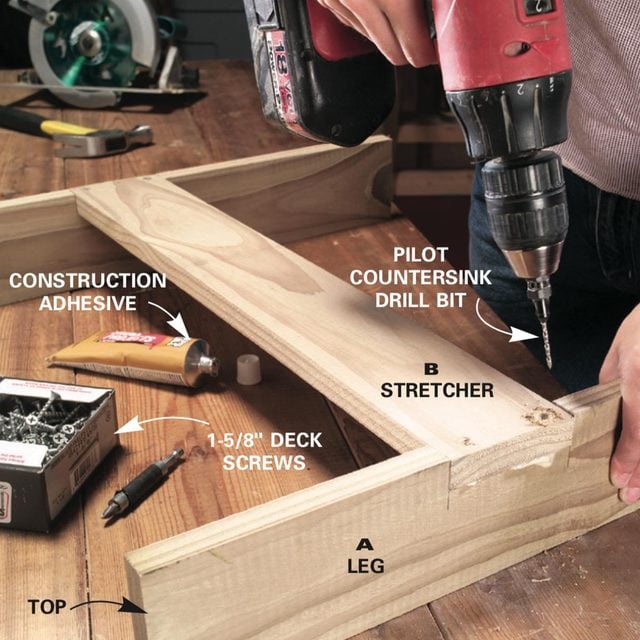
Spread a light bead of construction adhesive into each notch and align the front stretcher (B) with the edge of the legs. Drill and screw the stretcher to the legs.
Saturday Morning Workshop: How To Build A Folding Adirondack Chair
Cut out the arms

Mark the angle on the backside of each arm and cut the arms (C) and arm supports (D) with your circular saw.
Attach the arm supports

Align the arm supports with the top and front edges of the legs, then drill and screw each front leg to the arm support with two 1-5/8 in. deck screws.
Attach the rear legs
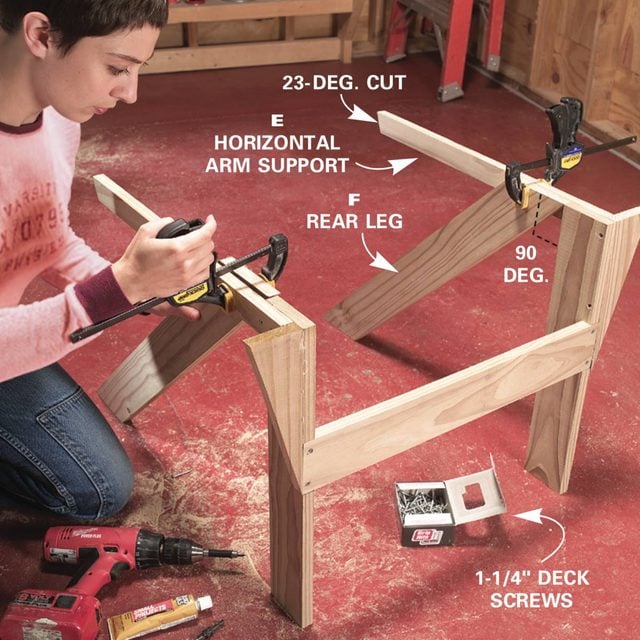
Fasten the horizontal arm supports (E) at 90 degrees to the front legs. Then glue, drill and screw the rear legs to the arm supports, making sure the arm supports are parallel to the floor.
Cut and mount the seat supports

Cut the seat supports (G) from 1×6 boards. Align the square front edge of the seat brace with the back of the front stretcher (C) and glue and screw them to the front and back legs. Cut the notches in the front legs to accept the front stringer as shown in Photo 1. As you chisel out the waste wood in the notch, shave the bottom carefully and fine-tune it with a rasp to keep the notch from getting too deep. As you assemble the basic frame (Steps 2 – 6), make sure your work surface is flat so each piece aligns with the adjoining pieces at the correct angle. Be sure to use a dab of construction adhesive in every joint and predrill a pilot and countersink hole for each screw. You can buy a bit at your local hardware store that drills a pilot and countersink in one operation for the No. 6 screws.
Assemble the back: Cut the back slats
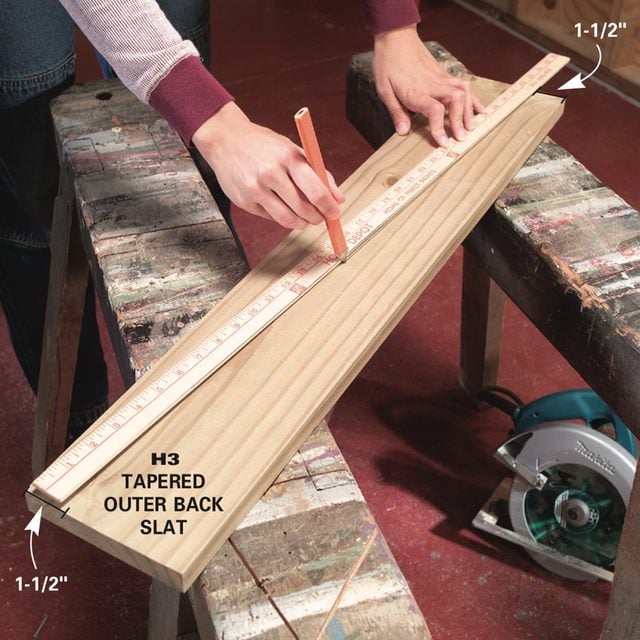
To achieve the gentle taper of the back assembly, you’ll need to taper the outer seat slat and cut it as shown in Step 7. Mark a diagonal line on H3, then clamp the board to your sawhorses and cut along the line to make a pair of outer back slats.
Assemble the back braces and slats

Set the back slats on a flat surface with 1/4-in. wide spacers. Center the back braces on the slats. Glue, drill and screw them with 1-1/4 in. deck screws.
First, place a mark 1-1/2 in. from the edge on opposite ends as shown. Connect the marks with a line and then saw right down the middle of the line with your circular saw. Sand or plane the cut edge to smooth away any saw marks. Before you assemble the back of the chair or love seat, cut 1/4-in. thick spacers from scrap wood. The spacers will ensure that the back assembly is the right width. Lay each slat on the floor and make sure the best-looking side of each board is facing down. As you screw the three back braces to the back slats, use a framing square to make sure they’re perpendicular. You’ll find it easier to get the proper alignment if you match the center point of each brace with the center line drawn down the middle back slat. Drill pilot holes and drive 1-1/4 in. deck screws through the braces into the slats as shown in Figure A and Photo 8.
Install the back: Screw the back to the frame

Align the bottom of the back assembly with the seat braces and the tops of the rear legs. Screw the legs to the back brace and screw the horizontal arm supports to the center back brace. Once you’ve assembled the back, it’s time to fasten it to the chair frame. Flip the frame assembly upside down and insert the back assembly into it. This can be a bit challenging, so make it easier by laying two nonskid rugs or mats on the floor under the chair frame and the top of the back assembly. These will help keep everything in place. As you align these assemblies, it’s critical to get the back of the seat braces flush with the outer back slats (H3) and then screw through the rear legs into the bottom back brace (J) as shown in Photo 9 and Figure A. Next, glue and screw the horizontal arm supports (E) into the center back brace (K) and then into the side of the outer back slat as well.
Add the seat and arms and then apply a finish: Screw the seat slats to the braces
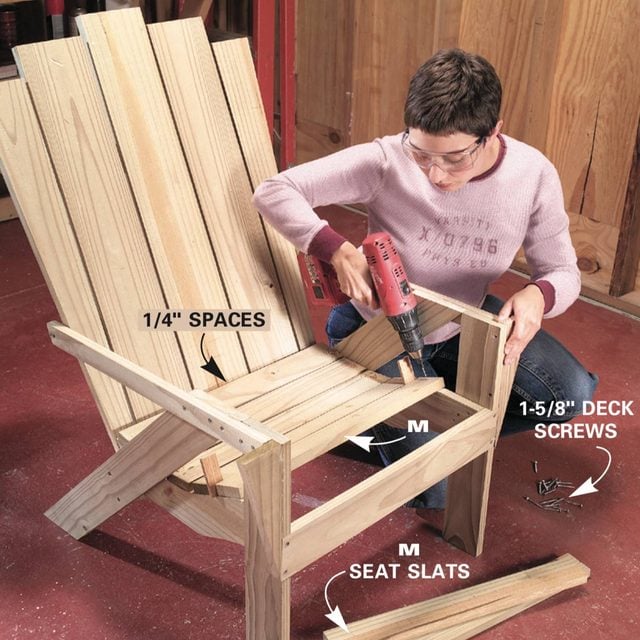
Space the seat slats (M), evenly starting at the back. Drill one pilot hole on each end of the slats and screw them to the seat brace. Screw the front seat slat to the seat brace as well as the front stretcher (B). With the completion of this phase, you’ll start to see a chair emerging. Flip the chair onto its legs and cut and predrill the seat slats. Glue and screw them to the seat braces with 1-5/8 in. deck screws. Don’t overdrive the screws—the heads should be just flush with the seat slats.
Mark the arm notch
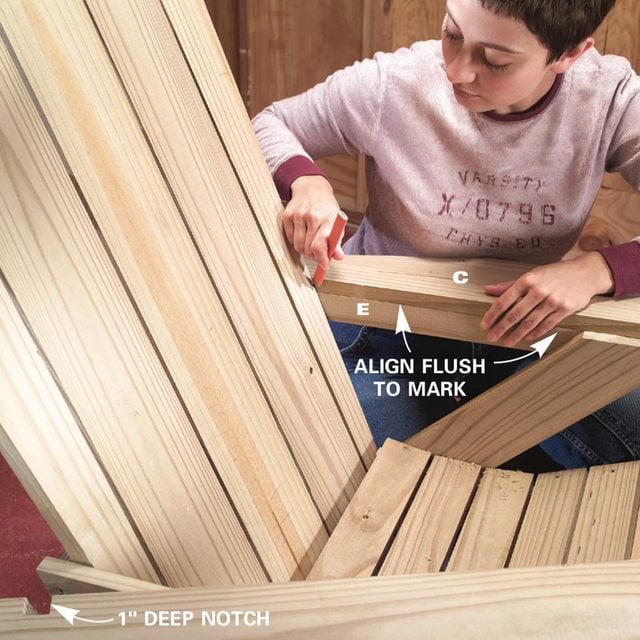
Set the arm flush with the edge of the arm support (E), overhanging the front leg 1-1/2 in. Mark the arm where it meets the back slat.
How to Paint Furniture: Farmhouse Style Chair
Install the arm

Notch the arm with a handsaw and fasten it to the horizontal support, the top edge of the back legs and to the front leg and arm support with 1-5/8 in. screws and glue.
The last step of the assembly is to fasten the arms to the arm supports and the legs as shown in Photos 11 and 12. The notches you cut near the back of the arms hold the back assembly firmly in place and reduce the stress on the screws at other joints. These compound notches slice through the arm at an angle. Cut the depth carefully with a handsaw and then chisel out the notch.
Once the chair is assembled, ease all the edges with 100-grit sandpaper, paying particular attention to the seat and arms. If the wood feels damp or cold to the touch, you may need to let the chair dry in a shaded area for a few days before you sand or stain it.
We used an Olympic oil-based cedar natural tone stain that lets the grain show through. Several options are available, including custom semitransparent stains that a paint supplier can mix for you. A quart will easily do a pair of chairs or a chair and love seat. This finish will last at least several years and can be cleaned and recoated as it shows signs of wear.
Add a personal touch: Mark and trim the back

You don’t need an expensive adirondack chair template to make a unique and finished chair back design. Create a round back by measuring down 15 in. from the top and draw a 14-in. radius with a homemade compass. You can build our step-back version of the chair and love seat or experiment with other shapes to suit your sense of style. Feel free to try the gable or round back shown below or draw a different shape on paper, tape it to the chair and step back to see how you like it.
Chair back design options
These three are the most common chair back styles, but you may see, and be inspired by, another!
Step Back

Gable Back

Round Back
