
What is a Chair Rail Molding and Why To Add It To Your Home

Updated: May 20, 2024
Chair rail molding isn't just about aesthetics. Learn its historical protective purpose and how it's become a key design element, with unique ideas and installation insights.
A chair rail is more than just an aesthetic addition to a room—it’s rooted in practicality. Traditionally, these horizontal moldings were strategically placed on walls to shield them from potential damage caused by the backs of moving chairs. Hence, the name “chair rail.”
On This Page
What is Chair Rail?
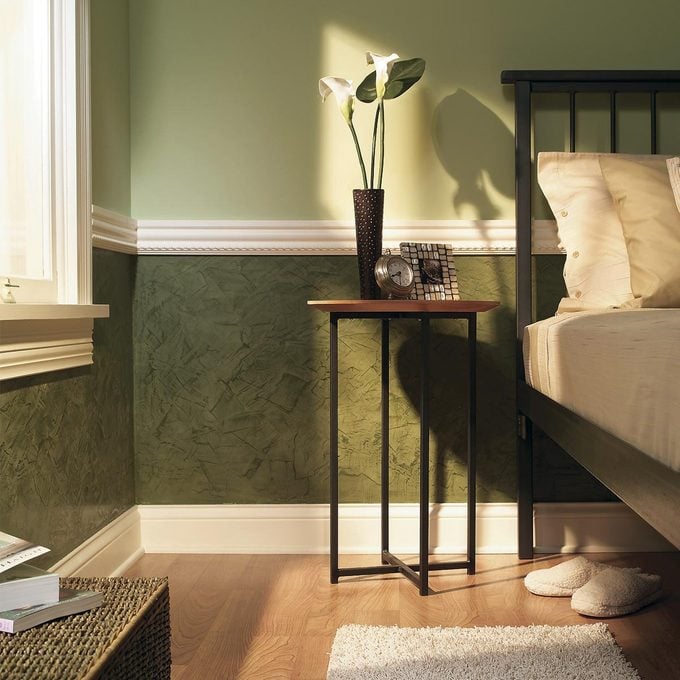
Chair rails are horizontal moldings applied to walls designed to protect them from “irrationally exuberant” chairs on the move. Not surprisingly, they’re usually installed about 30 inches from the floor—the approximate height of most chair backs. Aesthetics also play a role; proportionally a wall looks best with the chair rail positioned about one-third of the way up from the floor. Chair rails also serve to cleanly define space so you can apply different wall treatments—wallpaper, paint, wainscoting—to the upper and lower sections of a wall.
Variety in Chair Rail Design
The design spectrum of chair rails is vast, offering homeowners an array of choices to complement various interior styles. Some rails are understated and straightforward, like a single 1×3 strip. In contrast, others exhibit intricate profiles, featuring multiple convex and concave patterns that reflect sophisticated craftsmanship. For those looking to evoke a particular historical or period look, “built-up” chair rails consist of two or more stacked moldings, offering depth and complexity.
Installing chair rail is a great DIY project, even for beginners. The materials are relatively inexpensive and you can get by with basic hand tools and a miter saw—either manual or powered. The biggest challenge? Figuring out the best and most attractive way to butt chair rail moldings into existing window and door trim—especially if that trim is thin.
Chair Rail Ideas
Chair rails, while initially designed for practical reasons, have grown into a decorative tool that can be adapted in a multitude of ways to fit different design aesthetics. Here are some unique chair rail ideas to consider:
- Two-Tone Walls: This is a classic use of a chair rail but with a twist. Instead of using wallpaper and paint, consider painting the top and bottom halves of your wall in contrasting or complementary colors. For instance, a soft pastel above the chair rail paired with a darker or richer hue below can create a dynamic visual effect.
- Stenciled Chair Rail: Instead of a traditional wood or MDF molding, use a stencil to paint a decorative “chair rail” line around the room. This could be a series of patterns, shapes, or even a continuous design that mimics the look of a more intricate molding.
- Reclaimed Wood: For a rustic or farmhouse aesthetic, use reclaimed wood as your chair rail. The worn, weathered look of the wood can add texture and a touch of history to your space. It pairs well with whitewashed walls or other rustic design elements.
- Tile Chair Rail in Bathrooms: In wet areas like bathrooms, use a decorative tile strip as a chair rail. This not only adds a design element but is also functional, as tiles can handle moisture better than wood. You can choose from a variety of designs, from intricate mosaics to simple, monochromatic lines.
- Built-In Ledge: Make your chair rail more functional by turning it into a built-in ledge or narrow shelf that runs around the room. This can be a place to display photos, art, or small decor items. It’s especially useful in rooms like home offices or dens, where you might want to keep small items close at hand.
What is the Standard Chair Rail Height?
The standard chair rail height is typically between 28 to 32 inches from the floor. However, the most common height is approximately 30 inches. This measurement corresponds to the height of most chair backs, ensuring that the chair rail performs its protective function effectively.
That said, the height can vary depending on specific design intentions or the height of the room. Aesthetically, some designers suggest placing the chair rail at about one-third the height of the room, especially in spaces with tall ceilings, to achieve balanced proportions. As always, it’s essential to consider the specific room, furniture, and overall design when deciding on the exact placement of a chair rail.
Why Installing a Chair Rail Molding Is Worth It
Chair rail molding, once a functional addition designed to protect walls from wayward chairs, has evolved into a coveted design element for modern homeowners. Installing chair rail molding introduces a layer of architectural detail that can significantly elevate the appearance of a room. Beyond the aesthetic charm, chair rails create a visual division, allowing homeowners to experiment with diverse paint colors, wallpapers, or textures in a single space without it feeling overwhelming. This molding also provides an illusion of height and structure, making rooms feel more spacious and sophisticated. Furthermore, by acting as a buffer, it still serves its original purpose of guarding against scuffs and dings, ensuring that walls remain pristine and elegant over time. The versatility of chair rail molding makes it a worthwhile consideration for anyone looking to enhance the depth, character, and functionality of their interiors.
Originally Published: February 12, 2018