Have windows and door in need of trim? Consider milling your own. Learn how to mill and install your own wood trim.
Multiple Days
Advanced
Varies
Introduction
Building my own home from the ground up was an extremely rewarding experience. I learned many valuable lessons, one of which was that different steps require different mindsets.
One step I wasn't initially excited about but eventually learned to love was milling and installing my own solid wood trim around windows and doors. The work wasn't as fast-paced as building the foundation or framing the walls. But it certainly led to a great sense of accomplishment, along with visually stunning results.
If your home is in need of some trim work, consider milling and installing your own from solid wood. It's much cheaper than ready-milled trim, and the method I'm about to share is simpler than typical trim carpentry. Keep reading to learn how you can take on the job of working with trim wood, using the right tools and know-how.
Tools Required
- 23-Gauge pin nailer (optional)
- 5-inch random orbit sander
- 6-inch level
- Caulking gun
- Chop saw
- Drill
- Finishing hammer and finishing nails (if you don't use a pin nailer and compressor)
- Half-sheet sander
- Jointer
- Pencil
- Pocket joining clamp
- Pocket joining jig and drill bit
- Portable air compressor (optional)
- Quarter-sheet palm sander
- Quick grip clamp
- Robertson driver bit
- Shop vac
- Table saw
- Tape measure
- Thickness planer
- Utility knife
Materials Required
- 1 1/4-inch 23-gauge pin nails (optional)
- 1-1/4-in. long fine thread pocket screws (two for each corner)
- 1x6 lumber of your chosen species (3/4- x 5-1/2-in. actual dimensions)
- 2-inch 23-gauge pin nails (optional)
- 5-inch 80-grit sanding discs
- Caulking tube of silicone
- Finishing nails (if you don't have a pin nailer)
- Sheets of 120 and 180-grit sandpaper
- Shop rag or paintbrush (depending on what sort of finish you choose)
- Wood stain/finish of your choice
Project step-by-step (8)
Step 1
Calculate and Purchase Your Wood
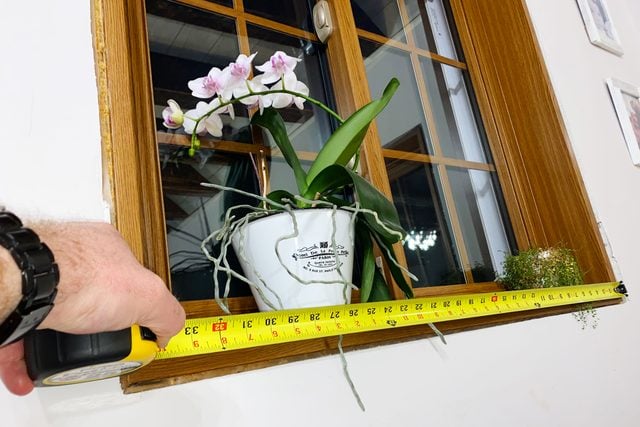
- Measure the sides of all windows and doors where you plan to install trim. Add up these figures, then add 10 percent.
- Decide if you want hardwood or softwood trim. Both can look great. Hardwood is tougher but more expensive. Softwood is more susceptible to dents and scratches but cheaper. For my window trim, I went with cherry, a hardwood.
- Purchase enough eight-foot lengths (or longer, if needed) of 1×6 lumber of your chosen species to make up the total length figure you calculated, including the extra 10 percent.
Step 2
Prepare the Main Trim Pieces
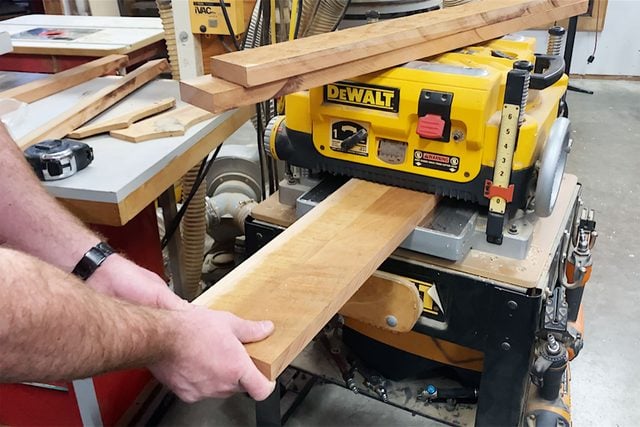
- Use your table saw to rip cut most of your 1×6 material to 3-1/4-in. wide. Cut enough to border all your windows and doors. These will be your main trim pieces.
- Plane these 3-1/4-in. wide strips down to 1/2-in. thick with your thickness planer.
- Joint both edges of each strip to make them straight.
Step 3
Prepare the Inner and Outer Border Strips
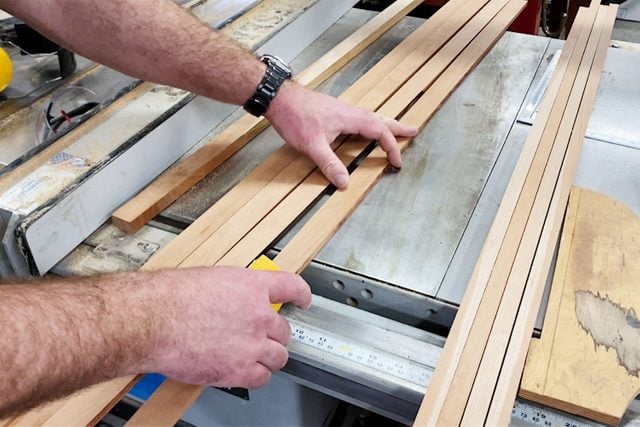
- Use your table saw and thickness planer to dimension your offcuts from the 3-1/4-in. wide pieces of wood into strips 1-1/8-in. wide and 5/8-in. thick. These will be the outer border pieces of your trim frames. Make sure you have more than enough total length of these strips to border the outside of all your windows and doors.
- Cut and plane any remaining offcuts and any extra full-size 1×6 into more long strips, this time 3/16-in. thick. Be sure they’re wide enough to spend from the inner face of your door and window jambs to 5/8-in. beyond the surrounding wall surface. These will be the inner border pieces of your trim frames. Make sure you have more than enough length to border the inside of all your windows and doors.
- Rough cut the strips to length, preparing one strip for each side of your window or door, two inches longer than needed
Step 4
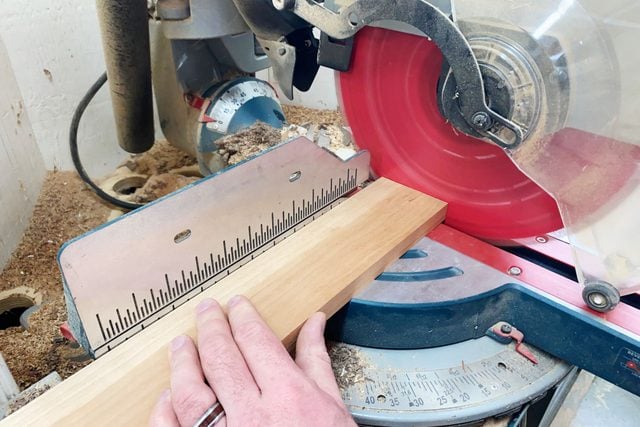
Cut the Main Trim Frame Pieces to Final Length
- Measure the exact inner dimensions of the jamb of the first window or door where you plan to install trim.
- Cut the 3-1/4-in. wide main trim frame pieces to length with a chop saw, according to your measurements. Be sure to cut the top and bottom pieces to cap the side pieces, not the other way around.
Step 5
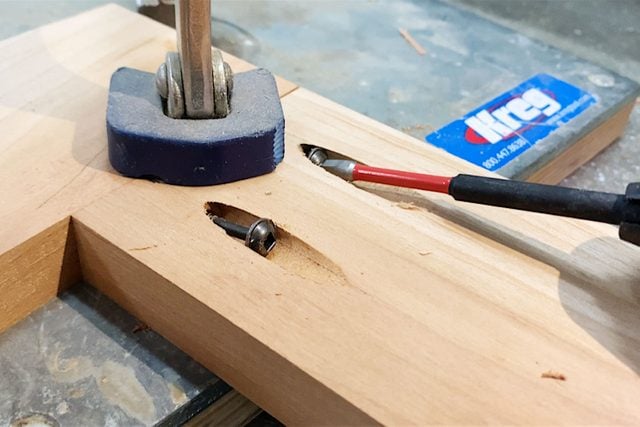
Join the Trim Frame Together
- Position your main trim frame pieces on a clean floor surface the way they’ll be around your window or door.
- Use your pocket joining clamp to hold each corner together, one at a time.
- With your drill and pocket screw jig and bit, drill pocket screw holes for each corner joint as its held in the clamp.
- Use your drill or a screwdriver to drive pocket screws into the holes you’ve just drilled, joining each corner together one at a time.
- Note: If you’re installing trim around a door, there won’t be a bottom piece on your frame.
Step 6
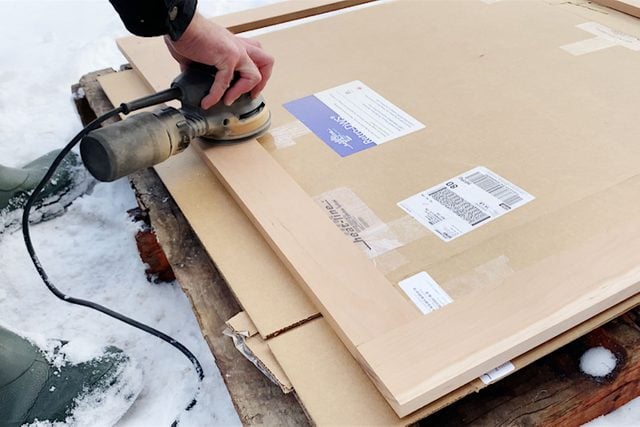
Sand the Trim Frame
- Use a random orbit sander with an 80-grit disc to flush up any height mismatch between frame members where they meet at the corners.
- Use a half-sheet sander with 120-grit paper to sand the entire front face of the trim frame until it’s smooth.
- Repeat the sanding with a quarter-sheet palm sander and 180-grit paper.
- Sand the edges of the frame and all the border strips by hand with 180-grit paper.
Step 7
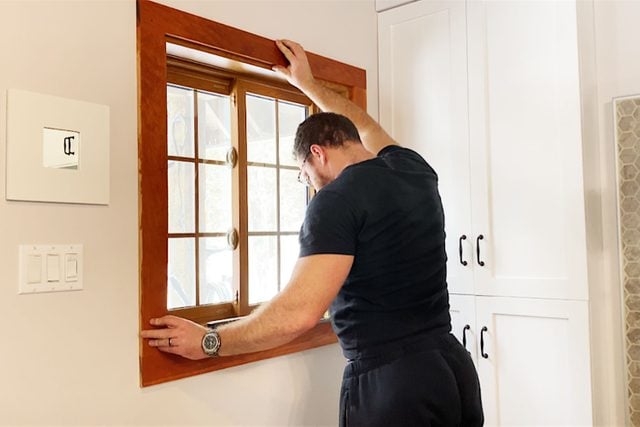
Finish and Install the Trim Frame
- Clean your trim frame thoroughly with a shop vac, then apply a finish of your choice. Light wood will give the best results if you stain it first, then apply urethane. Repeat with the border strips.
- Wait until your finish dries, then carefully transfer your assembled trim frame from your shop to your home, or wherever you’re installing it.
- Apply a small bead of silicone to the drywall around the window and door where you’re installing the trim.
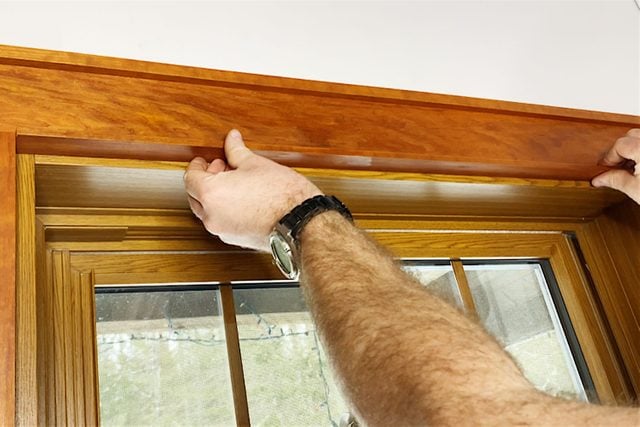
- Hold the trim frame in place against the wall, centered over the window or door. With your six-inch level, ensure it’s level and plumb.
- Fasten it in place with your 23-gauge pin nailer hooked to an air compressor, and two-inch pins or finishing nails driven by a finishing hammer. Place one fastener at each corner, and one in the middle of each side if necessary (i.e. if the frame isn’t sitting completely flat on the drywall.)
Step 8
Cut and Install Your Border Strips
- With a utility knife, carefully mark the lengths of your inner and outer border strips. Use the installed trim frame on your wall as a reference.
- Take your chop saw and cut inner and outer border pieces to length for each inside and outside edge of your trim frame.
- Dab a little finish on the cut ends, then install the strips around the trim frame with 1-1/4-in. 23-gauge pin nails or finishing nails.
- You’re done! Stand back and admire your work.