


DIY bookshelf: Build it in a day with your favorite young woodworker.
A full day
Beginner
$51–100
Introduction
Build this simple pine bookshelf with a miter saw, biscuits—and a young helper. It's a great way to teach your son or daughter about woodworking and tool use.Tools Required
- 45-degree chamfer bit
- Biscuit joiner
- Clamps
- Cordless drill
- Countersink drill bit
- Framing square
- Hearing protection
- Miter saw
- Orbital sander
- Router
- Safety glasses
- Table saw
- Tape measure
Materials Required
- 1 - 1x6 x 10 ft. No. 2 pine board
- 1 - 1x6 x 8 ft. No. 2 pine board
- 1 - 2x4 x8 ft. pine (rip to 2x2s for legs)
- 1 - Bottle of wood glue
- 2 - 1x8 x 8 ft. no. 2 pine boards
- 24 - 1-1/2 in. wood screws
- 39 - No. 20 wood biscuits
- 4 - 1-1/4 in. drywall or wood screws
- 4 - 1/4 in. flat washers
Overview
Here’s a simple DIY bookshelf project that gives you a chance to pass some of beginner-level woodworking skills on to the next generation. Any kid will love spending the day with you assembling this bookcase. And by the end of the day, your helper will have hands-on experience with several power tools, plus an attractive homemade bookshelf to show off.
The knotty pine bookcase parts are all standard dimensional lumber that you can find at any home center. We used biscuit joints for the shelves and legs. If you don’t own a biscuit joiner but still want to build this project, you can simply nail or screw the parts together and fill the holes. We used a table saw to cut the 1-1/2 in. square legs from 2x4s and a router with a 45-degree chamfer bit to bevel the edge of the top. If you don’t have a table saw or router, you can just use stock 2x2s for the legs and leave the edge of the top square.
Meet Justin and Jackson
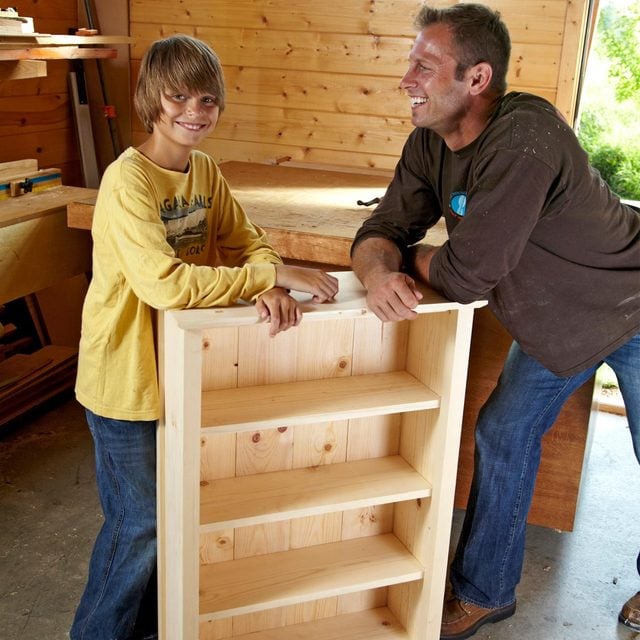
We recruited Justin and his son to help us with this homemade bookshelf story. Justin is a full-time firefighter and a woodworker in his off time. His 11-year-old son Jackson, an up-and-coming woodworker, had fun with his dad and learned a few power tool techniques in the process. We provided the plans and gave a few pointers along the way, and Justin and Jackson took it from there.
Getting started: Build a DIY Bookshelf
Use the cut list (see Additional Information, below) as a guide for cutting all the parts. The next step is to mark the shelf positions on the shelf sides. It’s important to keep track of the orientation of the parts. For reference, we placed a piece of masking tape on the top of each side, and on the top side of each shelf. Justin and Jackson used a framing square to draw lines indicating the bottom of each shelf.
No need to mark the location of biscuits on the shelves and sides. Instead make marks on the scrap of wood used as a fence. Draw marks to indicate the outside edges of the 1×8 shelves and sides, and mark 1-3/4 in. in from each edge to indicate the center of the biscuits. To use the fence, line up the outside marks with the edges of the part you’re cutting slots in. And then line up the center mark on the biscuit-joining tool with the marks for the center of the biscuits.
To mark the legs and sides for biscuits, set the legs in position and make pairs of marks that line up with each other on the legs and sides. Put a piece of masking tape on the top of each 2×2 leg, and keep this facing up when you cut the biscuit slots.
Cut slots for the biscuits
Biscuit joiners have a flip-down fence that can be used to position the slots, but instead we’re showing a method that allows you to reference the slots from the base of the biscuit joiner.
Jackson didn’t have any trouble mastering the biscuit joiner. With a little coaching from Justin, he cut slots like a pro. What’s trickiest about cutting the slots is keeping track of the orientation of the parts. Just remember to keep the masking tape facing up, with one exception: The slots on the 1×8 top should be cut with the tape side down.
Glue the bookcase together
Here’s where a helper like Jackson really comes in handy. You have to work fast to spread the glue in the biscuit slots and onto the biscuits, and then assemble the parts before the glue starts to swell the biscuits.
Start by arranging all the parts on your work surface. Justin used a flux brush to spread the glue in the slots, and onto the biscuits after they were installed. (Any small brush will work.) When you have everything assembled, install clamps to hold the sides tight to the shelves while the glue dries. Check by using a framing square or by measuring diagonally from opposite corners to make sure the bookcase is square. Adjust if needed. Then tighten the clamps. This is a good time to take a break while you let the glue dry for about an hour.
Build the top
To minimize potential cupping, we decided to make the top by gluing two pieces of 1×6 together rather than using a solid board. Choose a straight piece of 1×6 with a sharp, clean edge. Cut the pieces long and trim the top to length after you glue the two parts together. For pro tips on gluing boards edge-to-edge, see “Edge Gluing Boards.” Justin and Jackson cut biscuit slots in the sides of the two 1x6s to help hold them in alignment while installing the clamps. Glue and clamp the two 1x6s. Then let the glue set up about 30 minutes before routing the edge.
Add the legs, top and back
The legs are held to the sides of the bookcase with biscuits. When attached, the legs should protrude 1/2 in. past the outside, and overlap the shelves by 1/4 in. Glue in the biscuits, spread a line of glue along the edge of the side, and clamp the legs to the sides. Let the glue set for about 30 minutes.
Drill four 3/8 in. holes at the corners of the bookcase top. The holes are oversized to allow the top to expand and contract. Attach the top with four 1-1/4 in. screws and 1/4 in. washers.
Complete the bookcase by screwing the four 1x6s to the back of the unit. Drill 1/8 in. pilot holes for the screws to avoid splitting.
A little final sanding and the bookcase was ready for finish. When we left them, Justin and Jackson were discussing finishing options but were leaning toward a wipe-on oil finish. Our build-it-together bookcase was a great success. Give it a go with your up-and-coming woodworker. Looking for more designs? Learn how to build a wooden ladder shelf.
Project Plans
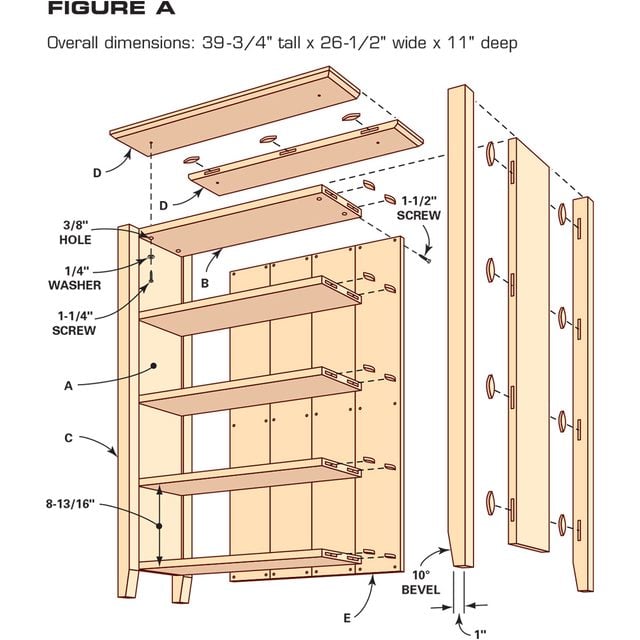
Cutting List
Top (A)
Material: 1×8 Pine
Quantity: 2
Dimensions: 3/4″ x 7-1/4″ x 36″
Shelves (B)
Material 1×8 Pine
Quantity: 5
Dimensions: 3/4″ x 7-1/4″ x 22-1/2″
Legs (C)
Material: 2×4 Pine
Quantity: 4
Dimensions: 1-1/2″ x 1-1/2″ x 39″
Top (D)
Material: 1×6 Pine
Quantity: 2
Dimensions: 3/4″ x 5-1/2″ x 28″
Back (E)
Material 1×6 Pine
Quantity: 4
Dimensions: 3/4″ x 5-1/2″ x 36″
Project step-by-step (12)
Step 1
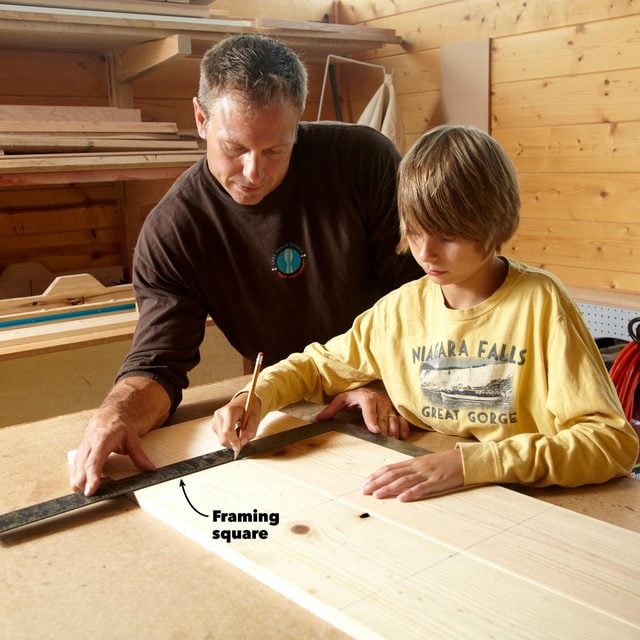
Mark both sides at once
To start this easy DIY bookshelf project, first lay the bookcase sides together to mark the shelf locations. The layout marks have to be perfect, so Justin closely supervised this step.
Step 2

Mark the biscuit slots
Make pairs of corresponding marks on the legs and sides. Later you’ll center the biscuit joiner on the marks to cut slots that align.
Step 3

Slot the end of the side
Clamp the fence to the work surface and butt the end of the shelf to it. Then center the biscuit joiner on the mark and cut the slot. Repeat for the second slot.
Step 4
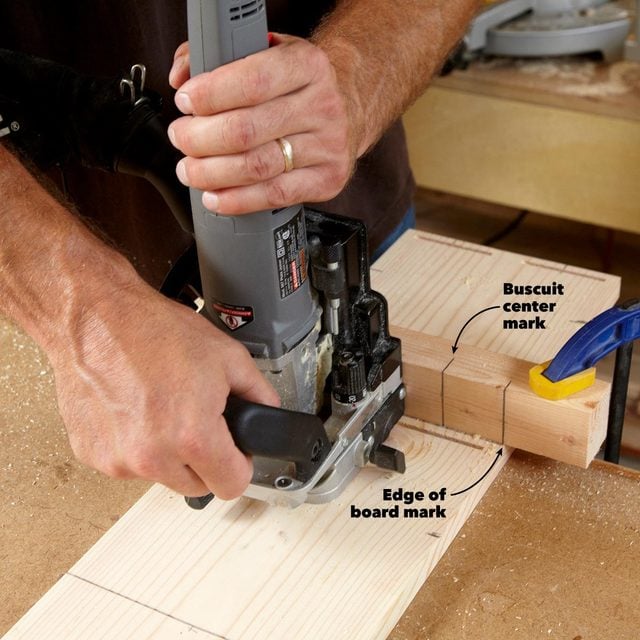
Cut slots for the shelves
Line up the 2×2 jig with the edge of board mark and clamp it. Center the biscuit joiner on the center mark on the fence and cut the slot. Repeat for the second slot.
Step 5

Cut slots for the legs
Line up the center of the biscuit joiner with the marks on the edge of the side and cut the slots. Make sure both the shelf side and the biscuit joiner are tight to the work surface when you cut the slot.
Step 6
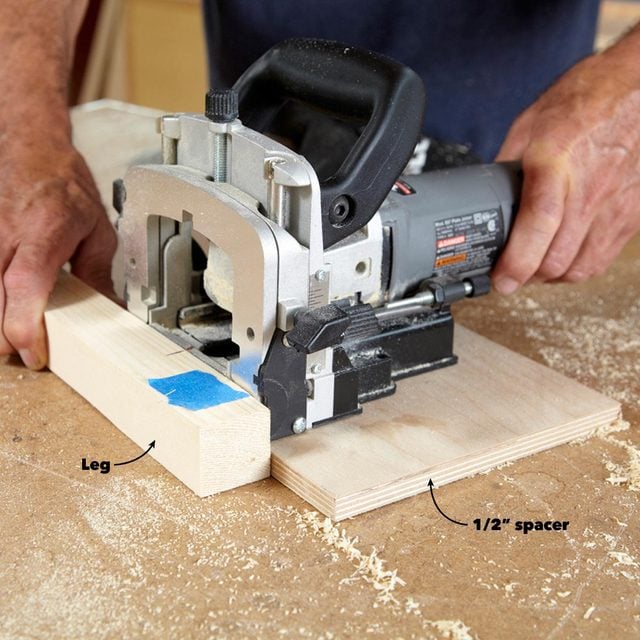
Position the slot with a spacer
Place a scrap of 1/2 in. plywood or particleboard on the work surface. Butt the leg against it and rest the biscuit joiner on the spacer while you cut the slots. The 1/2 in. spacer will automatically position the slots.
Step 7
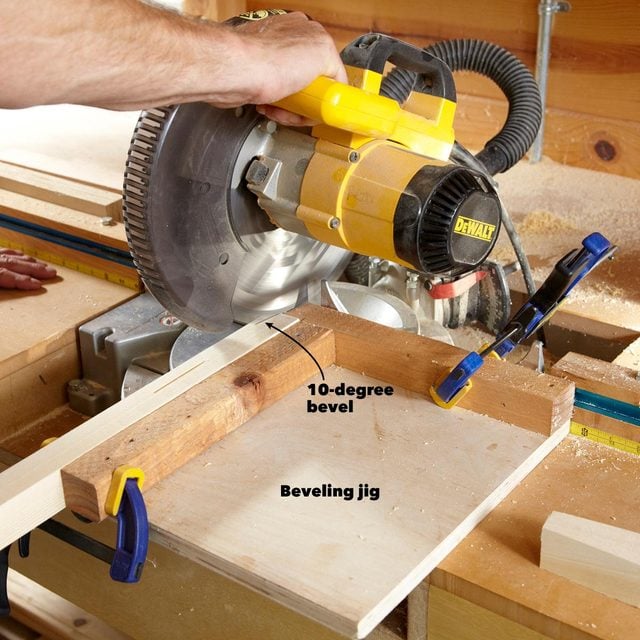
Bevel the legs with a simple jig
Screw two scraps to a small square of plywood to form a cradle for the legs. Clamp the jig to the miter saw fence, and cut a 10-degree bevel on the bottom of each leg.
Step 8
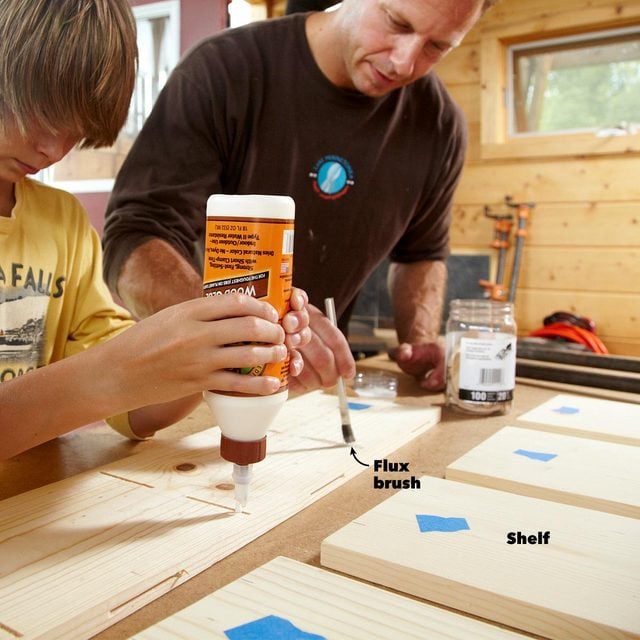
Add the biscuits
Work quickly to glue biscuits into the slots. Spread the glue in the slots, and onto the biscuits, with a brush.
Step 9
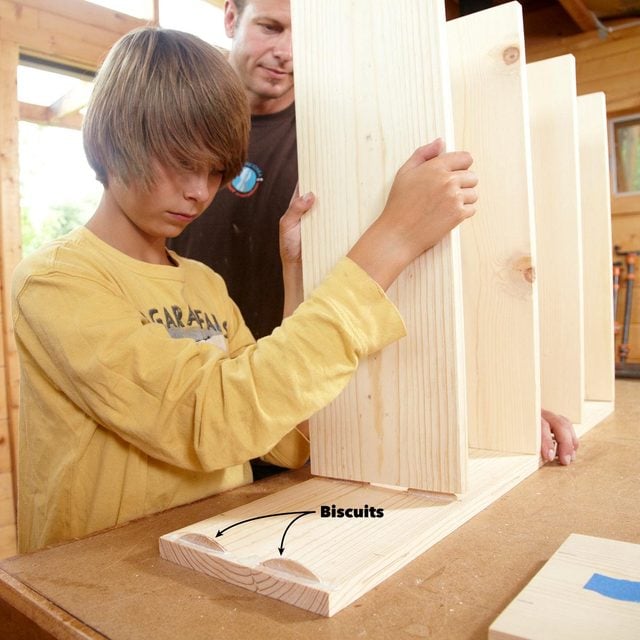
Assemble the shelves quickly
Biscuits start to swell and lock in place soon after the glue is applied, so it’s important to get the shelves assembled quickly.
Step 10
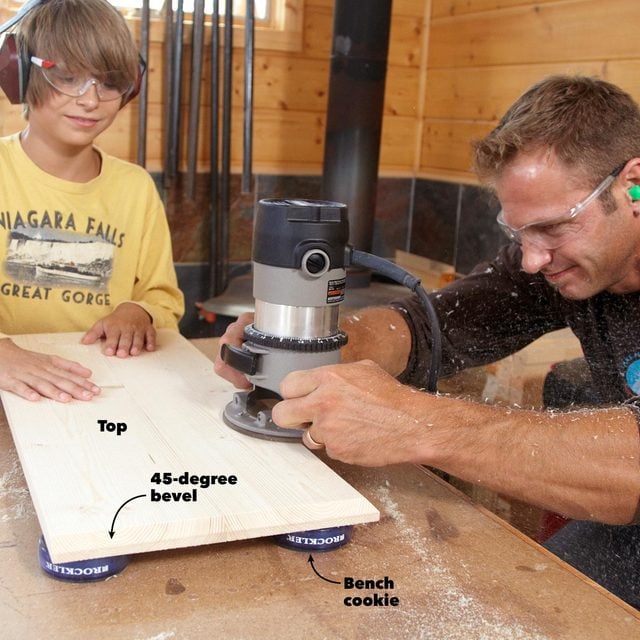
Beveling the edge is a job for Dad
Use a router and a 45 degree chamfering bit to bevel the front and sides of the top. Jackson held the top to keep it from shifting on the Bench Cookies (available at www.rockler.com).
Step 11
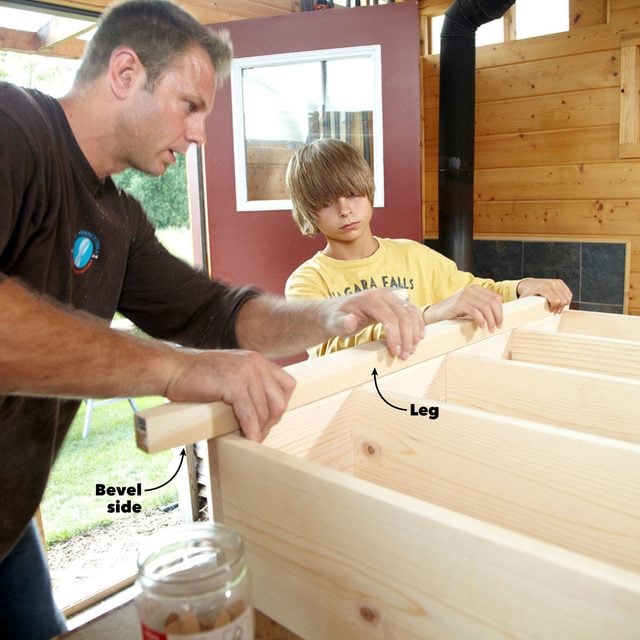
Insert the biscuits and clamp the legs
Spread the glue and insert the biscuits. Then glue on the legs. Clamp them and wait for the glue to dry before moving on to install the top and back.
Step 12
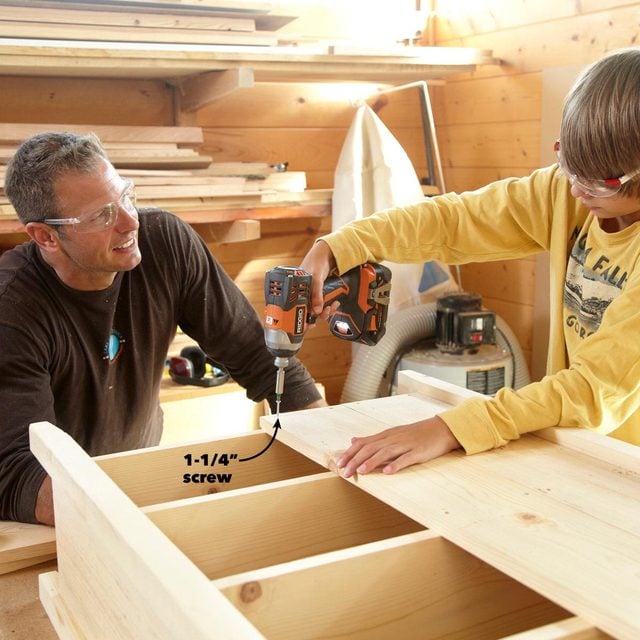
Screw on the back boards
Drill pilot holes to prevent splitting. Then screw the boards to the back of the bookcase. With a little coaching, Jackson was driving screws like a pro.
Want to build something new? Check out these attractive, useful projects you can build! The best part is that they don’t require a complete workshop and years of woodworking experience, just a few common tools and some old-fashioned elbow grease.