


Follow these simple steps for how to make your own DIY Christmas wreath by using the branches from your Christmas tree.
An hour or less
Beginner
Less than $20
Introduction
Follow these simple steps for how to make your own DIY Christmas wreath by using the branches from your Christmas tree.Watch How to Make a DIY Christmas Wreath in 7 Steps
Tools Required
- Plastic locking clip
- Pruning shears
- Wire cutters
Materials Required
- 22 Gauge floral wire
- Pine tree boughs
- Wire wreath frame
Project step-by-step (7)
Step 1
Gather Materials
- Purchase a wreath frame and a spool of floral wire from an arts & crafts store.
- Cut four to six branches from the bottom of your real Christmas tree using pruning shears.
- Gather up other accent greenery to incorporate into your wreath such as scotch pine, red winterberry holly, arborvitae and/or dogwood.


Step 2
Cut the Ends off the Tree Branches
- Cut the fresh ends off the branches into lengths of six to eight inches using pruning shears.
- Create individual piles of all the different vegetation you’ll be using in your wreath.
- Cut fourteen 12-inch pieces of floral wire.
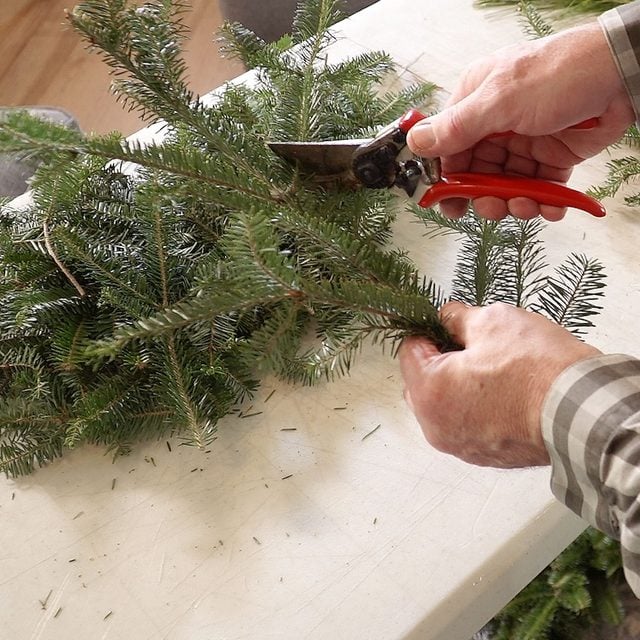

Step 3
Create the Bundles
- Make about fourteen bundles by clustering together the trimmings from each pile. Layer them on top of each other aligning the stems.
- Hold a bundle together with a plastic locking clip over the stems.
- Take a 12-inch piece of floral wire and wrap it around the stems pulling it tight, then twist the wire together. Flip the bundle over and do the same on the other side. (See photo.)
- Release the plastic locking clip.

Step 4
Attach the First Bundle
- Place your first bundle on top of the wreath frame so it follows the curve of the frame.
- Next, bend the attached wire around to the backside of the frame and twist the two ends together while pulling it tight, securing the bundle to the frame. (See photo.)
- Wrap the remaining wire around the frame keeping the tails of the wire pointing in, so as not to poke or scratch you.

Step 5
Attach More Bundles
- Position the greenery of the next bundle over the stems of the preceding bundle, securing the bundle as before.
- For a fuller look, tilt bundles, alternating left and right of the previous bundle.

Step 6
Secure the Last Bundle
- Carefully lift up the top of your first bundle and tuck the stems of the last bundle under it, securing it to the frame as before.

Step 7
Tighten Any Loose Bundles
- If you find that some of the bundles are loose, you can always tighten the wires on the backside of the wreath by twisting them with a pair of pliers.
- You can also attach more wire to the backside of the frame and make a few more rotations around the loose bundle, hiding the wire under the top of the next bundle.

FAQ
How long do fresh wreaths last?
Typically, a well-crafted fresh wreath made from hardy evergreens like pine, cedar, or fir can last for about a month, sometimes even longer, if properly cared for. To extend the life of your fresh wreath, keep it in a cool location away from direct sunlight and heat sources. Spritzing it with water or using a floral preservative can also help maintain freshness.
What wreath to use after Christmas?
Consider a winter-themed wreath with elements like pinecones, berries, and evergreen shrubbery. Alternatively, a simple, elegant wreath made from dried flowers or preserved greenery can provide a timeless and welcoming look. These wreaths can transition seamlessly into the New Year and beyond, allowing you to enjoy your decorative accents well into the winter season.
Originally Published: December 11, 2020