


The curves are simple, the look is divine, and you can build it!
Varies
Advanced
Varies
Introduction
Whether you have a small backyard stream to cross, or just want an attractive garden accent, here’s a perfect solution — an arched bridge. The curves and angles may look intimidating, but if you’d take on a deck project, you can build this, too. All of the bridge and railing arcs are basically the same, and you can do all of the cutting quickly and accurately with your trusty circular saw. Here’s how.
Before You Start
There’s a lot of ripping — cutting boards lengthwise — required to create the railing pieces. Buy or borrow a table saw for this if you don’t have one, or have someone do the cutting for you. You can use a circular saw with an edge guide, but getting smooth even cuts will be more difficult.
I used treated lumber for strength for the supporting arches. I used cedar for everything else, but any rot-resistant wood can be used. Use clear knot-free wood or solid composite decking for the handrail cap (P on illustration, see links below); it’ll bend more evenly and look better than boards with knots.
Tools Required
- 7-1/4-in. circular saw
- Drill bit
- Handheld router (optional)
- Level
- Miter saw (optional)
- Pneumatic brad nailer (optional)
- Random orbit sander
- Shovel
- Table Saw (optional)
Materials Required
- 4x6 treated wood
- Pea gravel
- Treated lumber
Project step-by-step (16)
Step 1
Prepare the backyard bridge site
- Mark out the location of the two 4×6 treated wood footings.
- Dig one trench roughly 10 inches deep, 54 inches long and 12 inches wide and pour in 3 to 4 inches of pea gravel.
- Level in a 4×6 x 48-inch treated footing so the top is about 3 inches below grade. That way, the top of the bridge walkway will be a few inches above the surrounding soil and easy to “ramp up to.”
- Measure off of this footing to locate the other 4×6 footing. Use a level on a long straight 2×4 to make certain the two footings are level to one another, and measure diagonals to make sure the footings are square to one another. Ensure the second footing is level across its length (photo below).
Step 2
Lay a 4×6 footing and level
- Dig a second trench about 8 feet away, then use a long straight 2×4 with a level attached to install the second footing level with the first one.
- Ensure the footings are square to one another: check that they are the same distance apart along their entire lengths, then adjust until the diagonal measurements are equal.

Step 3
Cut the arched joists
- Set your circular saw 1-5/8 inches deep and slowly cut the curve of the first support arch.
- Use an orbital or belt sander to smooth out any uneven areas.
- Then, use this as a template for creating the other arches.

Step 4
Attach the posts
- Secure the posts to the ends of two of the support arches with one screw.
- Use 1×3 braces and a level to hold the posts plumb, then bolt the arches to the 4x4s.
Plumb, level and square the framework
- Cut the four end posts (B) to length, then screw the ends of two inside support arches (C) to the 4×4 end posts with one screw. Screw or clamp a straight 1×3—the same length as the arch—to the tops of the 4x4s.
- Place these two assemblies on the footings and plumb and brace the 4×4 posts. Measure between the arches to ensure the sides are parallel and the ends are square to each other. Attach the posts to the footings with metal “L” brackets. Mark locations for two bolts on each post, then bolt the arches to the posts (photo below).
- Set the outside arches (D) on top of the inside arches and mark the cuts where they meet the posts. Establish the height of the outer arches by setting short pieces of 5/4 decking (H) on top of the inner arches. Clamp the outer arches in place flush with the top of the decking. Check their alignment, separate the arches, apply construction adhesive and secure these arches together using 2-1/2-inch screws. Drive screws from the inside arch into the outer arch so they won’t be seen.
- Use construction adhesive and 3-inch screws to attach the rim joists (F) to the posts. Secure the rims to the footings with metal “L” brackets.
- Set the last two inside support arches (C) in the middle of the footing, shimming or trimming if necessary to bring them to the level of the 4-1/2-inch support arches already in place on either side. Use construction adhesive and 3-inch screws to secure the inner support arches to one another, then secure them to the footings and the rim joists.

Step 5
Set a wider outside
- Arch on top of one of the already-installed support arches, and mark it where it intersects the post.
- Cut the outside arch to length and screw it to the outside face of the support arch.
- Repeat for the opposite side.
- Then glue, nail together and install the two center support arches.

Step 6
Cut and install the center posts
The posts require notching (inset). The blocking prevents the arches from twisting.
- Mark the locations for the center posts (E).
- Clamp the posts in place against the outside arches so they’re plumb and their bottoms align with the bottoms of the arches.
- Trace the top edge of the arch onto the side of the post.
- Set the circular saw to cut 1-1/2 inches deep and cut along the scribed line.
- Make full-depth cuts on the sides and chisel out the notch.

- Glue and bolt the posts to the arches (photo above), ensuring they’re perfectly plumb.
- Use the temporary 1x3s already in place to help brace the center posts.

Step 7
Determine the proper spacing
- Use screws to secure 2×4 blocking (G) at the center of the bridge to stiffen the framework. Set blocking 1/2 inch below the top of the arch so water won’t get trapped between the blocks and the decking.
- Cut all the bridge decking boards (H) 1/4 inch less than the distance between the outside arches; the gap at each end will allow the end grain to dry out and not trap moisture.
- Starting from the center of the bridge, lay out the decking on one side with 1/4-inch spacing between boards.
- If the last piece is short of the end, increase the space between boards;
- if it hangs over, center the first board on the center line of the bridge and adjust the spacing between boards as needed.
- Leave at least a 1/4-inch gap between boards so water drains.

Step 8
Install the decking
- Once you’ve established the right spacing, remove the boards and spread a thick bead of construction glue on the inner support arches.
- Cut two small pieces of wood the width of the gap for spacers, and install the decking (photo above).
- Predrill holes for the screws 3/4 inch in from the end of the board and about 1-1/2 inches in from each edge.
- This closer screw spacing will minimize the tendency for the deck boards to split as they try to conform to the slight arch.
- Don’t overtighten the screws— this could split the wood.
Step 9
Install the top and bottom rail supports
- Secure the balusters so they’re 1 inch below the top of the top support and even with the bottom of the bottom support.
- Then, use clamps to bend the sub-caps over the balusters and screw them into the balusters and the upper rail support.

Step 10
Attach the Remaining Balusters
- For safety, the balusters should be spaced no more than 4 inches apart, as the building code requires for deck railings.
- To get equal spacing, start by lightly (I said lightly!) marking out balusters at a 4-inch spacing on one of the top rails.
- If the last space between balusters is a little skinny, reduce the space between all the balusters and mark them out again (lightly!).
- Repeat this until you get equal spacing, and then use that measurement to space all the balusters on all the railing sections.
- To keep the fasteners hidden as much as possible, drive the 2-inch screws through the balusters and into the back side of the outside handrail supports. You can also secure the balusters with a pneumatic nailer since hand nailing is difficult because of all the jarring.
- Attach the balusters with glue and 2-inch screws at the top and bottom. Keep the tops at the 1-inch line and the bottoms hidden behind the lower handrail support. Double-check spacing and ensure the balusters are plumb—it’s easy to drift a little.
- Cut the sub-cap (N) to a length equal to the distance between posts.
- Run a bead of adhesive along the upper handrail support (L).
- Hold one end of the sub-cap down against the balusters and secure it to the post with a 3-inch screw.
- Bend the sub-cap down over the remaining balusters, holding it down with clamps.
- Drive 2-1/2-inch screws through the sub-cap into each baluster and horizontally through the sub-cap into the upper handrail support.
- Draw a line across the post from the top of the outer handrail support, then hold the inner handrail support against the post and scribe the cut line (photo above).
- Secure this inner handrail support to the balusters and sub-cap.
- Scribe, cut and attach all remaining upper and lower handrail supports and balusters using glue and screws or a pneumatic nailer.

Step 11
Shape the top members
- Using a square as a guide, use a rasp (shown above) or power sander to shape the three top members so they’re aligned and flat.

Step 12
Determine the length and angle cuts for the handrail
- Screw four temporary blocks to the top rail assembly, then clamp the handrail to them.
- Mark the angle on both ends, then cut to length.
- Use knot-free, straight-grained wood for easier bending.
- Check for high spots in the sub-cap assembly with a square and plane or sand down any uneven spots since the handrail needs to lie flat.
- Screw four 7-inch pieces of 1×3 scrap to the sub-cap, then clamp the handrail down and scribe the length and angle onto the handrail (P).
- Cut the handrail to length at the angles as marked.
- Squeeze a bead of adhesive down on the sub-cap and handrail supports.
- Clamp down the outside end of the handrail first, then slowly push down the other end (at the center post), using clamps to help muscle the wood down the last few inches; the fit will be very tight. When you reach the last 1/2 inch, tap the end of the handrail down snugly with a hammer and block of wood, then hold it in place with clamps at the ends until you’re finished securing it.
- Using a countersink bit with an extension, drill two holes from below in each space between balusters, angling the bit toward the outside of the handrail, so the 1-5/8-inch screws will have more wood to bite into. Drive in the screws.
- Secure the trim pieces (J) with 4D casing nails. They will cover the gap between the ends of the deck boards and the outer support arch.
- Apply caulk along these deck trim pieces and at the ends and edges of the handrails.
- Pour pea gravel around the footings to provide a smooth, gradual transition from the ground to the bridge walkway.
- Cut and glue the top caps (available at most home centers) onto the tops of the posts.
- Apply an exterior finish to the wood, let it dry, and then stroll across your new bridge.

Step 13
Install the handrail
- Apply adhesive to the top rail assembly, position the handrails, clamp in place, and then drive in screws from below to hold the handrail in place.
- Apply your favorite finish and take a stroll across your bridge once it’s dry.

Step 14
Cut the Curves
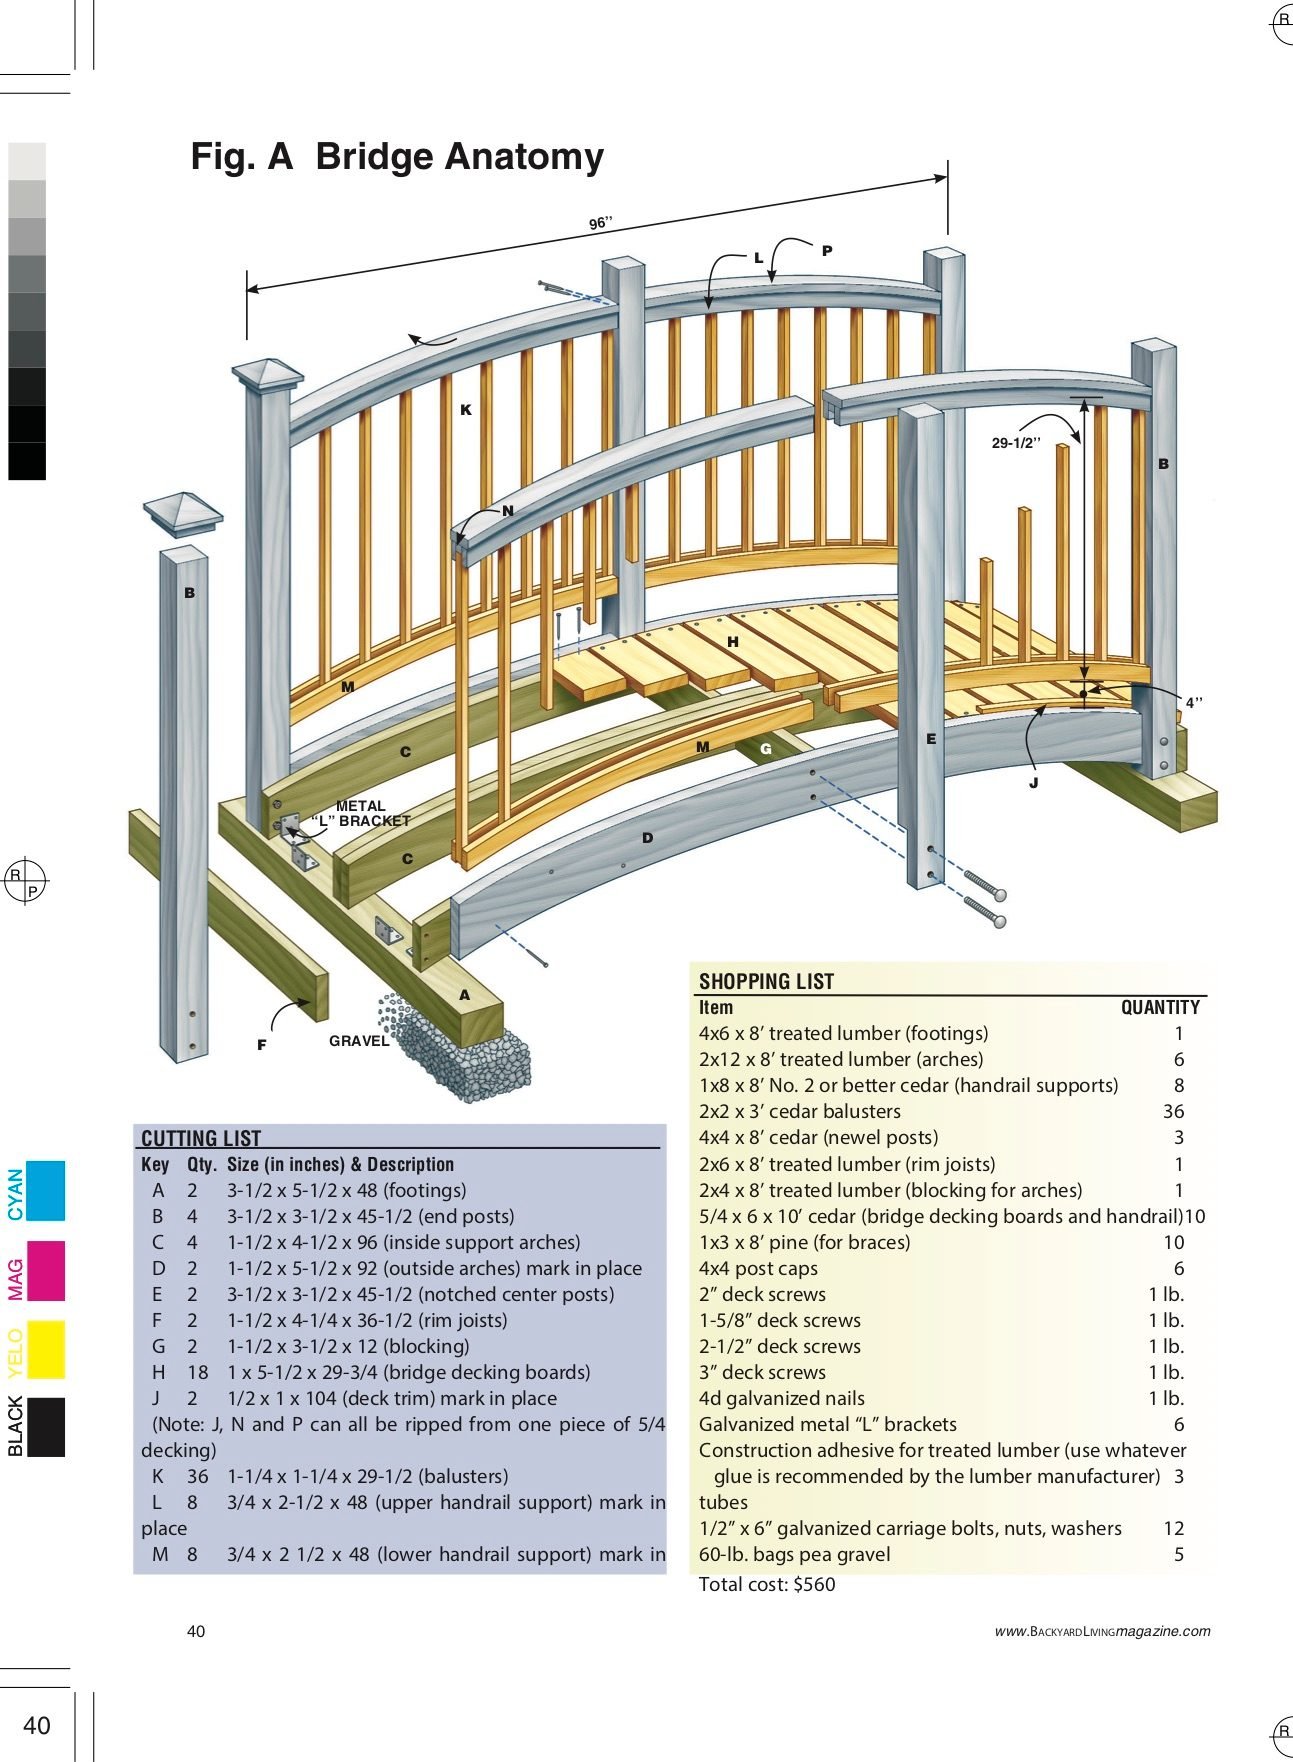
We wanted the 8-foot-long inner support arches to be 4-1/2 inches deep for strength, so we selected straight, relatively knot-free treated 2x12s and laid one on our sawhorses. To achieve a 4-1/2-inch-thick inner support arch:
- Make one mark 5-1/2 inches up from the bottom edge, centered lengthwise on the board.
- Drive a nail in at this point and two nails at each of the two outside lower corners (Figure B in the link below).
- Take a straight-grain, knot-free 1/4-inch-thick strip of wood, press it in an even arc against these three nails, and then trace the curve.
- Move each of the nails 4-1/2 inches above the bottom arch and repeat the process.
To cover the ends of the deck boards, the outer arches need to be 5-1/2 inches deep. To achieve this:
- Move the second set of nails 5-1/2 inches above the bottom arch.
- Cut out one of each arch using a circular saw, sand them smooth and then use those pieces as patterns to cut three more inner support arches and one more outer arch.
- Once you’ve sawn your four inner support arches and two outer arches, use your random orbital sander (or belt sander) once again to smooth the cut edges.
- You can use a 5/16-inch router bit to round over the outer edges of the two outside arches.
Finally, use one of your support arches to make a template for the top and bottom handrail supports.
- Trace the bottom of the arch onto a 1×8, then move the arch up 2-1/2 inches and trace the edge again to create the 2-1/2-inch-wide rail.
- Cut this out, smooth the edges with an orbital or belt sander, and then use this as a template for creating seven more arches.
Step 15
Railings follow the curves
- Glue and screw one baluster (K) to the side of each end post (B) and to each side of each center post (E) with three 2-1/2-inch screws. Set the bottoms of these balusters 4 inches up from the decking.
- Hold one of the precut upper handrail supports (L) against the outside of the posts at the top of the balusters, and trace the edge of the post onto the handrail support. Cut the rail to length, so it fits snugly between the two 4×4 posts.
- Draw a line 1 inch down from the top edge of the handrail support (which you just cut to length) using one of the other handrail supports as a pattern. Predrill and screw the outside handrail support to the two end balusters on this line so it’s 1 inch above the top of the baluster. Repeat the process for the lower outside handrail supports (M), except line up the bottom of the arch with the bottoms of the balusters.
The supplier, moisture content and standard wood sizes can be anything but standard. Our 5/4 decking measured 1 inch thick, and our 2×2 cedar balusters were actually 1 1/4 inches square. Be sure to check the actual size of your wood and adjust the measurements for this project as necessary.